Owner's Manual
Page 1
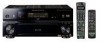
AUDIO/VIDEO MULTI-CHANNEL RECEIVER VSX-84TXSi VSX-84TXSi-S VSX-82TXS VSX-82TXS-S Register your product at www.pioneerelectronics.com (US) www.pioneerelectronics.ca (Canada) Operating Instructions
AUDIO/VIDEO MULTI-CHANNEL RECEIVER VSX-84TXSi VSX-84TXSi-S VSX-82TXS VSX-82TXS-S Register your product at www.pioneerelectronics.com (US) www.pioneerelectronics.ca (Canada) Operating Instructions
Owner's Manual
Page 2
... guarantee that may not cause harmful interference, and (2) this device must accept any interference received, including interference that interference will not occur in a residential installation. Product Name: AUDIO/VIDEO MULTI-CHANNEL RECEIVER Model Number: VSX-84TXSi, VSX-84TXSi-S, VSX-82TXS, VSX-82TXS-S Responsible Party Name: PIONEER ELECTRONICS SERVICE INC. LONG BEACH, CA 90801-1760, USA Phone: 310-952-2915...
... guarantee that may not cause harmful interference, and (2) this device must accept any interference received, including interference that interference will not occur in a residential installation. Product Name: AUDIO/VIDEO MULTI-CHANNEL RECEIVER Model Number: VSX-84TXSi, VSX-84TXSi-S, VSX-82TXS, VSX-82TXS-S Responsible Party Name: PIONEER ELECTRONICS SERVICE INC. LONG BEACH, CA 90801-1760, USA Phone: 310-952-2915...
Owner's Manual
Page 4
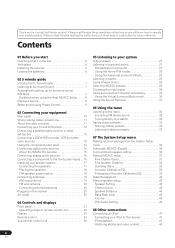
...11 Connecting your TV and DVD player 12 Connecting a satellite/cable receiver or other set-top box 13 Connecting a DVD/HDD recorder, ...FM wire antenna 20 Connecting external antennas 20 Plugging in the receiver 20 AC outlet 20 04 Controls and displays Front panel ... Listening to station presets 33 07 The System Setup menu Making receiver settings from the System Setup menu 34 Automatic MCACC (Expert 34...Ventilation 6 Installing the receiver 6 Loading the batteries 6 02 5 minute guide Introduction to home theater 7 Listening to operate your iPod to the receiver 47 iPod playback 47...
...11 Connecting your TV and DVD player 12 Connecting a satellite/cable receiver or other set-top box 13 Connecting a DVD/HDD recorder, ...FM wire antenna 20 Connecting external antennas 20 Plugging in the receiver 20 AC outlet 20 04 Controls and displays Front panel ... Listening to station presets 33 07 The System Setup menu Making receiver settings from the System Setup menu 34 Automatic MCACC (Expert 34...Ventilation 6 Installing the receiver 6 Loading the batteries 6 02 5 minute guide Introduction to home theater 7 Listening to operate your iPod to the receiver 47 iPod playback 47...
Owner's Manual
Page 5
...multi-room connections 57 Using the multi-room controls 59 Connecting an IR receiver 59 Switching components on and off using the 12 volt trigger 60 Using this receiver with a Pioneer plasma display. . . 60 Using the SR+ mode with a Pioneer plasma display 61 Connecting a PC for Advanced MCACC output . . ... different input signal formats . . . 88 OSD Adjustment 65 Specifications 89 Cleaning the unit 89 10 Using other functions Setting the AV options 66 Our philosophy 90 Features 90 Making an audio or a video recording 67 Playing a different source when recording 67 Reducing ...
...multi-room connections 57 Using the multi-room controls 59 Connecting an IR receiver 59 Switching components on and off using the 12 volt trigger 60 Using this receiver with a Pioneer plasma display. . . 60 Using the SR+ mode with a Pioneer plasma display 61 Connecting a PC for Advanced MCACC output . . ... different input signal formats . . . 88 OSD Adjustment 65 Specifications 89 Cleaning the unit 89 10 Using other functions Setting the AV options 66 Our philosophy 90 Features 90 Making an audio or a video recording 67 Playing a different source when recording 67 Reducing ...
Owner's Manual
Page 6
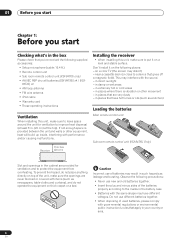
... • Setup microphone (cable: 16.4 ft.) • Remote control unit • Sub room remote control unit (VSX-84TXSi only) • AA/IEC R6P dry cell batteries (VSX-84TXSi) x4 / (VSX- 82TXS) x2 • AM loop antenna • FM wire antenna • iPod cable • Warranty card &#...do not place anything directly on top of used batteries, please comply with performance and/or causing malfunctions. 8 inches Receiver (20 cm) Installing the receiver • When installing this unit, make sure to protect the equipment from overheating. in places that have different voltages...
... • Setup microphone (cable: 16.4 ft.) • Remote control unit • Sub room remote control unit (VSX-84TXSi only) • AA/IEC R6P dry cell batteries (VSX-84TXSi) x4 / (VSX- 82TXS) x2 • AM loop antenna • FM wire antenna • iPod cable • Warranty card &#...do not place anything directly on top of used batteries, please comply with performance and/or causing malfunctions. 8 inches Receiver (20 cm) Installing the receiver • When installing this unit, make sure to protect the equipment from overheating. in places that have different voltages...

Owner's Manual
Page 7
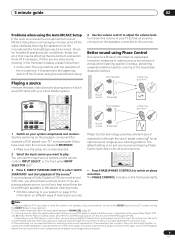
... Auto MCACC Setup. • Using the Auto MCACC Setup will overwrite any existing settings for the MCACC preset you 've set the receiver to the receiver. 2 Connect your TV and DVD player. Check the manual that the DVD input is showing in the default settings. • Be...Dolby Surround sources according to optimize the speaker settings and equalization for optimal surround sound. For surround sound, you can simply leave the receiver in the receiver's display, indicating that came with the following quick setup guide, you have your liking. If it on page 17. See Connecting ...
... Auto MCACC Setup. • Using the Auto MCACC Setup will overwrite any existing settings for the MCACC preset you 've set the receiver to the receiver. 2 Connect your TV and DVD player. Check the manual that the DVD input is showing in the default settings. • Be...Dolby Surround sources according to optimize the speaker settings and equalization for optimal surround sound. For surround sound, you can simply leave the receiver in the receiver's display, indicating that came with the following quick setup guide, you have your liking. If it on page 17. See Connecting ...

Owner's Manual
Page 8
... SELECT SYSTEM OFF SOURCE CD DVD DVR2 DVR1 TV SAT CD-R i Pod VIDEO 2 VIDEO 1 TV CONT XM RADIO TUNER ROOM2/3 RECEIVER D.ACCESS +10 AV PARAMETER TOP MENU ì TUNE DTVMENU ST SETUP ENTER CLASS DISC ENTER CH LEVEL MENU ST T.EDIT ì RETURN CATEGORY TUNE GUIDE TV CONTROL BAND ...TV VOL INPUT SELECT TV CH VOL 1 Switch on the receiver and your TV. 2 Connect the microphone to 6 minutes. 9 The Auto MCACC Setup has ...
... SELECT SYSTEM OFF SOURCE CD DVD DVR2 DVR1 TV SAT CD-R i Pod VIDEO 2 VIDEO 1 TV CONT XM RADIO TUNER ROOM2/3 RECEIVER D.ACCESS +10 AV PARAMETER TOP MENU ì TUNE DTVMENU ST SETUP ENTER CLASS DISC ENTER CH LEVEL MENU ST T.EDIT ì RETURN CATEGORY TUNE GUIDE TV CONTROL BAND ...TV VOL INPUT SELECT TV CH VOL 1 Switch on the receiver and your TV. 2 Connect the microphone to 6 minutes. 9 The Auto MCACC Setup has ...
Owner's Manual
Page 9
...source buttons on the playback component (for example a DVD player), your TV, make sure your sound source arrives at your system components and receiver. SURR SHIFT PHASE MCACC S.DIRECT • Press PHASE (PHASE CONTROL) to adjust the volume level. SURR SHIFT PHASE MCACC S.DIRECT 4 Use... for household appliances (air conditioner, fridge, fan, etc.), that the VIDEO 1 input is now selected.) 2 If you have one), then the receiver (press RECEIVER). • Make sure the setup mic is an MPEG audio option, set to output Dolby Digital, DTS and 88.2 kHz / 96 kHz PCM...
...source buttons on the playback component (for example a DVD player), your TV, make sure your sound source arrives at your system components and receiver. SURR SHIFT PHASE MCACC S.DIRECT • Press PHASE (PHASE CONTROL) to adjust the volume level. SURR SHIFT PHASE MCACC S.DIRECT 4 Use... for household appliances (air conditioner, fridge, fan, etc.), that the VIDEO 1 input is now selected.) 2 If you have one), then the receiver (press RECEIVER). • Make sure the setup mic is an MPEG audio option, set to output Dolby Digital, DTS and 88.2 kHz / 96 kHz PCM...
Owner's Manual
Page 10
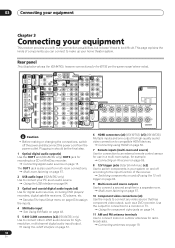
... 12V trigger jacks (total 50 mA max.) (x2) Use to switch components in a separate room. Connecting an IR receiver on page 57. 2 USB audio input (VSX-84TXSi only) Use to the input function of components you with many connection possibilities, but it doesn't have to compatible HDMI ... your equipment Chapter 3 Connecting your equipment This receiver provides you can connect to a monitor or TV. Using the i.LINK interface on and off according to connect your system on page 51. 6 HDMI connectors (x4) (VSX-82TXS) (x5) (VSX-84TXSi) Multiple inputs and one output for high-quality...
... 12V trigger jacks (total 50 mA max.) (x2) Use to switch components in a separate room. Connecting an IR receiver on page 57. 2 USB audio input (VSX-84TXSi only) Use to the input function of components you with many connection possibilities, but it doesn't have to compatible HDMI ... your equipment Chapter 3 Connecting your equipment This receiver provides you can connect to a monitor or TV. Using the i.LINK interface on and off according to connect your system on page 51. 6 HDMI connectors (x4) (VSX-82TXS) (x5) (VSX-84TXSi) Multiple inputs and one output for high-quality...
Owner's Manual
Page 11
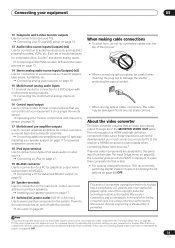
...converter ensures that you must be converted. Connecting your monitor/TV to the receiver's HDMI/component video outputs when connecting these resolutions cannot be damaged if bent around sharp corners. patents and other Pioneer components so that all video sources are assigned to the same input function... units) have resolutions that order). • For optimal video performance, THX recommends switching Digital Video Conversion (in Setting the AV options on page 63), the converter gives priority to a PC for connection to HDMI, component, S-video, then composite (in Setting the...
...converter ensures that you must be converted. Connecting your monitor/TV to the receiver's HDMI/component video outputs when connecting these resolutions cannot be damaged if bent around sharp corners. patents and other Pioneer components so that all video sources are assigned to the same input function... units) have resolutions that order). • For optimal video performance, THX recommends switching Digital Video Conversion (in Setting the AV options on page 63), the converter gives priority to a PC for connection to HDMI, component, S-video, then composite (in Setting the...
Owner's Manual
Page 12
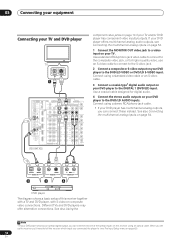
...2 IN ASSIGNABLE 1 3 S - Connect using a standard video cable or an S-video cable. 3 Connect a coaxial-type1 digital audio output on this receiver together with a TV and DVD player, with S-video or composite video connections. See also Using the Note 1 If your DVD player only has an...your equipment Connecting your DVD player to the DIGITAL 1 (DVD/LD) input. VIDEO VIDEO COMPONENT VIDEO VIDEO R L AUDIO R SURR OUT CONTROL VSX-84TXSi component video jacks on your TV. Use a coaxial cable designed for higher quality video, use an S-video cable to connect to the S-video jack...
...2 IN ASSIGNABLE 1 3 S - Connect using a standard video cable or an S-video cable. 3 Connect a coaxial-type1 digital audio output on this receiver together with a TV and DVD player, with S-video or composite video connections. See also Using the Note 1 If your DVD player only has an...your equipment Connecting your DVD player to the DIGITAL 1 (DVD/LD) input. VIDEO VIDEO COMPONENT VIDEO VIDEO R L AUDIO R SURR OUT CONTROL VSX-84TXSi component video jacks on your TV. Use a coaxial cable designed for higher quality video, use an S-video cable to connect to the S-video jack...
Owner's Manual
Page 13
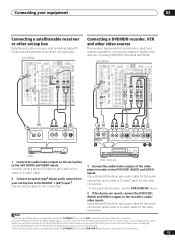
... only has a coaxial digital output, you make this connection. 2 If your satellite/cable receiver doesn't have a digital audio output, you can skip this step. 4 See The Input Setup menu on this connection. 13 En VSX-84TXSi MULTI-ROOM & SOURCE / REC SEL OUT1 ROOM3 (ZONE3) OUT2 S400 (AUDIO) IR... VIDEO VIDEO R L AUDIO R SURROUND L BACK MULTI CH IN OUT CONTROL DIGITAL OUT R AUDIO L VIDEO AV OUT S-VIDEO OPTICAL COAXIAL DIGITAL OUT 3 R AUDIO L VIDEO AV OUT S-VIDEO R AUDIO L AV IN VIDEO S-VIDEO 12 STB 1 Connect the audio/video outputs on the set-top box to the DVR/VCR1...
... only has a coaxial digital output, you make this connection. 2 If your satellite/cable receiver doesn't have a digital audio output, you can skip this step. 4 See The Input Setup menu on this connection. 13 En VSX-84TXSi MULTI-ROOM & SOURCE / REC SEL OUT1 ROOM3 (ZONE3) OUT2 S400 (AUDIO) IR... VIDEO VIDEO R L AUDIO R SURROUND L BACK MULTI CH IN OUT CONTROL DIGITAL OUT R AUDIO L VIDEO AV OUT S-VIDEO OPTICAL COAXIAL DIGITAL OUT 3 R AUDIO L VIDEO AV OUT S-VIDEO R AUDIO L AV IN VIDEO S-VIDEO 12 STB 1 Connect the audio/video outputs on the set-top box to the DVR/VCR1...

Owner's Manual
Page 14
...video should give superior picture quality when compared to the component video inputs on your TV or monitor. When you 'll need to tell the receiver which input you connected the recorder to one of ASSIGNABLE COMPONENT VIDEO inputs. Y PB PR 2 COMPONENT VIDEO TV Y PB PR 1 COMPONENT ...digital audio cable. You can also take advantage of your source to a set up the receiver you'll need to assign the component video inputs-see also The Input Setup menu on page 63). 14 En VSX-84TXSi MULTI-ROOM & SOURCE / REC SEL OUT1 ROOM3 (ZONE3) OUT2 S400 (AUDIO) IR MULTI...
...video should give superior picture quality when compared to the component video inputs on your TV or monitor. When you 'll need to tell the receiver which input you connected the recorder to one of ASSIGNABLE COMPONENT VIDEO inputs. Y PB PR 2 COMPONENT VIDEO TV Y PB PR 1 COMPONENT ...digital audio cable. You can also take advantage of your source to a set up the receiver you'll need to assign the component video inputs-see also The Input Setup menu on page 63). 14 En VSX-84TXSi MULTI-ROOM & SOURCE / REC SEL OUT1 ROOM3 (ZONE3) OUT2 S400 (AUDIO) IR MULTI...

Owner's Manual
Page 15
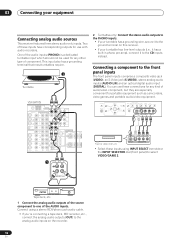
...IN ASSIGNABLE 1 3 S - Use an optical cable for making digital recordings. Use an optical cable to connect to the DIGITAL OUT1 or (VSX-84TXSi only) OUT2 (OUT1 is possible to playback WMA9 Pro-encoded audio using a coaxial cable. must make analog connections as explained in Connecting analog... on your digital component to the DIGITAL 4 (CD-R) input. Note 1 • If your equipment 03 Connecting digital audio sources This receiver has both digital inputs and outputs, allowing you to connect digital audio components for playback and for the connection. 2 For recording equipment, ...
...IN ASSIGNABLE 1 3 S - Use an optical cable for making digital recordings. Use an optical cable to connect to the DIGITAL OUT1 or (VSX-84TXSi only) OUT2 (OUT1 is possible to playback WMA9 Pro-encoded audio using a coaxial cable. must make analog connections as explained in Connecting analog... on your digital component to the DIGITAL 4 (CD-R) input. Note 1 • If your equipment 03 Connecting digital audio sources This receiver has both digital inputs and outputs, allowing you to connect digital audio components for playback and for the connection. 2 For recording equipment, ...
Owner's Manual
Page 16
SPEAKERS PHONES (TUNE +) AV PARAMETER (ST -) SETUP ENTER TUNER EDIT (ST +) RETURN (TUNE -)... Connect the stereo audio outputs to the PHONO inputs. • If your equipment Connecting analog audio sources This receiver features three stereo audio-only inputs. 03 Connecting your turntable has a grounding wire, secure it to select VIDEO...equipment. You can use with audio recorders. This input also has a grounding terminal that most turntables require. 2 Turntable VSX-84TXSi FM UNBAL 75 Ω MONITOR OUT ANTENNA AUDIO PHONO AM LOOP IN MULTI-ROOM & SOURCE R ROOM2(ZONE2) ...
SPEAKERS PHONES (TUNE +) AV PARAMETER (ST -) SETUP ENTER TUNER EDIT (ST +) RETURN (TUNE -)... Connect the stereo audio outputs to the PHONO inputs. • If your equipment Connecting analog audio sources This receiver features three stereo audio-only inputs. 03 Connecting your turntable has a grounding wire, secure it to select VIDEO...equipment. You can use with audio recorders. This input also has a grounding terminal that most turntables require. 2 Turntable VSX-84TXSi FM UNBAL 75 Ω MONITOR OUT ANTENNA AUDIO PHONO AM LOOP IN MULTI-ROOM & SOURCE R ROOM2(ZONE2) ...
Owner's Manual
Page 17
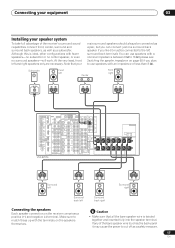
.../ GAME1 IN FR FL iPod SUB W. Note that all the bare speaker wire is ideal, other configurations with an impedance of the receiver's surround sound capabilities connect front, center, surround and surround back speakers, as well as a subwoofer. BLE PR PR IN 1 1...16 Ω (please see Switching the speaker impedance on the receiver comprises a positive (+) and negative (-) terminal. VIDEO VIDEO COMPONENT VIDEO VIDEO R L AUDIO R SURROUND LL BACK RS-232C MULTI CH IN OUT IN CONTROL VSX-84TXSi CENTER AC OUTLET SWITCHED 100 W(0.8A) MAX R SURROUND L ...
.../ GAME1 IN FR FL iPod SUB W. Note that all the bare speaker wire is ideal, other configurations with an impedance of the receiver's surround sound capabilities connect front, center, surround and surround back speakers, as well as a subwoofer. BLE PR PR IN 1 1...16 Ω (please see Switching the speaker impedance on the receiver comprises a positive (+) and negative (-) terminal. VIDEO VIDEO COMPONENT VIDEO VIDEO R L AUDIO R SURROUND LL BACK RS-232C MULTI CH IN OUT IN CONTROL VSX-84TXSi CENTER AC OUTLET SWITCHED 100 W(0.8A) MAX R SURROUND L ...

Owner's Manual
Page 20
...cords should not exceed 100 W (0.8 A). AC outlet Power supplied through this could cause a short circuit or electric shock. This can also cause the receiver to malfunction. • Since a subwoofer or power amplifier can cause a fire or give you have connected all your components to this unit's AC outlet... turned on the power cord or pinch the cord in the cord or tie it damaged, ask your nearest Pioneer authorized independent service company for a replacement. • The receiver should not be stepped on vacation. • Make sure the blue STANDBY/ON light has gone out before ...
...cords should not exceed 100 W (0.8 A). AC outlet Power supplied through this could cause a short circuit or electric shock. This can also cause the receiver to malfunction. • Since a subwoofer or power amplifier can cause a fire or give you have connected all your components to this unit's AC outlet... turned on the power cord or pinch the cord in the cord or tie it damaged, ask your nearest Pioneer authorized independent service company for a replacement. • The receiver should not be stepped on vacation. • Make sure the blue STANDBY/ON light has gone out before ...
Owner's Manual
Page 21
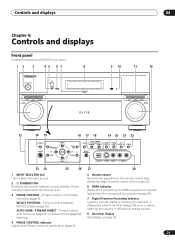
... Front panel Illustration shows the VSX-84TXSi front panel 12 3 45 67 8 STANDBY/ON PHASE CONTROL PHASE CONTROL INPUT SELECTOR MCACC AUTO SURR/ POSITION STREAM DIRECT DIGITAL PRECISION PROCESSING 9 10 11 12 AUDIO/VIDEO MULTI-CHANNEL RECEIVER VSX-84TXSi HOME THX STANDARD SURROUND ADVANCED ...SURROUND MASTER VOLUME 13 14 15 16 17 18 19 20 21 22 SPEAKERS PHONES (TUNE +) AV PARAMETER (ST -) SETUP ENTER TUNER EDIT (ST +) RETURN BAND ...
... Front panel Illustration shows the VSX-84TXSi front panel 12 3 45 67 8 STANDBY/ON PHASE CONTROL PHASE CONTROL INPUT SELECTOR MCACC AUTO SURR/ POSITION STREAM DIRECT DIGITAL PRECISION PROCESSING 9 10 11 12 AUDIO/VIDEO MULTI-CHANNEL RECEIVER VSX-84TXSi HOME THX STANDARD SURROUND ADVANCED ...SURROUND MASTER VOLUME 13 14 15 16 17 18 19 20 21 22 SPEAKERS PHONES (TUNE +) AV PARAMETER (ST -) SETUP ENTER TUNER EDIT (ST +) RETURN BAND ...
Owner's Manual
Page 22
... up your finger. buttons to select a Home THX listening mode (page 28). STANDBY/ON 30 30 7m (23 ft.) AUDIO/VIDEO MULTI-CHANNEL RECEIVER 22 En STANDARD SURROUND - ADVANCED SURROUND - Use the TUNE +/- Press for Standard decoding and to switch between the remote control and the... system (page 55). 15 AV PARAMETER Use to access the AV options (page 66). 16 TUNER EDIT Use with your surround sound system (see page 34). 04 Controls and displays 9 MCACC indicator Lights when one of the MCACC presets (page 29) is selected. 10 i.LINK indicator (VSX-84TXSi only) Lights when an i....
... up your finger. buttons to select a Home THX listening mode (page 28). STANDBY/ON 30 30 7m (23 ft.) AUDIO/VIDEO MULTI-CHANNEL RECEIVER 22 En STANDARD SURROUND - ADVANCED SURROUND - Use the TUNE +/- Press for Standard decoding and to switch between the remote control and the... system (page 55). 15 AV PARAMETER Use to access the AV options (page 66). 16 TUNER EDIT Use with your surround sound system (see page 34). 04 Controls and displays 9 MCACC indicator Lights when one of the MCACC presets (page 29) is selected. 10 i.LINK indicator (VSX-84TXSi only) Lights when an i....
Owner's Manual
Page 23
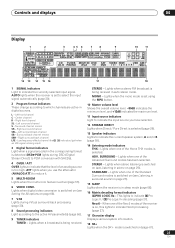
..., and +12dB indicates the maximum level. 11 Input source indicators Light to indicate the input source you use the attenuator (ANALOG ATT) to the active AV parameter(s) (page 66). 9 TUNER indicators TUNED - SURROUND - STANDARD - Controls and displays 04 Display 1 2 3 45 6 7 8 9 10 11 SIGNAL L C R ...change according to indicate the current speaker system, A and/or B (page 55). 14 Listening mode indicators THX - Lights when one of the receiver is on page 66). 7 V.SB Lights during DSD (Digital Stream Direct) to PCM conversion with SACDs). 4 OVER / ATT OVER lights to...
..., and +12dB indicates the maximum level. 11 Input source indicators Light to indicate the input source you use the attenuator (ANALOG ATT) to the active AV parameter(s) (page 66). 9 TUNER indicators TUNED - SURROUND - STANDARD - Controls and displays 04 Display 1 2 3 45 6 7 8 9 10 11 SIGNAL L C R ...change according to indicate the current speaker system, A and/or B (page 55). 14 Listening mode indicators THX - Lights when one of the receiver is on page 66). 7 V.SB Lights during DSD (Digital Stream Direct) to PCM conversion with SACDs). 4 OVER / ATT OVER lights to...


