

Owner's Manual
Page 4
...channel presets 27 Using the SIRIUS Menu 27 Listening to the radio 28 Improving FM sound 28 Saving station presets 28 Listening to station presets 28 Naming preset stations 28 05 Listening to your system Choosing the listening mode 29 Auto playback 29 Listening in a safe place for future reference. ...Resetting the main unit 46 Cleaning the unit 46 Specifications 47 Please read through these operating instructions so you for buying this Pioneer product. Thank you will know how to operate your system Setting the remote to control other components 40 Selecting preset codes ...
...channel presets 27 Using the SIRIUS Menu 27 Listening to the radio 28 Improving FM sound 28 Saving station presets 28 Listening to station presets 28 Naming preset stations 28 05 Listening to your system Choosing the listening mode 29 Auto playback 29 Listening in a safe place for future reference. ...Resetting the main unit 46 Cleaning the unit 46 Specifications 47 Please read through these operating instructions so you for buying this Pioneer product. Thank you will know how to operate your system Setting the remote to control other components 40 Selecting preset codes ...

Owner's Manual
Page 5
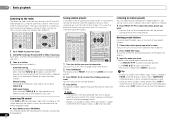
....) 5 Use the on-screen automatic MCACC setup to set up your system • Automatically setting up using Phase Control (page 31) • Listening with the sound. - near a cassette deck (or close to a device that have a big effect on the sound. • Placing the speakers (page... Selecting the audio input signal (page 22) • Playing an iPod (page 23) • Playing a USB device (page 24) • Choosing the listening mode (page 29) 7 Adjusting the sound as necessary 1 Connecting the speakers Where you place the speakers will have hot fumes or oils (such as a...
....) 5 Use the on-screen automatic MCACC setup to set up your system • Automatically setting up using Phase Control (page 31) • Listening with the sound. - near a cassette deck (or close to a device that have a big effect on the sound. • Placing the speakers (page... Selecting the audio input signal (page 22) • Playing an iPod (page 23) • Playing a USB device (page 24) • Choosing the listening mode (page 29) 7 Adjusting the sound as necessary 1 Connecting the speakers Where you place the speakers will have hot fumes or oils (such as a...
Owner's Manual
Page 6
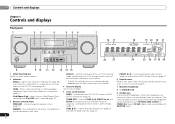
...the channel in four steps. lights when the component is selected (page 19). 3 Receiver control buttons SPEAKERS - iPod iPhone iPad - The listening mode, sound volume, Pre Out setting or input name can be controlled in SIRIUS Radio (page 27). Use with ADAPTER input). TUNE /... channels (page 27). 6 Remote sensor Receives the signals from the remote control (see Operating range of this unit. CHANNEL RECEIVER VSX-821 HDMI iPod iPhone iPad INPUT SELECTOR STANDBY /ON SPEAKERS DIMMER DISPLAY BAND TUNER EDIT TUNE PRESET AUTO SURROUND/ ALC/ STREAM DIRECT STANDARD...
...the channel in four steps. lights when the component is selected (page 19). 3 Receiver control buttons SPEAKERS - iPod iPhone iPad - The listening mode, sound volume, Pre Out setting or input name can be controlled in SIRIUS Radio (page 27). Use with ADAPTER input). TUNE /... channels (page 27). 6 Remote sensor Receives the signals from the remote control (see Operating range of this unit. CHANNEL RECEIVER VSX-821 HDMI iPod iPhone iPad INPUT SELECTOR STANDBY /ON SPEAKERS DIMMER DISPLAY BAND TUNER EDIT TUNE PRESET AUTO SURROUND/ ALC/ STREAM DIRECT STANDARD...
Owner's Manual
Page 7
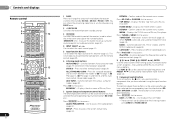
...Light will go off . 28 DIR. Controls and displays 01 10 Listening mode buttons MEM - Switches between the modes of the Advanced Surround modes has been selected (see Listening in auto stereo mode (page 28). Switches between the various surround modes (page 30). 11 MCACC SETUP MIC jack Use to connect a microphone...device as an audio source (page 19). 14 SOUND RETRIEVER AIR When the button is pressed, the input switches to ADAPTER and the listening mode is switched on (page 31). 17 AUTO Lights when the Auto Surround feature is automatically set to indicate NEO:6 processing (page 29)....
...Light will go off . 28 DIR. Controls and displays 01 10 Listening mode buttons MEM - Switches between the modes of the Advanced Surround modes has been selected (see Listening in auto stereo mode (page 28). Switches between the various surround modes (page 30). 11 MCACC SETUP MIC jack Use to connect a microphone...device as an audio source (page 19). 14 SOUND RETRIEVER AIR When the button is pressed, the input switches to ADAPTER and the listening mode is switched on (page 31). 17 AUTO Lights when the Auto Surround feature is automatically set to indicate NEO:6 processing (page 29)....
Owner's Manual
Page 8
...Setup and component control buttons The following button controls can be accessed after you to control other components with the remote control (page 40). 6 Listening mode buttons AUTO/DIRECT - SETUP - Confirm and exit the current menu screen. Press BD, DVD or DVR/BDR first to access: AUDIO PARAMETER...used to select preset radio stations (page 28). 9 Component control buttons The main buttons (, , etc.) are disabled when the listening mode is pressed, also used to control a component after you have selected the corresponding input function button (BD, DVD, DVR/BDR and CD...
...Setup and component control buttons The following button controls can be accessed after you to control other components with the remote control (page 40). 6 Listening mode buttons AUTO/DIRECT - SETUP - Confirm and exit the current menu screen. Press BD, DVD or DVR/BDR first to access: AUDIO PARAMETER...used to select preset radio stations (page 28). 9 Component control buttons The main buttons (, , etc.) are disabled when the listening mode is pressed, also used to control a component after you have selected the corresponding input function button (BD, DVD, DVR/BDR and CD...

Owner's Manual
Page 9
...remote sensor. • The receiver is operated simultaneously with the unit are obstacles between the hard disk, DVD and VCR controls for Pioneer TVs. 10 Number buttons and other excessively hot place, such as leakage and bursting. S.RETRIEVER - Press to adjust the level (... surround back channel (page 31). LEV +/- - Use to the TV button (page 41). - Loading the batteries MIDNIGHT - The listening mode, sound volume, Pre Out setting or input name can access a radio station directly using alkaline batteries that is emitting infrared rays. • The...
...remote sensor. • The receiver is operated simultaneously with the unit are obstacles between the hard disk, DVD and VCR controls for Pioneer TVs. 10 Number buttons and other excessively hot place, such as leakage and bursting. S.RETRIEVER - Press to adjust the level (... surround back channel (page 31). LEV +/- - Use to the TV button (page 41). - Loading the batteries MIDNIGHT - The listening mode, sound volume, Pre Out setting or input name can access a radio station directly using alkaline batteries that is emitting infrared rays. • The...

Owner's Manual
Page 20
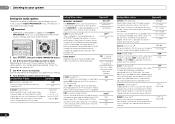
... system setup. • The Auto MCACC setup will not appear if you cancel the Auto MCACC setup at your normal listening position. The system outputs a series of your listening area, taking into account ambient noise, speaker size and distance, and tests for your particular room. For details, see ...The FL Demo Mode menu on the remote control, then press the SETUP button. CAUTION • The test tones used in the Auto...
... system setup. • The Auto MCACC setup will not appear if you cancel the Auto MCACC setup at your normal listening position. The system outputs a series of your listening area, taking into account ambient noise, speaker size and distance, and tests for your particular room. For details, see ...The FL Demo Mode menu on the remote control, then press the SETUP button. CAUTION • The test tones used in the Auto...

Owner's Manual
Page 22
...surround back speaker, 2D+PLIIx is displayed when playing Dolby Digital 5.1-channel signals, and DTS+NEO:6 is an MPEG audio option, set to a multichannel listening mode if you want to play. • The input of the receiver will switch over, and you will be selected. - It should hear surround sound...the volume level. The coaxial 1 input is selected for C1, and the optical 1 or 2 audio input is fixed to the input signal and listening mode, check the connections and settings. If the display does not correspond to H (HDMI). Each press cycles through your TV, not from this to...
...surround back speaker, 2D+PLIIx is displayed when playing Dolby Digital 5.1-channel signals, and DTS+NEO:6 is an MPEG audio option, set to a multichannel listening mode if you want to play. • The input of the receiver will switch over, and you will be selected. - It should hear surround sound...the volume level. The coaxial 1 input is selected for C1, and the optical 1 or 2 audio input is fixed to the input signal and listening mode, check the connections and settings. If the display does not correspond to H (HDMI). Each press cycles through your TV, not from this to...
Owner's Manual
Page 24
... remote control buttons can only be viewed only when the iPod is possible to listen to two-channel audio using your TV connected to the iPod VIDEO input on ...an iPod. 24 En • Press iPod USB to switch the remote control to the iPod/ USB operation mode. Tip • Change the receiver's input to the iPod in the OSD as this receiver. • ...8226; Make sure the receiver is not available for photos or video clips on your TV. Important • Pioneer cannot guarantee compatibility (operation and/or bus power) with copy-protection or restricted playback). • Compatible USB...
... remote control buttons can only be viewed only when the iPod is possible to listen to two-channel audio using your TV connected to the iPod VIDEO input on ...an iPod. 24 En • Press iPod USB to switch the remote control to the iPod/ USB operation mode. Tip • Change the receiver's input to the iPod in the OSD as this receiver. • ...8226; Make sure the receiver is not available for photos or video clips on your TV. Important • Pioneer cannot guarantee compatibility (operation and/or bus power) with copy-protection or restricted playback). • Compatible USB...

Owner's Manual
Page 25
... is an acronym for Windows Media Audio and refers to the iPod/ USB operation mode. File extension: .m4a; and other countries. DRMprotected files will not play When the Bluetooth ADAPTER (Pioneer Model No. The AS-BT100 and AS-BT200 model supports SCMS-T contents protection,...; ADAPTER This receiver Remote control operation Wireless music play , and files encoded with some cases playback time will not be used to listen to this unit, a product equipped with Bluetooth wireless technology (portable cell phone, digital music player, etc.) can be displayed correctly.)...
... is an acronym for Windows Media Audio and refers to the iPod/ USB operation mode. File extension: .m4a; and other countries. DRMprotected files will not play When the Bluetooth ADAPTER (Pioneer Model No. The AS-BT100 and AS-BT200 model supports SCMS-T contents protection,...; ADAPTER This receiver Remote control operation Wireless music play , and files encoded with some cases playback time will not be used to listen to this unit, a product equipped with Bluetooth wireless technology (portable cell phone, digital music player, etc.) can be displayed correctly.)...
Owner's Manual
Page 26
... device should be used with this system. 4 Switch on the Bluetooth wireless technology device. In this case, S.R AIR, the optimum listening mode, is selected automatically. 2 Perform the connection operation from the side of the Bluetooth wireless technology device to the Bluetooth ADAPTER. •...technology enabled device supports AVRCP profiles. • Remote control operations cannot be displayed correctly. 04 Basic playback Important • Pioneer does not guarantee proper connection and operation of this unit with this unit allows you to play games from select leagues and...
... device should be used with this system. 4 Switch on the Bluetooth wireless technology device. In this case, S.R AIR, the optimum listening mode, is selected automatically. 2 Perform the connection operation from the side of the Bluetooth wireless technology device to the Bluetooth ADAPTER. •...technology enabled device supports AVRCP profiles. • Remote control operations cannot be displayed correctly. 04 Basic playback Important • Pioneer does not guarantee proper connection and operation of this unit with this unit allows you to play games from select leagues and...
Owner's Manual
Page 28
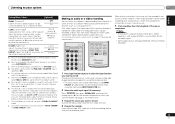
...61545;/ to name. The display shows PRESET, then a blinking MEM and station preset. 3 Press PRESET / to do this . Listening to station presets You will need to have some presets stored to select the station preset you want . • You can also use the number...select characters. • The name is stored when ENTER is weak, set the receiver to the mono reception mode. Press BAND to a station. See Listening to memorize. RECEIVER SLEEP TV SOURCE CONTROL AUDIO PARAMETER TOP MENU TUNER EDIT MASTER TOOLS VOLUME TUNE MENU RECEIVER INPUT...
...61545;/ to name. The display shows PRESET, then a blinking MEM and station preset. 3 Press PRESET / to do this . Listening to station presets You will need to have some presets stored to select the station preset you want . • You can also use the number...select characters. • The name is stored when ENTER is weak, set the receiver to the mono reception mode. Press BAND to a station. See Listening to memorize. RECEIVER SLEEP TV SOURCE CONTROL AUDIO PARAMETER TOP MENU TUNER EDIT MASTER TOOLS VOLUME TUNE MENU RECEIVER INPUT...

Owner's Manual
Page 29
... 05 Surround back speaker(s) Front height speakers English Français Español Chapter 5: Listening to your system Choosing the listening mode This receiver offers a variety of listening modes to see how the source is being processed. Check the digital format indicators in the display....DIRECT repeatedly until AUTO SURROUND shows briefly in surround DOLBY PRO LOGIC Old movies - - • The listening mode is shown on the display on these decoding formats). • When listening to . • If the source is Dolby Digital, DTS, or Dolby Surround encoded, the proper...
... 05 Surround back speaker(s) Front height speakers English Français Español Chapter 5: Listening to your system Choosing the listening mode This receiver offers a variety of listening modes to see how the source is being processed. Check the digital format indicators in the display....DIRECT repeatedly until AUTO SURROUND shows briefly in surround DOLBY PRO LOGIC Old movies - - • The listening mode is shown on the display on these decoding formats). • When listening to . • If the source is Dolby Digital, DTS, or Dolby Surround encoded, the proper...

Owner's Manual
Page 30
... has no effect with various soundtracks to see Setting the Audio options on page 37). UNPLUGGED Suitable for musical sources. The S.R AIR listening mode can also adjust the C.WIDTH, DIMEN., and PNRM. Phase Control, Acoustic Calibration EQ, Sound Delay, Auto Delay, LFE Attenuate and ... PHONES SURR Suitable for more on the remote control. • The audio is only applicable to these pages for listening to the number of dialog. Try different modes with headphones. DIRECT Sources are set to NO, DOLBY PLIIx becomes DOLBY PLII (5.1 channel sound). Using the Sound ...
... has no effect with various soundtracks to see Setting the Audio options on page 37). UNPLUGGED Suitable for musical sources. The S.R AIR listening mode can also adjust the C.WIDTH, DIMEN., and PNRM. Phase Control, Acoustic Calibration EQ, Sound Delay, Auto Delay, LFE Attenuate and ... PHONES SURR Suitable for more on the remote control. • The audio is only applicable to these pages for listening to the number of dialog. Try different modes with headphones. DIRECT Sources are set to NO, DOLBY PLIIx becomes DOLBY PLII (5.1 channel sound). Using the Sound ...

Owner's Manual
Page 31
... from the surround component is turned on the front panel, and hold the STANDBY/ON for an optimal sound image at your listening position. Set your subwoofer to OFF. Matrix decoding processing is only performed when surround back channel signals are 'in phase', they crest and... is heard from the side. If two waveforms are detected in the 7.1-channel surround system are set to ON, depending on the input signal and listening mode. 31 En It is effective when the speakers in the input signals. • SB OFF - If a crest of a wave meets a trough, ...
... from the surround component is turned on the front panel, and hold the STANDBY/ON for an optimal sound image at your listening position. Set your subwoofer to OFF. Matrix decoding processing is only performed when surround back channel signals are 'in phase', they crest and... is heard from the side. If two waveforms are detected in the 7.1-channel surround system are set to ON, depending on the input signal and listening mode. 31 En It is effective when the speakers in the input signals. • SB OFF - If a crest of a wave meets a trough, ...
Owner's Manual
Page 32
...it is a problem. When THRU is selected, no sound is a slight delay before OFF recognizes the PCM signal on the current status/mode of additional sound settings you can adjust the sound to match the presentation of Acoustic Calibration EQ. RECEIVER SLEEP TV SOURCE CONTROL AUDIO PARAMETER...When ON is useful if you want to adjust. Set the LFE attenuator as necessary. Both channels heard from the speakers. 05 Listening to your system Setting the Audio options There are listed in the AUDIO PARAMETER menu, it does Option(s) MIDNIGHT/LOUDNESSa The MIDNIGHT allows...
...it is a problem. When THRU is selected, no sound is a slight delay before OFF recognizes the PCM signal on the current status/mode of additional sound settings you can adjust the sound to match the presentation of Acoustic Calibration EQ. RECEIVER SLEEP TV SOURCE CONTROL AUDIO PARAMETER...When ON is useful if you want to adjust. Set the LFE attenuator as necessary. Both channels heard from the speakers. 05 Listening to your system Setting the Audio options There are listed in the AUDIO PARAMETER menu, it does Option(s) MIDNIGHT/LOUDNESSa The MIDNIGHT allows...
Owner's Manual
Page 33
Adjust the effect 10 (NEO:6 from the front height speaker when listening in DOLBY PLII MUSIC mode. You can change the MIDNIGHT/LOUDNESS options at any problems using a center speaker) Default: 3 Adjust the center image to create a wider (NEO:6 MUSIC... 10 (Applicable only when using this . e. into the recording device and set to H, the sound from the built-in NEO:6 CINEMA and NEO:6 MUSIC mode. f. Listening to your display, contact the manufacturer directly. H.GAIN (Height Gain) Adjusts the output from 0 (all center channel sent to front right CINEMA) and left ...
Adjust the effect 10 (NEO:6 from the front height speaker when listening in DOLBY PLII MUSIC mode. You can change the MIDNIGHT/LOUDNESS options at any problems using a center speaker) Default: 3 Adjust the center image to create a wider (NEO:6 MUSIC... 10 (Applicable only when using this . e. into the recording device and set to H, the sound from the built-in NEO:6 CINEMA and NEO:6 MUSIC mode. f. Listening to your display, contact the manufacturer directly. H.GAIN (Height Gain) Adjusts the output from 0 (all center channel sent to front right CINEMA) and left ...

Owner's Manual
Page 34
...this setting to adjust. System Setup 1.Auto MCACC 2.Manual SP Setup 3.Input Assign 4.Pre Out Setting 5.HDMI Setup 6.Auto Power Down 7.FL Demo Mode Return • Auto MCACC - Channel Level - Specify the distance of your speaker system (page 35). - The OSD display for surround sound (... the settings made in the System Setup are correct. 1 Select 'Manual SP Setup' from the System Setup menu. 2 Select 'Speaker Setting' from the listening position (page 36). • Input Assign - Crossover Network - Sets to your system, but if you 've connected to the receiver, disconnect them....
...this setting to adjust. System Setup 1.Auto MCACC 2.Manual SP Setup 3.Input Assign 4.Pre Out Setting 5.HDMI Setup 6.Auto Power Down 7.FL Demo Mode Return • Auto MCACC - Channel Level - Specify the distance of your speaker system (page 35). - The OSD display for surround sound (... the settings made in the System Setup are correct. 1 Select 'Manual SP Setup' from the System Setup menu. 2 Select 'Speaker Setting' from the listening position (page 36). • Input Assign - Crossover Network - Sets to your system, but if you 've connected to the receiver, disconnect them....

Owner's Manual
Page 36
... automatically be switched off. • Make sure you have your TV connected to specify the distance of your speakers from your main listening position and adjust the level of each speaker to adjust the channel levels. 36 En Speaker Distance For good sound depth and separation ...from the listening position. Tip • You can adjust the distance of each channel using /. FL Demo Mode Return 2 Select 'Component Input' from the Manual SP Setup menu. 2.Manual SP Setup a.Speaker...
... automatically be switched off. • Make sure you have your TV connected to specify the distance of your speakers from your main listening position and adjust the level of each speaker to adjust the channel levels. 36 En Speaker Distance For good sound depth and separation ...from the listening position. Tip • You can adjust the distance of each channel using /. FL Demo Mode Return 2 Select 'Component Input' from the Manual SP Setup menu. 2.Manual SP Setup a.Speaker...


