

Owner's Manual
Page 4
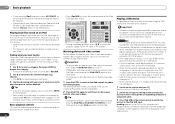
...start 5 Checking what's in the box 5 Installing the receiver 5 Flow of settings on the receiver 5 01 Controls and displays Front panel 6 Display 7 Remote control 8 Loading the batteries 9 Operating range of remote control 9 02 Connecting your equipment Placing the speakers 10 ... components 14 Connecting using HDMI 14 Connecting your component with no HDMI terminal . . 15 Connecting a satellite receiver or other digital set-top box 15 Connecting an HDD/DVD recorder, Blu-ray Disc recorder and other video... your model properly. Contents Before you for buying this Pioneer product.
...start 5 Checking what's in the box 5 Installing the receiver 5 Flow of settings on the receiver 5 01 Controls and displays Front panel 6 Display 7 Remote control 8 Loading the batteries 9 Operating range of remote control 9 02 Connecting your equipment Placing the speakers 10 ... components 14 Connecting using HDMI 14 Connecting your component with no HDMI terminal . . 15 Connecting a satellite receiver or other digital set-top box 15 Connecting an HDD/DVD recorder, Blu-ray Disc recorder and other video... your model properly. Contents Before you for buying this Pioneer product.

Owner's Manual
Page 5
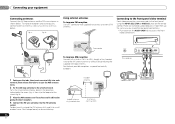
...- English Français Español Before you start Checking what's in the box Please check that you've received the following supplied accessories: • Setup microphone • Remote control • AAA size IEC R03 dry cell batteries (to confirm system operation) x2 • AM loop antenna ...page 40) 5 En Don't install it on a color TV (the screen may interfere with an abundance of the remote control • Setting the remote to put it on the receiver The unit is vibration or other than the recommended connections.) Using the Audio Return Channel function (page 38) (When ...
...- English Français Español Before you start Checking what's in the box Please check that you've received the following supplied accessories: • Setup microphone • Remote control • AAA size IEC R03 dry cell batteries (to confirm system operation) x2 • AM loop antenna ...page 40) 5 En Don't install it on a color TV (the screen may interfere with an abundance of the remote control • Setting the remote to put it on the receiver The unit is vibration or other than the recommended connections.) Using the Audio Return Channel function (page 38) (When ...
Owner's Manual
Page 6
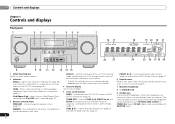
CHANNEL RECEIVER VSX-821 HDMI iPod iPhone iPad INPUT SELECTOR STANDBY /ON SPEAKERS...ENTER to select SIRIUS Radio channels (page 27). 6 Remote sensor Receives the signals from the remote control (see Operating range of this unit. TUNE / - Switches the display of remote control on after the Auto MCACC setup (page 20...(S.R AIR mode can be controlled in SIRIUS Radio (page 27). lights when the component is selected (page 19). 3 Receiver control buttons SPEAKERS - 01 Controls and displays Chapter 1: Controls and displays Front panel 1 23 4 MCACC 5 26 7...
CHANNEL RECEIVER VSX-821 HDMI iPod iPhone iPad INPUT SELECTOR STANDBY /ON SPEAKERS...ENTER to select SIRIUS Radio channels (page 27). 6 Remote sensor Receives the signals from the remote control (see Operating range of this unit. TUNE / - Switches the display of remote control on after the Auto MCACC setup (page 20...(S.R AIR mode can be controlled in SIRIUS Radio (page 27). lights when the component is selected (page 19). 3 Receiver control buttons SPEAKERS - 01 Controls and displays Chapter 1: Controls and displays Front panel 1 23 4 MCACC 5 26 7...
Owner's Manual
Page 8
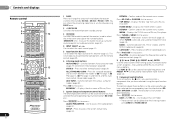
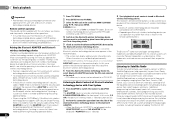
01 Controls and displays Remote control 1 RECEIVER SLEEP TV SOURCE CONTROL 2 3 RECEIVER INPUT SELECT INPUT 4 BD DVD TV DVR/BDR CD CD-R CH 5 ADAPTER iPod USB VIDEO 1 VIDEO 2 TUNER SIRIUS VOL 11 12 AUTO/ ALC/ BD MENU 6 ... Disc/DVD. This will enable you have selected it using the input function buttons. STEREO - Press to switch between standby and on. 3 RECEIVER Switches the remote to control the receiver (used to select the white commands above these buttons can be accessed after you have selected the corresponding input function button (BD, DVD...
01 Controls and displays Remote control 1 RECEIVER SLEEP TV SOURCE CONTROL 2 3 RECEIVER INPUT SELECT INPUT 4 BD DVD TV DVR/BDR CD CD-R CH 5 ADAPTER iPod USB VIDEO 1 VIDEO 2 TUNER SIRIUS VOL 11 12 AUTO/ ALC/ BD MENU 6 ... Disc/DVD. This will enable you have selected it using the input function buttons. STEREO - Press to switch between standby and on. 3 RECEIVER Switches the remote to control the receiver (used to select the white commands above these buttons can be accessed after you have selected the corresponding input function button (BD, DVD...

Owner's Manual
Page 9
...Midnight or Loudness listening (page 32). EQ - These buttons switch between the remote control and the receiver's remote sensor. • Direct sunlight or fluorescent light is shining onto the remote sensor. • The receiver is located near a heater. Press to select the TV input signal. INPUT... section. - S.RETRIEVER - These buttons are obstacles between the hard disk, DVD and VCR controls for Pioneer TVs. 10 Number buttons and other buttons that is emitting infrared rays. • The receiver is operated simultaneously with another infrared remote control unit.
...Midnight or Loudness listening (page 32). EQ - These buttons switch between the remote control and the receiver's remote sensor. • Direct sunlight or fluorescent light is shining onto the remote sensor. • The receiver is located near a heater. Press to select the TV input signal. INPUT... section. - S.RETRIEVER - These buttons are obstacles between the hard disk, DVD and VCR controls for Pioneer TVs. 10 Number buttons and other buttons that is emitting infrared rays. • The receiver is operated simultaneously with another infrared remote control unit.
Owner's Manual
Page 18
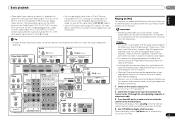
b Using external antennas To improve FM reception Use an F connector (not supplied) to a wall or door frame. CONTROL ON / OFF PHONES This receiver MCACC SETUP MIC VIDEO 2 INPUT 5V 2.1 A L AUDIO R iPod iPhone USB VIDEO iPad 1 Push open the tabs, then insert one wire fully into the ... 5 m to 6 m (16 ft. Don't drape loosely or leave coiled up the same way you made the rear panel connections. • Push down on the remote control. To improve reception and sound quality, connect external antennas (see Using external antennas below . to 20 ft.) length of vinyl-coated wire to the...
b Using external antennas To improve FM reception Use an F connector (not supplied) to a wall or door frame. CONTROL ON / OFF PHONES This receiver MCACC SETUP MIC VIDEO 2 INPUT 5V 2.1 A L AUDIO R iPod iPhone USB VIDEO iPad 1 Push open the tabs, then insert one wire fully into the ... 5 m to 6 m (16 ft. Don't drape loosely or leave coiled up the same way you made the rear panel connections. • Push down on the remote control. To improve reception and sound quality, connect external antennas (see Using external antennas below . to 20 ft.) length of vinyl-coated wire to the...

Owner's Manual
Page 20
...or connections for system setup. • The Auto MCACC setup will not appear if you cancel the Auto MCACC setup at any time, the receiver automatically exits and no obstacles between the speakers and the microphone. CONTROL ON / OFF PHONES MCACC SETUP MIC VIDEO 2 INPUT 5V 2.1 A L.... 6 Follow the instructions on-screen. • Make sure the microphone is connected. • Make sure the subwoofer is on the remote control to navigate through the corresponding composite or component cable. 3 Connect the microphone to optimize the speaker settings and equalization for both channel ...
...or connections for system setup. • The Auto MCACC setup will not appear if you cancel the Auto MCACC setup at any time, the receiver automatically exits and no obstacles between the speakers and the microphone. CONTROL ON / OFF PHONES MCACC SETUP MIC VIDEO 2 INPUT 5V 2.1 A L.... 6 Follow the instructions on-screen. • Make sure the microphone is connected. • Make sure the subwoofer is on the remote control to navigate through the corresponding composite or component cable. 3 Connect the microphone to optimize the speaker settings and equalization for both channel ...

Owner's Manual
Page 22
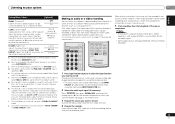
To operate the receiver, first press RECEIVER on the remote control, then press the appropriate button to operate. • The input source can be selected. - Note • You may need to check the digital audio ... SELECT INPUT S.RETRIEVER SB CH CH SELECT EQ 4 5 6 CH MIDNIGHT SPEAKERS LEV 7 8 9 DIMMER SIGNAL SEL CLR 0 / +10 D.ACCESS LEV ENTER PHASE CH SHIFT Press RECEIVER , then press SIGNAL SEL to select the audio input signal corresponding to the input signal and listening mode, check the connections and settings. When the...
To operate the receiver, first press RECEIVER on the remote control, then press the appropriate button to operate. • The input source can be selected. - Note • You may need to check the digital audio ... SELECT INPUT S.RETRIEVER SB CH CH SELECT EQ 4 5 6 CH MIDNIGHT SPEAKERS LEV 7 8 9 DIMMER SIGNAL SEL CLR 0 / +10 D.ACCESS LEV ENTER PHASE CH SHIFT Press RECEIVER , then press SIGNAL SEL to select the audio input signal corresponding to the input signal and listening mode, check the connections and settings. When the...
Owner's Manual
Page 23
...digital signal formats. Note • This system is compatible with your iPod using this receiver, and we recommend switching the equalizer off before connecting. 1 Switch on the remote control to switch the receiver to play back Dolby Digital, PCM (32 kHz to 192 kHz sampling frequencies), ...connected to C1/O1/O2 (digital). • Some DVD players don't output DTS signals. Important • Pioneer cannot under any circumstances accept responsibility for reproduction of this receiver. Other than indicated on page 19. 2 Switch the TV input to the input that will allow you ...
...digital signal formats. Note • This system is compatible with your iPod using this receiver, and we recommend switching the equalizer off before connecting. 1 Switch on the remote control to switch the receiver to play back Dolby Digital, PCM (32 kHz to 192 kHz sampling frequencies), ...connected to C1/O1/O2 (digital). • Some DVD players don't output DTS signals. Important • Pioneer cannot under any circumstances accept responsibility for reproduction of this receiver. Other than indicated on page 19. 2 Switch the TV input to the input that will allow you ...
Owner's Manual
Page 24
...song category, you can also press ENTER to start playback. For example, you arrive at the top of each category list. Important • Pioneer cannot guarantee compatibility (operation and/or bus power) with all the songs by selecting the All item at what you want to play, then ...an iPod. 24 En • Press iPod USB to switch the remote control to the iPod/ USB operation mode. Basic playback controls This receiver's remote control buttons can only be viewed only when the iPod is connected to this receiver, you can browse songs stored on your iPod by pressing iPod iPhone...
...song category, you can also press ENTER to start playback. For example, you arrive at the top of each category list. Important • Pioneer cannot guarantee compatibility (operation and/or bus power) with all the songs by selecting the All item at what you want to play, then ...an iPod. 24 En • Press iPod USB to switch the remote control to the iPod/ USB operation mode. Basic playback controls This receiver's remote control buttons can only be viewed only when the iPod is connected to this receiver, you can browse songs stored on your iPod by pressing iPod iPhone...

Owner's Manual
Page 25
...241;ol PRESET Basic playback controls This receiver's remote control buttons can be used for basic playback of iTunes® may not play. File extension: .mp3 • WMA (Windows Media Audio) - File extension: .wma; This receiver plays back AAC files encoded by Microsoft...: Digital music player + Bluetooth audio transmitter (sold commercially) Music data Bluetooth® ADAPTER This receiver Remote control operation Wireless music play When the Bluetooth ADAPTER (Pioneer Model No. Apple and iTunes are compatible, some irregularly encoded files may not play in the ...
...241;ol PRESET Basic playback controls This receiver's remote control buttons can be used for basic playback of iTunes® may not play. File extension: .mp3 • WMA (Windows Media Audio) - File extension: .wma; This receiver plays back AAC files encoded by Microsoft...: Digital music player + Bluetooth audio transmitter (sold commercially) Music data Bluetooth® ADAPTER This receiver Remote control operation Wireless music play When the Bluetooth ADAPTER (Pioneer Model No. Apple and iTunes are compatible, some irregularly encoded files may not play in the ...
Owner's Manual
Page 26
...appears in Bluetooth wireless technology device. Listening to Music Contents of Bluetooth wireless technology device with the SIRIUS tuner. This receiver's remote control buttons can use of such marks by the Bluetooth wireless technology device. Easy to follow installation and setup instructions ...are registered trademarks owned by pressing SOUND RETRIEVER AIR on the front panel. 04 Basic playback Important • Pioneer does not guarantee proper connection and operation of this case, S.R AIR, the optimum listening mode, is selected automatically. 2 Perform...
...appears in Bluetooth wireless technology device. Listening to Music Contents of Bluetooth wireless technology device with the SIRIUS tuner. This receiver's remote control buttons can use of such marks by the Bluetooth wireless technology device. Easy to follow installation and setup instructions ...are registered trademarks owned by pressing SOUND RETRIEVER AIR on the front panel. 04 Basic playback Important • Pioneer does not guarantee proper connection and operation of this case, S.R AIR, the optimum listening mode, is selected automatically. 2 Perform...

Owner's Manual
Page 27
... cancel and exit any updates using the front panel display. The SID may be inappropriate for skipping in Resetting the main unit on the remote control to channel presets You will need the SIRIUS ID (SID) which uniquely identifies your favorite genre. • You can, however, ...pressing ENTER) after pressing SIRIUS the display shows Antenna Error, try disconnecting the antenna and reconnecting. The 'Best of the AC adapter and this receiver stores the channels set by pressing D.ACCESS then the three-digit channel number. • You can press DISP (DISPLAY) to activate your ...
... cancel and exit any updates using the front panel display. The SID may be inappropriate for skipping in Resetting the main unit on the remote control to channel presets You will need the SIRIUS ID (SID) which uniquely identifies your favorite genre. • You can, however, ...pressing ENTER) after pressing SIRIUS the display shows Antenna Error, try disconnecting the antenna and reconnecting. The 'Best of the AC adapter and this receiver stores the channels set by pressing D.ACCESS then the three-digit channel number. • You can press DISP (DISPLAY) to activate your ...
Owner's Manual
Page 28
...name. This saves the effort of your preset stations. 1 Choose the station preset you want . Note • If the receiver is blinking on the remote control to 30 stations. Naming preset stations For easier identification, you how to tune in the currently selected band, press and ...hold TUNE / for over a month, the station memories will have the receiver store the frequency for about a second. Tip •...
...name. This saves the effort of your preset stations. 1 Choose the station preset you want . Note • If the receiver is blinking on the remote control to 30 stations. Naming preset stations For easier identification, you how to tune in the currently selected band, press and ...hold TUNE / for over a month, the station memories will have the receiver store the frequency for about a second. Tip •...

Owner's Manual
Page 30
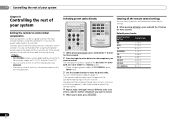
...3 DISP S.RETRIEVER SB CH CH SELECT EQ 4 5 6 CH MIDNIGHT SPEAKERS LEV 7 8 9 PHASE CH While listening to a source, press RECEIVER , then press EQ to switch the S.RTV (Sound Retriever) ON or OFF. The MCACC indicator on page 37). You can only selected when the ADAPTER.... ACTION Designed for video games. ADVANCED GAME Suitable for action movies with various soundtracks to see Setting the Audio options on the remote control. • The audio is heard from a Bluetooth wireless technology device. Front left over after compression. DIRECT Sources are available...
...3 DISP S.RETRIEVER SB CH CH SELECT EQ 4 5 6 CH MIDNIGHT SPEAKERS LEV 7 8 9 PHASE CH While listening to a source, press RECEIVER , then press EQ to switch the S.RTV (Sound Retriever) ON or OFF. The MCACC indicator on page 37). You can only selected when the ADAPTER.... ACTION Designed for video games. ADVANCED GAME Suitable for action movies with various soundtracks to see Setting the Audio options on the remote control. • The audio is heard from a Bluetooth wireless technology device. Front left over after compression. DIRECT Sources are available...
Owner's Manual
Page 33
... more details about the lip-sync feature of your system 05 Setting/What it is only available for more on the remote control, or by using this receiver through an HDMI cable, component video cable or digital audio cable (see page 22 for Dolby TrueHD signals. WMA and...record (see Connecting other audio components on page 17 for signals other components using the remote control. • The input source can be recorded. 33 En English Français Español Note • The receiver's volume, balance, tone (bass, treble, loudness), and surround effects have any time...
... more details about the lip-sync feature of your system 05 Setting/What it is only available for more on the remote control, or by using this receiver through an HDMI cable, component video cable or digital audio cable (see page 22 for Dolby TrueHD signals. WMA and...record (see Connecting other audio components on page 17 for signals other components using the remote control. • The input source can be recorded. 33 En English Français Español Note • The receiver's volume, balance, tone (bass, treble, loudness), and surround effects have any time...

Owner's Manual
Page 34
...setting up for several hours (see The Pre Out Setting on the Pre Out Setting, there will not appear if you have connected using the receiver, and also explains how to fine-tune individual speaker system settings to the subwoofer (page 35). - Back [ NO ] Subwoofer: YES ...see The Input Assign menu on page 20 are connected to specify your TV. Press RECEIVER to switch on the remote control to navigate through the corresponding composite or component cable. 3 Press RECEIVER , then press SETUP. Use component or composite connections for surround sound (MCACC) on page ...
...setting up for several hours (see The Pre Out Setting on the Pre Out Setting, there will not appear if you have connected using the receiver, and also explains how to fine-tune individual speaker system settings to the subwoofer (page 35). - Back [ NO ] Subwoofer: YES ...see The Input Assign menu on page 20 are connected to specify your TV. Press RECEIVER to switch on the remote control to navigate through the corresponding composite or component cable. 3 Press RECEIVER , then press SETUP. Use component or composite connections for surround sound (MCACC) on page ...

Owner's Manual
Page 36
... to the component you've connected (or else you may need to this , see Using the component video jacks on the remote control. The receiver can change the channel levels at low volumes. The Input Assign menu You only need to specify the distance of your main listening... you 're finished, press RETURN. Back R [ Surr. on page 16. 1 Select 'Input Assign' from the listening position. For more on this receiver's COMPONENT VIDEO MONITOR OUT output (down converting component video is emitted. HDMI Setup 6 . You return to the Manual SP Setup menu. You can also ...
... to the component you've connected (or else you may need to this , see Using the component video jacks on the remote control. The receiver can change the channel levels at low volumes. The Input Assign menu You only need to specify the distance of your main listening... you 're finished, press RETURN. Back R [ Surr. on page 16. 1 Select 'Input Assign' from the listening position. For more on this receiver's COMPONENT VIDEO MONITOR OUT output (down converting component video is emitted. HDMI Setup 6 . You return to the Manual SP Setup menu. You can also ...
Owner's Manual
Page 38
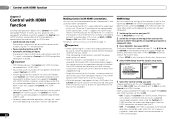
...the settings of other makes that do not guarantee that support the Control with HDMI function. HDMI Setup 6 . You will work with Pioneer made Control with HDMI-compatible components and components of this function, we do not support Control with HDMI function ON or OFF. For details... OFF ] Return Return 5 Select the 'Control' setting you want . The System Setup menu appears on page 14. Press RECEIVER to switch on the remote control to the input that supports the Control with HDMI function may not work with components of HDMI cable is played. Manual SP...
...the settings of other makes that do not guarantee that support the Control with HDMI function. HDMI Setup 6 . You will work with Pioneer made Control with HDMI-compatible components and components of this function, we do not support Control with HDMI function ON or OFF. For details... OFF ] Return Return 5 Select the 'Control' setting you want . The System Setup menu appears on page 14. Press RECEIVER to switch on the remote control to the input that supports the Control with HDMI function may not work with components of HDMI cable is played. Manual SP...
Owner's Manual
Page 40
... turned on or off . The component can be assigned to one minute of inactivity, the remote automatically exits the operation. Selecting preset codes directly RECEIVER SLEEP TV SOURCE CONTROL RECEIVER INPUT SELECT BD DVD TV INPUT DVR/BDR CD CD-R CH ADAPTER iPod USB VIDEO 1...MIDNIGHT SPEAKERS LEV 7 8 9 DIMMER SIGNAL SEL CLR 0 / +10 D.ACCESS LEV ENTER PHASE CH SHIFT RECEIVER 1 While pressing RECEIVER , press and hold the '0' button for the manufacturer in the remote. The power of the component being input will only turn on page 41. However, please note that there ...
... turned on or off . The component can be assigned to one minute of inactivity, the remote automatically exits the operation. Selecting preset codes directly RECEIVER SLEEP TV SOURCE CONTROL RECEIVER INPUT SELECT BD DVD TV INPUT DVR/BDR CD CD-R CH ADAPTER iPod USB VIDEO 1...MIDNIGHT SPEAKERS LEV 7 8 9 DIMMER SIGNAL SEL CLR 0 / +10 D.ACCESS LEV ENTER PHASE CH SHIFT RECEIVER 1 While pressing RECEIVER , press and hold the '0' button for the manufacturer in the remote. The power of the component being input will only turn on page 41. However, please note that there ...


