Owner's Manual
Page 2
... YOUR ENCLOSED WARRANTY CARD AND KEEP IN A SECURE AREA. Product Name: AUDIO/VIDEO MULTI-CHANNEL RECEIVER Model Number: VSX-918V-K, VSX-918V-S, VSX-818V-K, VSX-818V-S Responsible Party Name: PIONEER ELECTRONICS SERVICE INC. D3-4-2-1-4_A_En This product contains mercury. K057_En If the AC plug of this ...cords associated with accessories sold with the instructions, may invalidate the user's right to use shielded cables and connectors for connections. D8-10-1-2_En This Class B digital apparatus complies with electric appliances such as a vase or flower pot) or ...
... YOUR ENCLOSED WARRANTY CARD AND KEEP IN A SECURE AREA. Product Name: AUDIO/VIDEO MULTI-CHANNEL RECEIVER Model Number: VSX-918V-K, VSX-918V-S, VSX-818V-K, VSX-818V-S Responsible Party Name: PIONEER ELECTRONICS SERVICE INC. D3-4-2-1-4_A_En This product contains mercury. K057_En If the AC plug of this ...cords associated with accessories sold with the instructions, may invalidate the user's right to use shielded cables and connectors for connections. D8-10-1-2_En This Class B digital apparatus complies with electric appliances such as a vase or flower pot) or ...
Owner's Manual
Page 3
...operate normally, or has been dropped. When a cart is turned on and off all servicing to malfunction. Total electrical power consumption of connected equipment should also be easily unplugged from the AC outlet when left unused for a long period of the obsolete outlet. 10) Protect ...the power cord from being walked on vacation). CAUTION • Do not connect a TV set, monitor, heater or similar appliance to this unit to qualified service personnel. D3-4-2-2-1b_B_En VENTILATION CAUTION When installing this apparatus ...
...operate normally, or has been dropped. When a cart is turned on and off all servicing to malfunction. Total electrical power consumption of connected equipment should also be easily unplugged from the AC outlet when left unused for a long period of the obsolete outlet. 10) Protect ...the power cord from being walked on vacation). CAUTION • Do not connect a TV set, monitor, heater or similar appliance to this unit to qualified service personnel. D3-4-2-2-1b_B_En VENTILATION CAUTION When installing this apparatus ...
Owner's Manual
Page 4
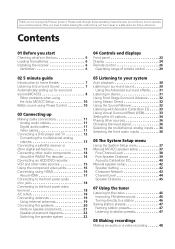
...Surround Back (VSB 33 Setting the AV options 34 Playing other sources 36 ...Connecting a DVD player and TV 12 Connecting the multichannel analog outputs 13 Connecting a satellite receiver or other digital set-top box 13 Connecting other audio components 14 About the WMA9 Pro decoder 14 Connecting...Connecting antennas 19 Using external antennas 19 Connecting the speakers 20 Hints on speaker placement 21 Speaker placement diagrams 22 Switching the speaker system 22 05 Listening to your model properly. Please read through these operating instructions so you for buying this Pioneer...
...Surround Back (VSB 33 Setting the AV options 34 Playing other sources 36 ...Connecting a DVD player and TV 12 Connecting the multichannel analog outputs 13 Connecting a satellite receiver or other digital set-top box 13 Connecting other audio components 14 About the WMA9 Pro decoder 14 Connecting...Connecting antennas 19 Using external antennas 19 Connecting the speakers 20 Hints on speaker placement 21 Speaker placement diagrams 22 Switching the speaker system 22 05 Listening to your model properly. Please read through these operating instructions so you for buying this Pioneer...
Owner's Manual
Page 5
... Neural Surround 59 About XM 59 Using SIRIUS Radio 60 Connecting your SIRIUS Connect Tuner . . . 60 Listening to SIRIUS Radio 61 Saving channel presets 61 Using the SIRIUS Menu 62 Using this receiver with a Pioneer flat panel TV 62 Using the SR+ mode with a Pioneer flat panel TV 63 11 Other Settings The Input Assign...
... Neural Surround 59 About XM 59 Using SIRIUS Radio 60 Connecting your SIRIUS Connect Tuner . . . 60 Listening to SIRIUS Radio 61 Saving channel presets 61 Using the SIRIUS Menu 62 Using this receiver with a Pioneer flat panel TV 62 Using the SR+ mode with a Pioneer flat panel TV 63 11 Other Settings The Input Assign...
Owner's Manual
Page 7
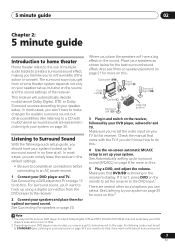
...sound. Listening to Surround Sound With the following quick setup guide, you should have to an AC power source. 1 Connect your DVD player, subwoofer and TV. See Connecting the speakers on the receiver, followed by your DVD player and TV. Place your speaker setup, but other sound options you place the speakers ...88.2 kHz/96 kHz PCM (2 channel) audio (see Hints on speaker placement on page 21 for more on this ) if you need to this receiver. See Connecting a DVD player and TV on page 12 to do this. 4 Use the on-screen automatic MCACC setup to set to STANDARD (see Listening in ...
...sound. Listening to Surround Sound With the following quick setup guide, you should have to an AC power source. 1 Connect your DVD player, subwoofer and TV. See Connecting the speakers on the receiver, followed by your DVD player and TV. Place your speaker setup, but other sound options you place the speakers ...88.2 kHz/96 kHz PCM (2 channel) audio (see Hints on speaker placement on page 21 for more on this ) if you need to this receiver. See Connecting a DVD player and TV on page 12 to do this. 4 Use the on-screen automatic MCACC setup to set to STANDARD (see Listening in ...
Owner's Manual
Page 8
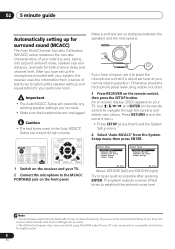
... SELECT SOURCE MULTI CONTROL TV CTRL DVD TV DVR CD-R XM SIRIUS CD FM AM PORTABLE iPod RECEIVER RECEIVER CONTROL ONE TOUCH COPY CH+ AV PARAMETER TOP MENU ST TUNE ENTER T.EDIT MENU ST GUIDE CATEGORY TUNE CH- Make sure there are unplugged. System Setup 1.Auto MCACC 2.... Above: VSX-918V (left) and VSX-818V (right) Try to be made . • Make sure the headphones are no settings will be as quiet as possible after three minutes of test tones to place the microphone so that it's about ear level at high volume. Use component or composite connections for your...
... SELECT SOURCE MULTI CONTROL TV CTRL DVD TV DVR CD-R XM SIRIUS CD FM AM PORTABLE iPod RECEIVER RECEIVER CONTROL ONE TOUCH COPY CH+ AV PARAMETER TOP MENU ST TUNE ENTER T.EDIT MENU ST GUIDE CATEGORY TUNE CH- Make sure there are unplugged. System Setup 1.Auto MCACC 2.... Above: VSX-918V (left) and VSX-818V (right) Try to be made . • Make sure the headphones are no settings will be as quiet as possible after three minutes of test tones to place the microphone so that it's about ear level at high volume. Use component or composite connections for your...
Owner's Manual
Page 9
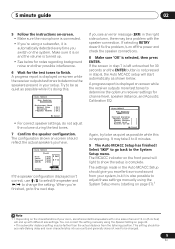
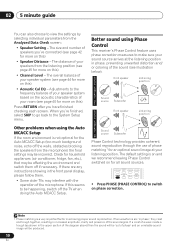
...En English Deutsch Français Italiano Nederlands Español 5 minute guide 02 5 Follow the instructions on-screen. • Make sure the microphone is connected. • If you're using the System Setup menu (starting on page 37).1 Note 1 • Depending on the characteristics of your room, sometimes...be as quiet as possible while it's doing this is turned up with the speaker connection. Make sure it is displayed on -screen while the receiver outputs more test tones to determine the optimum receiver settings for the test tones to the next step. If you switch on and the...
...En English Deutsch Français Italiano Nederlands Español 5 minute guide 02 5 Follow the instructions on-screen. • Make sure the microphone is connected. • If you're using the System Setup menu (starting on page 37).1 Note 1 • Depending on the characteristics of your room, sometimes...be as quiet as possible while it's doing this is turned up with the speaker connection. Make sure it is displayed on -screen while the receiver outputs more test tones to determine the optimum receiver settings for the test tones to the next step. If you switch on and the...
Owner's Manual
Page 10
The overall balance of the microphone. Other problems when using Phase Control This receiver's Phase Control feature uses phase correction measures to make sure your listening position. Better sound using the Auto MCACC Setup If the room environment is... more on this ) • Channel Level - The default setting is a very important factor in phase, preventing unwanted distortion and/ or coloring of speakers you've connected (see illustration below). If two waveforms are any instructions showing in the upper section of the diagram above) then the sound will be happening, switch...
The overall balance of the microphone. Other problems when using Phase Control This receiver's Phase Control feature uses phase correction measures to make sure your listening position. Better sound using the Auto MCACC Setup If the room environment is... more on this ) • Channel Level - The default setting is a very important factor in phase, preventing unwanted distortion and/ or coloring of speakers you've connected (see illustration below). If two waveforms are any instructions showing in the upper section of the diagram above) then the sound will be happening, switch...
Owner's Manual
Page 11
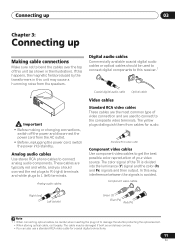
... signal and the color (PB and PR) signals and then output. The cable may cause a humming noise from cables for coaxial digital connections. 11 En If this happens, the magnetic field produced by the transformers in this unit (as shown in the illustration). Analog audio cables ... When storing optical cable, coil loosely. In this receiver.1 Coaxial digital audio cable Optical cable Video cables Standard RCA video cables These cables are used to connect digital components to the composite video terminals. The color signal of video connection and are the most common type of the TV ...
... signal and the color (PB and PR) signals and then output. The cable may cause a humming noise from cables for coaxial digital connections. 11 En If this happens, the magnetic field produced by the transformers in this unit (as shown in the illustration). Analog audio cables ... When storing optical cable, coil loosely. In this receiver.1 Coaxial digital audio cable Optical cable Video cables Standard RCA video cables These cables are used to connect digital components to the composite video terminals. The color signal of video connection and are the most common type of the TV ...
Owner's Manual
Page 12
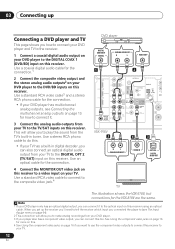
...TV This page shows you how to connect your DVD player and TV to the receiver. 1 Connect a coaxial digital audio output on your DVD player to the DIGITAL COAX 1 (DVD/BD) input on this receiver using an optical cable. Use an optical cable for the VSX-818V are the same. Use a standard ...RCA video cable3 and a stereo RCA phono cable for the connection. • If your DVD player has multichannel analog outputs, see ...
...TV This page shows you how to connect your DVD player and TV to the receiver. 1 Connect a coaxial digital audio output on your DVD player to the DIGITAL COAX 1 (DVD/BD) input on this receiver using an optical cable. Use an optical cable for the VSX-818V are the same. Use a standard ...RCA video cable3 and a stereo RCA phono cable for the connection. • If your DVD player has multichannel analog outputs, see ...
Owner's Manual
Page 13
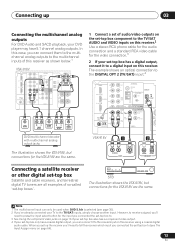
...video connection.3 2 If your set -top boxes'. R AUDIO L AV OUT VIDEO COAXIAL OPTICAL DIGITAL OUT Connecting a satellite receiver or other digital set-top box Satellite and cable receivers, and terrestrial digital TV tuners are all examples of this case, you connected the ...) R S P E AA K E R S DVD/multi-channel decoder with multi-channel analog output jacks VSX-918V 1 2 The illustration shows the VSX-918V, but connections for the VSX-818V are the same. In this receiver as shown below.1 VSX-918V HDMI IN R IN (DVD / BD) IN 1 IN (ASSIGNABLE) OUT (TV / SAT) IN...
...video connection.3 2 If your set -top boxes'. R AUDIO L AV OUT VIDEO COAXIAL OPTICAL DIGITAL OUT Connecting a satellite receiver or other digital set-top box Satellite and cable receivers, and terrestrial digital TV tuners are all examples of this case, you connected the ...) R S P E AA K E R S DVD/multi-channel decoder with multi-channel analog output jacks VSX-918V 1 2 The illustration shows the VSX-918V, but connections for the VSX-818V are the same. In this receiver as shown below.1 VSX-918V HDMI IN R IN (DVD / BD) IN 1 IN (ASSIGNABLE) OUT (TV / SAT) IN...
Owner's Manual
Page 14
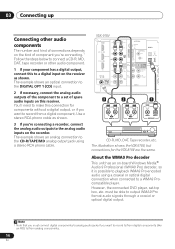
...L PLAY AUDIO OUT COAXIAL OPTICAL DIGITAL OUT CD-R, MD, DAT, Tape recorder, etc. The example shows an analog connection to a set -top box, etc. You'll need to make this connection for the VSX-818V are the same. Note 1 Note that you must be able to a WMA9 Procompatible player. 03...kind of connections depends on the kind of component you're connecting.1 Follow the steps below to connect a CD-R, MD, DAT, tape recorder or other audio component. 1 If your component has a digital output, connect this to a digital input on the receiver as shown. 3 If you're connecting a recorder, connect the ...
...L PLAY AUDIO OUT COAXIAL OPTICAL DIGITAL OUT CD-R, MD, DAT, Tape recorder, etc. The example shows an analog connection to a set -top box, etc. You'll need to make this connection for the VSX-818V are the same. Note 1 Note that you must be able to a WMA9 Procompatible player. 03...kind of connections depends on the kind of component you're connecting.1 Follow the steps below to connect a CD-R, MD, DAT, tape recorder or other audio component. 1 If your component has a digital output, connect this to a digital input on the receiver as shown. 3 If you're connecting a recorder, connect the ...
Owner's Manual
Page 15
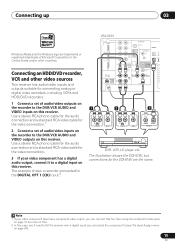
... digital input on this case, you'll need to tell the receiver which digital input you can connect this receiver. Use a stereo RCA phono cable for the audio connection and a standard RCA video cable for the VSX-818V are trademarks or registered trademarks of audio/video inputs on the recorder ...to the DVR/VCR AUDIO and VIDEO outputs on this. 2 In this receiver. English ...
... digital input on this case, you'll need to tell the receiver which digital input you can connect this receiver. Use a stereo RCA phono cable for the audio connection and a standard RCA video cable for the VSX-818V are trademarks or registered trademarks of audio/video inputs on the recorder ...to the DVR/VCR AUDIO and VIDEO outputs on this. 2 In this receiver. English ...
Owner's Manual
Page 16
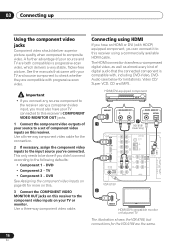
...Component video should deliver superior picture quality when compared to this receiver. Connecting using HDMI If you have your TV connected to this receiver's COMPONENT VIDEO MONITOR OUT jacks. 1 Connect the component video outputs of your source to a set of ... (ASSIGNABLE) R S P E A K A E R S VSX-818V 2 HDMI IN HDMI/DVI-compatible monitor or flat panel TV The illustration shows the VSX-818V, but connections for more on this. 3 Connect the COMPONENT VIDEO MONITOR OUT jacks on this receiver to the component video inputs on this receiver using a component video input, you can...
...Component video should deliver superior picture quality when compared to this receiver. Connecting using HDMI If you have your TV connected to this receiver's COMPONENT VIDEO MONITOR OUT jacks. 1 Connect the component video outputs of your source to a set of ... (ASSIGNABLE) R S P E A K A E R S VSX-818V 2 HDMI IN HDMI/DVI-compatible monitor or flat panel TV The illustration shows the VSX-818V, but connections for more on this. 3 Connect the COMPONENT VIDEO MONITOR OUT jacks on this receiver to the component video inputs on this receiver using a component video input, you can...
Owner's Manual
Page 17
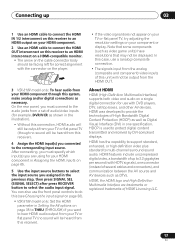
...231;ais Italiano Nederlands Español 1 Use an HDMI cable to connect the HDMI IN 1/2 interconnect on this (see Choosing the input signal on page 36). • VSX-918V model only: Set the HDMI parameter in Setting the AV options on page 35 to THRU (THROUGH) if you are trademarks ...sound will be output from the HDMI OUT. 3 VSX-818V model only: To hear audio from this receiver). 4 Assign the HDMI input(s) you assigned in Assigning the HDMI inputs on page 65. 5 Use the input source buttons to select the input source you connected to the corresponding input source. About HDMI HDMI (High...
...231;ais Italiano Nederlands Español 1 Use an HDMI cable to connect the HDMI IN 1/2 interconnect on this (see Choosing the input signal on page 36). • VSX-918V model only: Set the HDMI parameter in Setting the AV options on page 35 to THRU (THROUGH) if you are trademarks ...sound will be output from the HDMI OUT. 3 VSX-818V model only: To hear audio from this receiver). 4 Assign the HDMI input(s) you assigned in Assigning the HDMI inputs on page 65. 5 Use the input source buttons to select the input source you connected to the corresponding input source. About HDMI HDMI (High...
Owner's Manual
Page 18
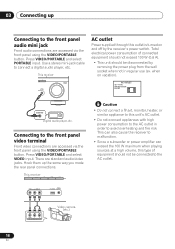
...the 100 W maximum when playing sources at a high volume, this type of connected equipment should not exceed 100 W (0.8 A). • This unit should not be disconnected by the receiver's power switch. This receiver AUX MCACC PORTABLE MASTER VOLUME AC outlet Power supplied through this unit's AC outlet...; Since a subwoofer or power amplifier can also cause the receiver to the front panel video terminal Front video connections are standard audio/video jacks. This receiver iPod FM/AM XM SIRIUS AUX Caution • Do not connect a TV set, monitor, heater, or similar appliance to ...
...the 100 W maximum when playing sources at a high volume, this type of connected equipment should not exceed 100 W (0.8 A). • This unit should not be disconnected by the receiver's power switch. This receiver AUX MCACC PORTABLE MASTER VOLUME AC outlet Power supplied through this unit's AC outlet...; Since a subwoofer or power amplifier can also cause the receiver to the front panel video terminal Front video connections are standard audio/video jacks. This receiver iPod FM/AM XM SIRIUS AUX Caution • Do not connect a TV set, monitor, heater, or similar appliance to ...
Owner's Manual
Page 19
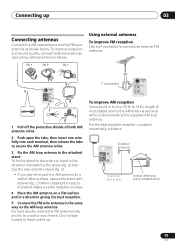
... AM loop antenna and the FM wire antenna as the AM loop antenna. F connector FM UNBAL 75 Ω AM LOOP To improve AM reception Connect a 5 m to a wall or other surface, secure the stand with screws (fig. b). • If you plan to mount the AM antenna to 6 m (15 ft. c) before ... frame. For best results, extend the FM antenna fully and fix to the stand. c Using external antennas To improve FM reception Use an F connector to connect an external FM antenna. 3 FM UNBAL 5 75 Ω AM LOOP 4 1 2 1 Pull off the protective shields of vinyl-coated wire to 6 m (15 ft. To fix ...
... AM loop antenna and the FM wire antenna as the AM loop antenna. F connector FM UNBAL 75 Ω AM LOOP To improve AM reception Connect a 5 m to a wall or other surface, secure the stand with screws (fig. b). • If you plan to mount the AM antenna to 6 m (15 ft. c) before ... frame. For best results, extend the FM antenna fully and fix to the stand. c Using external antennas To improve FM reception Use an F connector to connect an external FM antenna. 3 FM UNBAL 5 75 Ω AM LOOP 4 1 2 1 Pull off the protective shields of vinyl-coated wire to 6 m (15 ft. To fix ...
Owner's Manual
Page 20
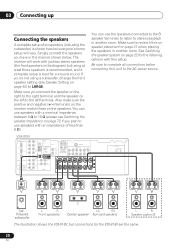
...connected to the B speaker terminals to listen to LARGE. See Switching the speaker system on page 21 when placing the speakers in the manner shown below. Make sure to the left to review Hints on speaker placement on page 22 for the VSX-818V are the same. 20 En VSX...A E R S CEN- Also make sure the positive and negative (+/-) terminals on the receiver match those on the left terminal. Make sure you have in another room. The receiver will vary. Simply connect the speakers you connect the speaker on the right to the right terminal and the speaker on the speakers.
...connected to the B speaker terminals to listen to LARGE. See Switching the speaker system on page 21 when placing the speakers in the manner shown below. Make sure to the left to review Hints on speaker placement on page 22 for the VSX-818V are the same. 20 En VSX...A E R S CEN- Also make sure the positive and negative (+/-) terminals on the receiver match those on the left terminal. Make sure you have in another room. The receiver will vary. Simply connect the speakers you connect the speaker on the right to the right terminal and the speaker on the speakers.
Owner's Manual
Page 21
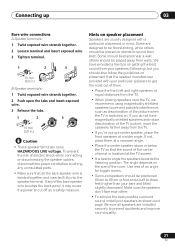
English Deutsch Français Italiano Nederlands Español Connecting up 03 Bare wire connections A-Speaker terminals: 1 Twist exposed wire strands together. 2 Loosen terminal and insert exposed wire. 3 Tighten terminal. 1 2 3 10 mm (3/8 in.) B-Speaker terminals: 1 Twist ...), but you 're using magnetically shielded speakers to sound their best. We have magnetically shielded speakers and notice discoloration of electric shock when connecting or disconnecting the speaker cables, disconnect the power cord before touching any of the room. If not, place them . • Place the...
English Deutsch Français Italiano Nederlands Español Connecting up 03 Bare wire connections A-Speaker terminals: 1 Twist exposed wire strands together. 2 Loosen terminal and insert exposed wire. 3 Tighten terminal. 1 2 3 10 mm (3/8 in.) B-Speaker terminals: 1 Twist ...), but you 're using magnetically shielded speakers to sound their best. We have magnetically shielded speakers and notice discoloration of electric shock when connecting or disconnecting the speaker cables, disconnect the power cord before touching any of the room. If not, place them . • Place the...
Owner's Manual
Page 22
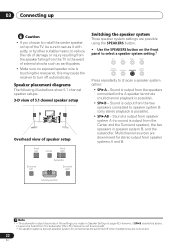
... En Sound is output from the Center and the Surround speaker), the two speakers in speaker system B, and the subwoofer. 03 Connecting up Caution • If you made in Speaker Setting on the front panel to select a speaker system setting.1 SOUND RETRIEVER VSB MODE ...Press repeatedly to choose a speaker system option: • SP A - Sound is output from the speakers connected to the A speaker terminals (multichannel playback is touching the rear panel, this may cause the receiver to turn off when headphones are downmixed for stereo output from the TV in the event of external...
... En Sound is output from the Center and the Surround speaker), the two speakers in speaker system B, and the subwoofer. 03 Connecting up Caution • If you made in Speaker Setting on the front panel to select a speaker system setting.1 SOUND RETRIEVER VSB MODE ...Press repeatedly to choose a speaker system option: • SP A - Sound is output from the speakers connected to the A speaker terminals (multichannel playback is touching the rear panel, this may cause the receiver to turn off when headphones are downmixed for stereo output from the TV in the event of external...


