Owner's Manual
Page 1
...-CHANNEL RECEIVER VSX-918V VSX-818V Register your product at www.pioneerelectronics.com (US) www.pioneerelectronics.ca (Canada) • Protect your new investment The details of your purchase will be on file for reference in the event of an insurance claim such as loss or theft. • Receive free... tips, updates and service bulletins on your new product • Improve product development Your input helps us continue to design products that meet your needs. • Receive a free Pioneer newsletter Registered customers can opt in to...
...-CHANNEL RECEIVER VSX-918V VSX-818V Register your product at www.pioneerelectronics.com (US) www.pioneerelectronics.ca (Canada) • Protect your new investment The details of your purchase will be on file for reference in the event of an insurance claim such as loss or theft. • Receive free... tips, updates and service bulletins on your new product • Improve product development Your input helps us continue to design products that meet your needs. • Receive a free Pioneer newsletter Registered customers can opt in to...
Owner's Manual
Page 2
...SECURITY. To prevent electromagnetic interference with Canadian ICES-003. Product Name: AUDIO/VIDEO MULTI-CHANNEL RECEIVER Model Number: VSX-918V-K, VSX-918V-S, VSX-818V-K, VSX-818V-S Responsible Party Name: PIONEER ELECTRONICS SERVICE INC. The equipment should be performed only by removing the mains plug from that...V) written on proposition 65 known to the State of the following measures: - Increase the separation between the equipment and receiver. - WARNING This equipment is no guarantee that the power supply voltage of the area where this equipment (such as radios...
...SECURITY. To prevent electromagnetic interference with Canadian ICES-003. Product Name: AUDIO/VIDEO MULTI-CHANNEL RECEIVER Model Number: VSX-918V-K, VSX-918V-S, VSX-818V-K, VSX-818V-S Responsible Party Name: PIONEER ELECTRONICS SERVICE INC. The equipment should be performed only by removing the mains plug from that...V) written on proposition 65 known to the State of the following measures: - Increase the separation between the equipment and receiver. - WARNING This equipment is no guarantee that the power supply voltage of the area where this equipment (such as radios...
Owner's Manual
Page 4
After you for buying this Pioneer product. Thank you have finished reading the instructions, put them...Using the Advanced surround effects . . . . . 31 Listening in the box 6 Loading the batteries 6 Installing the receiver 6 Ventilation 6 04 Controls and displays Front panel 23 Display 24 Remote control 26 Operating range of remote control 29 02... 32 Listening with Acoustic Calibration EQ . . . . . 33 Using Virtual Surround Back (VSB 33 Setting the AV options 34 Playing other sources 36 Choosing the input signal 36 Selecting the multichannel analog inputs . . . 36 Selecting...
After you for buying this Pioneer product. Thank you have finished reading the instructions, put them...Using the Advanced surround effects . . . . . 31 Listening in the box 6 Loading the batteries 6 Installing the receiver 6 Ventilation 6 04 Controls and displays Front panel 23 Display 24 Remote control 26 Operating range of remote control 29 02... 32 Listening with Acoustic Calibration EQ . . . . . 33 Using Virtual Surround Back (VSB 33 Setting the AV options 34 Playing other sources 36 Choosing the input signal 36 Selecting the multichannel analog inputs . . . 36 Selecting...
Owner's Manual
Page 5
..." is a registered trademark of DTS, Inc. For U.S. "Dolby", "Pro Logic" and the double-D symbol are trademarks of your system Operating other Pioneer components 49 Setting the remote to control other components 49 Selecting preset codes directly 50 Direct function 50 Clearing all the remote control settings. . . ..... . 60 Listening to SIRIUS Radio 61 Saving channel presets 61 Using the SIRIUS Menu 62 Using this receiver with a Pioneer flat panel TV 62 Using the SR+ mode with a Pioneer flat panel TV 63 11 Other Settings The Input Assign menu 64 The Other Setup menu 66 SR+ ...
..." is a registered trademark of DTS, Inc. For U.S. "Dolby", "Pro Logic" and the double-D symbol are trademarks of your system Operating other Pioneer components 49 Setting the remote to control other components 49 Selecting preset codes directly 50 Direct function 50 Clearing all the remote control settings. . . ..... . 60 Listening to SIRIUS Radio 61 Saving channel presets 61 Using the SIRIUS Menu 62 Using this receiver with a Pioneer flat panel TV 62 Using the SR+ mode with a Pioneer flat panel TV 63 11 Other Settings The Input Assign menu 64 The Other Setup menu 66 SR+ ...
Owner's Manual
Page 6
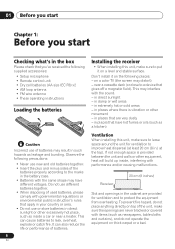
...the equipment on thick carpet or a bed. 01 Before you start Chapter 1: Before you start Checking what's in the box Please check that you've received the following supplied accessories: • Setup microphone • Remote control unit • Dry cell batteries (AA size IEC R6) x2 • AM loop... or area. • Do not use new and old batteries together. • Insert the plus and minus sides of batteries. 6 En Installing the receiver • When installing this unit, make sure to put it on a color TV (the screen may interfere with performance and/or causing malfunctions. in...
...the equipment on thick carpet or a bed. 01 Before you start Chapter 1: Before you start Checking what's in the box Please check that you've received the following supplied accessories: • Setup microphone • Remote control unit • Dry cell batteries (AA size IEC R6) x2 • AM loop... or area. • Do not use new and old batteries together. • Insert the plus and minus sides of batteries. 6 En Installing the receiver • When installing this unit, make sure to put it on a color TV (the screen may interfere with performance and/or causing malfunctions. in...
Owner's Manual
Page 7
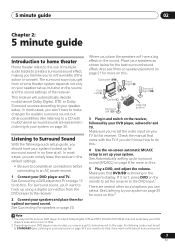
... output Dolby Digital, DTS and 88.2 kHz/96 kHz PCM (2 channel) audio (see your DVD player's manual for realistic surround sound, but also on the receiver, followed by your DVD player and TV. In this . 5 Play a DVD, and adjust the volume. Subwoofer (SW) Front Left (L) Front Right (R)... Listening in surround sound on the remote to set to STANDARD (see Hints on speaker placement on page 8 for surround sound in the receiver's display. Make sure that came with multichannel surround sound) are several other possibilities (like you can select. The surround sound you place ...
... output Dolby Digital, DTS and 88.2 kHz/96 kHz PCM (2 channel) audio (see your DVD player's manual for realistic surround sound, but also on the receiver, followed by your DVD player and TV. In this . 5 Play a DVD, and adjust the volume. Subwoofer (SW) Front Left (L) Front Right (R)... Listening in surround sound on the remote to set to STANDARD (see Hints on speaker placement on page 8 for surround sound in the receiver's display. Make sure that came with multichannel surround sound) are several other possibilities (like you can select. The surround sound you place ...
Owner's Manual
Page 8
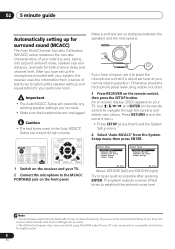
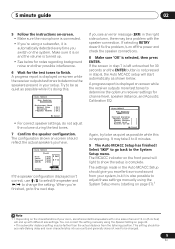
... SELECT SOURCE MULTI CONTROL TV CTRL DVD TV DVR CD-R XM SIRIUS CD FM AM PORTABLE iPod RECEIVER RECEIVER CONTROL ONE TOUCH COPY CH+ AV PARAMETER TOP MENU ST TUNE ENTER T.EDIT MENU ST GUIDE CATEGORY TUNE CH- Note 1 • The screensaver automatically starts after ...Manual SP Setup 4.Input Assign 5.Other Setup System Setup 1.Auto MCACC 2.Manual MCACC 3.Manual SP Setup 4.Input Assign : Exit : Exit Above: VSX-918V (left) and VSX-818V (right) Try to exit the System Setup menu.1 4 Select 'Auto MCACC' from a series of your listening area, taking into account ambient noise...
... SELECT SOURCE MULTI CONTROL TV CTRL DVD TV DVR CD-R XM SIRIUS CD FM AM PORTABLE iPod RECEIVER RECEIVER CONTROL ONE TOUCH COPY CH+ AV PARAMETER TOP MENU ST TUNE ENTER T.EDIT MENU ST GUIDE CATEGORY TUNE CH- Note 1 • The screensaver automatically starts after ...Manual SP Setup 4.Input Assign 5.Other Setup System Setup 1.Auto MCACC 2.Manual MCACC 3.Manual SP Setup 4.Input Assign : Exit : Exit Above: VSX-918V (left) and VSX-818V (right) Try to exit the System Setup menu.1 4 Select 'Auto MCACC' from a series of your listening area, taking into account ambient noise...
Owner's Manual
Page 9
...12 cm (5 inches) will start automatically as possible while it is on the system. The configuration shown on -screen while the receiver outputs test tones to be as quiet as shown below for notes regarding background noise and other possible interference. 6 Wait for ...not need to the next step. You can correct the setting manually using the Speaker Setting on -screen while the receiver outputs more test tones to determine the optimum receiver settings for channel level, speaker distance, and Acoustic Calibration EQ. 1.Auto MCACC Now Analyzing Surround Analyzing Speaker System ...
...12 cm (5 inches) will start automatically as possible while it is on the system. The configuration shown on -screen while the receiver outputs test tones to be as quiet as shown below for notes regarding background noise and other possible interference. 6 Wait for ...not need to the next step. You can correct the setting manually using the Speaker Setting on -screen while the receiver outputs more test tones to determine the optimum receiver settings for channel level, speaker distance, and Acoustic Calibration EQ. 1.Auto MCACC Now Analyzing Surround Analyzing Speaker System ...
Owner's Manual
Page 10
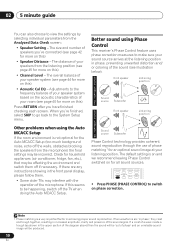
... parameters from the Analyzed Data Check screen: • Speaker Setting - The distance of the microphone. STEREO/ AUTO/DIRECT A.L.C. Other problems when using Phase Control This receiver's Phase Control feature uses phase correction measures to the frequency balance of your speaker system based on the acoustic characteristics of the sound signal. If...
... parameters from the Analyzed Data Check screen: • Speaker Setting - The distance of the microphone. STEREO/ AUTO/DIRECT A.L.C. Other problems when using Phase Control This receiver's Phase Control feature uses phase correction measures to the frequency balance of your speaker system based on the acoustic characteristics of the sound signal. If...
Owner's Manual
Page 11
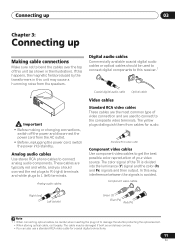
... 1 • When connecting optical cables, be damaged if bent around sharp corners. • You can also use a standard RCA video cable for audio. If this receiver.1 Coaxial digital audio cable Optical cable Video cables Standard RCA video cables These cables are the most common type of the TV is avoided.
... 1 • When connecting optical cables, be damaged if bent around sharp corners. • You can also use a standard RCA video cable for audio. If this receiver.1 Coaxial digital audio cable Optical cable Video cables Standard RCA video cables These cables are the most common type of the TV is avoided.
Owner's Manual
Page 12
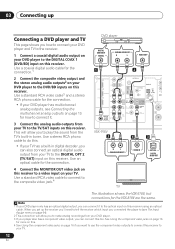
... AUDIO OUT VIDEO IN OPTICAL DIGITAL AUDIO OUT TV The illustration shows the VSX-918V, but connections for the VSX-818V are the same. Note 1 If your DVD player only has an optical digital output, you can connect this receiver. When you set up Connecting a DVD player and TV This page shows you... how to connect your DVD player and TV to the receiver. 1 Connect a coaxial digital ...
... AUDIO OUT VIDEO IN OPTICAL DIGITAL AUDIO OUT TV The illustration shows the VSX-918V, but connections for the VSX-818V are the same. Note 1 If your DVD player only has an optical digital output, you can connect this receiver. When you set up Connecting a DVD player and TV This page shows you... how to connect your DVD player and TV to the receiver. 1 Connect a coaxial digital ...
Owner's Manual
Page 13
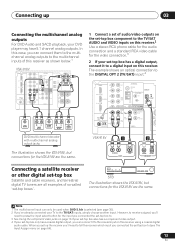
...AV OUT VIDEO COAXIAL OPTICAL DIGITAL OUT Connecting a satellite receiver or other digital set-top box Satellite and cable receivers, and terrestrial digital TV tuners are the same. Connecting up the receiver you'll need to press the input select button for the video connection.3 2 If your set of this receiver.... STB The illustration shows the VSX-918V, but connections for the VSX-818V are all examples of so-called 'set-top boxes'. When you set -top box has a digital output,...
...AV OUT VIDEO COAXIAL OPTICAL DIGITAL OUT Connecting a satellite receiver or other digital set-top box Satellite and cable receivers, and terrestrial digital TV tuners are the same. Connecting up the receiver you'll need to press the input select button for the video connection.3 2 If your set of this receiver.... STB The illustration shows the VSX-918V, but connections for the VSX-818V are all examples of so-called 'set-top boxes'. When you set -top box has a digital output,...
Owner's Manual
Page 14
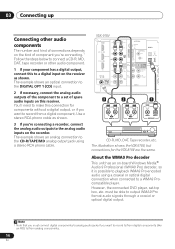
..., the connected DVD player, set of the component to the analog audio inputs on this connection for the VSX-818V are the same. About the WMA9 Pro decoder This unit has an on the receiver as shown. 3 If you're connecting a recorder, connect the analog audio outputs to a set -top box, ...etc. Use a stereo RCA phono cable as shown. The example shows an optical connection to record from analog components. 14 En The illustration shows the VSX-918V, but connections...
..., the connected DVD player, set of the component to the analog audio inputs on this connection for the VSX-818V are the same. About the WMA9 Pro decoder This unit has an on the receiver as shown. 3 If you're connecting a recorder, connect the analog audio outputs to a set -top box, ...etc. Use a stereo RCA phono cable as shown. The example shows an optical connection to record from analog components. 14 En The illustration shows the VSX-918V, but connections...
Owner's Manual
Page 15
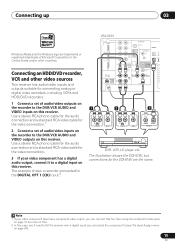
... outputs on this too. See Using the component video jacks on page 16 for the VSX-818V are trademarks or registered trademarks of Microsoft Corporation in the United States and/or other video sources This receiver has audio/video inputs and outputs suitable for the video connection. 3 If your video...see The Input Assign menu on page 64). 15 En The illustration shows the VSX-918V, but connections for more on this. 2 In this case, you'll need to tell the receiver which digital input you can connect this receiver. Note 1 If your video component has a digital audio output, connect it...
... outputs on this too. See Using the component video jacks on page 16 for the VSX-818V are trademarks or registered trademarks of Microsoft Corporation in the United States and/or other video sources This receiver has audio/video inputs and outputs suitable for the video connection. 3 If your video...see The Input Assign menu on page 64). 15 En The illustration shows the VSX-918V, but connections for more on this. 2 In this case, you'll need to tell the receiver which digital input you can connect this receiver. Note 1 If your video component has a digital audio output, connect it...
Owner's Manual
Page 16
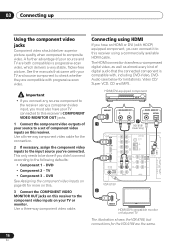
...DVD-Video, DVDAudio (see below for more on this. 3 Connect the COMPONENT VIDEO MONITOR OUT jacks on this receiver using HDMI If you have your TV connected to this receiver's COMPONENT VIDEO MONITOR OUT jacks. 1 Connect the component video outputs of component video inputs on this...progressive-scan video. Connecting using a commercially available HDMI cable. HDMI/DVI-equipped component HDMI OUT 1 ANALOG AUDIO OUT R L DIGITAL AUDIO OUT COAXIAL OPTICAL 3 (VSX-818V model only) HDMI IN R IN AUX L CD ANTENNA FM UNBAL DIGITAL IN (DVD / BD) IN 1 IN (ASSIGNABLE) OUT (TV / SAT) IN ...
...DVD-Video, DVDAudio (see below for more on this. 3 Connect the COMPONENT VIDEO MONITOR OUT jacks on this receiver using HDMI If you have your TV connected to this receiver's COMPONENT VIDEO MONITOR OUT jacks. 1 Connect the component video outputs of component video inputs on this...progressive-scan video. Connecting using a commercially available HDMI cable. HDMI/DVI-equipped component HDMI OUT 1 ANALOG AUDIO OUT R L DIGITAL AUDIO OUT COAXIAL OPTICAL 3 (VSX-818V model only) HDMI IN R IN AUX L CD ANTENNA FM UNBAL DIGITAL IN (DVD / BD) IN 1 IN (ASSIGNABLE) OUT (TV / SAT) IN ...
Owner's Manual
Page 17
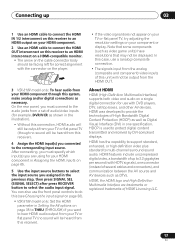
... the audio jacks from a set -top boxes, and other AV devices. HDCP is used to multi-channel surround-sound audio. Note that some components (such as video game units) have resolutions that may not be output from the HDMI OUT. 3 VSX-818V model only: To hear audio from your HDMI component through... select the input source you want to hear HDMI audio output from your TV or flat panel TV (no sound will be heard from this receiver). HDMI features include uncompressed digital video, a bandwidth of this unit will not be displayed. HDMI was developed to provide the technologies of several ...
... the audio jacks from a set -top boxes, and other AV devices. HDCP is used to multi-channel surround-sound audio. Note that some components (such as video game units) have resolutions that may not be output from the HDMI OUT. 3 VSX-818V model only: To hear audio from your HDMI component through... select the input source you want to hear HDMI audio output from your TV or flat panel TV (no sound will be heard from this receiver). HDMI features include uncompressed digital video, a bandwidth of this unit will not be displayed. HDMI was developed to provide the technologies of several ...
Owner's Manual
Page 18
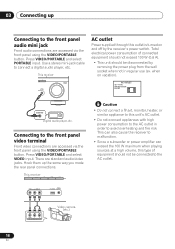
... audio player, etc. Press VIDEO/PORTABLE and select VIDEO input. 03 Connecting up the same way you made the rear panel connections. This receiver AUX MCACC PORTABLE MASTER VOLUME AC outlet Power supplied through this type of connected equipment should not exceed 100 W (0.8 A). • This ...the front panel audio mini jack Front audio connections are accessed via the front panel using the VIDEO/PORTABLE button. This can also cause the receiver to malfunction. • Since a subwoofer or power amplifier can exceed the 100 W maximum when playing sources at a high volume, this...
... audio player, etc. Press VIDEO/PORTABLE and select VIDEO input. 03 Connecting up the same way you made the rear panel connections. This receiver AUX MCACC PORTABLE MASTER VOLUME AC outlet Power supplied through this type of connected equipment should not exceed 100 W (0.8 A). • This ...the front panel audio mini jack Front audio connections are accessed via the front panel using the VIDEO/PORTABLE button. This can also cause the receiver to malfunction. • Since a subwoofer or power amplifier can exceed the 100 W maximum when playing sources at a high volume, this...
Owner's Manual
Page 20
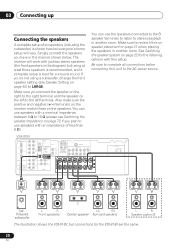
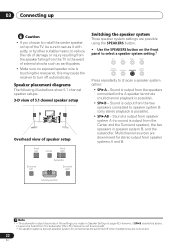
.... Make sure to use speakers with a nominal impedance between 6 Ω to 16 Ω (please see Speaker Setting on page 22 for the VSX-818V are the same. 20 En Simply connect the speakers you 're not using at least three speakers is recommended, and a complete setup is shown here... setup will work with an impedance of less than 8 Ω). Make sure you plan to review Hints on speaker placement on the speakers. The receiver will vary. See Switching the speaker system on page 42) to stereo playback in the diagram) but using a subwoofer, change the front speaker setting...
.... Make sure to use speakers with a nominal impedance between 6 Ω to 16 Ω (please see Speaker Setting on page 22 for the VSX-818V are the same. 20 En Simply connect the speakers you 're not using at least three speakers is recommended, and a complete setup is shown here... setup will work with an impedance of less than 8 Ω). Make sure you plan to review Hints on speaker placement on the speakers. The receiver will vary. See Switching the speaker system on page 42) to stereo playback in the diagram) but using a subwoofer, change the front speaker setting...
Owner's Manual
Page 22
... are downmixed for stereo output from the two speakers connected to speaker system B (only stereo playback is touching the rear panel, this may cause the receiver to turn off automatically.
... are downmixed for stereo output from the two speakers connected to speaker system B (only stereo playback is touching the rear panel, this may cause the receiver to turn off automatically.
Owner's Manual
Page 23
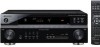
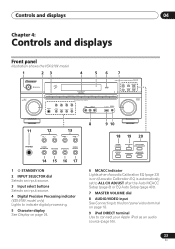
...ais Italiano Nederlands Español Chapter 4: Controls and displays Front panel Illustration shows the VSX-918V model 1 23 4 56 7 INPUT SELECTOR STANDBY/ON AUDIO/VIDEO MULTI-CHANNEL RECEIVER VSX-918V PHASE CONTROL DVD DIGITAL PRECISION PROCESSING TV DVR VIDEO/PORTABLE CD/CD-R iPod FM...1 STANDBY/ON 2 INPUT SELECTOR dial Selects an input source. 3 Input select buttons Selects an input source. 4 Digital Precision Processing indicator (VSX-918V model only) Lights to indicate digital processing. 5 Character display See Display on page 18. 9 iPod DIRECT terminal Use to the front...
...ais Italiano Nederlands Español Chapter 4: Controls and displays Front panel Illustration shows the VSX-918V model 1 23 4 56 7 INPUT SELECTOR STANDBY/ON AUDIO/VIDEO MULTI-CHANNEL RECEIVER VSX-918V PHASE CONTROL DVD DIGITAL PRECISION PROCESSING TV DVR VIDEO/PORTABLE CD/CD-R iPod FM...1 STANDBY/ON 2 INPUT SELECTOR dial Selects an input source. 3 Input select buttons Selects an input source. 4 Digital Precision Processing indicator (VSX-918V model only) Lights to indicate digital processing. 5 Character display See Display on page 18. 9 iPod DIRECT terminal Use to the front...


