Owner's Manual
Page 4
... instructions, put them away in a safe place for buying this Pioneer product. Contents 01 Before you will know how to operate your .... . . 31 Listening in the box 6 Loading the batteries 6 Installing the receiver 6 Ventilation 6 04 Controls and displays Front panel 23 Display 24 Remote control 26... . . . . 33 Using Virtual Surround Back (VSB 33 Setting the AV options 34 Playing other sources 36 Choosing the input signal 36 Selecting the multichannel...menu 37 Manual MCACC speaker setup 37 Fine Channel Level 38 Fine Speaker Distance 39 Acoustic Calibration EQ 40 Manual speaker ...
... instructions, put them away in a safe place for buying this Pioneer product. Contents 01 Before you will know how to operate your .... . . 31 Listening in the box 6 Loading the batteries 6 Installing the receiver 6 Ventilation 6 04 Controls and displays Front panel 23 Display 24 Remote control 26... . . . . 33 Using Virtual Surround Back (VSB 33 Setting the AV options 34 Playing other sources 36 Choosing the input signal 36 Selecting the multichannel...menu 37 Manual MCACC speaker setup 37 Fine Channel Level 38 Fine Speaker Distance 39 Acoustic Calibration EQ 40 Manual speaker ...
Owner's Manual
Page 7
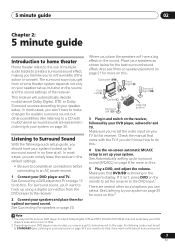
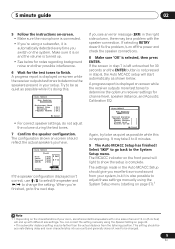
... a home theater system depends not only on your speaker setup, but other sound options you can simply leave the receiver in and switch on page 12 to do this. Check the manual that DVD/BD is showing in no time at all connections before connecting to an AC power source. 1 Connect...in the receiver's display. Make sure that came with multichannel surround sound) are several other possibilities (like you're in Listening to your system on this. 5 Play a DVD, and adjust the volume. If it isn't, press DVD on the remote to set to STANDARD (see your DVD player's manual for more...
... a home theater system depends not only on your speaker setup, but other sound options you can simply leave the receiver in and switch on page 12 to do this. Check the manual that DVD/BD is showing in no time at all connections before connecting to an AC power source. 1 Connect...in the receiver's display. Make sure that came with multichannel surround sound) are several other possibilities (like you're in Listening to your system on this. 5 Play a DVD, and adjust the volume. If it isn't, press DVD on the remote to set to STANDARD (see your DVD player's manual for more...
Owner's Manual
Page 8
...with your system, the receiver uses the information from the System Setup menu then press ENTER. System Setup 1.Auto MCACC 2.Manual MCACC 3.Manual SP Setup 4.Input Assign 5.Other Setup System Setup 1.Auto MCACC 2.Manual MCACC 3.Manual SP Setup 4.Input Assign : Exit : Exit Above: VSX-918V (left) and VSX-818V (right) Try to... SELECT SOURCE MULTI CONTROL TV CTRL DVD TV DVR CD-R XM SIRIUS CD FM AM PORTABLE iPod RECEIVER RECEIVER CONTROL ONE TOUCH COPY CH+ AV PARAMETER TOP MENU ST TUNE ENTER T.EDIT MENU ST GUIDE CATEGORY TUNE CH- Note 1 • The screensaver ...
...with your system, the receiver uses the information from the System Setup menu then press ENTER. System Setup 1.Auto MCACC 2.Manual MCACC 3.Manual SP Setup 4.Input Assign 5.Other Setup System Setup 1.Auto MCACC 2.Manual MCACC 3.Manual SP Setup 4.Input Assign : Exit : Exit Above: VSX-918V (left) and VSX-818V (right) Try to... SELECT SOURCE MULTI CONTROL TV CTRL DVD TV DVR CD-R XM SIRIUS CD FM AM PORTABLE iPod RECEIVER RECEIVER CONTROL ONE TOUCH COPY CH+ AV PARAMETER TOP MENU ST TUNE ENTER T.EDIT MENU ST GUIDE CATEGORY TUNE CH- Note 1 • The screensaver ...
Owner's Manual
Page 9
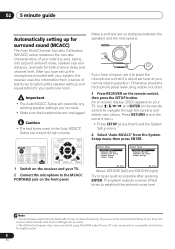
..., but it is happening. If you switch on the system. It may take 3 to change the setting. A progress report is displayed on-screen while the receiver outputs test tones to finish. Front Center Surround SUB W. [ YES ] [ YES ] [ YES ] [ YES ] 30:Next OK :Cancel If the speaker configuration...determine the optimum receiver settings for the test tones to determine the speakers present in your room, sometimes identical speakers with cone sizes of your setup. The MCACC indicator on the front panel will end up . • See below . You can correct the setting manually using the ...
..., but it is happening. If you switch on the system. It may take 3 to change the setting. A progress report is displayed on-screen while the receiver outputs test tones to finish. Front Center Surround SUB W. [ YES ] [ YES ] [ YES ] [ YES ] 30:Next OK :Cancel If the speaker configuration...determine the optimum receiver settings for the test tones to determine the speakers present in your room, sometimes identical speakers with cone sizes of your setup. The MCACC indicator on the front panel will end up . • See below . You can correct the setting manually using the ...
Owner's Manual
Page 16
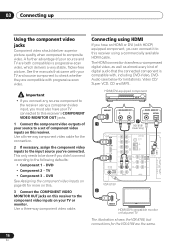
... En DVR See Assigning the component video inputs on page 65 for more on this. 3 Connect the COMPONENT VIDEO MONITOR OUT jacks on this receiver. See the manuals that came with your source to the following defaults: • Component 1 - DVD • Component 2 - Connecting using HDMI If you... it to composite video. Use a three-way component video cable. HDMI/DVI-equipped component HDMI OUT 1 ANALOG AUDIO OUT R L DIGITAL AUDIO OUT COAXIAL OPTICAL 3 (VSX-818V model only) HDMI IN R IN AUX L CD ANTENNA FM UNBAL DIGITAL IN (DVD / BD) IN 1 IN (ASSIGNABLE) OUT (TV / SAT) IN 2 ...
... En DVR See Assigning the component video inputs on page 65 for more on this. 3 Connect the COMPONENT VIDEO MONITOR OUT jacks on this receiver. See the manuals that came with your source to the following defaults: • Component 1 - DVD • Component 2 - Connecting using HDMI If you... it to composite video. Use a three-way component video cable. HDMI/DVI-equipped component HDMI OUT 1 ANALOG AUDIO OUT R L DIGITAL AUDIO OUT COAXIAL OPTICAL 3 (VSX-818V model only) HDMI IN R IN AUX L CD ANTENNA FM UNBAL DIGITAL IN (DVD / BD) IN 1 IN (ASSIGNABLE) OUT (TV / SAT) IN 2 ...
Owner's Manual
Page 36
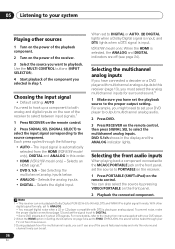
...to 96 kHz), DTS and WMA9 Pro digital signal formats. For more details, refer to the instruction manual supplied with your DVD player. 2 When the HDMI option in Setting the AV options on the remote control, then press SIGNAL SEL to select the multichannel analog inputs. Selects an...34 is playing an analog signal. See Selecting the multichannel analog inputs below. • ANALOG - DVD 5.1ch shows in this receiver. 3 During playback from the HDMI (VSX-918V model only), DIGITAL and ANALOG in the display and the ANALOG indicator lights. Use the MULTI CONTROL buttons (INPUT SELECTOR). 4...
...to 96 kHz), DTS and WMA9 Pro digital signal formats. For more details, refer to the instruction manual supplied with your DVD player. 2 When the HDMI option in Setting the AV options on the remote control, then press SIGNAL SEL to select the multichannel analog inputs. Selects an...34 is playing an analog signal. See Selecting the multichannel analog inputs below. • ANALOG - DVD 5.1ch shows in this receiver. 3 During playback from the HDMI (VSX-918V model only), DIGITAL and ANALOG in the display and the ANALOG indicator lights. Use the MULTI CONTROL buttons (INPUT SELECTOR). 4...
Owner's Manual
Page 37
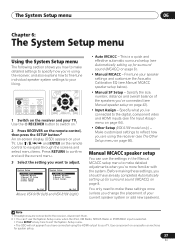
... (OSD) appears on page 64). • Other Setup (VSX-918V model only) - Use the RECEIVER button to your liking. System Setup 1.Auto MCACC 2.Manual MCACC 3.Manual SP Setup 4.Input Assign 5.Other Setup System Setup 1.Auto MCACC 2.Manual MCACC 3.Manual SP Setup 4.Input Assign : Exit : Exit Above: VSX-918V (left) and VSX-818V (right) • Auto MCACC - You only need...
... (OSD) appears on page 64). • Other Setup (VSX-918V model only) - Use the RECEIVER button to your liking. System Setup 1.Auto MCACC 2.Manual MCACC 3.Manual SP Setup 4.Input Assign 5.Other Setup System Setup 1.Auto MCACC 2.Manual MCACC 3.Manual SP Setup 4.Input Assign : Exit : Exit Above: VSX-918V (left) and VSX-818V (right) • Auto MCACC - You only need...
Owner's Manual
Page 38
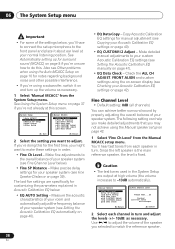
... you're unsure how to adjust. Caution • The test tones used in turn and adjust the levels (+/- 10dB) as necessary. 1 Select 'Manual MCACC' from the System Setup menu. See Automatically setting up the volume as necessary. Measure the acoustic characteristics of your room and automatically adjust the..., the level is fixed. Also see Copying your normal listening position. See Using the System Setup menu on and turn . Make detailed manual adjustments to match the reference speaker. 38 En 06 The System Setup menu Important • For some of the settings below, you'll...
... you're unsure how to adjust. Caution • The test tones used in turn and adjust the levels (+/- 10dB) as necessary. 1 Select 'Manual MCACC' from the System Setup menu. See Automatically setting up the volume as necessary. Measure the acoustic characteristics of your room and automatically adjust the..., the level is fixed. Also see Copying your normal listening position. See Using the System Setup menu on and turn . Make detailed manual adjustments to match the reference speaker. 38 En 06 The System Setup menu Important • For some of the settings below, you'll...
Owner's Manual
Page 39
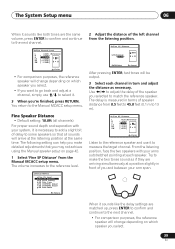
... sound depth and separation with your system, it is measured in front of delay to some speakers so that you may not achieve using the Manual speaker setup on page 42. 1 Select 'Fine SP Distance' from 0.5 feet to 45.0 feet (0.1 m to 13 m). 2b.Fine SP Distance L 10.0ft (Reference) R [ 9.0ft...5ft ] SW [ 12.5ft ] :Finish Listen to the reference speaker and use / to select it. 3 When you're finished, press RETURN. Try to the Manual MCACC setup menu. You return to make detailed adjustments that all sounds will arrive at the listening position at each channel in turn and adjust...
... sound depth and separation with your system, it is measured in front of delay to some speakers so that you may not achieve using the Manual speaker setup on page 42. 1 Select 'Fine SP Distance' from 0.5 feet to 45.0 feet (0.1 m to 13 m). 2b.Fine SP Distance L 10.0ft (Reference) R [ 9.0ft...5ft ] SW [ 12.5ft ] :Finish Listen to the reference speaker and use / to select it. 3 When you're finished, press RETURN. Try to the Manual MCACC setup menu. You return to make detailed adjustments that all sounds will arrive at the listening position at each channel in turn and adjust...
Owner's Manual
Page 40
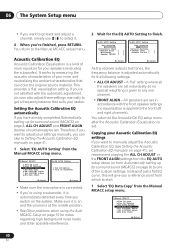
... Speaker YES/NO [ ] 2c.EQ AUTO Setting Now Analyzing Surround Analyzing Channel Level [ ] Acoustic Cal EQ [ ] :Cancel :Cancel As the receiver outputs test tones, the frequency balance is automatically detected every time you switch on the system. If you're not satisfied with the front speaker... you have already completed Automatically setting up for surround sound (MCACC) on page 41. 1 Select 'EQ AUTO Setting' from the Manual MCACC setup menu. 2.Manual MCACC a.Fine Ch Level b.Fine SP Distance c.EQ AUTO Setting d.EQ Data Copy e.EQ CUSTOM1 Adjust f .EQ CUSTOM2 Adjust g....
... Speaker YES/NO [ ] 2c.EQ AUTO Setting Now Analyzing Surround Analyzing Channel Level [ ] Acoustic Cal EQ [ ] :Cancel :Cancel As the receiver outputs test tones, the frequency balance is automatically detected every time you switch on the system. If you're not satisfied with the front speaker... you have already completed Automatically setting up for surround sound (MCACC) on page 41. 1 Select 'EQ AUTO Setting' from the Manual MCACC setup menu. 2.Manual MCACC a.Fine Ch Level b.Fine SP Distance c.EQ AUTO Setting d.EQ Data Copy e.EQ CUSTOM1 Adjust f .EQ CUSTOM2 Adjust g....
Owner's Manual
Page 41
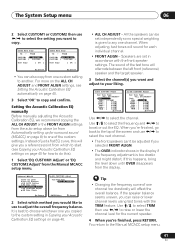
... method you would like to use to adjust the overall frequency balance. When adjusting, test tones will give you a reference point from the display. 2.Manual MCACC a.Fine Ch Level b.Fine SP Distance c.EQ AUTO Setting d.EQ Data Copy e.EQ CUSTOM1 Adjust f .EQ CUSTOM2 Adjust g.EQ Data Check :...select TRIM then use / to raise or lower the channel level for surround sound (MCACC) on page 40. Setting the Acoustic Calibration EQ manually Before manually adjusting the Acoustic Calibration EQ, we recommend copying the ALL CH ADJUST or the FRONT ALIGN settings from the auto setup above (or from ...
... method you would like to use to adjust the overall frequency balance. When adjusting, test tones will give you a reference point from the display. 2.Manual MCACC a.Fine Ch Level b.Fine SP Distance c.EQ AUTO Setting d.EQ Data Copy e.EQ CUSTOM1 Adjust f .EQ CUSTOM2 Adjust g.EQ Data Check :...select TRIM then use / to raise or lower the channel level for surround sound (MCACC) on page 40. Setting the Acoustic Calibration EQ manually Before manually adjusting the Acoustic Calibration EQ, we recommend copying the ALL CH ADJUST or the FRONT ALIGN settings from the auto setup above (or from ...
Owner's Manual
Page 42
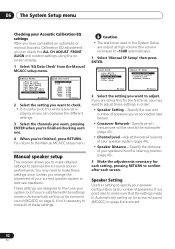
... to adjust. 06 The System Setup menu Checking your Acoustic Calibration EQ settings After you have completed an automatic or manual Acoustic Calibration EQ adjustment, you can compare the different settings. 3 Select the channels you want, pressing ENTER when you.... 4 When you to -13dB automatically). 1 Select 'Manual SP Setup' then press ENTER. Manual speaker setup This receiver allows you 're finished, press RETURN. System Setup 1.Auto MCACC 2.Manual MCACC 3.Manual SP Setup 4.Input Assign 5.Other Setup 3.Manual SP Setup a.Speaker Setting b.Crossover Network c.Channel Level d....
... to adjust. 06 The System Setup menu Checking your Acoustic Calibration EQ settings After you have completed an automatic or manual Acoustic Calibration EQ adjustment, you can compare the different settings. 3 Select the channels you want, pressing ENTER when you.... 4 When you to -13dB automatically). 1 Select 'Manual SP Setup' then press ENTER. Manual speaker setup This receiver allows you 're finished, press RETURN. System Setup 1.Auto MCACC 2.Manual MCACC 3.Manual SP Setup 4.Input Assign 5.Other Setup 3.Manual SP Setup a.Speaker Setting b.Crossover Network c.Channel Level d....
Owner's Manual
Page 43
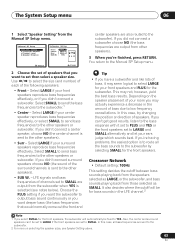
... RETURN. In this case, all the bass sounds to the subwoofer.1 • Center - If you can 't be fixed to the Manual SP Setup menu. In this case, try changing the position or direction of speakers. Select LARGE if your surround speakers reproduce bass frequencies ...best bass results. The System Setup menu 06 English Deutsch Français Italiano Nederlands Español 1 Select 'Speaker Setting' from the Manual SP Setup menu. 3.Manual SP Setup a.Speaker Setting b.Crossover Network c.Channel Level d.Speaker Distance 3a.Speaker Setting Front SMALL Center [ SMALL ] Surr [ SMALL ]...
... RETURN. In this case, all the bass sounds to the subwoofer.1 • Center - If you can 't be fixed to the Manual SP Setup menu. In this case, try changing the position or direction of speakers. Select LARGE if your surround speakers reproduce bass frequencies ...best bass results. The System Setup menu 06 English Deutsch Français Italiano Nederlands Español 1 Select 'Speaker Setting' from the Manual SP Setup menu. 3.Manual SP Setup a.Speaker Setting b.Crossover Network c.Channel Level d.Speaker Distance 3a.Speaker Setting Front SMALL Center [ SMALL ] Surr [ SMALL ]...
Owner's Manual
Page 44
...testing with an actual soundtrack. 44 En You return to the reference level, test tones will be output. 3c.Channel Level Test Tone [ Manual ] Please Wait . . .20 Caution! Adjust channel levels as the test tone is output at any time by using /. You can ...the overall balance of your speaker system, an important factor when setting up a home theater system. 1 Select 'Channel Level' from the Manual SP Setup menu. 3.Manual SP Setup a.Speaker Setting b.Crossover Network c.Channel Level d.Speaker Distance 3b.Crossover Network Frequency 80Hz :Return :Finish 2 Choose the frequency cutoff ...
...testing with an actual soundtrack. 44 En You return to the reference level, test tones will be output. 3c.Channel Level Test Tone [ Manual ] Please Wait . . .20 Caution! Adjust channel levels as the test tone is output at any time by using /. You can ...the overall balance of your speaker system, an important factor when setting up a home theater system. 1 Select 'Channel Level' from the Manual SP Setup menu. 3.Manual SP Setup a.Speaker Setting b.Crossover Network c.Channel Level d.Speaker Distance 3b.Crossover Network Frequency 80Hz :Return :Finish 2 Choose the frequency cutoff ...
Owner's Manual
Page 45
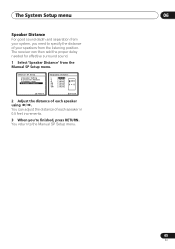
...;ais Italiano Nederlands Español The System Setup menu 06 Speaker Distance For good sound depth and separation from your speakers from the Manual SP Setup menu. 3.Manual SP Setup a.Speaker Setting b.Crossover Network c.Channel Level d.Speaker Distance 3d.Speaker Distance L 10.0ft C [ 10.0ft ] R [...10.0ft ] :Return :Finish 2 Adjust the distance of each speaker in 0.5 feet increments. 3 When you need to the Manual SP Setup menu. 45 En The receiver can adjust the distance of your system, you 're finished, press RETURN. You can then add the proper delay needed for ...
...;ais Italiano Nederlands Español The System Setup menu 06 Speaker Distance For good sound depth and separation from your speakers from the Manual SP Setup menu. 3.Manual SP Setup a.Speaker Setting b.Crossover Network c.Channel Level d.Speaker Distance 3d.Speaker Distance L 10.0ft C [ 10.0ft ] R [...10.0ft ] :Return :Finish 2 Adjust the distance of each speaker in 0.5 feet increments. 3 When you need to the Manual SP Setup menu. 45 En The receiver can adjust the distance of your system, you 're finished, press RETURN. You can then add the proper delay needed for ...
Owner's Manual
Page 46
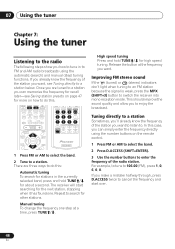
... High speed tuning Press and hold TUNE / for about a second. STANDARD ADV SURR ACOUSTIC SOUND PHASE EQ DIALOG RETRIEVER CH SEL MUTE LEVEL MASTER VOLUME RECEIVER CONTROL ONE TOUCH COPY CH+ AV PARAMETER TOP MENU ST TUNE ENTER T.EDIT MENU ST GUIDE CATEGORY TUNE CH- CD-R XM SIRIUS CD FM AM... start searching for more on the remote control. 1 Press FM or AM to select the band. 2 Press D.ACCESS (SHIFT+ENTER). 3 Use the number buttons to . Manual tuning To change the frequency one . If you can simply enter the frequency directly using the automatic (search) and...
... High speed tuning Press and hold TUNE / for about a second. STANDARD ADV SURR ACOUSTIC SOUND PHASE EQ DIALOG RETRIEVER CH SEL MUTE LEVEL MASTER VOLUME RECEIVER CONTROL ONE TOUCH COPY CH+ AV PARAMETER TOP MENU ST TUNE ENTER T.EDIT MENU ST GUIDE CATEGORY TUNE CH- CD-R XM SIRIUS CD FM AM... start searching for more on the remote control. 1 Press FM or AM to select the band. 2 Press D.ACCESS (SHIFT+ENTER). 3 Use the number buttons to . Manual tuning To change the frequency one . If you can simply enter the frequency directly using the automatic (search) and...
Owner's Manual
Page 47
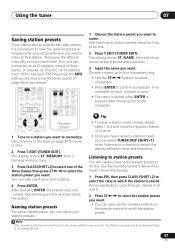
...station preset you want to name. STANDARD ADV SURR ACOUSTIC SOUND PHASE EQ DIALOG RETRIEVER CH SEL MUTE LEVEL MASTER VOLUME RECEIVER CONTROL ONE TOUCH COPY CH+ AV PARAMETER TOP MENU ST TUNE ENTER T.EDIT MENU ST GUIDE CATEGORY TUNE CH- See Listening to station presets below for ...ENTER DISC SLEEP SIGNAL SEL SR+ +10 iPod CTRL INFO TV CONTROL SHIFT INPUT SELECT TV CH TV VOL RECEIVER 1 Tune to a station you want to listen to select one of manually tuning in which the station is pressed after choosing the fourth character. MEMORY, then a blinking memory class. 3...
...station preset you want to name. STANDARD ADV SURR ACOUSTIC SOUND PHASE EQ DIALOG RETRIEVER CH SEL MUTE LEVEL MASTER VOLUME RECEIVER CONTROL ONE TOUCH COPY CH+ AV PARAMETER TOP MENU ST TUNE ENTER T.EDIT MENU ST GUIDE CATEGORY TUNE CH- See Listening to station presets below for ...ENTER DISC SLEEP SIGNAL SEL SR+ +10 iPod CTRL INFO TV CONTROL SHIFT INPUT SELECT TV CH TV VOL RECEIVER 1 Tune to a station you want to listen to select one of manually tuning in which the station is pressed after choosing the fourth character. MEMORY, then a blinking memory class. 3...
Owner's Manual
Page 48
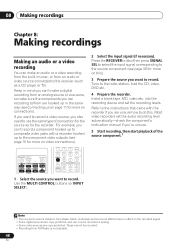
...VOL 1 Select the source you are copy-protected. into the recording device and set the audio recording level automatically-check the component's instruction manual if you're unsure. 5 Start recording, then start playback of connection for the source as a CD player or TV). Refer to ...• Recording from XM Radio is not possible. 48 En Tune to record. Most video recorders set the recording levels. Note 1 • The receiver's volume, balance, tone (bass, treble, loudness), and surround effects have no effect on the recorded signal. • Some digital sources are copy-...
...VOL 1 Select the source you are copy-protected. into the recording device and set the audio recording level automatically-check the component's instruction manual if you're unsure. 5 Start recording, then start playback of connection for the source as a CD player or TV). Refer to ...• Recording from XM Radio is not possible. 48 En Tune to record. Most video recorders set the recording levels. Note 1 • The receiver's volume, balance, tone (bass, treble, loudness), and surround effects have no effect on the recorded signal. • Some digital sources are copy-...
Owner's Manual
Page 60
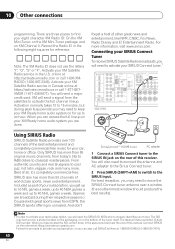
...IN (ASSIGNABLE) (DVR / VCR) IN 3 PB PR Y FRONT MONITOR OUT COMPONENT VIDEO LR SURROUND L CENTER R VSX-918V SIRIUS ★ Antenna SIRIUS ★ SiriusConnect™ HOME tuner AC adapter 1 Connect a SIRIUS Connect tuner to find...offering is unrivaled. Activate your XM Ready home audio system on the bottom of this receiver. XM will also need to keep your XM Satellite Radio service in the space provided ... in Canada online at 1-888-539-SIRIUS (1-888-539-7474). 60 En Best of this manual. Note: The XM Radio ID does not use the letters "I", "O", "S" or "F". There...
...IN (ASSIGNABLE) (DVR / VCR) IN 3 PB PR Y FRONT MONITOR OUT COMPONENT VIDEO LR SURROUND L CENTER R VSX-918V SIRIUS ★ Antenna SIRIUS ★ SiriusConnect™ HOME tuner AC adapter 1 Connect a SIRIUS Connect tuner to find...offering is unrivaled. Activate your XM Ready home audio system on the bottom of this receiver. XM will also need to keep your XM Satellite Radio service in the space provided ... in Canada online at 1-888-539-SIRIUS (1-888-539-7474). 60 En Best of this manual. Note: The XM Radio ID does not use the letters "I", "O", "S" or "F". There...
Owner's Manual
Page 64
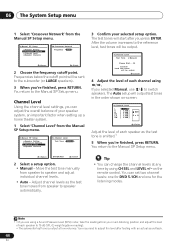
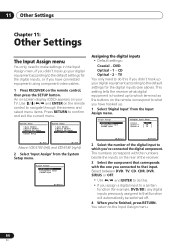
...Manual MCACC 3.Manual SP Setup 4.Input Assign : Exit : Exit Above: VSX-918V (left) and VSX-818V (right) 2 Select 'Input Assign' from the Input Assign menu. 4.Input Assign a.Digital Input b.Component Input c.HDMI Input 4a.Digital Input Setup Coaxial Optical-1 Optical-2 DVD [ CD ] [ TV ] :Return :Finish 2 Select the number of the receiver...switched off. 4 When you're finished, press RETURN. This setting tells the receiver what you have connected equipment using component video cables. 1 Press RECEIVER on the remote control to navigate through the screens and select menu items. ...
...Manual MCACC 3.Manual SP Setup 4.Input Assign : Exit : Exit Above: VSX-918V (left) and VSX-818V (right) 2 Select 'Input Assign' from the Input Assign menu. 4.Input Assign a.Digital Input b.Component Input c.HDMI Input 4a.Digital Input Setup Coaxial Optical-1 Optical-2 DVD [ CD ] [ TV ] :Return :Finish 2 Select the number of the receiver...switched off. 4 When you're finished, press RETURN. This setting tells the receiver what you have connected equipment using component video cables. 1 Press RECEIVER on the remote control to navigate through the screens and select menu items. ...


