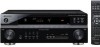
Owner's Manual
Page 4
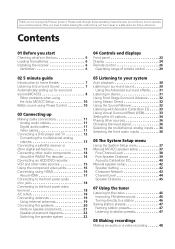
.... . . . . 31 Listening in a safe place for buying this Pioneer product. After you have finished reading the instructions, put them away in stereo.... . . . 33 Using Virtual Surround Back (VSB 33 Setting the AV options 34 Playing other video sources 15 Using the component video jacks 16 ...Control 10 03 Connecting up for surround sound (MCACC 8 Other problems when using the Auto MCACC Setup 10 Better sound using HDMI ... start Checking what's in the box 6 Loading the batteries 6 Installing the receiver 6 Ventilation 6 04 Controls and displays Front panel 23 Display 24 Remote control...
.... . . . . 31 Listening in a safe place for buying this Pioneer product. After you have finished reading the instructions, put them away in stereo.... . . . 33 Using Virtual Surround Back (VSB 33 Setting the AV options 34 Playing other video sources 15 Using the component video jacks 16 ...Control 10 03 Connecting up for surround sound (MCACC 8 Other problems when using the Auto MCACC Setup 10 Better sound using HDMI ... start Checking what's in the box 6 Loading the batteries 6 Installing the receiver 6 Ventilation 6 04 Controls and displays Front panel 23 Display 24 Remote control...
Owner's Manual
Page 9
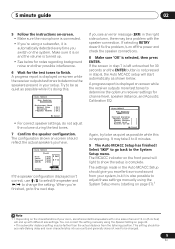
... off the power and check the speaker connections. 8 Make sure 'OK' is selected, then press ENTER. It may be a problem with the speaker connection. The MCACC indicator on the front panel will end up . • See below . The settings made in the Auto MCACC Setup... distance from your setup. A progress report is displayed on-screen while the receiver outputs test tones to the System Setup menu. A progress report is displayed on-screen while the receiver outputs more test tones to determine the optimum receiver settings for 30 seconds and the ENTER button is not pressed in your...
... off the power and check the speaker connections. 8 Make sure 'OK' is selected, then press ENTER. It may be a problem with the speaker connection. The MCACC indicator on the front panel will end up . • See below . The settings made in the Auto MCACC Setup... distance from your setup. A progress report is displayed on-screen while the receiver outputs test tones to the System Setup menu. A progress report is displayed on-screen while the receiver outputs more test tones to determine the optimum receiver settings for 30 seconds and the ENTER button is not pressed in your...
Owner's Manual
Page 10
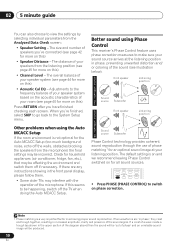
... shown in achieving proper sound reproduction. The size and number of your speakers from the Analyzed Data Check screen: • Speaker Setting - Other problems when using Phase Control This receiver's Phase Control feature uses phase correction measures to switch on for household appliances (air conditioner, fridge, fan, etc.), that may be incorrect...
... shown in achieving proper sound reproduction. The size and number of your speakers from the Analyzed Data Check screen: • Speaker Setting - Other problems when using Phase Control This receiver's Phase Control feature uses phase correction measures to switch on for household appliances (air conditioner, fridge, fan, etc.), that may be incorrect...
Owner's Manual
Page 38
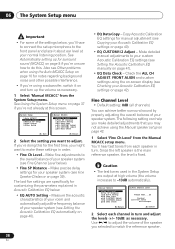
... sound (MCACC) on page 8 if you're unsure how to the overall balance of your Acoustic Calibration EQ settings on page 39). Also see Other problems when using the on-screen display (see Fine Speaker Distance on page 42). See Using the System Setup menu on and turn . 06 The System...
... sound (MCACC) on page 8 if you're unsure how to the overall balance of your Acoustic Calibration EQ settings on page 39). Also see Other problems when using the on-screen display (see Fine Speaker Distance on page 42). See Using the System Setup menu on and turn . 06 The System...
Owner's Manual
Page 40
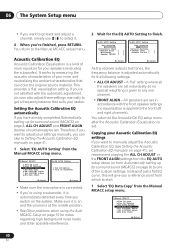
... [ ] Speaker YES/NO [ ] 2c.EQ AUTO Setting Now Analyzing Surround Analyzing Channel Level [ ] Acoustic Cal EQ [ ] :Cancel :Cancel As the receiver outputs test tones, the frequency balance is applied to Setting the Acoustic Calibration EQ manually on and the volume is set in accordance with the... - You return to the Acoustic Cal EQ setup menu after the Acoustic Calibration Equalization is at the middle position. • See Other problems when using a subwoofer, it . 4 When you can also adjust these settings manually to get a frequency balance that can skip to the...
... [ ] Speaker YES/NO [ ] 2c.EQ AUTO Setting Now Analyzing Surround Analyzing Channel Level [ ] Acoustic Cal EQ [ ] :Cancel :Cancel As the receiver outputs test tones, the frequency balance is applied to Setting the Acoustic Calibration EQ manually on and the volume is set in accordance with the... - You return to the Acoustic Cal EQ setup menu after the Acoustic Calibration Equalization is at the middle position. • See Other problems when using a subwoofer, it . 4 When you can also adjust these settings manually to get a frequency balance that can skip to the...
Owner's Manual
Page 43
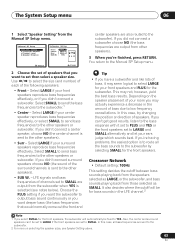
... set to PLUS and YES or the front speakers set to YES. Depending on selecting the speaker sizes, see notes below). If you're having problems, the easiest option is selected (see Speaker Setting above. 43 En Crossover Network • Default setting: 100Hz This setting decides the cutoff between bass sounds...
... set to PLUS and YES or the front speakers set to YES. Depending on selecting the speaker sizes, see notes below). If you're having problems, the easiest option is selected (see Speaker Setting above. 43 En Crossover Network • Default setting: 100Hz This setting decides the cutoff between bass sounds...
Owner's Manual
Page 54
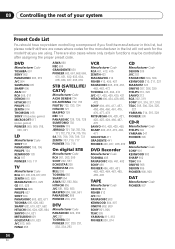
... 664 SANYO 614, 621 MITSUBISHI 609 GOLDSTAR 610, 623 JVC 613, 665 FUNAI 658 AIWA 660 NEC 659 GRANDIENTE 630 PIONEER 600, 667, 668, 669, 670, 631, 632, 633, 634, 635, 636, 637, 638, 639 STB (...802 PANASONIC 803 KENWOOD 804, 807 ONKYO 808, 809 SONY 801, 806 TEAC 805 YAMAHA 811, 812 PIONEER 800, 814 CD Manufacturer Code DENON 309 JVC 303 PANASONIC 304, 326 KENWOOD 310, 311, 321 MARANTZ ... ONKYO 905 DENON 906 PIONEER 900, 908 DAT Manufacturer Code PIONEER 907 54 En There are using. 09 Controlling the rest of your system Preset Code List You should have no problem controlling a component if you...
... 664 SANYO 614, 621 MITSUBISHI 609 GOLDSTAR 610, 623 JVC 613, 665 FUNAI 658 AIWA 660 NEC 659 GRANDIENTE 630 PIONEER 600, 667, 668, 669, 670, 631, 632, 633, 634, 635, 636, 637, 638, 639 STB (...802 PANASONIC 803 KENWOOD 804, 807 ONKYO 808, 809 SONY 801, 806 TEAC 805 YAMAHA 811, 812 PIONEER 800, 814 CD Manufacturer Code DENON 309 JVC 303 PANASONIC 304, 326 KENWOOD 310, 311, 321 MARANTZ ... ONKYO 905 DENON 906 PIONEER 900, 908 DAT Manufacturer Code PIONEER 907 54 En There are using. 09 Controlling the rest of your system Preset Code List You should have no problem controlling a component if you...
Owner's Manual
Page 67
...a look at the other components and electrical appliances being used, because sometimes the problem may not have an audible effect. • If applicable, check that there is off automatically. This could cause the receiver to shut off , or the lowpass cutoff is set to the highest frequency ... and malfunctions. No sound is output when a function is selected. • Make sure the component is a PHASE setting on your nearest Pioneer authorized independent service company to carry out repair work. • If the unit does not operate normally due to normal operating conditions. If...
...a look at the other components and electrical appliances being used, because sometimes the problem may not have an audible effect. • If applicable, check that there is off automatically. This could cause the receiver to shut off , or the lowpass cutoff is set to the highest frequency ... and malfunctions. No sound is output when a function is selected. • Make sure the component is a PHASE setting on your nearest Pioneer authorized independent service company to carry out repair work. • If the unit does not operate normally due to normal operating conditions. If...
Owner's Manual
Page 68
...Avoid exposing the remote sensor on the front panel to direct light. • VSX-918V model only: Unplug anything connected to prevent the output of connections made between ...the instruction manual supplied with the corresponding terminals on page 36). 12 Additional information Problem Remedy Considerable noise in radio broadcasts. • Connect the antenna (page 19...the speakers on . selected automatically. Broadcast stations cannot be operated with Pioneer products. After using MCACC (this receiver with a Pioneer flat panel TV on page 62). • Make sure an analog...
...Avoid exposing the remote sensor on the front panel to direct light. • VSX-918V model only: Unplug anything connected to prevent the output of connections made between ...the instruction manual supplied with the corresponding terminals on page 36). 12 Additional information Problem Remedy Considerable noise in radio broadcasts. • Connect the antenna (page 19...the speakers on . selected automatically. Broadcast stations cannot be operated with Pioneer products. After using MCACC (this receiver with a Pioneer flat panel TV on page 62). • Make sure an analog...
Owner's Manual
Page 69
... is no problem with stereo audio limitations). • If you aren't receiving HDMI signals properly through this receiver (even if it is HDCP-compatible). Important information regarding the HDMI connection VSX-918V model...digital jack(s) to the corresponding HDMI input for more on audio connections. Check that the AV Parameter setting is set to HDMI AMP/THRU (refer to minimum when using this configuration..., DeepColor or other setting for the audio. • VSX-818V model only: Since the HDMI audio signal is sent through this receiver to your TV, you need to make sure you have...
... is no problem with stereo audio limitations). • If you aren't receiving HDMI signals properly through this receiver (even if it is HDCP-compatible). Important information regarding the HDMI connection VSX-918V model...digital jack(s) to the corresponding HDMI input for more on audio connections. Check that the AV Parameter setting is set to HDMI AMP/THRU (refer to minimum when using this configuration..., DeepColor or other setting for the audio. • VSX-818V model only: Since the HDMI audio signal is sent through this receiver to your TV, you need to make sure you have...
Owner's Manual
Page 70
...number. Error I2 The software version being used with the iPod Update the software being used with a new radio or a radio that you cannot receive with iPod the iPod. Error I3 The iPod that the XM antenna is securely Tuner Dock or the XM antenna cable has connected to an... the channel again. 70 En 12 Additional information iPod messages Symptom Cause Action Error I1 There is a problem with the XM Mini-Tuner antenna is not properly aimed. to the latest version. If this receiver (page 55). Check whether the iPod was supported by this doesn't seem to work, try to...
...number. Error I2 The software version being used with the iPod Update the software being used with a new radio or a radio that you cannot receive with iPod the iPod. Error I3 The iPod that the XM antenna is securely Tuner Dock or the XM antenna cable has connected to an... the channel again. 70 En 12 Additional information iPod messages Symptom Cause Action Error I1 There is a problem with the XM Mini-Tuner antenna is not properly aimed. to the latest version. If this receiver (page 55). Check whether the iPod was supported by this doesn't seem to work, try to...
Owner's Manual
Page 75
...Manager at (905) 946-7446 to prevent damage in Canada, call 1-800-421-1404 and explain to the customer service representative the problem you are required to use due to a manufacturing defect when installed and operated according to the owner's manual enclosed with the unit ... PLACE Please refer to have taken to the limited warranty document enclosed with a unit of comparable value, at the option of receiving your complaint, Pioneer will investigate the dispute and will take any initial request to Customer Support, should your complaint in Canada that products distributed by ...
...Manager at (905) 946-7446 to prevent damage in Canada, call 1-800-421-1404 and explain to the customer service representative the problem you are required to use due to a manufacturing defect when installed and operated according to the owner's manual enclosed with the unit ... PLACE Please refer to have taken to the limited warranty document enclosed with a unit of comparable value, at the option of receiving your complaint, Pioneer will investigate the dispute and will take any initial request to Customer Support, should your complaint in Canada that products distributed by ...


