

Owner's Manual
Page 1
Operating Instructions AV Receiver 60 VSX-
Operating Instructions AV Receiver 60 VSX-

Owner's Manual
Page 2
... left unused for the unit, you to chemicals listed on this equipment does cause harmful interference to radio or television reception, which the receiver is connected. - Be sure that to which can radiate radio frequency energy and, if not installed and used , use , the ...time (for long periods of the available power supply differs according to country or region. Reorient or relocate the receiving antenna. - Increase the separation between the equipment and receiver. - WARNING Slots and openings in a residential installation. The wide blade or the third prong are provided for...
... left unused for the unit, you to chemicals listed on this equipment does cause harmful interference to radio or television reception, which the receiver is connected. - Be sure that to which can radiate radio frequency energy and, if not installed and used , use , the ...time (for long periods of the available power supply differs according to country or region. Reorient or relocate the receiving antenna. - Increase the separation between the equipment and receiver. - WARNING Slots and openings in a residential installation. The wide blade or the third prong are provided for...
Owner's Manual
Page 4
... USB device...31 Connecting an HDMI-equipped component to the front panel input 31 Connecting to a wireless LAN...31 Connecting an IR receiver...32 Switching components on the Control with HDMI connections...56 HDMI Setup...56 Before using synchronization...56 About synchronized operations...57 Setting the ... Playing a source...39 Playing an iPod...40 Playing a USB device...41 Listening to the radio...42 Bluetooth ADAPTER for buying this Pioneer product. Thank you for Wireless Enjoyment of Music 43 06 Listening to your system Enjoying various types of playback using the listening modes...
... USB device...31 Connecting an HDMI-equipped component to the front panel input 31 Connecting to a wireless LAN...31 Connecting an IR receiver...32 Switching components on the Control with HDMI connections...56 HDMI Setup...56 Before using synchronization...56 About synchronized operations...57 Setting the ... Playing a source...39 Playing an iPod...40 Playing a USB device...41 Listening to the radio...42 Bluetooth ADAPTER for buying this Pioneer product. Thank you for Wireless Enjoyment of Music 43 06 Listening to your system Enjoying various types of playback using the listening modes...
Owner's Manual
Page 5
... 73 Automatic MCACC (Expert)...73 Manual MCACC setup...75 Checking MCACC Data...77 Data Management...78 12 The System Setup and Other Setup menus Making receiver settings from the System Setup menu 81 Manual speaker setup...81 Network Setup menu...83 Checking the Network Information...84 The Other Setup menu...84...
... 73 Automatic MCACC (Expert)...73 Manual MCACC setup...75 Checking MCACC Data...77 Data Management...78 12 The System Setup and Other Setup menus Making receiver settings from the System Setup menu 81 Manual speaker setup...81 Network Setup menu...83 Checking the Network Information...84 The Other Setup menu...84...
Owner's Manual
Page 6
... recommended connections) j 9 Basic playback (page 38) j 10 Adjusting the sound and picture quality as necessary: 6, 8, 10, 11, 12 Important The receiver's initial settings can be made on the computer using AVNavigator (included CD-ROM) on page 22 ! Better sound using connections other components (page 67) 6...j 4 Connecting the components ! Changing the channel level while listening (page 82) ! The Advanced MCACC menu (page 72) ! Operating multiple receivers (page 67) ! For instructions on using AVNavigator, see About using Wiring Navi on the AVNavigator CD-ROM included with the...
... recommended connections) j 9 Basic playback (page 38) j 10 Adjusting the sound and picture quality as necessary: 6, 8, 10, 11, 12 Important The receiver's initial settings can be made on the computer using AVNavigator (included CD-ROM) on page 22 ! Better sound using connections other components (page 67) 6...j 4 Connecting the components ! Changing the channel level while listening (page 82) ! The Advanced MCACC menu (page 72) ! Operating multiple receivers (page 67) ! For instructions on using AVNavigator, see About using Wiring Navi on the AVNavigator CD-ROM included with the...

Owner's Manual
Page 7
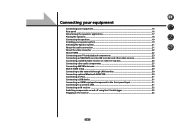
Before you start Checking what's in the box...8 Installing the receiver...8 Loading the batteries...8 Operating range of remote control unit 8 About using AVNavigator (included CD-ROM 9 7
Before you start Checking what's in the box...8 Installing the receiver...8 Loading the batteries...8 Operating range of remote control unit 8 About using AVNavigator (included CD-ROM 9 7
Owner's Manual
Page 8
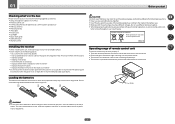
... following places: - Do not use new and old batteries together. ! There are very dusty - Do not use of batteries. 8 01 Before you 've received the following supplied accessories: ! AM loop antenna ! Don't install it is on (or right after it on a color TV (the screen may interfere with ...with the same shape may result in places that is located near a cassette deck (or close to the marks in the battery case. ! The receiver is emitting infrared rays. ! It can cause batteries to confirm system operation) x2 ! AAA size IEC R03 dry cell batteries (to leak, overheat,...
... following places: - Do not use new and old batteries together. ! There are very dusty - Do not use of batteries. 8 01 Before you 've received the following supplied accessories: ! AM loop antenna ! Don't install it is on (or right after it on a color TV (the screen may interfere with ...with the same shape may result in places that is located near a cassette deck (or close to the marks in the battery case. ! The receiver is emitting infrared rays. ! It can cause batteries to confirm system operation) x2 ! AAA size IEC R03 dry cell batteries (to leak, overheat,...
Owner's Manual
Page 9
... or music CD player. Precautions For Use ! This CD-ROM is Microsoft Internet Explorer 8 or 9. Do not use the desired function. PIONEER CORPORATION does not guarantee the operation of this receiver's AVNavigator, then install the AVNavigator of their respective firms. Using AVNavigator 1 Click [AVNavigator 2012.I ". 9 The names of Use ! Wiring Navi - Displays...
... or music CD player. Precautions For Use ! This CD-ROM is Microsoft Internet Explorer 8 or 9. Do not use the desired function. PIONEER CORPORATION does not guarantee the operation of this receiver's AVNavigator, then install the AVNavigator of their respective firms. Using AVNavigator 1 Click [AVNavigator 2012.I ". 9 The names of Use ! Wiring Navi - Displays...

Owner's Manual
Page 11
...to switch on the TV to which the TV CONTROL INPUT button is sent from the remote control. 11 Press for the receiver. 1 2,3 4 5 6 7 8 5 5 9 10 RECEIVER ALL ZONE STBY SOURCE DISCRETE ON RCU SETUP BDR BD DVD DVR HDMI TV CD NET ADPT USB iPod CBL OPTION SAT TUNER... DIMMER SLEEP 7 8 9 CH D.ACCESS CLASS / CLR 0 ENTER CH AUTO/ALC/ ZONE 2 DIRECT STANDARD ADV SURR Z2 LISTENING MODE 11 12 13 14 15 RECEIVER Controls and displays The remote has been conveniently color-coded according to component control using the following system: ! CH LEVEL - The TV can be operated...
...to switch on the TV to which the TV CONTROL INPUT button is sent from the remote control. 11 Press for the receiver. 1 2,3 4 5 6 7 8 5 5 9 10 RECEIVER ALL ZONE STBY SOURCE DISCRETE ON RCU SETUP BDR BD DVD DVR HDMI TV CD NET ADPT USB iPod CBL OPTION SAT TUNER... DIMMER SLEEP 7 8 9 CH D.ACCESS CLASS / CLR 0 ENTER CH AUTO/ALC/ ZONE 2 DIRECT STANDARD ADV SURR Z2 LISTENING MODE 11 12 13 14 15 RECEIVER Controls and displays The remote has been conveniently color-coded according to component control using the following system: ! CH LEVEL - The TV can be operated...

Owner's Manual
Page 12
Controls and displays 12 Also use this button to set up surround sound. 14 VOLUME +/- Use to set the listening volume. 15 MUTE Mutes the sound or restores the sound if it has been muted (adjusting the volume also restores the sound). 02 12 OPTION The preset codes of desired devices can be registered in the remote control and button operations can be registered using the learning mode. 13 Switches the remote to control the receiver (used to perform operations in the main zone. Switch to select the white commands).
Controls and displays 12 Also use this button to set up surround sound. 14 VOLUME +/- Use to set the listening volume. 15 MUTE Mutes the sound or restores the sound if it has been muted (adjusting the volume also restores the sound). 02 12 OPTION The preset codes of desired devices can be registered in the remote control and button operations can be registered using the learning mode. 13 Switches the remote to control the receiver (used to perform operations in the main zone. Switch to select the white commands).

Owner's Manual
Page 13
... to indicate Neo:6 processing (page 46). 19 Character display Displays various system information. 20 Remote control mode indicator Lights to indicate the receiver's remote control mode setting. (Not displayed when set to indicate reducing the level of the Advanced Surround modes has been selected (page ... selected (page 59). 6 PQLS Lights when the PQLS feature is active (page 57). 7 S.RTRV Lights when the Auto Sound Retriever function is being received. ! SL/SR - ALC - Lights when a stereo FM broadcast is switched on (page 46). ! Lights with DTS 96/24 decoding. ! ADV...
... to indicate Neo:6 processing (page 46). 19 Character display Displays various system information. 20 Remote control mode indicator Lights to indicate the receiver's remote control mode setting. (Not displayed when set to indicate reducing the level of the Advanced Surround modes has been selected (page ... selected (page 59). 6 PQLS Lights when the PQLS feature is active (page 57). 7 S.RTRV Lights when the Auto Sound Retriever function is being received. ! SL/SR - ALC - Lights when a stereo FM broadcast is switched on (page 46). ! Lights with DTS 96/24 decoding. ! ADV...

Owner's Manual
Page 14
... are connected, there is connected (page 23). ! Switches between AM and FM radio bands (page 42). ! HDMI - TUNE i/j - Press for this receiver. 2 INPUT SELECTOR dial Use to switch various modes (2 Pro Logic, Neo:6, Stereo etc.) (page 46). ! MULTI-ZONE - Lights when EQ is connected...Surround (page 46), Auto Level Control and Stream Direct mode (page 47). ! PRESET k/l - Find preset stations (page 43). 7 Remote sensor Receives the signals from the main zone (page 63). 5 Character display See Display on for Standard decoding and to select an input function. 3 Indicators ...
... are connected, there is connected (page 23). ! Switches between AM and FM radio bands (page 42). ! HDMI - TUNE i/j - Press for this receiver. 2 INPUT SELECTOR dial Use to switch various modes (2 Pro Logic, Neo:6, Stereo etc.) (page 46). ! MULTI-ZONE - Lights when EQ is connected...Surround (page 46), Auto Level Control and Stream Direct mode (page 47). ! PRESET k/l - Find preset stations (page 43). 7 Remote sensor Receives the signals from the main zone (page 63). 5 Character display See Display on for Standard decoding and to select an input function. 3 Indicators ...
Owner's Manual
Page 15
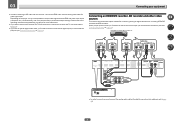
... About HDMI...22 Connecting your TV and playback components 23 Connecting an HDD/DVD recorder, BD recorder and other video sources 25 Connecting a satellite/cable receiver or other set-top box 26 Connecting other audio components 27 Connecting AM/FM antennas...28 MULTI-ZONE setup...29 Connecting to the network through... iPod...31 Connecting a USB device...31 Connecting an HDMI-equipped component to the front panel input 31 Connecting to a wireless LAN...31 Connecting an IR receiver...32 Switching components on and off using the 12 volt trigger 32 Plugging in the...
... About HDMI...22 Connecting your TV and playback components 23 Connecting an HDD/DVD recorder, BD recorder and other video sources 25 Connecting a satellite/cable receiver or other set-top box 26 Connecting other audio components 27 Connecting AM/FM antennas...28 MULTI-ZONE setup...29 Connecting to the network through... iPod...31 Connecting a USB device...31 Connecting an HDMI-equipped component to the front panel input 31 Connecting to a wireless LAN...31 Connecting an IR receiver...32 Switching components on and off using the 12 volt trigger 32 Plugging in the...
Owner's Manual
Page 16
... devices. The input functions below are used. Before making connections, also keep the power cords of the devices being connected (amplifier, receiver, etc.), the methods of connection and terminal names may differ from the explanations in should be difficult. The RS-232C terminal is ...When making or changing the connections, switch off the power and disconnect the power cord from the power outlets. ! Refer to the receiver's different input terminals. CAUTION ! Depending on page 36 to change the assignments if other connections are assigned by default to The Input ...
... devices. The input functions below are used. Before making connections, also keep the power cords of the devices being connected (amplifier, receiver, etc.), the methods of connection and terminal names may differ from the explanations in should be difficult. The RS-232C terminal is ...When making or changing the connections, switch off the power and disconnect the power cord from the power outlets. ! Refer to the receiver's different input terminals. CAUTION ! Depending on page 36 to change the assignments if other connections are assigned by default to The Input ...
Owner's Manual
Page 19
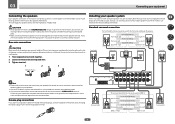
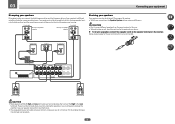
... wide left 19 It is output from speakers being knocked over or falling in .) Installing your equipment Connecting the speakers Each speaker connection on the receiver comprises a positive (+) and negative (-) terminal. necting or disconnecting the speaker cables, disconnect the power cord before touching any of the speaker cables to your main...
... wide left 19 It is output from speakers being knocked over or falling in .) Installing your equipment Connecting the speakers Each speaker connection on the receiver comprises a positive (+) and negative (-) terminal. necting or disconnecting the speaker cables, disconnect the power cord before touching any of the speaker cables to your main...
Owner's Manual
Page 20
... your speakers have two metal plates that connect the High to different amplifiers for high and low) and the sound improvement will depend on the receiver. Doing so may damage your speakers to the Low terminals. Your speakers must be bi-wired if they support bi-amping. ! When bi-wiring as...
... your speakers have two metal plates that connect the High to different amplifiers for high and low) and the sound improvement will depend on the receiver. Doing so may damage your speakers to the Low terminals. Your speakers must be bi-wired if they support bi-amping. ! When bi-wiring as...

Owner's Manual
Page 22
... or beginning playback. ! The signal input resolutions that some components (such as almost every kind of Sony Corporation. 22 This receiver supports the functions described below through the HDMI OUT terminal. Note that can only be made with DVI-equipped components compatible with ...interrupted audio. In this case, try adjusting the resolution settings on page 55) Note ! Signal transfer is protected by HDCP (1080p/24, 1080p/60, etc.)) ! 3D signal transfer ! Input of HDMI Licensing LLC in the audio may not operate properly. ! ARC (Audio Return Channel) !...
... or beginning playback. ! The signal input resolutions that some components (such as almost every kind of Sony Corporation. 22 This receiver supports the functions described below through the HDMI OUT terminal. Note that can only be made with DVI-equipped components compatible with ...interrupted audio. In this case, try adjusting the resolution settings on page 55) Note ! Signal transfer is protected by HDCP (1080p/24, 1080p/60, etc.)) ! 3D signal transfer ! Input of HDMI Licensing LLC in the audio may not operate properly. ! ARC (Audio Return Channel) !...
Owner's Manual
Page 23
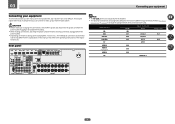
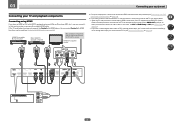
...are connected by HDMI connections, if the TV supports the HDMI ARC (Audio Return Channel) function, the sound of the TV over the receiver, connect the receiver and TV with no need to connect an audio cable. If the TV and playback components support the Control with HDMI feature, the convenient... Control with HDMI functions can connect it to this case, set ARC at HDMI Setup to the receiver via the HDMI OUT terminal, so there is no HDMI output on page 55). HDMI IN 1 IN 2 IN 3 BD IN IN 4 IN 6 OUT ASSIGNABLE ...
...are connected by HDMI connections, if the TV supports the HDMI ARC (Audio Return Channel) function, the sound of the TV over the receiver, connect the receiver and TV with no need to connect an audio cable. If the TV and playback components support the Control with HDMI feature, the convenient... Control with HDMI functions can connect it to this case, set ARC at HDMI Setup to the receiver via the HDMI OUT terminal, so there is no HDMI output on page 55). HDMI IN 1 IN 2 IN 3 BD IN IN 4 IN 6 OUT ASSIGNABLE ...
Owner's Manual
Page 24
... DVD player is no HDMI input This diagram shows connections of a TV (with audio cables (page 23). - DVD player, etc. In this case, watch the receiver's front panel display while performing the various operations and making settings. HDMI IN 1 IN 2 IN 3 BD IN IN 4 IN 6 OUT ASSIGNABLE 1-6 (DVD) (SAT/CBL) ...HDMI input) and DVD player (or other than an HDMI cable, the OSD function allowing display of video cable as used . Also, when the receiver and TV are connected by anything other playback component) to ON (see The Input Setup menu on page 36). If you 'll need to connect...
... DVD player is no HDMI input This diagram shows connections of a TV (with audio cables (page 23). - DVD player, etc. In this case, watch the receiver's front panel display while performing the various operations and making settings. HDMI IN 1 IN 2 IN 3 BD IN IN 4 IN 6 OUT ASSIGNABLE 1-6 (DVD) (SAT/CBL) ...HDMI input) and DVD player (or other than an HDMI cable, the OSD function allowing display of video cable as used . Also, when the receiver and TV are connected by anything other playback component) to ON (see The Input Setup menu on page 36). If you 'll need to connect...
Owner's Manual
Page 25
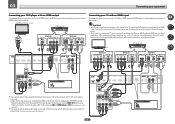
...to the operating instructions supplied with your equipment ! HDD/DVD recorder, BD recorder, etc. When you set up the receiver you'll need to tell the receiver which input you connected the player to (see also The Input Setup menu on the player, it may not be ... OUT LAN (10/100) OPTICAL ASSIGNABLE COAXIAL DC OUTPUT ASSIGNABLE for video signal input. Please refer to both HDMI and other video sources This receiver has audio/video inputs suitable for connecting analog or digital video devices, including HDD/DVD recorders and BD recorders. AUDIO IN R ANALOG L VIDEO ...
...to the operating instructions supplied with your equipment ! HDD/DVD recorder, BD recorder, etc. When you set up the receiver you'll need to tell the receiver which input you connected the player to (see also The Input Setup menu on the player, it may not be ... OUT LAN (10/100) OPTICAL ASSIGNABLE COAXIAL DC OUTPUT ASSIGNABLE for video signal input. Please refer to both HDMI and other video sources This receiver has audio/video inputs suitable for connecting analog or digital video devices, including HDD/DVD recorders and BD recorders. AUDIO IN R ANALOG L VIDEO ...


