
Owner's Manual
Page 4
...USB device...31 Connecting an HDMI-equipped component to the front panel input 31 Connecting to the radio...42 Bluetooth ADAPTER for buying this Pioneer product. Please read through these operating instructions so you for Wireless Enjoyment of Music 43 06 Listening to your system Enjoying various types...57 Cautions on and off using the 12 volt trigger 32 Plugging in one input function 69 Direct function...69 About the ALL ZONE STBY (All Zone Standby) and DISCRETE ON (Discrete On) functions 69 Resetting the remote control settings...69 Controlling components...70 4 Contents 01 Before ...
...USB device...31 Connecting an HDMI-equipped component to the front panel input 31 Connecting to the radio...42 Bluetooth ADAPTER for buying this Pioneer product. Please read through these operating instructions so you for Wireless Enjoyment of Music 43 06 Listening to your system Enjoying various types...57 Cautions on and off using the 12 volt trigger 32 Plugging in one input function 69 Direct function...69 About the ALL ZONE STBY (All Zone Standby) and DISCRETE ON (Discrete On) functions 69 Resetting the remote control settings...69 Controlling components...70 4 Contents 01 Before ...
Owner's Manual
Page 6
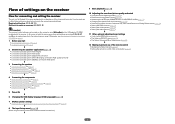
... height) ! 7.2 channel surround system (Front wide) ! 7.2 channel surround system & Speaker B connection ! 5.2 channel surround system & Front Bi-amping connection (High quality surround) ! 5.2 channel surround system & ZONE 2 connection (Multi Zone) j 3 Connecting the speakers ! Plugging in the box on page 32 j 5 Power On j 6 Changing the OSD display language (OSD Language) (page 34) j 7 MCACC speaker settings...
... height) ! 7.2 channel surround system (Front wide) ! 7.2 channel surround system & Speaker B connection ! 5.2 channel surround system & Front Bi-amping connection (High quality surround) ! 5.2 channel surround system & ZONE 2 connection (Multi Zone) j 3 Connecting the speakers ! Plugging in the box on page 32 j 5 Power On j 6 Changing the OSD display language (OSD Language) (page 34) j 7 MCACC speaker settings...

Owner's Manual
Page 11
...RETURN - STANDARD - Blue - SLEEP - The TV can be operated with these buttons regardless of the input set for this receiver. 2 ALL ZONE STBY DISCRETE ON Use this button to perform unique operations (page 69). 3 RCU SETUP Use to input the preset code when making remote control... +Favorite 1 2 3 AUDIO SIGNAL SEL CH LEVEL 4 5 6 DISP SPEAKERS DIMMER SLEEP 7 8 9 CH D.ACCESS CLASS / CLR 0 ENTER CH AUTO/ALC/ ZONE 2 DIRECT STANDARD ADV SURR Z2 LISTENING MODE 11 12 13 14 15 RECEIVER Controls and displays The remote has been conveniently color-coded according to...
...RETURN - STANDARD - Blue - SLEEP - The TV can be operated with these buttons regardless of the input set for this receiver. 2 ALL ZONE STBY DISCRETE ON Use this button to perform unique operations (page 69). 3 RCU SETUP Use to input the preset code when making remote control... +Favorite 1 2 3 AUDIO SIGNAL SEL CH LEVEL 4 5 6 DISP SPEAKERS DIMMER SLEEP 7 8 9 CH D.ACCESS CLASS / CLR 0 ENTER CH AUTO/ALC/ ZONE 2 DIRECT STANDARD ADV SURR Z2 LISTENING MODE 11 12 13 14 15 RECEIVER Controls and displays The remote has been conveniently color-coded according to...

Owner's Manual
Page 12
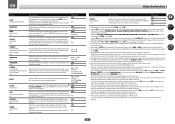
Switch to set the listening volume. 15 MUTE Mutes the sound or restores the sound if it has been muted (adjusting the volume also restores the sound). Also use this button to perform operations in the remote control and button operations can be registered using the learning mode. 13 Switches the remote to control the receiver (used to set up surround sound. 14 VOLUME +/- Controls and displays 12 02 12 OPTION The preset codes of desired devices can be registered in the main zone. Use to select the white commands).
Switch to set the listening volume. 15 MUTE Mutes the sound or restores the sound if it has been muted (adjusting the volume also restores the sound). Also use this button to perform operations in the remote control and button operations can be registered using the learning mode. 13 Switches the remote to control the receiver (used to set up surround sound. 14 VOLUME +/- Controls and displays 12 02 12 OPTION The preset codes of desired devices can be registered in the main zone. Use to select the white commands).

Owner's Manual
Page 13
... AUTO SURROUND STREAM DIRECT 2PROLOGIC x Neo:6 ADV.SURROUND STANDARD SP AB SLEEP R 2DIGITAL PLUS DSD PCM TUNED SR 2TrueHD DTS HD ES 96/24 MULTI-ZONE PQLS ALC ATT STEREO S.RTRV SOUND UP MIX OVER MONO XR MSTR CD TUNER iPod DVD TV VIDEO BD DVR HDMI [ 2 ] USB [ 3 ] [ ...effects channel (the (( )) indicators light when an LFE signal is detected. ! 2 DIGITAL - Either one of DTS-HD Master Audio signals. 4 MULTI-ZONE Lights when the MULTI-ZONE feature is active (page 63). 5 SOUND Lights when the DIALOG E (Dialog Enhancement) or TONE (tone controls) features is selected (page 59). 6...
... AUTO SURROUND STREAM DIRECT 2PROLOGIC x Neo:6 ADV.SURROUND STANDARD SP AB SLEEP R 2DIGITAL PLUS DSD PCM TUNED SR 2TrueHD DTS HD ES 96/24 MULTI-ZONE PQLS ALC ATT STEREO S.RTRV SOUND UP MIX OVER MONO XR MSTR CD TUNER iPod DVD TV VIDEO BD DVR HDMI [ 2 ] USB [ 3 ] [ ...effects channel (the (( )) indicators light when an LFE signal is detected. ! 2 DIGITAL - Either one of DTS-HD Master Audio signals. 4 MULTI-ZONE Lights when the MULTI-ZONE feature is active (page 63). 5 SOUND Lights when the DIALOG E (Dialog Enhancement) or TONE (tone controls) features is selected (page 59). 6...

Owner's Manual
Page 14
...from the speakers. 11 Listening mode buttons ! BAND - Find preset stations (page 43). 7 Remote sensor Receives the signals from the main zone (page 63). 5 Character display See Display on for this receiver. 2 INPUT SELECTOR dial Use to memorize and name stations for recall (page...:6, Stereo etc.) (page 46). ! Use with the display's dimmer adjustment (page 64). ! Find radio frequencies (page 42). ! STANDARD SURROUND - MULTI-ZONE - Switches between the various surround modes (page 46). ! Removing the front cover CONTROL ON / OFF iPod iPhone USB iPad Attaching the front cover 2 ...
...from the speakers. 11 Listening mode buttons ! BAND - Find preset stations (page 43). 7 Remote sensor Receives the signals from the main zone (page 63). 5 Character display See Display on for this receiver. 2 INPUT SELECTOR dial Use to memorize and name stations for recall (page...:6, Stereo etc.) (page 46). ! Use with the display's dimmer adjustment (page 64). ! Find radio frequencies (page 42). ! STANDARD SURROUND - MULTI-ZONE - Switches between the various surround modes (page 46). ! Removing the front cover CONTROL ON / OFF iPod iPhone USB iPad Attaching the front cover 2 ...
Owner's Manual
Page 15
... other video sources 25 Connecting a satellite/cable receiver or other set-top box 26 Connecting other audio components 27 Connecting AM/FM antennas...28 MULTI-ZONE setup...29 Connecting to the network through LAN interface 30 Connecting optional Bluetooth ADAPTER 30 Connecting an iPod...31 Connecting a USB device...31 Connecting an...
... other video sources 25 Connecting a satellite/cable receiver or other set-top box 26 Connecting other audio components 27 Connecting AM/FM antennas...28 MULTI-ZONE setup...29 Connecting to the network through LAN interface 30 Connecting optional Bluetooth ADAPTER 30 Connecting an iPod...31 Connecting a USB device...31 Connecting an...
Owner's Manual
Page 16
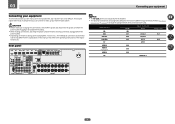
... WIRELESS LAN ASSIGNABLE 1-6 (DVD) (SAT/CBL) (DVR/BDR) IR IN OUT 12V TRIGGER (OUTPUT 12 V 50 mA MAX) VIDEO MONITOR DVR/BDR OUT OUT AUDIO ZONE 2 L OUT R SAT/ IN DVD IN CBL DVR/BDR IN L IN 1 (DVD) ASSIGNABLE IN 2 (DVR/ BDR) OUT R PRE OUT SUB WOOFER 1 ...) IN ANTENNA A FRONT R L AM LOOP (OUTPUT 5 V 0.6 A MAX) IN 1 IN 2 IN 1 IN 2 (TV) (DVR/BDR) (DVD) (SAT/CBL) CENTER SURROUND R L SURROUND BACK / ZONE 2 R L (Single) FRONT HEIGHT / WIDE / R L B L IN R MONITOR OUT Y PB PR RS-232C COMPONENT VIDEO DVD SAT/CBL ANALOG IN 1 (CD) ASSIGNABLE FM UNBAL 75 SPEAKERS AC...
... WIRELESS LAN ASSIGNABLE 1-6 (DVD) (SAT/CBL) (DVR/BDR) IR IN OUT 12V TRIGGER (OUTPUT 12 V 50 mA MAX) VIDEO MONITOR DVR/BDR OUT OUT AUDIO ZONE 2 L OUT R SAT/ IN DVD IN CBL DVR/BDR IN L IN 1 (DVD) ASSIGNABLE IN 2 (DVR/ BDR) OUT R PRE OUT SUB WOOFER 1 ...) IN ANTENNA A FRONT R L AM LOOP (OUTPUT 5 V 0.6 A MAX) IN 1 IN 2 IN 1 IN 2 (TV) (DVR/BDR) (DVD) (SAT/CBL) CENTER SURROUND R L SURROUND BACK / ZONE 2 R L (Single) FRONT HEIGHT / WIDE / R L B L IN R MONITOR OUT Y PB PR RS-232C COMPONENT VIDEO DVD SAT/CBL ANALOG IN 1 (CD) ASSIGNABLE FM UNBAL 75 SPEAKERS AC...

Owner's Manual
Page 17
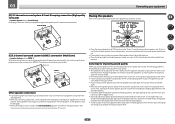
... below . This surround system produces a more true-to achieve more powerful sound reproduction. The same connections also allow for 7.2-channel surround sound in the main zone with the left and right front height speakers shown in [A] with stereo playback of speakers you can be made if you use any of the... back speakers. SBR SL SBL Speaker B With these connections you have two subwoofers, the second subwoofer can simultaneously enjoy 5.2-channel surround sound in the main zone when not using the B speakers. 17
... below . This surround system produces a more true-to achieve more powerful sound reproduction. The same connections also allow for 7.2-channel surround sound in the main zone with the left and right front height speakers shown in [A] with stereo playback of speakers you can be made if you use any of the... back speakers. SBR SL SBL Speaker B With these connections you have two subwoofers, the second subwoofer can simultaneously enjoy 5.2-channel surround sound in the main zone when not using the B speakers. 17
Owner's Manual
Page 18
...beside you to place speakers around your CRT TV. ! Front Bi-Amp R L SW 1 SW 2 C SR SL [E] 5.2 channel surround system & ZONE 2 connection (Multi Zone) ! Place the left / right speakers). ! Surround and surround back speakers should help you . ! Make sure the speakers don't face each other ...low frequency reproduction capabilities to 9 ft.) apart, at the TV screen. FHL SW 2 SW 1 FHR C L R FWL 30 30 FWR 60 60 120 120 SL 60 SR SBL SB SBR ! If you . ! The following guidelines should be sure to connect only one meter (3.3 ft.) directly above or below...
...beside you to place speakers around your CRT TV. ! Front Bi-Amp R L SW 1 SW 2 C SR SL [E] 5.2 channel surround system & ZONE 2 connection (Multi Zone) ! Place the left / right speakers). ! Surround and surround back speakers should help you . ! Make sure the speakers don't face each other ...low frequency reproduction capabilities to 9 ft.) apart, at the TV screen. FHL SW 2 SW 1 FHR C L R FWL 30 30 FWR 60 60 120 120 SL 60 SR SBL SB SBR ! If you . ! The following guidelines should be sure to connect only one meter (3.3 ft.) directly above or below...
Owner's Manual
Page 19
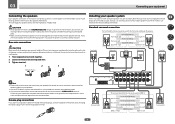
...Center Subwoofer 2 Front left LINE LEVEL INPUT LINE LEVEL INPUT PRE OUT SUB WOOFER 1 2 A FRONT R L CENTER SURROUND R L SURROUND BACK / ZONE 2 R L (Single) FRONT HEIGHT / WIDE / R L B Note ! 03 Connecting your speaker system At the very least, front left and ...Bare wire connections CAUTION Make sure that your speakers. ! PRE OUT SUB WOOFER 1 2 A FRONT R L CENTER SURROUND R L SURROUND BACK / ZONE 2 R L (Single) FRONT HEIGHT / WIDE / R L B SPEAKERS Surround right The surround back terminals can connect just one surround back speaker ...
...Center Subwoofer 2 Front left LINE LEVEL INPUT LINE LEVEL INPUT PRE OUT SUB WOOFER 1 2 A FRONT R L CENTER SURROUND R L SURROUND BACK / ZONE 2 R L (Single) FRONT HEIGHT / WIDE / R L B Note ! 03 Connecting your speaker system At the very least, front left and ...Bare wire connections CAUTION Make sure that your speakers. ! PRE OUT SUB WOOFER 1 2 A FRONT R L CENTER SURROUND R L SURROUND BACK / ZONE 2 R L (Single) FRONT HEIGHT / WIDE / R L B SPEAKERS Surround right The surround back terminals can connect just one surround back speaker ...
Owner's Manual
Page 20
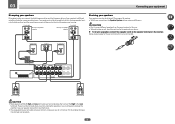
.... ! Subwoofer 1 LINE LEVEL INPUT Center Subwoofer 2 LINE LEVEL INPUT PRE OUT SUB WOOFER 1 2 A FRONT R L CENTER SURROUND R L SURROUND BACK / ZONE 2 R L (Single) FRONT HEIGHT / WIDE / R L B PRE OUT SUB WOOFER 1 2 A FRONT R L CENTER SURROUND R L SURROUND BACK / ZONE 2 R L (Single) FRONT HEIGHT / WIDE / R L B SPEAKERS Surround right Surround left High Low Low Bi-wiring your speakers Your speakers can...
.... ! Subwoofer 1 LINE LEVEL INPUT Center Subwoofer 2 LINE LEVEL INPUT PRE OUT SUB WOOFER 1 2 A FRONT R L CENTER SURROUND R L SURROUND BACK / ZONE 2 R L (Single) FRONT HEIGHT / WIDE / R L B PRE OUT SUB WOOFER 1 2 A FRONT R L CENTER SURROUND R L SURROUND BACK / ZONE 2 R L (Single) FRONT HEIGHT / WIDE / R L B SPEAKERS Surround right Surround left High Low Low Bi-wiring your speakers Your speakers can...

Owner's Manual
Page 21
...speaker terminals. See Speaker system setting on page 81 to the front height speaker terminals. See Standard surround connection on page 19. 2 Select 'ZONE 2' from the Speaker System menu. See Standard surround connection on page 19. 2 Select 'Speaker B' from the Speaker System menu. Front height...21 Also, the surround back terminals can be used for front wide and Speaker B connections, in addition to for bi-amping and ZONE 2 connections, in addition to the front and surround back speaker terminals. Bi-Amping setup Bi-amping connection of speakers to the application...
...speaker terminals. See Speaker system setting on page 81 to the front height speaker terminals. See Standard surround connection on page 19. 2 Select 'ZONE 2' from the Speaker System menu. See Standard surround connection on page 19. 2 Select 'Speaker B' from the Speaker System menu. Front height...21 Also, the surround back terminals can be used for front wide and Speaker B connections, in addition to for bi-amping and ZONE 2 connections, in addition to the front and surround back speaker terminals. Bi-Amping setup Bi-amping connection of speakers to the application...

Owner's Manual
Page 29
... is only possible to select the same input as shown in the following table shows the signals that can be output to ZONE 2: Sub Zone Input functions available ZONE 2 DVD, SAT/CBL, DVR/BDR, INTERNET RADIO, SiriusXM, PANDORA, MEDIA SERVER, FAVORITES, iPod/USB, TV, CD, TUNER, ADAPTER PORT (... after you are not using the speaker terminals for the sub zone (For detail, see MULTI-ZONE setup using speaker terminals (ZONE 2) You must select ZONE 2 in the main zone for the sub zone (ZONE 2). 03 Connecting your equipment MULTI-ZONE setup This receiver can power up to two independent systems in...
... is only possible to select the same input as shown in the following table shows the signals that can be output to ZONE 2: Sub Zone Input functions available ZONE 2 DVD, SAT/CBL, DVR/BDR, INTERNET RADIO, SiriusXM, PANDORA, MEDIA SERVER, FAVORITES, iPod/USB, TV, CD, TUNER, ADAPTER PORT (... after you are not using the speaker terminals for the sub zone (For detail, see MULTI-ZONE setup using speaker terminals (ZONE 2) You must select ZONE 2 in the main zone for the sub zone (ZONE 2). 03 Connecting your equipment MULTI-ZONE setup This receiver can power up to two independent systems in...
Owner's Manual
Page 32
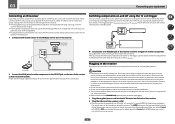
... Connecting an IR receiver If you keep your stereo components in a closed cabinet or shelving unit, or you wish to use the sub zone remote control in another zone, you can use an optional IR receiver (such as a Niles or Xantech unit) to the IR IN jack on the rear of ... a replacement. ! Please see Control with a mono mini-plug on and off just by tugging the cord, and never touch the power cord when your nearest Pioneer authorized independent service company for the connection. Make sure the blue u STANDBY/ON light has gone out before unplugging. 1 Plug the supplied power cord into...
... Connecting an IR receiver If you keep your stereo components in a closed cabinet or shelving unit, or you wish to use the sub zone remote control in another zone, you can use an optional IR receiver (such as a Niles or Xantech unit) to the IR IN jack on the rear of ... a replacement. ! Please see Control with a mono mini-plug on and off just by tugging the cord, and never touch the power cord when your nearest Pioneer authorized independent service company for the connection. Make sure the blue u STANDBY/ON light has gone out before unplugging. 1 Plug the supplied power cord into...
Owner's Manual
Page 36
... the input using the 12 volt trigger on the remote control correspond to the components you've connected. ! nected with the (main or sub) zone specified. 7 When you 've connected your TV. The default names correspond with the names next to the terminals on the rear panel (such as...see Input function default and possible settings on the remote control. 5 Select the input(s) to which terminal so the buttons on page 32), select MAIN, ZONE 2 or OFF for easier identification. There are con- HDMI Setup f. If you have connected components to this case, you need to tell the receiver...
... the input using the 12 volt trigger on the remote control correspond to the components you've connected. ! nected with the (main or sub) zone specified. 7 When you 've connected your TV. The default names correspond with the names next to the terminals on the rear panel (such as...see Input function default and possible settings on the remote control. 5 Select the input(s) to which terminal so the buttons on page 32), select MAIN, ZONE 2 or OFF for easier identification. There are con- HDMI Setup f. If you have connected components to this case, you need to tell the receiver...
Owner's Manual
Page 40
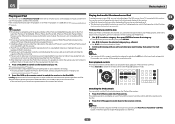
..., artist name, album name, song name, genre or composer, similar to using this receiver. ! When the display shows the names of Pioneer (http://pioneer.jp/homeav/support/ios/na/). ! Note ! Note that characters that cannot be displayed on the website of folders and files, you're ... and video of non-copyrighted materials or materials the user is not available for playback on and completion of Pioneer to your iPod is possible to control the sub zone, but not to listen to the iPod/USB operation mode. However, some models. Basic playback controls This ...
..., artist name, album name, song name, genre or composer, similar to using this receiver. ! When the display shows the names of Pioneer (http://pioneer.jp/homeav/support/ios/na/). ! Note ! Note that characters that cannot be displayed on the website of folders and files, you're ... and video of non-copyrighted materials or materials the user is not available for playback on and completion of Pioneer to your iPod is possible to control the sub zone, but not to listen to the iPod/USB operation mode. However, some models. Basic playback controls This ...
Owner's Manual
Page 41
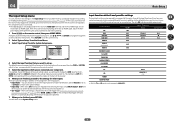
...hard drives, portable flash memory drives (particularly key drives) and digital audio players (MP3 players) of the USB device are displayed as this receiver. ! Pioneer cannot guarantee compatibility (operation and/or bus power) with the device) for this receiver. ! Loading appears in the GUI screen as #. 1 Use ... files using the USB interface on the front of this receiver starts recognizing the USB device connected. About one minute is displayed in the sub zone. 1 Use i/j to select a folder, then press ENTER to browse that may occur when connected to this receiver. 1 Press u RECEIVER...
...hard drives, portable flash memory drives (particularly key drives) and digital audio players (MP3 players) of the USB device are displayed as this receiver. ! Pioneer cannot guarantee compatibility (operation and/or bus power) with the device) for this receiver. ! Loading appears in the GUI screen as #. 1 Use ... files using the USB interface on the front of this receiver starts recognizing the USB device connected. About one minute is displayed in the sub zone. 1 Use i/j to select a folder, then press ENTER to browse that may occur when connected to this receiver. 1 Press u RECEIVER...
Owner's Manual
Page 58
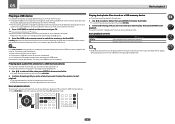
Using other functions Setting the Audio options...59 Setting the Video options...61 Switching the speaker terminals 63 Using the MULTI-ZONE controls...63 Making an audio or a video recording 64 Using the sleep timer...64 Dimming the display...64 Checking your system settings...64 Resetting the system...64 58
Using other functions Setting the Audio options...59 Setting the Video options...61 Switching the speaker terminals 63 Using the MULTI-ZONE controls...63 Making an audio or a video recording 64 Using the sleep timer...64 Dimming the display...64 Checking your system settings...64 Resetting the system...64 58
Owner's Manual
Page 60
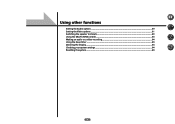
... wide channel through to UP4 can only use the Virtual Surround Back mode if the surround speakers are on and the FH setting is selected. 60 For more forward (positive settings). i Only when listening to 2-channel sources in HDMI Setup is set to ON. (See HDMI Setup on page 56.) c UP1... to a TV. It can be made only when TONE is set to NO or if Front Bi-Amp or ZONE 2 is only available for a 'wraparound' effect. You can be set to ON. Adjust the effect from this receiver or Stream Direct modes is set A.DELAY...
... wide channel through to UP4 can only use the Virtual Surround Back mode if the surround speakers are on and the FH setting is selected. 60 For more forward (positive settings). i Only when listening to 2-channel sources in HDMI Setup is set to ON. (See HDMI Setup on page 56.) c UP1... to a TV. It can be made only when TONE is set to NO or if Front Bi-Amp or ZONE 2 is only available for a 'wraparound' effect. You can be set to ON. Adjust the effect from this receiver or Stream Direct modes is set A.DELAY...


