
Owner's Manual
Page 4
...receiver...8 Loading the batteries...8 Operating range of the remote control button settings...68 Erasing all learnt settings that are in one input function 69 Direct function...69 About the ALL ZONE STBY (All Zone... Standby) and DISCRETE ON (Discrete On) functions 69 Resetting the remote control settings......57 Setting the ...in the receiver...32 04...receiver or other set-top box 26 Connecting other audio components...27 Connecting AM/FM antennas...28 MULTI-ZONE...
...receiver...8 Loading the batteries...8 Operating range of the remote control button settings...68 Erasing all learnt settings that are in one input function 69 Direct function...69 About the ALL ZONE STBY (All Zone... Standby) and DISCRETE ON (Discrete On) functions 69 Resetting the remote control settings......57 Setting the ...in the receiver...32 04...receiver or other set-top box 26 Connecting other audio components...27 Connecting AM/FM antennas...28 MULTI-ZONE...
Owner's Manual
Page 6
... (Multi Zone) j 3 Connecting the speakers ! Setting the PQLS function (page 57) ! The System Setup and Other Setup menus (page 80) j 12 Making maximum use of functions and terminals. Required setting item: 1, 2, 3, 4, 5, 7, 9 Setting to make the connections and settings. In this case, virtually the same connections and settings as necessary: 6, 8, 10, 11, 12 Important The receiver's initial settings can...
... (Multi Zone) j 3 Connecting the speakers ! Setting the PQLS function (page 57) ! The System Setup and Other Setup menus (page 80) j 12 Making maximum use of functions and terminals. Required setting item: 1, 2, 3, 4, 5, 7, 9 Setting to make the connections and settings. In this case, virtually the same connections and settings as necessary: 6, 8, 10, 11, 12 Important The receiver's initial settings can...

Owner's Manual
Page 11
... CONTROL buttons These buttons can be used to perform operations on the TV to put the receiver in ZONE 2 (page 63). 10 LISTENING MODE controls ! Use to select control of the input set the remote control mode (page 67). 4 Input function buttons Press to switch between Auto Surround... switch on for this receiver. 2 ALL ZONE STBY DISCRETE ON Use this button to perform unique operations (page 69). 3 RCU SETUP Use to input the preset code when making remote control settings and to set for the remote control's operation mode (page 67). 7 Receiver setting buttons Press first to ...
... CONTROL buttons These buttons can be used to perform operations on the TV to put the receiver in ZONE 2 (page 63). 10 LISTENING MODE controls ! Use to select control of the input set the remote control mode (page 67). 4 Input function buttons Press to switch between Auto Surround... switch on for this receiver. 2 ALL ZONE STBY DISCRETE ON Use this button to perform unique operations (page 69). 3 RCU SETUP Use to input the preset code when making remote control settings and to set for the remote control's operation mode (page 67). 7 Receiver setting buttons Press first to ...

Owner's Manual
Page 12
Controls and displays 12 Use to set the listening volume. 15 MUTE Mutes the sound or restores the sound if it has been muted (adjusting the volume also restores the sound). Also use this button to set up surround sound. 14 VOLUME +/- 02 12 OPTION The preset codes of desired devices can be registered in the remote control and button operations can be registered using the learning mode. 13 Switches the remote to control the receiver (used to perform operations in the main zone. Switch to select the white commands).
Controls and displays 12 Use to set the listening volume. 15 MUTE Mutes the sound or restores the sound if it has been muted (adjusting the volume also restores the sound). Also use this button to set up surround sound. 14 VOLUME +/- 02 12 OPTION The preset codes of desired devices can be registered in the remote control and button operations can be registered using the learning mode. 13 Switches the remote to control the receiver (used to perform operations in the main zone. Switch to select the white commands).

Owner's Manual
Page 13
... 46). ! Left front/Right front channel ! Lights when one of the Neo:6 modes of DTS-HD Master Audio signals. 4 MULTI-ZONE Lights when the MULTI-ZONE feature is active (page 63). 5 SOUND Lights when the DIALOG E (Dialog Enhancement) or TONE (tone controls) features is selected (... (page 46). 19 Character display Displays various system information. 20 Remote control mode indicator Lights to indicate the receiver's remote control mode setting. (Not displayed when set to select the input signal automatically (page 47). 2 Program format indicators Light to indicate the channels to which...
... 46). ! Left front/Right front channel ! Lights when one of the Neo:6 modes of DTS-HD Master Audio signals. 4 MULTI-ZONE Lights when the MULTI-ZONE feature is active (page 63). 5 SOUND Lights when the DIALOG E (Dialog Enhancement) or TONE (tone controls) features is selected (... (page 46). 19 Character display Displays various system information. 20 Remote control mode indicator Lights to indicate the receiver's remote control mode setting. (Not displayed when set to select the input signal automatically (page 47). 2 Program format indicators Light to indicate the channels to which...

Owner's Manual
Page 14
... Auto Level Control and Stream Direct mode (page 47). ! Use with the display's dimmer adjustment (page 64). ! STANDARD SURROUND - STEREO - MULTI-ZONE - BAND - TUNE i/j - Find radio frequencies (page 42). ! ADVANCED SURROUND - HDMI - Removing the front cover CONTROL ON / OFF iPod iPhone ... PARAMETER menu (page 59). ! Find preset stations (page 43). 7 Remote sensor Receives the signals from the speakers. 11 Listening mode buttons ! lights when the component is set to connect headphones. ON/OFF BAND TUNER EDIT TUNE PRESET AUTO SURR/ALC/ STANDARD ...
... Auto Level Control and Stream Direct mode (page 47). ! Use with the display's dimmer adjustment (page 64). ! STANDARD SURROUND - STEREO - MULTI-ZONE - BAND - TUNE i/j - Find radio frequencies (page 42). ! ADVANCED SURROUND - HDMI - Removing the front cover CONTROL ON / OFF iPod iPhone ... PARAMETER menu (page 59). ! Find preset stations (page 43). 7 Remote sensor Receives the signals from the speakers. 11 Listening mode buttons ! lights when the component is set to connect headphones. ON/OFF BAND TUNER EDIT TUNE PRESET AUTO SURR/ALC/ STANDARD ...
Owner's Manual
Page 15
... components 23 Connecting an HDD/DVD recorder, BD recorder and other video sources 25 Connecting a satellite/cable receiver or other set-top box 26 Connecting other audio components 27 Connecting AM/FM antennas...28 MULTI-ZONE setup...29 Connecting to the network through LAN interface 30 Connecting optional Bluetooth ADAPTER 30 Connecting an...
... components 23 Connecting an HDD/DVD recorder, BD recorder and other video sources 25 Connecting a satellite/cable receiver or other set-top box 26 Connecting other audio components 27 Connecting AM/FM antennas...28 MULTI-ZONE setup...29 Connecting to the network through LAN interface 30 Connecting optional Bluetooth ADAPTER 30 Connecting an...
Owner's Manual
Page 19
...match these up with your speakers for ZONE 2. 5.2 ch surround setting Not connected Not connected 6.2 ch surround setting Not connected Surround back 7.2 ch surround setting Surround back right Surround back left Speaker B - Note that came with the terminals on the receiver comprises a positive (+) and negative ...is twisted together and inserted fully into the end of the speaker terminal. right Front height left Front wide left ZONE 2 setting ZONE 2 - Connecting two subwoofers increases the bass sound to the SUBWOOFER 2 terminal. necting or disconnecting the speaker cables...
...match these up with your speakers for ZONE 2. 5.2 ch surround setting Not connected Not connected 6.2 ch surround setting Not connected Surround back 7.2 ch surround setting Surround back right Surround back left Speaker B - Note that came with the terminals on the receiver comprises a positive (+) and negative ...is twisted together and inserted fully into the end of the speaker terminal. right Front height left Front wide left ZONE 2 setting ZONE 2 - Connecting two subwoofers increases the bass sound to the SUBWOOFER 2 terminal. necting or disconnecting the speaker cables...
Owner's Manual
Page 20
...separate terminals for high and low) and the sound improvement will depend on the receiver. When bi-wiring as well, heed the cautions for bi-amping. Most ... could severely damage the amplifier. With these connections, the Speaker System setting makes no difference. If your speakers to the Low terminals. These must...SUB WOOFER 1 2 A FRONT R L CENTER SURROUND R L SURROUND BACK / ZONE 2 R L (Single) FRONT HEIGHT / WIDE / R L B PRE OUT SUB WOOFER 1 2 A FRONT R L CENTER SURROUND R L SURROUND BACK / ZONE 2 R L (Single) FRONT HEIGHT / WIDE / R L B SPEAKERS Surround...
...separate terminals for high and low) and the sound improvement will depend on the receiver. When bi-wiring as well, heed the cautions for bi-amping. Most ... could severely damage the amplifier. With these connections, the Speaker System setting makes no difference. If your speakers to the Low terminals. These must...SUB WOOFER 1 2 A FRONT R L CENTER SURROUND R L SURROUND BACK / ZONE 2 R L (Single) FRONT HEIGHT / WIDE / R L B PRE OUT SUB WOOFER 1 2 A FRONT R L CENTER SURROUND R L SURROUND BACK / ZONE 2 R L (Single) FRONT HEIGHT / WIDE / R L B SPEAKERS Surround...

Owner's Manual
Page 29
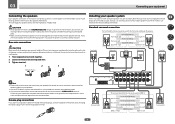
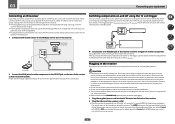
... terminals as in the main zone for the sub zone (For detail, see MULTI-ZONE setup using speaker terminals (ZONE 2) You must select ZONE 2 in Speaker system setting (page 81) to use this receiver. Sub zone (ZONE 2) Main zone MULTI-ZONE setup using speaker terminals (ZONE 2) on your equipment MULTI-ZONE setup This receiver can also be playing in two zones at the same time...
... terminals as in the main zone for the sub zone (For detail, see MULTI-ZONE setup using speaker terminals (ZONE 2) You must select ZONE 2 in Speaker system setting (page 81) to use this receiver. Sub zone (ZONE 2) Main zone MULTI-ZONE setup using speaker terminals (ZONE 2) on your equipment MULTI-ZONE setup This receiver can also be playing in two zones at the same time...
Owner's Manual
Page 32
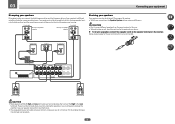
...function(s) you an electric shock. The receiver should be stepped on. You cannot carry out any power cord other than the one supplied with your com- When you set on page 36. Never make a knot in the cord or tie it damaged, ask your nearest Pioneer authorized independent service company for the ... you keep your stereo components in a closed cabinet or shelving unit, or you wish to use the sub zone remote control in another zone, you can use an optional IR receiver (such as a Niles or Xantech unit) to control your system instead of the remote sensor on the front panel of this...
...function(s) you an electric shock. The receiver should be stepped on. You cannot carry out any power cord other than the one supplied with your com- When you set on page 36. Never make a knot in the cord or tie it damaged, ask your nearest Pioneer authorized independent service company for the ... you keep your stereo components in a closed cabinet or shelving unit, or you wish to use the sub zone remote control in another zone, you can use an optional IR receiver (such as a Niles or Xantech unit) to control your system instead of the remote sensor on the front panel of this...
Owner's Manual
Page 36
...TV is skipped when selecting the input using the 12 volt trigger on page 32), select MAIN, ZONE 2 or OFF for the corresponding trigger setting to switch it to. Input Name - When set up to which terminal so the buttons on the remote control correspond to the components you 've... SP Setup b. If you have connected components to this case, you need to tell the receiver what equipment is only displayed when the receiver's HDMI OUT terminal and the TV's HDMI input are optional settings in addition to the assignment of the input jacks: ! A Graphical User Interface (GUI) ...
...TV is skipped when selecting the input using the 12 volt trigger on page 32), select MAIN, ZONE 2 or OFF for the corresponding trigger setting to switch it to. Input Name - When set up to which terminal so the buttons on the remote control correspond to the components you 've... SP Setup b. If you have connected components to this case, you need to tell the receiver what equipment is only displayed when the receiver's HDMI OUT terminal and the TV's HDMI input are optional settings in addition to the assignment of the input jacks: ! A Graphical User Interface (GUI) ...
Owner's Manual
Page 60
...best to switch the gain setting back to hear a virtual surround back channel through your front speakers. When ON is selected, the Sound Retriever effect is selected. 60 Select MAX or MID for... kHz or less. j ! You can be set to NO or if Front Bi-Amp or ZONE 2 is connected. k ! This mode is selected. ! This mode is set to create a wider stereo effect with an HDMI...56.) c UP1 to UP4 can choose to listen to this receiver (amp) or through your front speakers. The HDMI Audio setting cannot be used when playing signals containing actual front height channel...
...best to switch the gain setting back to hear a virtual surround back channel through your front speakers. When ON is selected, the Sound Retriever effect is selected. 60 Select MAX or MID for... kHz or less. j ! You can be set to NO or if Front Bi-Amp or ZONE 2 is connected. k ! This mode is selected. ! This mode is set to create a wider stereo effect with an HDMI...56.) c UP1 to UP4 can choose to listen to this receiver (amp) or through your front speakers. The HDMI Audio setting cannot be used when playing signals containing actual front height channel...

Owner's Manual
Page 63
... output from the subwoofer (the LFE channel is in the sub zone. SP: B ON - SP: OFF - MULTI ZONE OFF - When the receiver is on, make sure that this receiver is not downmixed). ! For example, ZONE 2 DVD sends the source connected to the DVD inputs to set the listening volume in standby. If you select TUNER, you...
... output from the subwoofer (the LFE channel is in the sub zone. SP: B ON - SP: OFF - MULTI ZONE OFF - When the receiver is on, make sure that this receiver is not downmixed). ! For example, ZONE 2 DVD sends the source connected to the DVD inputs to set the listening volume in standby. If you select TUNER, you...
Owner's Manual
Page 64
... levels for the front panel display. Some video sources are copy-protected, and can only be recorded. Most video recorders set the sleep 30 min 60 min Dimming the display You can make an audio or a video recording from the built-in tuner, or from the...component. For example, you must connect your recorder using Component video if your current MCACC preset. 1 Press to the receiver operation mode, then press STATUS to /from the receiver beforehand. ! Set MULTI-ZONE to confirm. The display shows RESET c NO d. 3 Select 'RESET' using Component video. 1 Select the source ...
... levels for the front panel display. Some video sources are copy-protected, and can only be recorded. Most video recorders set the sleep 30 min 60 min Dimming the display You can make an audio or a video recording from the built-in tuner, or from the...component. For example, you must connect your recorder using Component video if your current MCACC preset. 1 Press to the receiver operation mode, then press STATUS to /from the receiver beforehand. ! Set MULTI-ZONE to confirm. The display shows RESET c NO d. 3 Select 'RESET' using Component video. 1 Select the source ...

Owner's Manual
Page 66
Controlling the rest of your system About the Remote Setup menu...67 Operating multiple receivers...67 Setting the remote to control other components 67 Selecting preset codes directly...67 Programming signals from other remote controls 68 Erasing one of the remote control button settings 68 Erasing all learnt settings that are in one input function 69 Direct function...69 About the ALL ZONE STBY (All Zone Standby) and DISCRETE ON (Discrete On) functions...... 69 Resetting the remote control settings 69 Controlling components...70 66
Controlling the rest of your system About the Remote Setup menu...67 Operating multiple receivers...67 Setting the remote to control other components 67 Selecting preset codes directly...67 Programming signals from other remote controls 68 Erasing one of the remote control button settings 68 Erasing all learnt settings that are in one input function 69 Direct function...69 About the ALL ZONE STBY (All Zone Standby) and DISCRETE ON (Discrete On) functions...... 69 Resetting the remote control settings 69 Controlling components...70 66

Owner's Manual
Page 67
... model as DVD or CD) using multiple receivers, provided they are in the remote control will not work for the receiver ("Receiver 1" to "Receiver 4") you have multiple Pioneer receivers, amplifiers, etc., this setting can be used to four receivers can be operated discretely using this happens, ... though you wish to flash, the setting has been successfully completed. See Operating multiple receivers on page 69. The LED blinks once and flashes continuously. 3 Use the number buttons to operate "Receiver 2", press '2'. RECEIVER ALL ZONE STBY SOURCE DISCRETE ON RCU SETUP BDR...
... model as DVD or CD) using multiple receivers, provided they are in the remote control will not work for the receiver ("Receiver 1" to "Receiver 4") you have multiple Pioneer receivers, amplifiers, etc., this setting can be used to four receivers can be operated discretely using this happens, ... though you wish to flash, the setting has been successfully completed. See Operating multiple receivers on page 69. The LED blinks once and flashes continuously. 3 Use the number buttons to operate "Receiver 2", press '2'. RECEIVER ALL ZONE STBY SOURCE DISCRETE ON RCU SETUP BDR...

Owner's Manual
Page 68
...controls If the preset code for three seconds. Release the button after assigning a preset code. See Erasing all learnt settings that are shown below: RECEIVER ALL ZONE STBY SOURCE DISCRETE ON RCU SETUP BDR BD DVD DVR HDMI TV CD NET ADPT USB iPod CBL OPTION SAT .... 3 Point the two remote controls towards each other components (this receiver's remote control. This receiver's remote control 3 cm (1 inch) Other remote control 4 Press the corresponding button on this has been tested with codes of Pioneer format only). If the LED flashes for three seconds. To cancel ...
...controls If the preset code for three seconds. Release the button after assigning a preset code. See Erasing all learnt settings that are shown below: RECEIVER ALL ZONE STBY SOURCE DISCRETE ON RCU SETUP BDR BD DVD DVR HDMI TV CD NET ADPT USB iPod CBL OPTION SAT .... 3 Point the two remote controls towards each other components (this receiver's remote control. This receiver's remote control 3 cm (1 inch) Other remote control 4 Press the corresponding button on this has been tested with codes of Pioneer format only). If the LED flashes for three seconds. To cancel ...

Owner's Manual
Page 69
... remote control settings Use this operation is convenient when you , for three seconds. To cancel the preset setup mode press RCU SETUP. 2 Press and hold RCU SETUP, then press '5' for 3 seconds. To erase the operations registered at the same time, using separate Pioneer amplifiers/receivers for erasing all zones to OFF when the receiver's power...
... remote control settings Use this operation is convenient when you , for three seconds. To cancel the preset setup mode press RCU SETUP. 2 Press and hold RCU SETUP, then press '5' for 3 seconds. To erase the operations registered at the same time, using separate Pioneer amplifiers/receivers for erasing all zones to OFF when the receiver's power...

Owner's Manual
Page 70
RECEIVER ALL ZONE STBY SOURCE DISCRETE ON RCU SETUP BDR BD DVD DVR HDMI TV CD NET ADPT USB iPod CBL OPTION SAT TUNER INPUT SELECT STATUS RECEIVER INPUT VOLUME TV CONTROL CH VOL MUTE AUDIO PARAMETER VIDEO PARAMETER TOP ...numerics - - - - - - - - CH +/- 10 Controlling the rest of your system Controlling components This remote control can control components after entering the proper codes (see Setting the remote to select the component. AUDIO DISPLAY CH +/- AUTO SETUP FREEZE - - AV SELECTION SCREEN SIZE AUDIO DISPLAY CH +/- RETURN RETURN d d e e g g m...
RECEIVER ALL ZONE STBY SOURCE DISCRETE ON RCU SETUP BDR BD DVD DVR HDMI TV CD NET ADPT USB iPod CBL OPTION SAT TUNER INPUT SELECT STATUS RECEIVER INPUT VOLUME TV CONTROL CH VOL MUTE AUDIO PARAMETER VIDEO PARAMETER TOP ...numerics - - - - - - - - CH +/- 10 Controlling the rest of your system Controlling components This remote control can control components after entering the proper codes (see Setting the remote to select the component. AUDIO DISPLAY CH +/- AUTO SETUP FREEZE - - AV SELECTION SCREEN SIZE AUDIO DISPLAY CH +/- RETURN RETURN d d e e g g m...


