
Owner's Manual
Page 3
...requires repair will be deceiving. ESTABLISH A SAFE LEVEL: • Set your volume control at a low setting. • Slowly increase the sound until you can be charged for general household purposes. the use shielded cables and connectors for other equipment. IMPORTANT NOTICE THE MODEL NUMBER AND ...at a safe level - BE SURE TO OBSERVE THE FOLLOWING GUIDELINES: • Do not turn up the volume so high that lets the sound come through clearly without distortion. • Once you . • Use caution or temporarily discontinue use in Your Hands Get the most importantly...
...requires repair will be deceiving. ESTABLISH A SAFE LEVEL: • Set your volume control at a low setting. • Slowly increase the sound until you can be charged for general household purposes. the use shielded cables and connectors for other equipment. IMPORTANT NOTICE THE MODEL NUMBER AND ...at a safe level - BE SURE TO OBSERVE THE FOLLOWING GUIDELINES: • Do not turn up the volume so high that lets the sound come through clearly without distortion. • Once you . • Use caution or temporarily discontinue use in Your Hands Get the most importantly...
Owner's Manual
Page 4
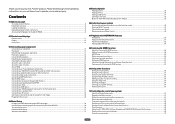
...your system Enjoying various types of playback using the listening modes 46 Selecting MCACC presets...47 Choosing the input signal...47 Better sound using Phase Control...48 07 Playback with NETWORK features Introduction...50 Playback with Network functions...51 About network playback...52 About ... Playing a source...39 Playing an iPod...40 Playing a USB device...41 Listening to the radio...42 Bluetooth ADAPTER for buying this Pioneer product. Please read through LAN interface...30 Connecting optional Bluetooth ADAPTER...30 Connecting an iPod...31 Connecting a USB device...31 Connecting an...
...your system Enjoying various types of playback using the listening modes 46 Selecting MCACC presets...47 Choosing the input signal...47 Better sound using Phase Control...48 07 Playback with NETWORK features Introduction...50 Playback with Network functions...51 About network playback...52 About ... Playing a source...39 Playing an iPod...40 Playing a USB device...41 Listening to the radio...42 Bluetooth ADAPTER for buying this Pioneer product. Please read through LAN interface...30 Connecting optional Bluetooth ADAPTER...30 Connecting an iPod...31 Connecting a USB device...31 Connecting an...
Owner's Manual
Page 5
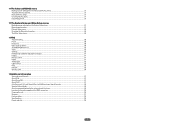
...setup...81 Network Setup menu...83 Checking the Network Information...84 The Other Setup menu...84 13 FAQ Troubleshooting...88 Power...88 No sound...88 Other audio problems...89 ADAPTER PORT terminal...90 Video...90 Settings...90 Professional Calibration EQ graphical output...91 Display...91 Remote ...control...91 HDMI...91 AVNavigator...92 USB interface...93 iPod...93 Network...93 Wireless LAN...94 14 Additional information Surround sound formats...97 About iPod...97 About SiriusXM...97 About FLAC...97 Auto Surround, ALC and Stream Direct with different input signal formats ...
...setup...81 Network Setup menu...83 Checking the Network Information...84 The Other Setup menu...84 13 FAQ Troubleshooting...88 Power...88 No sound...88 Other audio problems...89 ADAPTER PORT terminal...90 Video...90 Settings...90 Professional Calibration EQ graphical output...91 Display...91 Remote ...control...91 HDMI...91 AVNavigator...92 USB interface...93 iPod...93 Network...93 Wireless LAN...94 14 Additional information Surround sound formats...97 About iPod...97 About SiriusXM...97 About FLAC...97 Auto Surround, ALC and Stream Direct with different input signal formats ...
Owner's Manual
Page 6
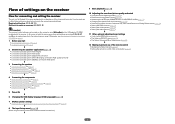
...used easily after following the procedure below to control other than the recommended connections) j 9 Basic playback (page 38) j 10 Adjusting the sound and picture quality as necessary: 6, 8, 10, 11, 12 Important The receiver's initial settings can be made interactively. In this case,... page 22 ! Plugging in steps 2, 3, 4, 5, 6, 7 and 8 can be made on the computer using Phase Control (page 48) ! Automatically conducting optimum sound tuning (Full Auto MCACC) on page 32 j 5 Power On j 6 Changing the OSD display language (OSD Language) (page 34) j 7 MCACC speaker settings ...
...used easily after following the procedure below to control other than the recommended connections) j 9 Basic playback (page 38) j 10 Adjusting the sound and picture quality as necessary: 6, 8, 10, 11, 12 Important The receiver's initial settings can be made interactively. In this case,... page 22 ! Plugging in steps 2, 3, 4, 5, 6, 7 and 8 can be made on the computer using Phase Control (page 48) ! Automatically conducting optimum sound tuning (Full Auto MCACC) on page 32 j 5 Power On j 6 Changing the OSD display language (OSD Language) (page 34) j 7 MCACC speaker settings ...
Owner's Manual
Page 8
... the European Union. in places that are only valid in your country/area. (Symbol examples for batteries) These symbols are very dusty - Batteries with the sound. - Pb K058c_A1_En Operating range of the batteries properly according to check initial operations; on the following precautions: ! iPod cable ! Do not touch this unit, make...
... the European Union. in places that are only valid in your country/area. (Symbol examples for batteries) These symbols are very dusty - Batteries with the sound. - Pb K058c_A1_En Operating range of the batteries properly according to check initial operations; on the following precautions: ! iPod cable ! Do not touch this unit, make...

Owner's Manual
Page 11
... SIGNAL SEL - SPEAKERS - SLEEP - Press to confirm and exit the current menu screen. 8 i/j/k/l/ENTER Use the arrow buttons when setting up your surround sound system (see page 73) and the Audio or Video options (page 59 or 61). 9 ZONE 2 Switch to perform operations in sleep mode and select... Stream Direct mode (page 47). ! Press to access the Home Menu (pages 34, 36, 56, 73 and 81). ! Press to restore CD quality sound to select an input signal (page 47). ! Use to compressed audio sources (page 59). ! Press repeatedly to select a channel, then use k/l to access...
... SIGNAL SEL - SPEAKERS - SLEEP - Press to confirm and exit the current menu screen. 8 i/j/k/l/ENTER Use the arrow buttons when setting up your surround sound system (see page 73) and the Audio or Video options (page 59 or 61). 9 ZONE 2 Switch to perform operations in sleep mode and select... Stream Direct mode (page 47). ! Press to access the Home Menu (pages 34, 36, 56, 73 and 81). ! Press to restore CD quality sound to select an input signal (page 47). ! Use to compressed audio sources (page 59). ! Press repeatedly to select a channel, then use k/l to access...

Owner's Manual
Page 12
Use to perform operations in the remote control and button operations can be registered using the learning mode. 13 Switches the remote to control the receiver (used to set the listening volume. 15 MUTE Mutes the sound or restores the sound if it has been muted (adjusting the volume also restores the sound). Switch to set up surround sound. 14 VOLUME +/- Controls and displays 12 02 12 OPTION The preset codes of desired devices can be registered in the main zone. Also use this button to select the white commands).
Use to perform operations in the remote control and button operations can be registered using the learning mode. 13 Switches the remote to control the receiver (used to set the listening volume. 15 MUTE Mutes the sound or restores the sound if it has been muted (adjusting the volume also restores the sound). Switch to set up surround sound. 14 VOLUME +/- Controls and displays 12 02 12 OPTION The preset codes of desired devices can be registered in the main zone. Also use this button to select the white commands).

Owner's Manual
Page 13
...- MONO - PCM - Lights when the ALC (Auto level control) mode is set to indicate the current speaker system using MPX. 12 Lights when the sound is being input. ! Center channel ! Neo:6 - AUTO lights when the receiver is selected (page 46). ! Either one of an analog signal (page ...TONE (tone controls) features is selected (page 59). 6 PQLS Lights when the PQLS feature is active (page 57). 7 S.RTRV Lights when the Auto Sound Retriever function is on (page 46). ! Low frequency effects channel (the (( )) indicators light when an LFE signal is being input) ! Lights with Dolby...
...- MONO - PCM - Lights when the ALC (Auto level control) mode is set to indicate the current speaker system using MPX. 12 Lights when the sound is being input. ! Center channel ! Neo:6 - AUTO lights when the receiver is selected (page 46). ! Either one of an analog signal (page ...TONE (tone controls) features is selected (page 59). 6 PQLS Lights when the PQLS feature is active (page 57). 7 S.RTRV Lights when the Auto Sound Retriever function is on (page 46). ! Low frequency effects channel (the (( )) indicators light when an LFE signal is being input) ! Lights with Dolby...

Owner's Manual
Page 14
... sub zone from the speakers. 11 Listening mode buttons ! iPod iPhone iPad - TUNER EDIT - STANDARD SURROUND - STEREO - Lights to indicate iPod/iPhone/iPad is no sound output from the main zone (page 63). 5 Character display See Display on the iPod (page 40). Removing the front cover CONTROL ON / OFF iPod iPhone...
... sub zone from the speakers. 11 Listening mode buttons ! iPod iPhone iPad - TUNER EDIT - STANDARD SURROUND - STEREO - Lights to indicate iPod/iPhone/iPad is no sound output from the main zone (page 63). 5 Character display See Display on the iPod (page 40). Removing the front cover CONTROL ON / OFF iPod iPhone...

Owner's Manual
Page 17
...surround back speakers. It is also possible to only connect one from above. Choose one of the surround back speakers (SB) or neither. ! Sound does not come through simultaneously from the front height speakers and the surround back speakers. If you have . ! Speaker System setting: Normal(SB/FW...SW 1/SW 2). The Speaker System setting must be connected to the SUBWOOFER 2 terminal. The same connections also allow for 7.2-channel surround sound in the main zone when not using the B speakers. 17 03 Connecting your equipment Determining the speakers' application This unit permits you to...
...surround back speakers. It is also possible to only connect one from above. Choose one of the surround back speakers (SB) or neither. ! Sound does not come through simultaneously from the front height speakers and the surround back speakers. If you have . ! Speaker System setting: Normal(SB/FW...SW 1/SW 2). The Speaker System setting must be connected to the SUBWOOFER 2 terminal. The same connections also allow for 7.2-channel surround sound in the main zone when not using the B speakers. 17 03 Connecting your equipment Determining the speakers' application This unit permits you to...
Owner's Manual
Page 18
... front height speakers / front wide speakers, we recommend placing the surround speaker right beside you can simultaneously enjoy 5.2-channel surround sound in the main zone with 5.2-channel surround sound. After connecting, be positioned 60 cm to 3 ft.) higher than 5.2 speakers (except front left/ right speakers). ! Place the surround speakers at the TV screen...
... front height speakers / front wide speakers, we recommend placing the surround speaker right beside you can simultaneously enjoy 5.2-channel surround sound in the main zone with 5.2-channel surround sound. After connecting, be positioned 60 cm to 3 ft.) higher than 5.2 speakers (except front left/ right speakers). ! Place the surround speakers at the TV screen...
Owner's Manual
Page 19
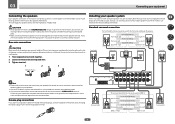
...7.2 ch surround setting Surround back right Surround back left and right speakers only are securely installed. This not only improves sound quality, but you can also be connected to the left 19 Note that all the bare speaker wire is twisted together... speaker terminal. Front right Front height setting Front height right Front wide setting Front wide right Speaker B setting Speaker B - Connecting two subwoofers increases the bass sound to 16 W. PRE OUT SUB WOOFER 1 2 A FRONT R L CENTER SURROUND R L SURROUND BACK / ZONE 2 R L (Single) FRONT HEIGHT / WIDE / R L B...
...7.2 ch surround setting Surround back right Surround back left and right speakers only are securely installed. This not only improves sound quality, but you can also be connected to the left 19 Note that all the bare speaker wire is twisted together... speaker terminal. Front right Front height setting Front height right Front wide setting Front wide right Speaker B setting Speaker B - Connecting two subwoofers increases the bass sound to 16 W. PRE OUT SUB WOOFER 1 2 A FRONT R L CENTER SURROUND R L SURROUND BACK / ZONE 2 R L (Single) FRONT HEIGHT / WIDE / R L B...
Owner's Manual
Page 20
..., heed the cautions for bi-amping. Don't connect different speakers from the same terminal in this (having separate terminals for high and low) and the sound improvement will depend on the receiver. Most speakers with both High and Low terminals have a removable crossover network, make sure you do this way. ! 03...
..., heed the cautions for bi-amping. Don't connect different speakers from the same terminal in this (having separate terminals for high and low) and the sound improvement will depend on the receiver. Most speakers with both High and Low terminals have a removable crossover network, make sure you do this way. ! 03...

Owner's Manual
Page 21
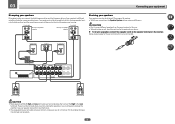
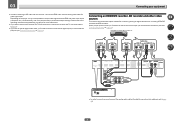
...in addition to the front and surround back speaker terminals. With an HDMI cable, video and audio signals can simultaneously enjoy 5.1-channel surround sound in ZONE 2. 1 Connect a pair of speakers to the application. Also, the surround back terminals can listen to stereo playback in ...another component in the main zone with 5.1-channel surround sound. 1 Connect bi-amp compatible speakers to for high sound quality with stereo playback on another room. 1 Connect a pair of cables and terminals HDMI Transferable audio ...
...in addition to the front and surround back speaker terminals. With an HDMI cable, video and audio signals can simultaneously enjoy 5.1-channel surround sound in ZONE 2. 1 Connect a pair of speakers to the application. Also, the surround back terminals can listen to stereo playback in ...another component in the main zone with 5.1-channel surround sound. 1 Connect bi-amp compatible speakers to for high sound quality with stereo playback on another room. 1 Connect a pair of cables and terminals HDMI Transferable audio ...
Owner's Manual
Page 23
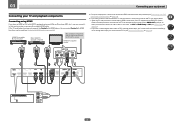
... analog audio input you can be input to the receiver via the HDMI OUT terminal, so there is required in order to listen to the sound of the TV over the receiver, connect the receiver and TV with HDCP) equipped component (Blu-ray Disc player (BD), etc.), you connected the TV...connections are connected by HDMI connections, if the TV supports the HDMI ARC (Audio Return Channel) function, the sound of the TV over the receiver. If you want to listen to the sound of the TV can be used (see Connecting your TV and playback components Connecting using a commercially available HDMI cable...
... analog audio input you can be input to the receiver via the HDMI OUT terminal, so there is required in order to listen to the sound of the TV over the receiver, connect the receiver and TV with HDCP) equipped component (Blu-ray Disc player (BD), etc.), you connected the TV...connections are connected by HDMI connections, if the TV supports the HDMI ARC (Audio Return Channel) function, the sound of the TV over the receiver. If you want to listen to the sound of the TV can be used (see Connecting your TV and playback components Connecting using a commercially available HDMI cable...
Owner's Manual
Page 24
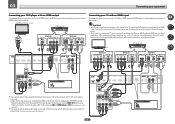
...IN 1 (DVD) ASSIGNABLE Y PB PR COMPONENT VIDEO DVD ! Important ! DVD player, etc. If you use an optical digital audio cable, you'll need to the sound of the TV over the receiver, connect the receiver and TV with audio cables (page 23). - If you connected the player to connect the receiver... and player. ! When the TV and receiver are connected by HDMI connections, if the TV supports the HDMI ARC (Audio Return Channel) function, the sound of the TV can be used to (see HDMI Setup on page 36). In this case, set ARC at HDMI Setup to the receiver. In...
...IN 1 (DVD) ASSIGNABLE Y PB PR COMPONENT VIDEO DVD ! Important ! DVD player, etc. If you use an optical digital audio cable, you'll need to the sound of the TV over the receiver, connect the receiver and TV with audio cables (page 23). - If you connected the player to connect the receiver... and player. ! When the TV and receiver are connected by HDMI connections, if the TV supports the HDMI ARC (Audio Return Channel) function, the sound of the TV can be used to (see HDMI Setup on page 36). In this case, set ARC at HDMI Setup to the receiver. In...
Owner's Manual
Page 25
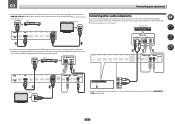
If you want to listen to the sound of the TV over the receiver, connect the receiver and TV with this receiver, connect an HDMI cable, and use an optical digital audio cable, ...
If you want to listen to the sound of the TV over the receiver, connect the receiver and TV with this receiver, connect an HDMI cable, and use an optical digital audio cable, ...
Owner's Manual
Page 27
Even if your turntable has line-level outputs (i.e., it has a built-in some cases the sound is output from the HDMI output terminal. When you set up the receiver you'll need to tell the receiver which input you to the ...
Even if your turntable has line-level outputs (i.e., it has a built-in some cases the sound is output from the HDMI output terminal. When you set up the receiver you'll need to tell the receiver which input you to the ...

Owner's Manual
Page 28
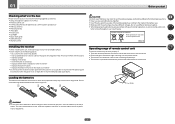
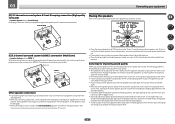
.... 03 Connecting your equipment Connecting AM/FM antennas Connect the AM loop antenna and the FM wire antenna as shown below. To improve reception and sound quality, connect external antennas (see Connecting external antennas on a flat surface and in the direction indicated by the arrow (fig. to the AM LOOP terminals...
.... 03 Connecting your equipment Connecting AM/FM antennas Connect the AM loop antenna and the FM wire antenna as shown below. To improve reception and sound quality, connect external antennas (see Connecting external antennas on a flat surface and in the direction indicated by the arrow (fig. to the AM LOOP terminals...
Owner's Manual
Page 33
Basic Setup Changing the OSD display language (OSD Language 34 Automatically conducting optimum sound tuning (Full Auto MCACC 34 The Input Setup menu...36 Operation Mode Setup...37 About the Home Menu...37 33
Basic Setup Changing the OSD display language (OSD Language 34 Automatically conducting optimum sound tuning (Full Auto MCACC 34 The Input Setup menu...36 Operation Mode Setup...37 About the Home Menu...37 33


