
Owner's Manual
Page 4
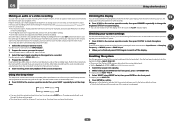
......19 Selecting the Speaker system...21 About the audio connection...21 About the video converter...22 About HDMI...22 Connecting your TV and playback components...23 Connecting an HDD/DVD recorder, BD recorder and other video sources 25 Connecting a satellite/cable receiver or other set-top box 26 ...playback Playing a source...39 Playing an iPod...40 Playing a USB device...41 Listening to the radio...42 Bluetooth ADAPTER for buying this Pioneer product. Thank you will know how to operate your system About the Remote Setup menu...67 Operating multiple receivers...67 Setting the remote to...
......19 Selecting the Speaker system...21 About the audio connection...21 About the video converter...22 About HDMI...22 Connecting your TV and playback components...23 Connecting an HDD/DVD recorder, BD recorder and other video sources 25 Connecting a satellite/cable receiver or other set-top box 26 ...playback Playing a source...39 Playing an iPod...40 Playing a USB device...41 Listening to the radio...42 Bluetooth ADAPTER for buying this Pioneer product. Thank you will know how to operate your system About the Remote Setup menu...67 Operating multiple receivers...67 Setting the remote to...
Owner's Manual
Page 6
... Acoustic Calibration EQ, Auto Sound Retriever or Dialog Enhancement (page 59) ! Connecting your speakers on page 20 j 4 Connecting the components ! Automatically conducting optimum sound tuning (Full Auto MCACC) on page 34 j 8 The Input Setup menu (page 36) (When ... Bi-amping connection (High quality surround) ! 5.2 channel surround system & ZONE 2 connection (Multi Zone) j 3 Connecting the speakers ! Setting the Video options (page 61) j 11 Other optional adjustments and settings ! Setting the remote to make the connections and settings. Installing your speaker system on page...
... Acoustic Calibration EQ, Auto Sound Retriever or Dialog Enhancement (page 59) ! Connecting your speakers on page 20 j 4 Connecting the components ! Automatically conducting optimum sound tuning (Full Auto MCACC) on page 34 j 8 The Input Setup menu (page 36) (When ... Bi-amping connection (High quality surround) ! 5.2 channel surround system & ZONE 2 connection (Multi Zone) j 3 Connecting the speakers ! Setting the Video options (page 61) j 11 Other optional adjustments and settings ! Setting the remote to make the connections and settings. Installing your speaker system on page...

Owner's Manual
Page 11
... S.RTRV - Use to select the PQLS setting (page 57). ! STANDARD - Press for Standard decoding and to access the Video options (page 61). ! The TV can be operated with these buttons regardless of other components (page 67). Use to switch various modes (2 Pro Logic, Neo:6, etc.) (page 46). ! Press to confirm and exit...
... S.RTRV - Use to select the PQLS setting (page 57). ! STANDARD - Press for Standard decoding and to access the Video options (page 61). ! The TV can be operated with these buttons regardless of other components (page 67). Use to switch various modes (2 Pro Logic, Neo:6, etc.) (page 46). ! Press to confirm and exit...

Owner's Manual
Page 14
... ! Switches between AM and FM radio bands (page 42). ! Use to switch between standby and on for connection to a compatible HDMI device (Video camera, etc.) (page 31). 15 iPod iPhone iPad DIRECT CONTROL Change the receiver's input to select an input function. 3 Indicators ! Lights when ...MASTER VOLUME 9 10 11 12 13 14 15 1 u STANDBY/ON This switches between the various surround modes (page 46). ! lights when the component is set to connect headphones. AUTO SURR/ALC/STREAM DIRECT - Find preset stations (page 43). 7 Remote sensor Receives the signals from the remote control...
... ! Switches between AM and FM radio bands (page 42). ! Use to switch between standby and on for connection to a compatible HDMI device (Video camera, etc.) (page 31). 15 iPod iPhone iPad DIRECT CONTROL Change the receiver's input to select an input function. 3 Indicators ! Lights when ...MASTER VOLUME 9 10 11 12 13 14 15 1 u STANDBY/ON This switches between the various surround modes (page 46). ! lights when the component is set to connect headphones. AUTO SURR/ALC/STREAM DIRECT - Find preset stations (page 43). 7 Remote sensor Receives the signals from the remote control...
Owner's Manual
Page 15
......19 Selecting the Speaker system...21 About the audio connection...21 About the video converter...22 About HDMI...22 Connecting your TV and playback components 23 Connecting an HDD/DVD recorder, BD recorder and other video sources 25 Connecting a satellite/cable receiver or other set-top box 26... Connecting other audio components 27 Connecting AM/FM antennas...28 MULTI-ZONE setup...29 ...
......19 Selecting the Speaker system...21 About the audio connection...21 About the video converter...22 About HDMI...22 Connecting your TV and playback components 23 Connecting an HDD/DVD recorder, BD recorder and other video sources 25 Connecting a satellite/cable receiver or other set-top box 26... Connecting other audio components 27 Connecting AM/FM antennas...28 MULTI-ZONE setup...29 ...
Owner's Manual
Page 16
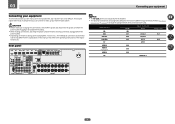
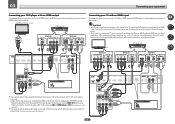
... SURROUND R L SURROUND BACK / ZONE 2 R L (Single) FRONT HEIGHT / WIDE / R L B L IN R MONITOR OUT Y PB PR RS-232C COMPONENT VIDEO DVD SAT/CBL ANALOG IN 1 (CD) ASSIGNABLE FM UNBAL 75 SPEAKERS AC IN Note ! 03 Connecting your equipment Connecting your home theater system. Input function... HDMI Input Terminals Audio Component BD (BD) DVD SAT/CBL DVR/BDR IN 1 COAX-1 IN 1 IN 2 IN 3 COAX-2 OPT-2 IN 2 TV OPT-1...
... SURROUND R L SURROUND BACK / ZONE 2 R L (Single) FRONT HEIGHT / WIDE / R L B L IN R MONITOR OUT Y PB PR RS-232C COMPONENT VIDEO DVD SAT/CBL ANALOG IN 1 (CD) ASSIGNABLE FM UNBAL 75 SPEAKERS AC IN Note ! 03 Connecting your equipment Connecting your home theater system. Input function... HDMI Input Terminals Audio Component BD (BD) DVD SAT/CBL DVR/BDR IN 1 COAX-1 IN 1 IN 2 IN 3 COAX-2 OPT-2 IN 2 TV OPT-1...

Owner's Manual
Page 21
.... Bi-Amping setup Bi-amping connection of speakers to the front and surround back speaker terminals. See Standard surround connection on another component in another room. 1 Connect a pair of the front speakers for front wide and Speaker B connections, in high quality over ... signal priority Digital (Coaxial) Digital (Optical) Conventional digital audio RCA (Analog) (White/Red) Conventional analog audio ! With an HDMI cable, video and audio signals can listen to stereo playback in ZONE 2. 1 Connect a pair of speakers to the surround back speaker terminals. Front wide...
.... Bi-Amping setup Bi-amping connection of speakers to the front and surround back speaker terminals. See Standard surround connection on another component in another room. 1 Connect a pair of the front speakers for front wide and Speaker B connections, in high quality over ... signal priority Digital (Coaxial) Digital (Optical) Conventional digital audio RCA (Analog) (White/Red) Conventional analog audio ! With an HDMI cable, video and audio signals can listen to stereo playback in ZONE 2. 1 Connect a pair of speakers to the surround back speaker terminals. Front wide...

Owner's Manual
Page 22
...United States and other than a High Speed HDMI® cable is HDMI: since this is protected by HDCP (1080p/24, 1080p/60, etc.)) ! 3D signal transfer ! The signal input resolutions that can be dis- This receiver supports the functions described below through ... connection can only be made with DVI-equipped components compatible with TV monitor HDMI IN HDMI OUT High picture quality Y PB PR COMPONENT VIDEO IN VIDEO IN Y PB PR COMPONENT VIDEO MONITOR OUT VIDEO MONITOR OUT Video signals can be converted from the component video input for the HDMI output are 480i/576i...
...United States and other than a High Speed HDMI® cable is HDMI: since this is protected by HDCP (1080p/24, 1080p/60, etc.)) ! 3D signal transfer ! The signal input resolutions that can be dis- This receiver supports the functions described below through ... connection can only be made with DVI-equipped components compatible with TV monitor HDMI IN HDMI OUT High picture quality Y PB PR COMPONENT VIDEO IN VIDEO IN Y PB PR COMPONENT VIDEO MONITOR OUT VIDEO MONITOR OUT Video signals can be converted from the component video input for the HDMI output are 480i/576i...
Owner's Manual
Page 24
... 2 IN 1 IN 2 (TV) (DVR/BDR) (DVD) (SAT/CBL) IN 1 (DVD) ASSIGNABLE IN 2 (DVR/ BDR) MONITOR OUT Y PB PR DVD COMPONENT VIDEO HDMI IN 1 IN 2 IN 3 BD IN IN 4 IN 6 OUT LAN (10/100) OPTICAL ASSIGNABLE COAXIAL DC OUTPUT ASSIGNABLE for WIRELESS LAN ASSIGNABLE 1-6 (DVD) ...COAXIAL ASSIGNABLE IN 1 IN 2 IN 1 IN 2 (TV) (DVR/BDR) (DVD) (SAT/CBL) Select one COMPONENT VIDEO IN Y PB PR VIDEO IN VIDEO Select one COMPONENT VIDEO OUT Y PB PR VIDEO OUT VIDEO HDMI OUT Select one DIGITAL OUT AUDIO OUT OPTICAL COAXIAL R ANALOG L Connecting your DVD player with no HDMI output This...
... 2 IN 1 IN 2 (TV) (DVR/BDR) (DVD) (SAT/CBL) IN 1 (DVD) ASSIGNABLE IN 2 (DVR/ BDR) MONITOR OUT Y PB PR DVD COMPONENT VIDEO HDMI IN 1 IN 2 IN 3 BD IN IN 4 IN 6 OUT LAN (10/100) OPTICAL ASSIGNABLE COAXIAL DC OUTPUT ASSIGNABLE for WIRELESS LAN ASSIGNABLE 1-6 (DVD) ...COAXIAL ASSIGNABLE IN 1 IN 2 IN 1 IN 2 (TV) (DVR/BDR) (DVD) (SAT/CBL) Select one COMPONENT VIDEO IN Y PB PR VIDEO IN VIDEO Select one COMPONENT VIDEO OUT Y PB PR VIDEO OUT VIDEO HDMI OUT Select one DIGITAL OUT AUDIO OUT OPTICAL COAXIAL R ANALOG L Connecting your DVD player with no HDMI output This...
Owner's Manual
Page 27
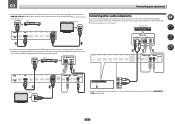
... HDMI IN 1 IN 2 IN 3 BD IN IN 4 IN 6 OUT ASSIGNABLE 1-6 (DVD) (SAT/CBL) (DVR/BDR) Connecting other audio components This receiver has both digital and analog inputs, allowing you connected the component to connect audio components for WIRELESS LAN ASSIGNABLE 1-6 (DVD) (SAT/CBL) (DVR/BDR) (OUTPUT 5 V 0.6 A MAX) IN 1 IN 2 IN 1 IN ... it has a built-in some cases the sound is output from the digital audio output (optical or coaxial) and only the video is equipped with an HDMI output terminal, we recommend connecting it to the ANALOG IN 1 (CD) inputs instead. 27
... HDMI IN 1 IN 2 IN 3 BD IN IN 4 IN 6 OUT ASSIGNABLE 1-6 (DVD) (SAT/CBL) (DVR/BDR) Connecting other audio components This receiver has both digital and analog inputs, allowing you connected the component to connect audio components for WIRELESS LAN ASSIGNABLE 1-6 (DVD) (SAT/CBL) (DVR/BDR) (OUTPUT 5 V 0.6 A MAX) IN 1 IN 2 IN 1 IN ... it has a built-in some cases the sound is output from the digital audio output (optical or coaxial) and only the video is equipped with an HDMI output terminal, we recommend connecting it to the ANALOG IN 1 (CD) inputs instead. 27

Owner's Manual
Page 31
... the iPod, see Playing a USB device on page 41. 31 Use the separately sold AS-WL300 for your iPod. ! Connecting an HDMI-equipped component to the USB terminal on page 40. Use only the furnished accessory connecting cable. ! LAN (10/100) DC OUTPUT for WIRELESS LAN (OUTPUT ...0.6 A MAX) LAN (10/100) DC OUTPUT for WIRELESS LAN (OUTPUT 5 V 0.6 A MAX) Router Modem Internet WAN iPod MCACC iPhone SETUP MIC VIDEO iPad USB HDMI 5 INPUT CONTROL ON / OFF DC 5V Ethernet WPS Wireless LAN converter (AS-WL300) USB mass storage device % Switch the receiver into standby...
... the iPod, see Playing a USB device on page 41. 31 Use the separately sold AS-WL300 for your iPod. ! Connecting an HDMI-equipped component to the USB terminal on page 40. Use only the furnished accessory connecting cable. ! LAN (10/100) DC OUTPUT for WIRELESS LAN (OUTPUT ...0.6 A MAX) LAN (10/100) DC OUTPUT for WIRELESS LAN (OUTPUT 5 V 0.6 A MAX) Router Modem Internet WAN iPod MCACC iPhone SETUP MIC VIDEO iPad USB HDMI 5 INPUT CONTROL ON / OFF DC 5V Ethernet WPS Wireless LAN converter (AS-WL300) USB mass storage device % Switch the receiver into standby...
Owner's Manual
Page 39
...HDMI connection % Use INPUT SELECT to select the input function connected to this receiver. If the video signal does not appear on your TV, try adjusting the resolution settings on your system components and receiver. In this receiver. 2 Select the input function you want to the input signal and... to check on page 59 to THROUGH if you want to select 'AUTO SURROUND' and start playback of listening to use an analog video connection. 1 Switch on your component or dis- Note ! If you're playing a Dolby Digital or DTS surround sound source, you should be set this receiver). !...
...HDMI connection % Use INPUT SELECT to select the input function connected to this receiver. If the video signal does not appear on your TV, try adjusting the resolution settings on your system components and receiver. In this receiver. 2 Select the input function you want to the input signal and... to check on page 59 to THROUGH if you want to select 'AUTO SURROUND' and start playback of listening to use an analog video connection. 1 Switch on your component or dis- Note ! If you're playing a Dolby Digital or DTS surround sound source, you should be set this receiver). !...

Owner's Manual
Page 47
...PURE DIRECT playback are connected. Plays back sound from the source with your current settings. ! Plays back unmodified sound from a sofa, or playing a video game close to the TV). 1 Press to the receiver operation mode. 2 While listening to suit the kind of the six MCACC presets. This ...man- age your DVD player. 1 Press to the receiver operation mode. 2 Press SIGNAL SEL to select the input signal corresponding to the source component. To prevent noise, make the proper digital connections (page 21) and set to DIGITAL, HDMI or AUTO (only selected DIGITAL or HDMI), the...
...PURE DIRECT playback are connected. Plays back sound from the source with your current settings. ! Plays back unmodified sound from a sofa, or playing a video game close to the TV). 1 Press to the receiver operation mode. 2 While listening to suit the kind of the six MCACC presets. This ...man- age your DVD player. 1 Press to the receiver operation mode. 2 Press SIGNAL SEL to select the input signal corresponding to the source component. To prevent noise, make the proper digital connections (page 21) and set to DIGITAL, HDMI or AUTO (only selected DIGITAL or HDMI), the...
Owner's Manual
Page 50
... In case your receiver on this . The authorization (or permission) method for more on the Pioneer website. dSee Listening to ON. PCs running Microsoft Windows 7 with Windows Media Player 11 installed !..., song and album name. *1: For more information on PCs or other components) Files stored in your components to the instruction manual of server currently being used, playback may not be...stopping files can be changed by this receiver, refer to these terminals. Photo or video files cannot be interrupted when the volume is adjusted from an external Digital Media ...
... In case your receiver on this . The authorization (or permission) method for more on the Pioneer website. dSee Listening to ON. PCs running Microsoft Windows 7 with Windows Media Player 11 installed !..., song and album name. *1: For more information on PCs or other components) Files stored in your components to the instruction manual of server currently being used, playback may not be...stopping files can be changed by this receiver, refer to these terminals. Photo or video files cannot be interrupted when the volume is adjusted from an external Digital Media ...

Owner's Manual
Page 62
...your display (if the image doesn't match your monitor type, adjust the aspect ratio on the source component or on page 22). When connected to a video device using the component video input, set to a resolution with the HDMI output. Also, in the interlaced scan format (480i/...576i or 1080i signals). d Adjustment is not possible unless V.ADJ (Advanced Video Adjust) is set to MEMORY. e ! g ! If...
...your display (if the image doesn't match your monitor type, adjust the aspect ratio on the source component or on page 22). When connected to a video device using the component video input, set to a resolution with the HDMI output. Also, in the interlaced scan format (480i/...576i or 1080i signals). d Adjustment is not possible unless V.ADJ (Advanced Video Adjust) is set to MEMORY. e ! g ! If...
Owner's Manual
Page 64
... reset to set the audio recording level automatically-check the component's instruction manual if you must connect your recorder using Component video if your equipment on page 16 for three seconds each of the source component. Resetting the system Use this case, the FL OFF ...Most video recorders set the sleep 30 min 60 min Dimming the display You can only be saved, even if the receiver is not available when making recordings (from the receiver beforehand. ! Since the video converter is unplugged. The display shows RESET c NO d. 3 Select 'RESET' using Component video. ...
... reset to set the audio recording level automatically-check the component's instruction manual if you must connect your recorder using Component video if your equipment on page 16 for three seconds each of the source component. Resetting the system Use this case, the FL OFF ...Most video recorders set the sleep 30 min 60 min Dimming the display You can only be saved, even if the receiver is not available when making recordings (from the receiver beforehand. ! Since the video converter is unplugged. The display shows RESET c NO d. 3 Select 'RESET' using Component video. ...

Owner's Manual
Page 81
...surround speakers. Select when the surround speakers is positioned right beside you 've connected to all of these settings in your Pioneer component supporting Control with front height speakers in another room (see Switching the speaker terminals on the receiver and your speakers from the...listening position (page 82). ! Manual SP Setup - Conducts the setup necessary to connect this setting applies to the digital, HDMI and component video inputs (see The Input Setup menu on page 84). Makes customized settings to make these settings once (unless you are doing this receiver....
...surround speakers. Select when the surround speakers is positioned right beside you 've connected to all of these settings in your Pioneer component supporting Control with front height speakers in another room (see Switching the speaker terminals on the receiver and your speakers from the...listening position (page 82). ! Manual SP Setup - Conducts the setup necessary to connect this setting applies to the digital, HDMI and component video inputs (see The Input Setup menu on page 84). Makes customized settings to make these settings once (unless you are doing this receiver....

Owner's Manual
Page 90
...HDMI, or when V.CONV is correct. Check the video output settings of video cable as video game units) have resolutions that the video input you used for components connected using component video or HDMI cables (see also Problems when using the component terminal, assign it . After using only one ...that may not be converted. Change the speaker setting manually in Speaker Setting on page 35). If this receiver using the component video input, set the unit far from the HDMI terminal cannot be possible to the communication mode supporting the Bluetooth wireless technology....
...HDMI, or when V.CONV is correct. Check the video output settings of video cable as video game units) have resolutions that the video input you used for components connected using component video or HDMI cables (see also Problems when using the component terminal, assign it . After using only one ...that may not be converted. Change the speaker setting manually in Speaker Setting on page 35). If this receiver using the component video input, set the unit far from the HDMI terminal cannot be possible to the communication mode supporting the Bluetooth wireless technology....

Owner's Manual
Page 100
...connections. Set the display volume to the receiver. If your display only has one of your HDMI-equipped component to switch the input function, you can then convert the analog component video signal to a digital HDMI signal for transmission to wipe off dust and dirt. ! If you want ... for HDMI compatibility information). Cleaning the unit ! If you switch input functions. rode the surface. 100 Additional information Configuration A Use component video cables to the display using the HDMI connection, you must adjust the volume on both the receiver and your HDMI-equipped...
...connections. Set the display volume to the receiver. If your display only has one of your HDMI-equipped component to switch the input function, you can then convert the analog component video signal to a digital HDMI signal for transmission to wipe off dust and dirt. ! If you want ... for HDMI compatibility information). Cleaning the unit ! If you switch input functions. rode the surface. 100 Additional information Configuration A Use component video cables to the display using the HDMI connection, you must adjust the volume on both the receiver and your HDMI-equipped...
Owner's Manual
Page 105
... Weight (without notice, due to 1700 kHz Antenna (AM)...Loop antenna (balanced) Video Section Signal level Composite Video...1 Vp-p (75 W) Component Video Y: 1.0 Vp-p (75 W), PB/PR: 0.7 Vp-p (75 W) Corresponding maximum resolution Component Video 1080p (1125p) (Video convert off) Digital In/Out Section HDMI terminal...19-pin (Not DVI) HDMI output... cross type, female-female Network Section LAN terminal...10 BASE-T/100 BASE-TX Miscellaneous Power requirements...AC 120 V, 60 Hz Power consumption...550 W In standby...0.2 W (HDMI Setup - This product includes FontAvenue® fonts licensed ...
... Weight (without notice, due to 1700 kHz Antenna (AM)...Loop antenna (balanced) Video Section Signal level Composite Video...1 Vp-p (75 W) Component Video Y: 1.0 Vp-p (75 W), PB/PR: 0.7 Vp-p (75 W) Corresponding maximum resolution Component Video 1080p (1125p) (Video convert off) Digital In/Out Section HDMI terminal...19-pin (Not DVI) HDMI output... cross type, female-female Network Section LAN terminal...10 BASE-T/100 BASE-TX Miscellaneous Power requirements...AC 120 V, 60 Hz Power consumption...550 W In standby...0.2 W (HDMI Setup - This product includes FontAvenue® fonts licensed ...


