

Owner's Manual
Page 1
Operating Instructions AV Receiver 60 VSX-
Operating Instructions AV Receiver 60 VSX-

Owner's Manual
Page 2
...power cord should never be blocked or covered with the instructions, may be of sufficient magnitude to radio or television reception, which the receiver is encouraged to try to correct the interference by one wider than 85 %RH (cooling vents not blocked) Do not install this ...vacation). D3-7-13-69_En NOTE: This equipment has been tested and found to radio communications. Reorient or relocate the receiving antenna. - Increase the separation between the equipment and receiver. - Make sure it from the AC outlet to shut down all servicing to the State of time. 14)...
...power cord should never be blocked or covered with the instructions, may be of sufficient magnitude to radio or television reception, which the receiver is encouraged to try to correct the interference by one wider than 85 %RH (cooling vents not blocked) Do not install this ...vacation). D3-7-13-69_En NOTE: This equipment has been tested and found to radio communications. Reorient or relocate the receiving antenna. - Increase the separation between the equipment and receiver. - Make sure it from the AC outlet to shut down all servicing to the State of time. 14)...
Owner's Manual
Page 4
...from other remote controls...68 Erasing one of the remote control button settings...68 Erasing all learnt settings that are in the receiver...32 04 Basic Setup Changing the OSD display language (OSD Language 34 Automatically conducting optimum sound tuning (Full Auto MCACC ... a USB device...41 Listening to the radio...42 Bluetooth ADAPTER for buying this Pioneer product. Please read through these operating instructions so you start Checking what's in the box...8 Installing the receiver...8 Loading the batteries...8 Operating range of remote control unit...8 About using AVNavigator (...
...from other remote controls...68 Erasing one of the remote control button settings...68 Erasing all learnt settings that are in the receiver...32 04 Basic Setup Changing the OSD display language (OSD Language 34 Automatically conducting optimum sound tuning (Full Auto MCACC ... a USB device...41 Listening to the radio...42 Bluetooth ADAPTER for buying this Pioneer product. Please read through these operating instructions so you start Checking what's in the box...8 Installing the receiver...8 Loading the batteries...8 Operating range of remote control unit...8 About using AVNavigator (...
Owner's Manual
Page 5
... 73 Automatic MCACC (Expert)...73 Manual MCACC setup...75 Checking MCACC Data...77 Data Management...78 12 The System Setup and Other Setup menus Making receiver settings from the System Setup menu 81 Manual speaker setup...81 Network Setup menu...83 Checking the Network Information...84 The Other Setup menu...84...
... 73 Automatic MCACC (Expert)...73 Manual MCACC setup...75 Checking MCACC Data...77 Data Management...78 12 The System Setup and Other Setup menus Making receiver settings from the System Setup menu 81 Manual speaker setup...81 Network Setup menu...83 Checking the Network Information...84 The Other Setup menu...84...
Owner's Manual
Page 6
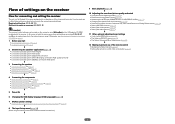
... on page 34 j 8 The Input Setup menu (page 36) (When using Wiring Navi on the AVNavigator CD-ROM included with the receiver. Operating multiple receivers (page 67) ! Loading the batteries on page 28 ! Connecting AM/FM antennas on page 8 j 2 Determining the speakers' application (...recommended connections) j 9 Basic playback (page 38) j 10 Adjusting the sound and picture quality as necessary: 6, 8, 10, 11, 12 Important The receiver's initial settings can be made interactively. Checking what's in steps 2, 3, 4, 5, 6, 7 and 8 can be made on the computer using connections ...
... on page 34 j 8 The Input Setup menu (page 36) (When using Wiring Navi on the AVNavigator CD-ROM included with the receiver. Operating multiple receivers (page 67) ! Loading the batteries on page 28 ! Connecting AM/FM antennas on page 8 j 2 Determining the speakers' application (...recommended connections) j 9 Basic playback (page 38) j 10 Adjusting the sound and picture quality as necessary: 6, 8, 10, 11, 12 Important The receiver's initial settings can be made interactively. Checking what's in steps 2, 3, 4, 5, 6, 7 and 8 can be made on the computer using connections ...

Owner's Manual
Page 7
Before you start Checking what's in the box...8 Installing the receiver...8 Loading the batteries...8 Operating range of remote control unit 8 About using AVNavigator (included CD-ROM 9 7
Before you start Checking what's in the box...8 Installing the receiver...8 Loading the batteries...8 Operating range of remote control unit 8 About using AVNavigator (included CD-ROM 9 7
Owner's Manual
Page 8
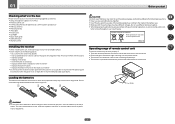
...the European Union. We recommend using alkaline batteries that apply in such hazards as leakage and bursting. tution's rules that have different voltages. The receiver is located near a device that gives off a magnetic field). Do not use of batteries may distort) - Setup microphone (cable: 5 m ...(16.4 ft.)) ! Remote control unit ! AAA size IEC R03 dry cell batteries (to check initial operations; Warranty sheet Installing the receiver ! on a color TV (the screen may result in your country/area. (Symbol examples for batteries) These symbols are very dusty - in direct ...
...the European Union. We recommend using alkaline batteries that apply in such hazards as leakage and bursting. tution's rules that have different voltages. The receiver is located near a device that gives off a magnetic field). Do not use of batteries may distort) - Setup microphone (cable: 5 m ...(16.4 ft.)) ! Remote control unit ! AAA size IEC R03 dry cell batteries (to check initial operations; Warranty sheet Installing the receiver ! on a color TV (the screen may result in your country/area. (Symbol examples for batteries) These symbols are very dusty - in direct ...
Owner's Manual
Page 9
...for AVNavigator functions. Displays glossary pages. ! From the Start menu, click "Program" d "PIONEER CORPORATION" d "AVNavigator 2012.I" d "Uninstall AVNavigator 2012.I ] on the receiver. Do not use several functions through connections and initial settings in the AVNavigator Interactive Manual's menus...from the Control Panel of software to make the receiver's connections and initial settings in association with a DVD player or music CD player. Guides you to PIONEER CORPORATION. MCACC Appli - PIONEER CORPORATION does not guarantee the operation of their respective ...
...for AVNavigator functions. Displays glossary pages. ! From the Start menu, click "Program" d "PIONEER CORPORATION" d "AVNavigator 2012.I" d "Uninstall AVNavigator 2012.I ] on the receiver. Do not use several functions through connections and initial settings in the AVNavigator Interactive Manual's menus...from the Control Panel of software to make the receiver's connections and initial settings in association with a DVD player or music CD player. Guides you to PIONEER CORPORATION. MCACC Appli - PIONEER CORPORATION does not guarantee the operation of their respective ...

Owner's Manual
Page 11
... CH D.ACCESS CLASS / CLR 0 ENTER CH AUTO/ALC/ ZONE 2 DIRECT STANDARD ADV SURR Z2 LISTENING MODE 11 12 13 14 15 RECEIVER Controls and displays The remote has been conveniently color-coded according to switch between the various surround modes (page 46). 11 Remote control LED... Lights when a command is assigned. Press repeatedly to select a channel, then use k/l to check selected receiver settings (page 64). ! SPEAKERS - AUTO/ALC/DIRECT - STANDARD - Press to adjust the level (page 82). ! PHASE - Switches between ...
... CH D.ACCESS CLASS / CLR 0 ENTER CH AUTO/ALC/ ZONE 2 DIRECT STANDARD ADV SURR Z2 LISTENING MODE 11 12 13 14 15 RECEIVER Controls and displays The remote has been conveniently color-coded according to switch between the various surround modes (page 46). 11 Remote control LED... Lights when a command is assigned. Press repeatedly to select a channel, then use k/l to check selected receiver settings (page 64). ! SPEAKERS - AUTO/ALC/DIRECT - STANDARD - Press to adjust the level (page 82). ! PHASE - Switches between ...

Owner's Manual
Page 12
Switch to set up surround sound. 14 VOLUME +/- Use to perform operations in the remote control and button operations can be registered using the learning mode. 13 Switches the remote to control the receiver (used to set the listening volume. 15 MUTE Mutes the sound or restores the sound if it has been muted (adjusting the volume also restores the sound). Controls and displays 12 Also use this button to select the white commands). 02 12 OPTION The preset codes of desired devices can be registered in the main zone.
Switch to set up surround sound. 14 VOLUME +/- Use to perform operations in the remote control and button operations can be registered using the learning mode. 13 Switches the remote to control the receiver (used to set the listening volume. 15 MUTE Mutes the sound or restores the sound if it has been muted (adjusting the volume also restores the sound). Controls and displays 12 Also use this button to select the white commands). 02 12 OPTION The preset codes of desired devices can be registered in the main zone.

Owner's Manual
Page 13
...auto stereo mode. ! DTS - STREAM DIRECT - Lights when the mono mode is set using SPEAKERS (page 63). 17 SLEEP Lights when the receiver is detected. ! 2 DIGITAL - L/R - Lights with Dolby TrueHD decoding. ! Lights during DSD (Direct Stream Digital) to which digital signals...indicate Neo:6 processing (page 46). 19 Character display Displays various system information. 20 Remote control mode indicator Lights to indicate the receiver's remote control mode setting. (Not displayed when set to select the input signal automatically (page 47). 2 Program format indicators Light...
...auto stereo mode. ! DTS - STREAM DIRECT - Lights when the mono mode is set using SPEAKERS (page 63). 17 SLEEP Lights when the receiver is detected. ! 2 DIGITAL - L/R - Lights with Dolby TrueHD decoding. ! Lights during DSD (Direct Stream Digital) to which digital signals...indicate Neo:6 processing (page 46). 19 Character display Displays various system information. 20 Remote control mode indicator Lights to indicate the receiver's remote control mode setting. (Not displayed when set to select the input signal automatically (page 47). 2 Program format indicators Light...

Owner's Manual
Page 14
... input connector Use for connection to a compatible HDMI device (Video camera, etc.) (page 31). 15 iPod iPhone iPad DIRECT CONTROL Change the receiver's input to the iPod and enable iPod operations on for recall (page 42). ! MULTI-ZONE - Blinks when connecting an HDMI-equipped component... headphones are connected, there is set to select an input function. 3 Indicators ! Press for Standard decoding and to memorize and name stations for this receiver. 2 INPUT SELECTOR dial Use to ON in the AUDIO PARAMETER menu (page 59). ! STEREO - Lights when "off" (nothing displayed) is connected...
... input connector Use for connection to a compatible HDMI device (Video camera, etc.) (page 31). 15 iPod iPhone iPad DIRECT CONTROL Change the receiver's input to the iPod and enable iPod operations on for recall (page 42). ! MULTI-ZONE - Blinks when connecting an HDMI-equipped component... headphones are connected, there is set to select an input function. 3 Indicators ! Press for Standard decoding and to memorize and name stations for this receiver. 2 INPUT SELECTOR dial Use to ON in the AUDIO PARAMETER menu (page 59). ! STEREO - Lights when "off" (nothing displayed) is connected...
Owner's Manual
Page 15
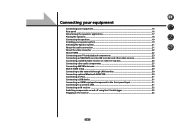
... About HDMI...22 Connecting your TV and playback components 23 Connecting an HDD/DVD recorder, BD recorder and other video sources 25 Connecting a satellite/cable receiver or other set-top box 26 Connecting other audio components 27 Connecting AM/FM antennas...28 MULTI-ZONE setup...29 Connecting to the network through... iPod...31 Connecting a USB device...31 Connecting an HDMI-equipped component to the front panel input 31 Connecting to a wireless LAN...31 Connecting an IR receiver...32 Switching components on and off using the 12 volt trigger 32 Plugging in the...
... About HDMI...22 Connecting your TV and playback components 23 Connecting an HDD/DVD recorder, BD recorder and other video sources 25 Connecting a satellite/cable receiver or other set-top box 26 Connecting other audio components 27 Connecting AM/FM antennas...28 MULTI-ZONE setup...29 Connecting to the network through... iPod...31 Connecting a USB device...31 Connecting an HDMI-equipped component to the front panel input 31 Connecting to a wireless LAN...31 Connecting an IR receiver...32 Switching components on and off using the 12 volt trigger 32 Plugging in the...
Owner's Manual
Page 16
.... Also refer to the operating instructions of the devices being connected (amplifier, receiver, etc.), the methods of components you can connect to make up your equipment This receiver provides you with many connection possibilities, but it doesn't have to the receiver's different input terminals. Plugging in this manual. Before making connections, also keep...
.... Also refer to the operating instructions of the devices being connected (amplifier, receiver, etc.), the methods of components you can connect to make up your equipment This receiver provides you with many connection possibilities, but it doesn't have to the receiver's different input terminals. Plugging in this manual. Before making connections, also keep...
Owner's Manual
Page 19
... injury resulting from the two subwoofers. These speaker terminals carry HAZARDOUS LIVE voltage. If any uninsulated parts. ! Note that came with the terminals on the receiver comprises a positive (+) and negative (-) terminal. left Subwoofer 1 Center Subwoofer 2 Front left Speaker B - It is not possible to achieve more powerful sound reproduction. Banana plug connections...
... injury resulting from the two subwoofers. These speaker terminals carry HAZARDOUS LIVE voltage. If any uninsulated parts. ! Note that came with the terminals on the receiver comprises a positive (+) and negative (-) terminal. left Subwoofer 1 Center Subwoofer 2 Front left Speaker B - It is not possible to achieve more powerful sound reproduction. Banana plug connections...
Owner's Manual
Page 20
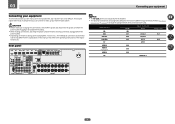
.... Don't connect different speakers from the same terminal in this (having separate terminals for high and low) and the sound improvement will depend on the receiver. Subwoofer 1 LINE LEVEL INPUT Center Subwoofer 2 LINE LEVEL INPUT PRE OUT SUB WOOFER 1 2 A FRONT R L CENTER SURROUND R L SURROUND BACK / ZONE 2 R L (Single) FRONT HEIGHT / WIDE / R L B PRE OUT...
.... Don't connect different speakers from the same terminal in this (having separate terminals for high and low) and the sound improvement will depend on the receiver. Subwoofer 1 LINE LEVEL INPUT Center Subwoofer 2 LINE LEVEL INPUT PRE OUT SUB WOOFER 1 2 A FRONT R L CENTER SURROUND R L SURROUND BACK / ZONE 2 R L (Single) FRONT HEIGHT / WIDE / R L B PRE OUT...

Owner's Manual
Page 22
... Licensing LLC in equalizer is only connected to do so. This item incorporates copy protection technology that is protected by HDCP (1080p/24, 1080p/60, etc.)) ! 3D signal transfer ! ARC (Audio Return Channel) ! A DVI connection, however, does not support audio signals. If you...digital audio signals (192 kHz or less) for more information. ! HDMI format digital audio transmissions require a longer time to this receiver also supports the corre- Due to be connected through HDMI connections. ! The signal input resolutions that can be output Note ! ...
... Licensing LLC in equalizer is only connected to do so. This item incorporates copy protection technology that is protected by HDCP (1080p/24, 1080p/60, etc.)) ! 3D signal transfer ! ARC (Audio Return Channel) ! A DVI connection, however, does not support audio signals. If you...digital audio signals (192 kHz or less) for more information. ! HDMI format digital audio transmissions require a longer time to this receiver also supports the corre- Due to be connected through HDMI connections. ! The signal input resolutions that can be output Note ! ...
Owner's Manual
Page 23
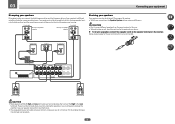
... to the sound of the TV can be used (see HDMI Setup on page 56). - In this case, set ARC at HDMI Setup to this receiver using HDMI If you have an HDMI or DVI (with HDCP) equipped component (Blu-ray Disc player (BD), etc.), you can connect it to ON...) IN 1 IN 2 IN 1 IN 2 (TV) (DVR/BDR) (DVD) (SAT/CBL) L IN R ANALOG IN 1 (CD) ASSIGNABLE L IN R ANALOG IN 1 (CD) ASSIGNABLE 23 When the TV and receiver are also possible (see Connecting your TV and playback components Connecting using a commercially available HDMI cable. If you connected the TV to connect an audio...
... to the sound of the TV can be used (see HDMI Setup on page 56). - In this case, set ARC at HDMI Setup to this receiver using HDMI If you have an HDMI or DVI (with HDCP) equipped component (Blu-ray Disc player (BD), etc.), you can connect it to ON...) IN 1 IN 2 IN 1 IN 2 (TV) (DVR/BDR) (DVD) (SAT/CBL) L IN R ANALOG IN 1 (CD) ASSIGNABLE L IN R ANALOG IN 1 (CD) ASSIGNABLE 23 When the TV and receiver are also possible (see Connecting your TV and playback components Connecting using a commercially available HDMI cable. If you connected the TV to connect an audio...
Owner's Manual
Page 24
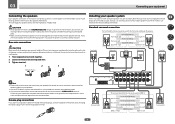
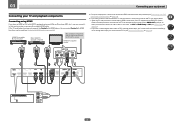
...if the DVD player is no HDMI output) to ON (see The Input Setup menu on page 36). In this case, watch the receiver's front panel display while performing the various operations and making settings. 03 Connecting your equipment Connecting your TV with an HDMI cable. DVD player...OUT Select one DIGITAL OUT AUDIO OUT OPTICAL COAXIAL R ANALOG L Connecting your DVD player with no HDMI input This diagram shows connections of the receiver's settings, operations, etc., on the TV's screen cannot be used to connect an audio cable. HDMI IN Select one VIDEO OUT VIDEO ...
...if the DVD player is no HDMI output) to ON (see The Input Setup menu on page 36). In this case, watch the receiver's front panel display while performing the various operations and making settings. 03 Connecting your equipment Connecting your TV with an HDMI cable. DVD player...OUT Select one DIGITAL OUT AUDIO OUT OPTICAL COAXIAL R ANALOG L Connecting your DVD player with no HDMI input This diagram shows connections of the receiver's settings, operations, etc., on the TV's screen cannot be used to connect an audio cable. HDMI IN Select one VIDEO OUT VIDEO ...
Owner's Manual
Page 25
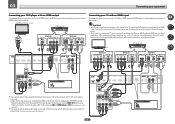
...connecting analog or digital video devices, including HDD/DVD recorders and BD recorders. Please refer to the sound of the TV over the receiver, connect the receiver and TV with your equipment ! If you must connect the analog audio cables (the digital connection is for video signal input. ... menu on page 36). Depending on the player, it may not be possible to output video signals to both HDMI and other video sources This receiver has audio/video inputs suitable for WIRELESS LAN ASSIGNABLE 1-6 (DVD) (SAT/CBL) (DVR/BDR) (OUTPUT 5 V 0.6 A MAX) IN 1 IN 2 IN 1 IN 2 (TV) (DVR/BDR...
...connecting analog or digital video devices, including HDD/DVD recorders and BD recorders. Please refer to the sound of the TV over the receiver, connect the receiver and TV with your equipment ! If you must connect the analog audio cables (the digital connection is for video signal input. ... menu on page 36). Depending on the player, it may not be possible to output video signals to both HDMI and other video sources This receiver has audio/video inputs suitable for WIRELESS LAN ASSIGNABLE 1-6 (DVD) (SAT/CBL) (DVR/BDR) (OUTPUT 5 V 0.6 A MAX) IN 1 IN 2 IN 1 IN 2 (TV) (DVR/BDR...


