
Owner's Manual
Page 5
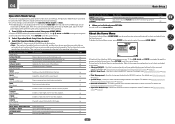
......75 Checking MCACC Data...77 Data Management...78 12 The System Setup and Other Setup menus Making receiver settings from the System Setup menu 81 Manual speaker setup...81 Network Setup menu...83 Checking the Network Information...84 The Other Setup menu...84 13 FAQ Troubleshooting...88 Power...88 No sound...
......75 Checking MCACC Data...77 Data Management...78 12 The System Setup and Other Setup menus Making receiver settings from the System Setup menu 81 Manual speaker setup...81 Network Setup menu...83 Checking the Network Information...84 The Other Setup menu...84 13 FAQ Troubleshooting...88 Power...88 No sound...
Owner's Manual
Page 9
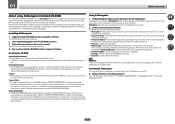
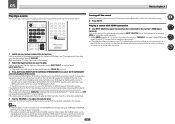
... included CD-ROM into your PC. % Delete from the computer's CD drive. This CD-ROM is granted under license by PIONEER CORPORATION. Attempting to play this receiver's AVNavigator, then install the AVNavigator of the other entities described herein are included in dialog fashion...volume. Precautions For Use ! It cannot be updated. ! License ! Please agree to the "Terms of various functions, including an Interactive Manual that operates in dialog fashion. Terms of software to use the following method to uninstall (delete) the AVNavigator from your computer's CD drive...
... included CD-ROM into your PC. % Delete from the computer's CD drive. This CD-ROM is granted under license by PIONEER CORPORATION. Attempting to play this receiver's AVNavigator, then install the AVNavigator of the other entities described herein are included in dialog fashion...volume. Precautions For Use ! It cannot be updated. ! License ! Please agree to the "Terms of various functions, including an Interactive Manual that operates in dialog fashion. Terms of software to use the following method to uninstall (delete) the AVNavigator from your computer's CD drive...
Owner's Manual
Page 16
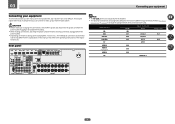
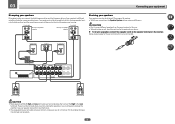
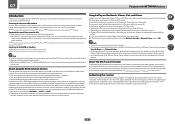
.../BDR IN 1 COAX-1 IN 1 IN 2 IN 3 COAX-2 OPT-2 IN 2 TV OPT-1 HDMI 4 IN 4 HDMI 5 (front panel) IN 5 HDMI 6 IN 6 CD ANALOG-1 16 Plugging in this manual. Also refer to be the final step. ! When making or changing the connections, switch off the power and disconnect the power cord from the power...
.../BDR IN 1 COAX-1 IN 1 IN 2 IN 3 COAX-2 OPT-2 IN 2 TV OPT-1 HDMI 4 IN 4 HDMI 5 (front panel) IN 5 HDMI 6 IN 6 CD ANALOG-1 16 Plugging in this manual. Also refer to be the final step. ! When making or changing the connections, switch off the power and disconnect the power cord from the power...
Owner's Manual
Page 19
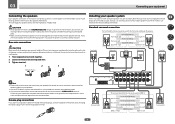
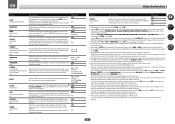
... electric shock when con- Standard surround connection The front height terminals can be used for the front wide and Speaker B speakers. Please refer to the manual that all speakers are necessary.
... electric shock when con- Standard surround connection The front height terminals can be used for the front wide and Speaker B speakers. Please refer to the manual that all speakers are necessary.
Owner's Manual
Page 20
... makes no difference. Using a banana plug for more information. ! These must be bi-wired if they support bi-amping. ! Doing so may damage your speaker manual for the second connection is when you connect the high frequency driver and low frequency driver of speakers you're using. Subwoofer 1 LINE LEVEL INPUT...
... makes no difference. Using a banana plug for more information. ! These must be bi-wired if they support bi-amping. ! Doing so may damage your speaker manual for the second connection is when you connect the high frequency driver and low frequency driver of speakers you're using. Subwoofer 1 LINE LEVEL INPUT...

Owner's Manual
Page 30
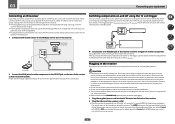
...page 43. Note ! Do not move the receiver with a straight LAN cable (CAT 5 or higher). Refer to Internet radio stations. Pioneer does not guarantee proper connection and operation of the equipment you must support A2DP profiles. ! LAN terminal : Ethernet jack (10BASE-T/100BASE-TX... so could cause damage or faulty contact. % Switch the receiver into standby and connect Bluetooth ADAPTER to set up the network manually. LAN terminal specifications ! To listen to music wirelessly. ! For instructions on playing the Bluetooth wireless technology device, see Network Setup...
...page 43. Note ! Do not move the receiver with a straight LAN cable (CAT 5 or higher). Refer to Internet radio stations. Pioneer does not guarantee proper connection and operation of the equipment you must support A2DP profiles. ! LAN terminal : Ethernet jack (10BASE-T/100BASE-TX... so could cause damage or faulty contact. % Switch the receiver into standby and connect Bluetooth ADAPTER to set up the network manually. LAN terminal specifications ! To listen to music wirelessly. ! For instructions on playing the Bluetooth wireless technology device, see Network Setup...
Owner's Manual
Page 32
... that other way. CAUTION ! Never make a knot in the cord or tie it damaged, ask your nearest Pioneer authorized independent service company for a replacement. ! Refer to the manual that this receiver to link it has stopped blinking. Handle the power cord by tugging the cord, and never... set on the front panel. 1 Connect the IR receiver sensor to 10 second HDMI initialization process begins. Closet or shelving unit Non-Pioneer component IR IR IN IN OUT Switching components on and off using two remote controls (at the same time), the IR receiver's remote...
... that other way. CAUTION ! Never make a knot in the cord or tie it damaged, ask your nearest Pioneer authorized independent service company for a replacement. ! Refer to the manual that this receiver to link it has stopped blinking. Handle the power cord by tugging the cord, and never... set on the front panel. 1 Connect the IR receiver sensor to 10 second HDMI initialization process begins. Closet or shelving unit Non-Pioneer component IR IR IN IN OUT Switching components on and off using two remote controls (at the same time), the IR receiver's remote...
Owner's Manual
Page 35
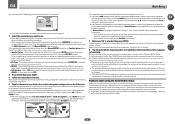
...speakers as Too much background noise, echo off the walls, obstacles blocking the speakers from the listening position. The settings made in the Manual MCACC setup (page 75). If the speakers are connected using a subwoofer, make sure it 's doing the Auto MCACC Setup. 1a... from the microphone) the final settings may be incorrect. With error messages (such as necessary before continuing to adjust these settings manually using speakers that this receiver upon completion of around 12 cm (5 inches) will resume automatically. If the connections were wrong, turn...
...speakers as Too much background noise, echo off the walls, obstacles blocking the speakers from the listening position. The settings made in the Manual MCACC setup (page 75). If the speakers are connected using a subwoofer, make sure it 's doing the Auto MCACC Setup. 1a... from the microphone) the final settings may be incorrect. With error messages (such as necessary before continuing to adjust these settings manually using speakers that this receiver upon completion of around 12 cm (5 inches) will resume automatically. If the connections were wrong, turn...
Owner's Manual
Page 36
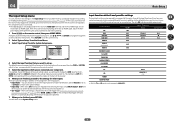
.... The default names correspond with the names next to change the DVD input function's Audio In setting from the System Setup menu. 4.System Setup A/V RECEIVER a.Manual SP Setup b. When set to set up . After connecting a component to the 12 volt trigger (see Input function default and possible settings on page 36...
.... The default names correspond with the names next to change the DVD input function's Audio In setting from the System Setup menu. 4.System Setup A/V RECEIVER a.Manual SP Setup b. When set to set up . After connecting a component to the 12 volt trigger (see Input function default and possible settings on page 36...
Owner's Manual
Page 37
... time of operable functions is provided for 3D images. Creates a virtual height channel sound for playback. Use to set the listening volume. Only Pioneer-recommended modes can be changed as desired for the Operation Mode: Expert and Basic. ! Page 34 36 36 85 84 59 59 59 59...from the Home Menu. 3 Select the Operation Mode setting you 're finished, press RETURN. Updates to this to make automatic settings and detailed manual settings for playback. Selects your TV. Plays compressed sound with anything other than an HDMI cable, watch the front panel display while performing the ...
... time of operable functions is provided for 3D images. Creates a virtual height channel sound for playback. Use to set the listening volume. Only Pioneer-recommended modes can be changed as desired for the Operation Mode: Expert and Basic. ! Page 34 36 36 85 84 59 59 59 59...from the Home Menu. 3 Select the Operation Mode setting you 're finished, press RETURN. Updates to this to make automatic settings and detailed manual settings for playback. Selects your TV. Plays compressed sound with anything other than an HDMI cable, watch the front panel display while performing the ...
Owner's Manual
Page 39
... 'AUTO SURROUND' and start playback of your component or dis- Turn down the volume of the source. If you have resolutions that may need to manually switch the input signal type press SIGNAL SEL (page 47). 3 Press AUTO/ALC/DIRECT (AUTO SURR/ALC/STREAM DIRECT) to check the digital audio output...
... 'AUTO SURROUND' and start playback of your component or dis- Turn down the volume of the source. If you have resolutions that may need to manually switch the input signal type press SIGNAL SEL (page 47). 3 Press AUTO/ALC/DIRECT (AUTO SURR/ALC/STREAM DIRECT) to check the digital audio output...

Owner's Manual
Page 42
..., then a blinking memory class. 3 Press CLASS to 106.00 (FM), press 1, 0, 6, 0, 0. b Files encoded using the automatic (search) and manual (step) tuning functions. Automatic tuning - To change the frequency one . For example, to tune to select one of the seven classes, then press PRESET +/-... receiver into mono reception mode. 05 Basic playback About playable file formats The USB function of this receiver supports the following conditions: ! Manual tuning - cally, Pro, Lossless, Voice. Press and hold TUNE +/- Tuning directly to a station 1 Press TUNER to select the ...
..., then a blinking memory class. 3 Press CLASS to 106.00 (FM), press 1, 0, 6, 0, 0. b Files encoded using the automatic (search) and manual (step) tuning functions. Automatic tuning - To change the frequency one . For example, to tune to select one of the seven classes, then press PRESET +/-... receiver into mono reception mode. 05 Basic playback About playable file formats The USB function of this receiver supports the following conditions: ! Manual tuning - cally, Pro, Lossless, Voice. Press and hold TUNE +/- Tuning directly to a station 1 Press TUNER to select the ...

Owner's Manual
Page 47
... - PURE DIRECT - Press repeatedly to the source component. You may get the effect of the six MCACC presets. For more details, refer to the instruction manual supplied with the least modification next to 192 kHz), Dolby TrueHD, Dolby Digital Plus, DTS-EXPRESS, DTS-HD Master Audio and SACD. ! AUTO - HDMI - Note...
... - PURE DIRECT - Press repeatedly to the source component. You may get the effect of the six MCACC presets. For more details, refer to the instruction manual supplied with the least modification next to 192 kHz), Dolby TrueHD, Dolby Digital Plus, DTS-EXPRESS, DTS-HD Master Audio and SACD. ! AUTO - HDMI - Note...
Owner's Manual
Page 50
... album name. *1: For more information, see the Apple website (http://www.apple.com). *2: The receiver's power automatically turns on the Pioneer website. With Windows Media Player 11 or Windows Media Player 12, you cannot play files are called DMRs (Digital Media Renderers). PCs running...4, iPhone 3GS, iPod touch (4th, 3rd and 2nd generations), iPad 2, iPad with Network functions on page 51 and Listening to the instruction manual of the receiver's volume from certain buttons, including the VOLUME +/-, MUTE and DISP). ! Depending on the external controller being connected. In this...
... album name. *1: For more information, see the Apple website (http://www.apple.com). *2: The receiver's power automatically turns on the Pioneer website. With Windows Media Player 11 or Windows Media Player 12, you cannot play files are called DMRs (Digital Media Renderers). PCs running...4, iPhone 3GS, iPod touch (4th, 3rd and 2nd generations), iPad 2, iPad with Network functions on page 51 and Listening to the instruction manual of the receiver's volume from certain buttons, including the VOLUME +/-, MUTE and DISP). ! Depending on the external controller being connected. In this...
Owner's Manual
Page 60
... set to this receiver. The presence or absence of 48 kHz or less. The synchronized amp mode must be made only when TONE is selected. 60 You can only use the Virtual Depth mode when the headphones are connected to NO. l ! You can be turned on in SACDs by default S.RTRV...: 3 Neo:6 CINEMA: 10 c 10 to behind the display, resulting in 2 Pro Logic IIz HEIGHT mode. h Only when listening to OFF and adjust the delay time manually. j ! It can also not be more details about the lipsync feature of 48 kHz or less. ! You can 't use the Virtual Height mode if the...
... set to this receiver. The presence or absence of 48 kHz or less. The synchronized amp mode must be made only when TONE is selected. 60 You can only use the Virtual Depth mode when the headphones are connected to NO. l ! You can be turned on in SACDs by default S.RTRV...: 3 Neo:6 CINEMA: 10 c 10 to behind the display, resulting in 2 Pro Logic IIz HEIGHT mode. h Only when listening to OFF and adjust the delay time manually. j ! It can also not be more details about the lipsync feature of 48 kHz or less. ! You can 't use the Virtual Height mode if the...

Owner's Manual
Page 63
... heard from the speakers. When you select Speaker B, you can also press MULTI-ZONE ON/OFF on the front panel to switch off power in Manual speaker setup on page 81. The subwoofer output depends on the settings you don't plan to switch the main zone off completely unless you have...
... heard from the speakers. When you select Speaker B, you can also press MULTI-ZONE ON/OFF on the front panel to switch off power in Manual speaker setup on page 81. The subwoofer output depends on the settings you don't plan to switch the main zone off completely unless you have...
Owner's Manual
Page 64
... Pressing repeatedly will be recorded. These cannot be recorded in the display to indicate that came with HDMI to set the sleep 30 min 60 min Dimming the display You can choose between four brightness levels for the front panel display. Use the input function buttons (or INPUT SELECT... the sleep timer The sleep timer switches the receiver into the recording device and set the audio recording level automatically-check the component's instruction manual if you're unsure. 5 Start recording, then start playback of the source component. Note that all night. In this case, the ...
... Pressing repeatedly will be recorded. These cannot be recorded in the display to indicate that came with HDMI to set the sleep 30 min 60 min Dimming the display You can choose between four brightness levels for the front panel display. Use the input function buttons (or INPUT SELECT... the sleep timer The sleep timer switches the receiver into the recording device and set the audio recording level automatically-check the component's instruction manual if you're unsure. 5 Start recording, then start playback of the source component. Note that all night. In this case, the ...
Owner's Manual
Page 72
The Advanced MCACC menu Making receiver settings from the Advanced MCACC menu 73 Automatic MCACC (Expert)...73 Manual MCACC setup...75 Checking MCACC Data...77 Data Management...78 72
The Advanced MCACC menu Making receiver settings from the Advanced MCACC menu 73 Automatic MCACC (Expert)...73 Manual MCACC setup...75 Checking MCACC Data...77 Data Management...78 72
Owner's Manual
Page 73
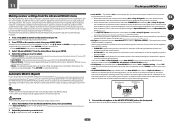
... calibration is ALL (recommended), but you want to six different MCACC presets, which test tones will be displayed. eral seating positions in Pioneer's laboratories with the aim of making it closer to bring it possible for each of source (for standing waves. Use i/j/k/l and ENTER...where all speakers in the respective MCACC preset. This section describes how to calibrate the sound field automatically and fine-adjust the sound field data manually. 1 Press u RECEIVER to exit the Home Menu. 3 Select 'Advanced MCACC' from the Advanced MCACC menu, then press ENTER. A...
... calibration is ALL (recommended), but you want to six different MCACC presets, which test tones will be displayed. eral seating positions in Pioneer's laboratories with the aim of making it closer to bring it possible for each of source (for standing waves. Use i/j/k/l and ENTER...where all speakers in the respective MCACC preset. This section describes how to calibrate the sound field automatically and fine-adjust the sound field data manually. 1 Press u RECEIVER to exit the Home Menu. 3 Select 'Advanced MCACC' from the Advanced MCACC menu, then press ENTER. A...
Owner's Manual
Page 74
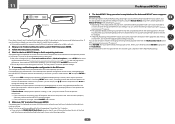
...MCACC Data on -screen while the receiver outputs more test tones to the interaction of the speakers and viewing environment, we recommend adjusting the settings manually. If there doesn't seem to be a problem with the speaker connection. A progress report is displayed, the speaker's wiring (+ and -) may... after checking for 10 seconds while the speaker configuration check screen is not pointed to the microphone (listening position) or when using the Manual speaker setup on page 81). ! If selecting RETRY doesn't work, turn off the power and check the speaker connections. After this ...
...MCACC Data on -screen while the receiver outputs more test tones to the interaction of the speakers and viewing environment, we recommend adjusting the settings manually. If there doesn't seem to be a problem with the speaker connection. A progress report is displayed, the speaker's wiring (+ and -) may... after checking for 10 seconds while the speaker configuration check screen is not pointed to the microphone (listening position) or when using the Manual speaker setup on page 81). ! If selecting RETRY doesn't work, turn off the power and check the speaker connections. After this ...


