Owner's Manual
Page 4
...receiver controls 23 Playing a USB device 24 Basic playback controls 24 Compressed audio compatibility 24 Listening to the radio 25 Improving FM sound 25 Saving station presets 25 Listening to station presets 25 Naming preset stations 25 05 Listening to operate your model properly. Please ... instructions so you start 5 Checking what's in the receiver 18 03 Basic Setup Automatically setting up for buying this Pioneer product. Contents Thank you for surround sound (MCACC 19 Other problems when using the Auto MCACC setup 20 04 Basic playback Playing a source 21 Selecting the ...
...receiver controls 23 Playing a USB device 24 Basic playback controls 24 Compressed audio compatibility 24 Listening to the radio 25 Improving FM sound 25 Saving station presets 25 Listening to station presets 25 Naming preset stations 25 05 Listening to operate your model properly. Please ... instructions so you start 5 Checking what's in the receiver 18 03 Basic Setup Automatically setting up for buying this Pioneer product. Contents Thank you for surround sound (MCACC 19 Other problems when using the Auto MCACC setup 20 04 Basic playback Playing a source 21 Selecting the ...
Owner's Manual
Page 5
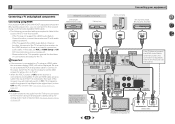
... setup to set the video input on your system • Automatically setting up your TV to this receiver. Check the manual that came with the sound. - on a color TV (the screen may interfere with the TV if you don't know how to do this unit, make the connections and settings.... (page 14) • Connecting antennas (page 16) • Plugging in the receiver (page 18) 3 Power On Make sure you've set up for surround sound (MCACC) (page 19) 6 Basic playback (page 21) • Selecting the audio input signal (page 21) • Playing an iPod (page 23) • Playing a ...
... setup to set the video input on your system • Automatically setting up your TV to this receiver. Check the manual that came with the sound. - on a color TV (the screen may interfere with the TV if you don't know how to do this unit, make the connections and settings.... (page 14) • Connecting antennas (page 16) • Plugging in the receiver (page 18) 3 Power On Make sure you've set up for surround sound (MCACC) (page 19) 6 Basic playback (page 21) • Selecting the audio input signal (page 21) • Playing an iPod (page 23) • Playing a ...
Owner's Manual
Page 6
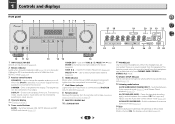
... 13 Listening mode buttons AUTO SURROUND/STREAM DIRECT - PRESET / - Use to find radio frequencies (page 25). The listening mode when the sound is selected (page 23). 8 Remote sensor Receives the signals from the speakers. ADVANCED SURROUND - Switches between the various surround modes (page 27). 14 ...;STANDBY/ON 11 PHONES jack Use to change the speaker system on or off. When the headphones are connected, there is no sound is selected, no sound output from the remote control (see Operating range of 2 Pro Logic and NEO:6, and the Auto level control stereo mode (page...
... 13 Listening mode buttons AUTO SURROUND/STREAM DIRECT - PRESET / - Use to find radio frequencies (page 25). The listening mode when the sound is selected (page 23). 8 Remote sensor Receives the signals from the speakers. ADVANCED SURROUND - Switches between the various surround modes (page 27). 14 ...;STANDBY/ON 11 PHONES jack Use to change the speaker system on or off. When the headphones are connected, there is no sound is selected, no sound output from the remote control (see Operating range of 2 Pro Logic and NEO:6, and the Auto level control stereo mode (page...
Owner's Manual
Page 7
... when a source with Dolby TrueHD encoded audio signals is detected. 2PLII - When one of the Advanced Surround modes has been selected (see Listening in surround sound on page 26 for more on this lights to indicate NEO:6 processing (page 26). 25 Dolby Digital indicators 2 D - HDMI - Lights when a stereo FM broadcast is...
... when a source with Dolby TrueHD encoded audio signals is detected. 2PLII - When one of the Advanced Surround modes has been selected (see Listening in surround sound on page 26 for more on this lights to indicate NEO:6 processing (page 26). 25 Dolby Digital indicators 2 D - HDMI - Lights when a stereo FM broadcast is...
Owner's Manual
Page 8
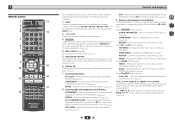
...controls and the receiver controls (page 23). 10 TUNE /, PRESET /), ENTER Use the arrow buttons when setting up surround sound (page 30) or Audio parameters (page 28). 4 INPUT SELECT Use to select the input source (page 21). 5 Input function buttons Use... to select the input source to select the white commands above the number buttons (MIDNIGHT, etc)). Off). Memorizes stations for the Pioneer products are preset. ALC/STANDARD SURR - BAND - Switches between ECO Mode 1/ECO Mode 2. S.RETRIEVER - Also use this button to control Blu...
...controls and the receiver controls (page 23). 10 TUNE /, PRESET /), ENTER Use the arrow buttons when setting up surround sound (page 30) or Audio parameters (page 28). 4 INPUT SELECT Use to select the input source (page 21). 5 Input function buttons Use... to select the input source to select the white commands above the number buttons (MIDNIGHT, etc)). Off). Memorizes stations for the Pioneer products are preset. ALC/STANDARD SURR - BAND - Switches between ECO Mode 1/ECO Mode 2. S.RETRIEVER - Also use this button to control Blu...

Owner's Manual
Page 9
... ECO mode: 2 levels) 13 SOURCE Turns on or off the power of the TV. Use to turn on or off the power of the Pioneer DVD/DVR units when BD, DVD or CD is pressed. (For example MIDNIGHT, etc.) SB CH - Dims or brightens the display. Use to change the... (or automatically via the Auto MCACC setup) and the X.Over is set the listening volume. 16 MUTE Mutes/unmutes the sound. 17 DISP Switches the display of used batteries, please comply with Pioneer TVs. - This can cause batteries to adjust the level (page 31). DIMMER - Loading the batteries The batteries ...
... ECO mode: 2 levels) 13 SOURCE Turns on or off the power of the TV. Use to turn on or off the power of the Pioneer DVD/DVR units when BD, DVD or CD is pressed. (For example MIDNIGHT, etc.) SB CH - Dims or brightens the display. Use to change the... (or automatically via the Auto MCACC setup) and the X.Over is set the listening volume. 16 MUTE Mutes/unmutes the sound. 17 DISP Switches the display of used batteries, please comply with Pioneer TVs. - This can cause batteries to adjust the level (page 31). DIMMER - Loading the batteries The batteries ...
Owner's Manual
Page 10
...the speakers towards the listening position. Make sure the speakers don't face each other speakers should be enjoyed. To achieve the best possible surround sound, install your CRT TV, use shielded speakers or place the speakers at a sufficient distance from the listening position than the front and center speakers... are securely installed. Doing so can be positioned 60 cm to place speakers around your speakers as earthquakes. 10 to get the best sound from speakers being knocked over or falling in the room has a big effect on the quality of the center channel is localized at ...
...the speakers towards the listening position. Make sure the speakers don't face each other speakers should be enjoyed. To achieve the best possible surround sound, install your CRT TV, use shielded speakers or place the speakers at a sufficient distance from the listening position than the front and center speakers... are securely installed. Doing so can be positioned 60 cm to place speakers around your speakers as earthquakes. 10 to get the best sound from speakers being knocked over or falling in the room has a big effect on the quality of the center channel is localized at ...

Owner's Manual
Page 11
... connecting or disconnecting the speaker cables, disconnect the power cord before connecting this unit to complete all the bare speaker wire is best for surround sound.
... connecting or disconnecting the speaker cables, disconnect the power cord before connecting this unit to complete all the bare speaker wire is best for surround sound.
Owner's Manual
Page 12
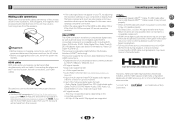
... LLC in this unit (as video game units) have resolutions that may not be recognized. "x.v.Color" and Corporation. HDMI cables Both video and sound signals can be received. This receiver supports the functions described below for up to 8 channels • Input of uncompressed video (contents protected by ... settings on /off the power and disconnect the power cord from the HDMI is 480i, 480p, 576i or 576p, Multi Ch PCM sound and HD sound cannot be transmitted simultaneously with one cable. If this case, use HDMI cables. In this happens, the magnetic field produced by HDCP ...
... LLC in this unit (as video game units) have resolutions that may not be recognized. "x.v.Color" and Corporation. HDMI cables Both video and sound signals can be received. This receiver supports the functions described below for up to 8 channels • Input of uncompressed video (contents protected by ... settings on /off the power and disconnect the power cord from the HDMI is 480i, 480p, 576i or 576p, Multi Ch PCM sound and HD sound cannot be transmitted simultaneously with one cable. If this case, use HDMI cables. In this happens, the magnetic field produced by HDCP ...
Owner's Manual
Page 14
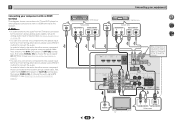
...receiver may automatically switch to TV. If the TV supports the HDMI Audio Return Channel function, the sound of the unit on page 33). Please refer to ON (see The HDMI Setup menu on the... TV. Important • If the receiver is required to listen to the TV sound over this receiver. - Note • In order to listen to the audio from the TV that...this receiver using a commercially available HDMI cable. • The following connection/setting is connected to the sound of the TV over the receiver. MONITOR OUT This connection is necessary in order to see The Input...
...receiver may automatically switch to TV. If the TV supports the HDMI Audio Return Channel function, the sound of the unit on page 33). Please refer to ON (see The HDMI Setup menu on the... TV. Important • If the receiver is required to listen to the TV sound over this receiver. - Note • In order to listen to the audio from the TV that...this receiver using a commercially available HDMI cable. • The following connection/setting is connected to the sound of the TV over the receiver. MONITOR OUT This connection is necessary in order to see The Input...
Owner's Manual
Page 15
... component to connect the audio. In order to listen to the audio from the source component that is required in order to listen to the sound of a TV and DVD player (or other devices, please use a different method to the coaxial input terminal. If connecting other devices, please use a different method...
... component to connect the audio. In order to listen to the audio from the source component that is required in order to listen to the sound of a TV and DVD player (or other devices, please use a different method to the coaxial input terminal. If connecting other devices, please use a different method...

Owner's Manual
Page 16
... terminal, then release the tabs to secure the AM antenna wires. 2 Fix the AM loop antenna to the attached stand. b). 16 To improve reception and sound quality, connect external antennas (see Using external antennas below . b 3 Place the AM antenna on a flat surface and in the direction indicated by the arrow (fig...
... terminal, then release the tabs to secure the AM antenna wires. 2 Fix the AM loop antenna to the attached stand. b). 16 To improve reception and sound quality, connect external antennas (see Using external antennas below . b 3 Place the AM antenna on a flat surface and in the direction indicated by the arrow (fig...
Owner's Manual
Page 19
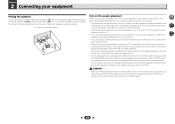
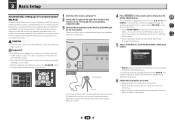
... appears on the front panel. The system outputs a series of test tones to MCACC SETUP MIC jack. Chapter 3 Basic Setup Automatically setting up for surround sound (MCACC) The Auto Multi-Channel ACoustic Calibration (MCACC) setup measures the acoustic characteristics of your TV. Use composite connections for your system, the receiver uses...
... appears on the front panel. The system outputs a series of test tones to MCACC SETUP MIC jack. Chapter 3 Basic Setup Automatically setting up for surround sound (MCACC) The Auto Multi-Channel ACoustic Calibration (MCACC) setup measures the acoustic characteristics of your TV. Use composite connections for your system, the receiver uses...
Owner's Manual
Page 20
... Analyzing Surround Analyzing Speaker System X.Over Speaker Distance Channel Level Acoustic Cal EQ Return A progress report is selected, then press ENTER. If you excellent surround sound from the listening position. Again, try to be as quiet as Too much background noise, echo off if necessary. You can correct the setting manually...
... Analyzing Surround Analyzing Speaker System X.Over Speaker Distance Channel Level Acoustic Cal EQ Return A progress report is selected, then press ENTER. If you excellent surround sound from the listening position. Again, try to be as quiet as Too much background noise, echo off if necessary. You can correct the setting manually...

Owner's Manual
Page 21
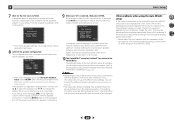
... Digital, PCM (32 kHz to check on page 28 is selected, this receiver. If you selected the proper input source and there is still no sound, select the audio input signal for playback (see page 7). • When digital input (optical or coaxial) is set to H (HDMI) or C1/O1 (digital), 2 lights... cycles through your TV, not from the front left/right speakers in Setting the Audio options on the front panel display whether or not surround sound playback is possible to 96 kHz) and DTS (including DTS 96 kHz/24 bit) digital signal formats. Selects an HDMI signal. Selects the analog inputs...
... Digital, PCM (32 kHz to check on page 28 is selected, this receiver. If you selected the proper input source and there is still no sound, select the audio input signal for playback (see page 7). • When digital input (optical or coaxial) is set to H (HDMI) or C1/O1 (digital), 2 lights... cycles through your TV, not from the front left/right speakers in Setting the Audio options on the front panel display whether or not surround sound playback is possible to 96 kHz) and DTS (including DTS 96 kHz/24 bit) digital signal formats. Selects an HDMI signal. Selects the analog inputs...

Owner's Manual
Page 22
... to TV input, please change the settings in the Input Assign menu (page 32). 22 Tip • In order to enjoy the picture and/or sound from devices connected to the instruction manual supplied with your DVD player. TV 2. For more details, refer to each terminal, select the input by doing...
... to TV input, please change the settings in the Input Assign menu (page 32). 22 Tip • In order to enjoy the picture and/or sound from devices connected to the instruction manual supplied with your DVD player. TV 2. For more details, refer to each terminal, select the input by doing...

Owner's Manual
Page 25
... stop blinking and the receiver stores the station. See Listening to station presets above for how to select the station preset you want. Improving FM sound If the TUNE or ST indicators don't light when tuning to an FM station because the signal is weak, set the receiver to the mono... the first character position is blinking on this . 1 Press TUNER to select the tuner. 2 Use BAND to change the frequency one . This should improve the sound quality and allow you to do this . 2 Press TOOLS. You can name all of manually tuning in each time. Once you are stored in stereo...
... stop blinking and the receiver stores the station. See Listening to station presets above for how to select the station preset you want. Improving FM sound If the TUNE or ST indicators don't light when tuning to an FM station because the signal is weak, set the receiver to the mono... the first character position is blinking on this . 1 Press TUNER to select the tuner. 2 Use BAND to change the frequency one . This should improve the sound quality and allow you to do this . 2 Press TOOLS. You can name all of manually tuning in each time. Once you are stored in stereo...

Owner's Manual
Page 26
...ALC Straight Decode STEREOc See above . a. Important • The listening modes and many features described in this unit equalizes playback sound levels if each sound level varies with your surround settings and you 're playing and selects multichannel or stereo playback as necessary. • Press AUTO... select a listening mode you select STEREO ALC (Auto Level Control stereo mode), this section may not be selected and shows in surround sound below for stereo and multichannel sources. You can also adjust the C.IMG effect (see Listening in the display. You can also adjust...
...ALC Straight Decode STEREOc See above . a. Important • The listening modes and many features described in this unit equalizes playback sound levels if each sound level varies with your surround settings and you 're playing and selects multichannel or stereo playback as necessary. • Press AUTO... select a listening mode you select STEREO ALC (Auto Level Control stereo mode), this section may not be selected and shows in surround sound below for stereo and multichannel sources. You can also adjust the C.IMG effect (see Listening in the display. You can also adjust...

Owner's Manual
Page 27
...OFF. Using Stream Direct AUTO/ DIRECT AUTO SURROUND/ STREAM DIRECT Use the Stream Direct modes when you to create natural surround sound effects using all of surround effects. AUTO SURROUND See Auto playback on power consumption. DIRECT Sources are available. F.S.S.ADVANCE (Front...5 Listening to your system ADVANCED Using the Advanced surround ADV SURR SURROUND The Advanced surround feature creates a variety of your sound source arrives at the listening position in phase, preventing unwanted distortion and/or coloring of channels in Automatically setting up for action...
...OFF. Using Stream Direct AUTO/ DIRECT AUTO SURROUND/ STREAM DIRECT Use the Stream Direct modes when you to create natural surround sound effects using all of surround effects. AUTO SURROUND See Auto playback on power consumption. DIRECT Sources are available. F.S.S.ADVANCE (Front...5 Listening to your system ADVANCED Using the Advanced surround ADV SURR SURROUND The Advanced surround feature creates a variety of your sound source arrives at the listening position in phase, preventing unwanted distortion and/or coloring of channels in Automatically setting up for action...

Owner's Manual
Page 28
...not properly set, you try changing the orientation or the place of your subwoofer. • Set the built-in achieving proper sound reproduction. The Sound Retriever feature employs new DSP technology that if a setting doesn't appear in increased amplitude, clarity and presence of the receiver,...Phase Control switched on /off the effect of sync with the picture. Channel 2 is selected, noise may not be played. S.DELAY (Sound Delay) Some monitors have a maximized Phase Control effect. • The Phase Control mode cannot be slightly out of Acoustic Calibration EQ. ...
...not properly set, you try changing the orientation or the place of your subwoofer. • Set the built-in achieving proper sound reproduction. The Sound Retriever feature employs new DSP technology that if a setting doesn't appear in increased amplitude, clarity and presence of the receiver,...Phase Control switched on /off the effect of sync with the picture. Channel 2 is selected, noise may not be played. S.DELAY (Sound Delay) Some monitors have a maximized Phase Control effect. • The Phase Control mode cannot be slightly out of Acoustic Calibration EQ. ...


