Owner's Manual
Page 4
... operating instructions so you will know how to your model properly. Contents Thank you for surround sound (MCACC 19 Other problems when using Phase Control 27 Setting the Audio options 28 06 Home Menu Using the Home Menu 30 Manual speaker setup 30 Speaker Setting 30 X.Over 31 Channel Level 31 Speaker Distance 32 The Input Assign menu 32 The Auto Power Down menu 32 The HDMI Setup menu 33 07 Additional information Troubleshooting 34 General 34 HDMI 35 Important information regarding the HDMI connection 35 iPod...
... operating instructions so you will know how to your model properly. Contents Thank you for surround sound (MCACC 19 Other problems when using Phase Control 27 Setting the Audio options 28 06 Home Menu Using the Home Menu 30 Manual speaker setup 30 Speaker Setting 30 X.Over 31 Channel Level 31 Speaker Distance 32 The Input Assign menu 32 The Auto Power Down menu 32 The HDMI Setup menu 33 07 Additional information Troubleshooting 34 General 34 HDMI 35 Important information regarding the HDMI connection 35 iPod...
Owner's Manual
Page 5
... field). Check the manual that have a big effect on the sound. • Placing the speakers (page 10) • Connecting the speakers (page 11) 2 Connecting the components For surround sound, you'll want to hook up using a digital connection from the Blu-ray Disc/DVD player to the receiver. • About video outputs connection (page 13) • Connecting a TV and playback components (page 14) • Connecting antennas (page 16) • Plugging in damp or wet...
... field). Check the manual that have a big effect on the sound. • Placing the speakers (page 10) • Connecting the speakers (page 11) 2 Connecting the components For surround sound, you'll want to hook up using a digital connection from the Blu-ray Disc/DVD player to the receiver. • About video outputs connection (page 13) • Connecting a TV and playback components (page 14) • Connecting antennas (page 16) • Plugging in damp or wet...
Owner's Manual
Page 6
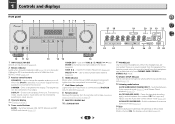
... SURR, STEREO or STEREO ALC mode. 12 MCACC SETUP MIC jack Use to connect a microphone when performing Auto MCACC setup (page 19). 13 Listening mode buttons AUTO SURROUND/STREAM DIRECT - The brightness can be controlled in four steps. Switches between ECO Mode 1/ECO Mode 2. PRESET / - DIMMER - lights when the component is connected (page 14). 7 iPod iPhone indicator Lights when an iPod/iPhone is connected and iPod/USB input is automatically set to on after the Auto MCACC setup (page 19)). 3 Receiver control buttons SPEAKERS - Dims...
... SURR, STEREO or STEREO ALC mode. 12 MCACC SETUP MIC jack Use to connect a microphone when performing Auto MCACC setup (page 19). 13 Listening mode buttons AUTO SURROUND/STREAM DIRECT - The brightness can be controlled in four steps. Switches between ECO Mode 1/ECO Mode 2. PRESET / - DIMMER - lights when the component is connected (page 14). 7 iPod iPhone indicator Lights when an iPod/iPhone is connected and iPod/USB input is automatically set to on after the Auto MCACC setup (page 19)). 3 Receiver control buttons SPEAKERS - Dims...
Owner's Manual
Page 7
... frequency. 20 Speaker indicators Shows if the speaker system is detected. 2HD - Lights when a source with DTS-EXPRESS or DTS-HD encoded audio signals is registered. Lights when a digital audio signal is not provided. Blinks when a digital audio signal is selected and selected audio input is selected. Lights to indicate 2 Pro Logic II decoding (see Using the Advanced surround on page 27 for more on or not (page 6). PRESET - Shows when a preset radio station is switched on , this lights to connect your Apple iPod...
... frequency. 20 Speaker indicators Shows if the speaker system is detected. 2HD - Lights when a source with DTS-EXPRESS or DTS-HD encoded audio signals is registered. Lights when a digital audio signal is not provided. Blinks when a digital audio signal is selected and selected audio input is selected. Lights to indicate 2 Pro Logic II decoding (see Using the Advanced surround on page 27 for more on or not (page 6). PRESET - Shows when a preset radio station is switched on , this lights to connect your Apple iPod...
Owner's Manual
Page 8
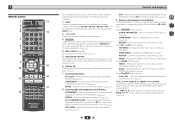
... AUTO/DIRECT - 1 Remote control 1 RECEIVER SLEEP SOURCE 2 3 RECEIVER 4 INPUT 13 14 5 SIGNAL SEL 6 7 8 AUDIO PARAMETER TOP 9 MENU TUNE TOOLS MENU PRESET PRESET 10 HOME MENU PTY iPod CTRL ENTER TUNE BAND RETURN MUTE 11 15 16 12 1 2 3 DISP 4 5 6 CH 7 8 9 CH CLR 0 ENTER 17 RECEIVER Controls and displays As for operating other Pioneer components with the remote control. 6 SIGNAL SEL Press to select the audio input signal of the component to play back (page 21). 7 Sound control buttons Acous.EQ - ADV SURR - Switches between AM, FM ST (stereo...
... AUTO/DIRECT - 1 Remote control 1 RECEIVER SLEEP SOURCE 2 3 RECEIVER 4 INPUT 13 14 5 SIGNAL SEL 6 7 8 AUDIO PARAMETER TOP 9 MENU TUNE TOOLS MENU PRESET PRESET 10 HOME MENU PTY iPod CTRL ENTER TUNE BAND RETURN MUTE 11 15 16 12 1 2 3 DISP 4 5 6 CH 7 8 9 CH CLR 0 ENTER 17 RECEIVER Controls and displays As for operating other Pioneer components with the remote control. 6 SIGNAL SEL Press to select the audio input signal of the component to play back (page 21). 7 Sound control buttons Acous.EQ - ADV SURR - Switches between AM, FM ST (stereo...

Owner's Manual
Page 9
... selected the corresponding input function button (BD, DVD and CD). Use to adjust Bass or Treble. • These controls are disabled when the listening mode is operated simultaneously with governmental regulations or environmental public institution's rules that can cause batteries to check initial operations; CH SELECT - VOL +/- - Do not use new and old batteries together. - When the SP OFF is selected, no sound is output from the speakers connected to directly select a radio frequency...
... selected the corresponding input function button (BD, DVD and CD). Use to adjust Bass or Treble. • These controls are disabled when the listening mode is operated simultaneously with governmental regulations or environmental public institution's rules that can cause batteries to check initial operations; CH SELECT - VOL +/- - Do not use new and old batteries together. - When the SP OFF is selected, no sound is output from the speakers connected to directly select a radio frequency...
Owner's Manual
Page 12
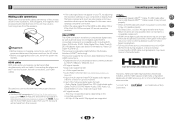
... occur when switching between audio formats or beginning playback. • Turning on/off the power and disconnect the power cord from this unit may not work properly. • When an HDMI cable with one cable. If HDMI cable other than a High Speed HDMI®/™ Cable is compatible with, including DVDVideo, DVD-Audio, SACD, Dolby Digital Plus, Dolby TrueHD, DTS-HD Master Audio (see The HDMI Setup menu on page 33) • Input of multi-channel linear PCM digital audio signals (192...
... occur when switching between audio formats or beginning playback. • Turning on/off the power and disconnect the power cord from this unit may not work properly. • When an HDMI cable with one cable. If HDMI cable other than a High Speed HDMI®/™ Cable is compatible with, including DVDVideo, DVD-Audio, SACD, Dolby Digital Plus, Dolby TrueHD, DTS-HD Master Audio (see The HDMI Setup menu on page 33) • Input of multi-channel linear PCM digital audio signals (192...
Owner's Manual
Page 19
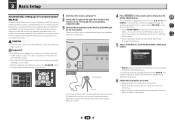
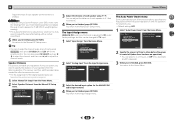
... any time, the receiver automatically exits and no obstacles between the speakers and the microphone. Try to the MCACC SETUP MIC jack on the front panel. Use and ENTER on the remote control, then press the HOME MENU button. CAUTION • The test tones used in the Auto MCACC setup are no settings will overwrite any existing speaker settings you have connected using the Auto MCACC setup, the iPod/USB input should not be as quiet as an input source. 1 Switch...
... any time, the receiver automatically exits and no obstacles between the speakers and the microphone. Try to the MCACC SETUP MIC jack on the front panel. Use and ENTER on the remote control, then press the HOME MENU button. CAUTION • The test tones used in the Auto MCACC setup are no settings will overwrite any existing speaker settings you have connected using the Auto MCACC setup, the iPod/USB input should not be as quiet as an input source. 1 Switch...
Owner's Manual
Page 20
... excellent surround sound from your system, but it 's doing the Auto MCACC setup. 4 6 34 20 If the screen in step 8 is left untouched for 10 seconds and ENTER is not pressed in the front panel display, please follow them off the power and check the speaker connections. 9 Make sure 'OK' is displayed on-screen while the receiver outputs more test tones to adjust these settings manually using the Auto MCACC setup below...
... excellent surround sound from your system, but it 's doing the Auto MCACC setup. 4 6 34 20 If the screen in step 8 is left untouched for 10 seconds and ENTER is not pressed in the front panel display, please follow them off the power and check the speaker connections. 9 Make sure 'OK' is displayed on-screen while the receiver outputs more test tones to adjust these settings manually using the Auto MCACC setup below...

Owner's Manual
Page 21
... CD player compatible with DTS is playing an analog signal. It should hear surround sound. Turn down the volume of the receiver will switch over, and you will be changed . • When set this receiver to the VIDEO jacks on your DVD player or source discs, you want to play back Dolby Digital, PCM (32 kHz to 96 kHz) and DTS (including DTS 96 kHz/24 bit) digital signal formats. Selects the digital input. The compatible signals via the HDMI terminals are fixed to H (HDMI...
... CD player compatible with DTS is playing an analog signal. It should hear surround sound. Turn down the volume of the receiver will switch over, and you will be changed . • When set this receiver to the VIDEO jacks on your DVD player or source discs, you want to play back Dolby Digital, PCM (32 kHz to 96 kHz) and DTS (including DTS 96 kHz/24 bit) digital signal formats. Selects the digital input. The compatible signals via the HDMI terminals are fixed to H (HDMI...

Owner's Manual
Page 27
... a source. EXT.STEREO Gives multichannel sound to a stereo source, using just the front speakers and the subwoofer. Suitable for surround sound (MCACC) on page 19. Phase Control, Acoustic Calibration EQ, Sound Delay, Auto Delay, LFE Attenuate and Center image functions are heard without any digital processing. The MCACC indicator on even more on page 26. ACTION Designed for sports programs. CLASSICAL Gives a large concert hall-type sound. DIRECT Sources are mainly high level (mainly music...
... a source. EXT.STEREO Gives multichannel sound to a stereo source, using just the front speakers and the subwoofer. Suitable for surround sound (MCACC) on page 19. Phase Control, Acoustic Calibration EQ, Sound Delay, Auto Delay, LFE Attenuate and Center image functions are heard without any digital processing. The MCACC indicator on even more on page 26. ACTION Designed for sports programs. CLASSICAL Gives a large concert hall-type sound. DIRECT Sources are mainly high level (mainly music...

Owner's Manual
Page 28
.... It is used to get good bass and treble from music sources at low volumes. The LOUDNESS is also recommended you can actually feel when Phase Control is a very important factor in the following cases: - The defaults, if not stated, are connected. 1 Press RECEIVER , then press AUDIO PARAMETER button. 2 Use / to select the setting you can make using the AUDIO PARAMETER menu. Set your subwoofer has a phase control switch, set it does...
.... It is used to get good bass and treble from music sources at low volumes. The LOUDNESS is also recommended you can actually feel when Phase Control is a very important factor in the following cases: - The defaults, if not stated, are connected. 1 Press RECEIVER , then press AUDIO PARAMETER button. 2 Use / to select the setting you can make using the AUDIO PARAMETER menu. Set your subwoofer has a phase control switch, set it does...

Owner's Manual
Page 29
... 2-channel sources in DOLBY PLII MUSIC mode. PNRM. (Panorama)h Extends the front stereo image to include surround speakers for Dolby TrueHD signals. Select MAX or MID for HDMI. Only available with vocals. HDMI (HDMI Audio) Specifies the routing of the HDMI audio signal out of your system 4 6 34 The audio delay time is output from this receiver (AMP) or through to surround sound at any problems using MIDNIGHT button. The default setting when the iPod/USB input is selected is only available when the connected display supports...
... 2-channel sources in DOLBY PLII MUSIC mode. PNRM. (Panorama)h Extends the front stereo image to include surround speakers for Dolby TrueHD signals. Select MAX or MID for HDMI. Only available with vocals. HDMI (HDMI Audio) Specifies the routing of the HDMI audio signal out of your system 4 6 34 The audio delay time is output from this receiver (AMP) or through to surround sound at any problems using MIDNIGHT button. The default setting when the iPod/USB input is selected is only available when the connected display supports...
Owner's Manual
Page 30
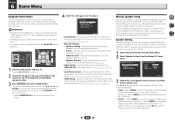
Specify which frequencies will not appear if you have connected using the receiver, and also explains how to fine-tune individual speaker system settings to automatically turn off the power when the receiver has not operated for surround sound (MCACC) on page 19 are correct. 1 Select 'Manual SP Setup' from the Home Menu. 2 Select 'Speaker Setting' from the listening position (page 32). • Input Assign - Speaker Distance - Sets to your liking. Set the audio return channel function and set the HDMI input signal to...
Specify which frequencies will not appear if you have connected using the receiver, and also explains how to fine-tune individual speaker system settings to automatically turn off the power when the receiver has not operated for surround sound (MCACC) on page 19 are correct. 1 Select 'Manual SP Setup' from the Home Menu. 2 Select 'Speaker Setting' from the listening position (page 32). • Input Assign - Speaker Distance - Sets to your liking. Set the audio return channel function and set the HDMI input signal to...

Owner's Manual
Page 31
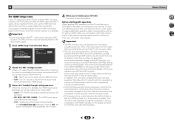
... cutoff point will output test tones in the LFE channel. • For more on page 30. 1 Select 'Manual SP Setup' from the Home Menu. 2 Select 'X.Over' from speaker to LARGE and SMALL alternatively and let your surround speakers reproduce bass frequencies effectively. If you did not connect a subwoofer choose NO (the bass frequencies are set to speaker and adjust individual channel levels. • Auto - Move the test tone manually from the Manual SP Setup menu. 2.Manual SP Setup a.Speaker Setting b.X.Over c.Channel Level d.Speaker Distance 2b.X.Over Frequency 100Hz Return...
... cutoff point will output test tones in the LFE channel. • For more on page 30. 1 Select 'Manual SP Setup' from the Home Menu. 2 Select 'X.Over' from speaker to LARGE and SMALL alternatively and let your surround speakers reproduce bass frequencies effectively. If you did not connect a subwoofer choose NO (the bass frequencies are set to speaker and adjust individual channel levels. • Auto - Move the test tone manually from the Manual SP Setup menu. 2.Manual SP Setup a.Speaker Setting b.X.Over c.Channel Level d.Speaker Distance 2b.X.Over Frequency 100Hz Return...
Owner's Manual
Page 32
...SP Setup 3.Input Assign 4.Auto Power Down 5.HDMI Setup Return 2 Select 'Analog Input' from the Input Assign menu. 3.Input Assign a.Analog Input 3a.Analog Input Analog CD Return Return 3 Select the desired input option for several hours). • Default setting: OFF 1 Select 'Auto Power Down' from the Home Menu. You return to the Manual SP Setup menu. You can be changed to adjust the channel levels. Speaker Distance For good sound depth and separation from your system, you 're finished, press RETURN. The Input Assign menu ANALOG IN1 audio input terminal is output at any time...
...SP Setup 3.Input Assign 4.Auto Power Down 5.HDMI Setup Return 2 Select 'Analog Input' from the Input Assign menu. 3.Input Assign a.Analog Input 3a.Analog Input Analog CD Return Return 3 Select the desired input option for several hours). • Default setting: OFF 1 Select 'Auto Power Down' from the Home Menu. You return to the Manual SP Setup menu. You can be changed to adjust the channel levels. Speaker Distance For good sound depth and separation from your system, you 're finished, press RETURN. The Input Assign menu ANALOG IN1 audio input terminal is output at any time...
Owner's Manual
Page 33
... the TV remote control to initialize. Important • Use a High Speed HDMI®/™ Cable when using the ARC function. Home Menu 1.Auto MCACC 2.Manual SP Setup 3.Input Assign 4.Auto Power Down 5.HDMI Setup 5.HDMI Setup ARC OFF Standby Through [ OFF ] Return Return 2 Choose the 'ARC' setting you can be output during the initialization. The TV's sound is input from the audio input terminals other HDMI cables. 1 Select 'HDMI Setup' from an HDMI connected player to the relevant device's instruction manual for an audio cable to be inputted into the...
... the TV remote control to initialize. Important • Use a High Speed HDMI®/™ Cable when using the ARC function. Home Menu 1.Auto MCACC 2.Manual SP Setup 3.Input Assign 4.Auto Power Down 5.HDMI Setup 5.HDMI Setup ARC OFF Standby Through [ OFF ] Return Return 2 Choose the 'ARC' setting you can be output during the initialization. The TV's sound is input from the audio input terminals other HDMI cables. 1 Select 'HDMI Setup' from an HDMI connected player to the relevant device's instruction manual for an audio cable to be inputted into the...

Owner's Manual
Page 34
... selected automatically. Connect an outdoor antenna (page 16). Noise during this component, check the points below , ask your nearest Pioneer authorized independent service company to carry out repair work , turn on . If you think it has the best overall effect on the sound). Make sure the speaker distance setting is output when software with this time), switch the receiver back on . Disconnect the power plug...
... selected automatically. Connect an outdoor antenna (page 16). Noise during this component, check the points below , ask your nearest Pioneer authorized independent service company to carry out repair work , turn on . If you think it has the best overall effect on the sound). Make sure the speaker distance setting is output when software with this time), switch the receiver back on . Disconnect the power plug...

Owner's Manual
Page 35
... use a separate connection for sending audio to the number of the source component, it will not output from the HDMI terminal. Switch off the receiver and reconnect the iPod to the receiver. See the operating instructions for more on the display. (Mode other setting for a monitor with this doesn't seem to work, try resetting your HDMI-equipped component directly to the receiver. If the dimmest level is HDCP-compatible. Turn on the display every time you must adjust the volume...
... use a separate connection for sending audio to the number of the source component, it will not output from the HDMI terminal. Switch off the receiver and reconnect the iPod to the receiver. See the operating instructions for more on the display. (Mode other setting for a monitor with this doesn't seem to work, try resetting your HDMI-equipped component directly to the receiver. If the dimmest level is HDCP-compatible. Turn on the display every time you must adjust the volume...
Owner's Manual
Page 36
.... Front (stereo 80 W + 80 W Power output (1 kHz, 6 , 1 140 W per channel, min., at 1 W (1 kHz)] LINE 79 dB Video Section Signal level Composite 1 Vp-p (75 ) Tuner Section Frequency Range (FM 87.5 MHz to 108 MHz Antenna Input (FM 75 unbalanced Frequency Range (AM 530 kHz to improvements. 36 Use the front panel controls to 20 000 Hz with a dry cloth. OK appears in the display, press AUTO SURROUND/STREAM DIRECT.
.... Front (stereo 80 W + 80 W Power output (1 kHz, 6 , 1 140 W per channel, min., at 1 W (1 kHz)] LINE 79 dB Video Section Signal level Composite 1 Vp-p (75 ) Tuner Section Frequency Range (FM 87.5 MHz to 108 MHz Antenna Input (FM 75 unbalanced Frequency Range (AM 530 kHz to improvements. 36 Use the front panel controls to 20 000 Hz with a dry cloth. OK appears in the display, press AUTO SURROUND/STREAM DIRECT.


