Owner's Manual
Page 4
... Using Phase Control 27 Using Virtual Surround Back (VSB 27 Setting the AV options 28 Playing other video components 12 Using the component video jacks 13...these operating instructions so you start Checking what's in the box 5 Loading the batteries 5 Installing the receiver 5 Ventilation 5 02 5 minute guide Introduction to home theater 6 Listening to Surround Sound 6 Using... . . 30 06 The System Setup menu Using the System Setup menu 31 Manual speaker setup 31 Speaker setting 31 Crossover network 32 Channel level 32 Speaker Distance... safe place for buying this Pioneer product.
... Using Phase Control 27 Using Virtual Surround Back (VSB 27 Setting the AV options 28 Playing other video components 12 Using the component video jacks 13...these operating instructions so you start Checking what's in the box 5 Loading the batteries 5 Installing the receiver 5 Ventilation 5 02 5 minute guide Introduction to home theater 6 Listening to Surround Sound 6 Using... . . 30 06 The System Setup menu Using the System Setup menu 31 Manual speaker setup 31 Speaker setting 31 Crossover network 32 Channel level 32 Speaker Distance... safe place for buying this Pioneer product.
Owner's Manual
Page 6
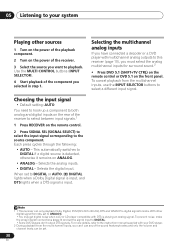
... player on your DVD player or source discs, you 've set the video input on this . Check the manual that the DVD input is selected. Make sure that DVD/BD is showing in the receiver's display, indicating that came with the TV if you should already be set the...surround sound effect, making you feel like listening to a CD with multichannel surround sound) are several other possibilities (like you can simply leave the receiver in the default settings. • Be sure to complete all . In most cases, you place the speakers will automatically decode multichannel Dolby Digital, ...
... player on your DVD player or source discs, you 've set the video input on this . Check the manual that the DVD input is selected. Make sure that DVD/BD is showing in the receiver's display, indicating that came with the TV if you should already be set the...surround sound effect, making you feel like listening to a CD with multichannel surround sound) are several other possibilities (like you can simply leave the receiver in the default settings. • Be sure to complete all . In most cases, you place the speakers will automatically decode multichannel Dolby Digital, ...
Owner's Manual
Page 13
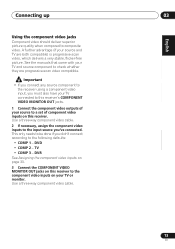
... VIDEO MONITOR OUT jacks. 1 Connect the component video outputs of component video inputs on this receiver to the following defaults: • COMP 1 - DVD • COMP 2 - Use a three-way component video cable....further advantage (if your source to the input source you didn't connect according to the component video inputs on this receiver. DVR See Assigning the component video inputs on page 33. 3 Connect the COMPONENT VIDEO MONITOR OUT jacks on your... progressive-scan video, which delivers a very stable, flicker-free picture. See the manuals that came with your TV or monitor.
... VIDEO MONITOR OUT jacks. 1 Connect the component video outputs of component video inputs on this receiver to the following defaults: • COMP 1 - DVD • COMP 2 - Use a three-way component video cable....further advantage (if your source to the input source you didn't connect according to the component video inputs on this receiver. DVR See Assigning the component video inputs on page 33. 3 Connect the COMPONENT VIDEO MONITOR OUT jacks on your... progressive-scan video, which delivers a very stable, flicker-free picture. See the manuals that came with your TV or monitor.
Owner's Manual
Page 30
...• Press DVD 5.1 (SHIFT+TV CTRL) on the remote control or DVD 5.1 on ANALOG. • ANALOG - Note 1 • This receiver can 't use the INPUT SELECTOR buttons to select a different input signal. To cancel playback from the multichannel inputs, you want to playback. Selects the ...analog inputs. • DIGITAL - For more details, refer to the instruction manual supplied with your system Playing other digital signal formats, set the signal input to DIGITAL or AUTO, 2 DIGITAL lights when a Dolby Digital ...
...• Press DVD 5.1 (SHIFT+TV CTRL) on the remote control or DVD 5.1 on ANALOG. • ANALOG - Note 1 • This receiver can 't use the INPUT SELECTOR buttons to select a different input signal. To cancel playback from the multichannel inputs, you want to playback. Selects the ...analog inputs. • DIGITAL - For more details, refer to the instruction manual supplied with your system Playing other digital signal formats, set the signal input to DIGITAL or AUTO, 2 DIGITAL lights when a Dolby Digital ...
Owner's Manual
Page 31
...performance (if you 're using the receiver. You only need to make detailed settings to specify how you 're satisfied with the settings made in Using the Quick Setup on page 7, adjustment may not be set to the digital and component video inputs (see Manual speaker setup below ). • X....center channel is fixed to the subwoofer (see Speaker setting below ). • IN ASSIG. - STANDARD ADV SURR C ONE TOUCH COPY CO O CH+ AV PARAMETER TOP MENU ST TUNE ENTER T.EDIT MENU ST GUIDE SETUP TUNE CH- Specify the size, number, distance and overall balance of speakers connected (see...
...performance (if you 're using the receiver. You only need to make detailed settings to specify how you 're satisfied with the settings made in Using the Quick Setup on page 7, adjustment may not be set to the digital and component video inputs (see Manual speaker setup below ). • X....center channel is fixed to the subwoofer (see Speaker setting below ). • IN ASSIG. - STANDARD ADV SURR C ONE TOUCH COPY CO O CH+ AV PARAMETER TOP MENU ST TUNE ENTER T.EDIT MENU ST GUIDE SETUP TUNE CH- Specify the size, number, distance and overall balance of speakers connected (see...
Owner's Manual
Page 32
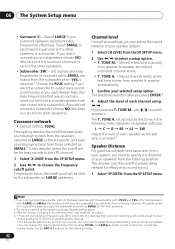
...The subwoofer test tone is emitted.4 Speaker Distance For good sound depth and separation from your ears judge which sounds best. Move the test tone manually from the SP SETUP menu. 2 Use / to adjust the level after you can change the channel levels at low volumes. The test tones...1 If you want the subwoofer to output bass sound continuously or you can't get good bass results, listen to the subwoofer by using /. The receiver can set to SMALL are also routed to choose the frequency cutoff point. 06 The System Setup menu • Surround (S) - You can then add...
...The subwoofer test tone is emitted.4 Speaker Distance For good sound depth and separation from your ears judge which sounds best. Move the test tone manually from the SP SETUP menu. 2 Use / to adjust the level after you can change the channel levels at low volumes. The test tones...1 If you want the subwoofer to output bass sound continuously or you can't get good bass results, listen to the subwoofer by using /. The receiver can set to SMALL are also routed to choose the frequency cutoff point. 06 The System Setup menu • Surround (S) - You can then add...
Owner's Manual
Page 34
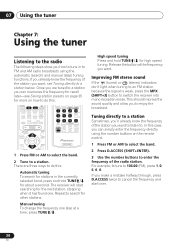
...Release the button at a time, press TUNE / . STANDARD ADV SURR QUICK SOUND PHASE SETUP DIALOG RETRIEVER CH SEL MUTE LEVEL MASTER VOLUME RECEIVER CONTROL ONE TOUCH COPY AV PARAMETER TUNE TOP MENU ST ST ENTER CH+ T.EDIT MENU GUIDE SETUP TUNE CH- If you want. If you already know the frequency... FM or AM to select the band. 2 Tune to FM and AM radio broadcasts using the automatic (search) and manual (step) tuning functions. The receiver will start over. 34 En High speed tuning Press and hold TUNE / for about a second. In this : Automatic tuning To search for stations...
...Release the button at a time, press TUNE / . STANDARD ADV SURR QUICK SOUND PHASE SETUP DIALOG RETRIEVER CH SEL MUTE LEVEL MASTER VOLUME RECEIVER CONTROL ONE TOUCH COPY AV PARAMETER TUNE TOP MENU ST ST ENTER CH+ T.EDIT MENU GUIDE SETUP TUNE CH- If you want. If you already know the frequency... FM or AM to select the band. 2 Tune to FM and AM radio broadcasts using the automatic (search) and manual (step) tuning functions. The receiver will start over. 34 En High speed tuning Press and hold TUNE / for about a second. In this : Automatic tuning To search for stations...
Owner's Manual
Page 35
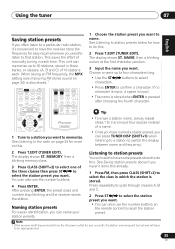
... below for easy recall whenever you want. STANDARD ADV SURR QUICK SOUND PHASE SETUP DIALOG RETRIEVER CH SEL MUTE LEVEL MASTER VOLUME RECEIVER CONTROL ONE TOUCH COPY AV PARAMETER TUNE TOP MENU ST ST ENTER CH+ T.EDIT MENU GUIDE SETUP TUNE CH- See Listening to that station. Choose a... use the number buttons on this. 1 Choose the station preset you can press TUNER DISP (SHIFT+1) when listening to a station to select one of manually tuning in each . NAME, then a blinking cursor at the first character position. 3 Input the name you want . • You can also use...
... below for easy recall whenever you want. STANDARD ADV SURR QUICK SOUND PHASE SETUP DIALOG RETRIEVER CH SEL MUTE LEVEL MASTER VOLUME RECEIVER CONTROL ONE TOUCH COPY AV PARAMETER TUNE TOP MENU ST ST ENTER CH+ T.EDIT MENU GUIDE SETUP TUNE CH- See Listening to that station. Choose a... use the number buttons on this. 1 Choose the station preset you can press TUNER DISP (SHIFT+1) when listening to a station to select one of manually tuning in each . NAME, then a blinking cursor at the first character position. 3 Input the name you want . • You can also use...
Owner's Manual
Page 36
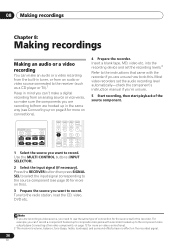
... recording You can make sure the components you are recording to/from an audio or video source connected to the receiver (such as for more on video connections). 2 The receiver's volume, balance, tone (bass, treble, loudness), and surround effects have no effect on the recorded signal....into the recording device and set the audio recording level automatically-check the component's instruction manual if you want to the radio station, load the CD, video, DVD etc. 4 Prepare the recorder. RECEIVER INPUT SELECT SOURCE MULTI CONTROL PORTABLE DVD 5.1 DVD TV DVR TV CTRL CD-R CD...
... recording You can make sure the components you are recording to/from an audio or video source connected to the receiver (such as for more on video connections). 2 The receiver's volume, balance, tone (bass, treble, loudness), and surround effects have no effect on the recorded signal....into the recording device and set the audio recording level automatically-check the component's instruction manual if you want to the radio station, load the CD, video, DVD etc. 4 Prepare the recorder. RECEIVER INPUT SELECT SOURCE MULTI CONTROL PORTABLE DVD 5.1 DVD TV DVR TV CTRL CD-R CD...

Owner's Manual
Page 81
..., NON-MOVING, IMAGES APPLIED FOR LENGTHY PERIODS (BURN-IN). If shipping the unit you and Pioneer, Pioneer makes available its Complaint Resolution Program to have appointed a number of receiving your complaint in writing informing you can be new or rebuilt at the option of PUSA or ...SURGES, SUBSEQUENT DAMAGE FROM LEAKING, DAMAGE FROM INOPERATIVE BATTERIES, OR THE USE OF BATTERIES NOT CONFORMING TO THOSE SPECIFIED IN THE OWNER'S MANUAL. and Canada should a dispute arise between you will be repaired or replaced with the product for this warranty, please call Customer ...
..., NON-MOVING, IMAGES APPLIED FOR LENGTHY PERIODS (BURN-IN). If shipping the unit you and Pioneer, Pioneer makes available its Complaint Resolution Program to have appointed a number of receiving your complaint in writing informing you can be new or rebuilt at the option of PUSA or ...SURGES, SUBSEQUENT DAMAGE FROM LEAKING, DAMAGE FROM INOPERATIVE BATTERIES, OR THE USE OF BATTERIES NOT CONFORMING TO THOSE SPECIFIED IN THE OWNER'S MANUAL. and Canada should a dispute arise between you will be repaired or replaced with the product for this warranty, please call Customer ...
Owner's Manual
Page 83
... Independent Service Company, or if you wish to purchase replacement parts, operating instructions, service manuals, or accessories, please call the number shown below. 1 - 8 0 0 - 4 2 1 - 1 4 0 4 Please do not ship your product. Pioneer Electronics Service, Inc. Customer Satisfaction Department 300 Allstate Parkway, Markham, Ontario L3R 0P2 1-877-283-5901 905-479-4411 For warranty information...
... Independent Service Company, or if you wish to purchase replacement parts, operating instructions, service manuals, or accessories, please call the number shown below. 1 - 8 0 0 - 4 2 1 - 1 4 0 4 Please do not ship your product. Pioneer Electronics Service, Inc. Customer Satisfaction Department 300 Allstate Parkway, Markham, Ontario L3R 0P2 1-877-283-5901 905-479-4411 For warranty information...


