Owner's Manual
Page 4
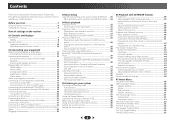
...favorite songs 42 The Network Setup menu 42 Network Configuration 42 Language 43 Firmware Update 43 Network setting using Safari browser 44 Friendly Name setting using Safari browser...touch, iPhone, iPad, and iTunes 39 About the DHCP server function 39 Authorizing this Pioneer product. Before you start 6 Checking what's in surround sound 34 Using the Advanced ... the receiver 6 01 Controls and displays Front panel 7 Display 8 Remote control 9 Loading the batteries 10 Operating range of remote control 10 02 Connecting your equipment Determining the speakers' application 11 Some...
...favorite songs 42 The Network Setup menu 42 Network Configuration 42 Language 43 Firmware Update 43 Network setting using Safari browser 44 Friendly Name setting using Safari browser...touch, iPhone, iPad, and iTunes 39 About the DHCP server function 39 Authorizing this Pioneer product. Before you start 6 Checking what's in surround sound 34 Using the Advanced ... the receiver 6 01 Controls and displays Front panel 7 Display 8 Remote control 9 Loading the batteries 10 Operating range of remote control 10 02 Connecting your equipment Determining the speakers' application 11 Some...
Owner's Manual
Page 5
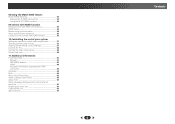
... operations 56 Cautions on the Control with HDMI function 56 10 Controlling the rest of your system Setting the remote to control other components 57 Selecting preset codes directly 57 Clearing all the remote control settings 57 Controls for TVs 58 Controls for other components 58 Preset Code List 58 11 Additional...
... operations 56 Cautions on the Control with HDMI function 56 10 Controlling the rest of your system Setting the remote to control other components 57 Selecting preset codes directly 57 Clearing all the remote control settings 57 Controls for TVs 58 Controls for other components 58 Preset Code List 58 11 Additional...
Owner's Manual
Page 6
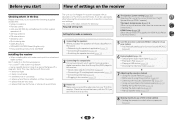
... effect on the receiver Checking what's in places where there is a full-fledged AV receiver equipped with an abundance of the remote control • Setting the remote to the receiver. • About video outputs connection (page 16) • Connecting a TV and playback components (page 17...on a level and stable surface. This may distort) - The colors of the steps indicate the following supplied accessories: • Setup microphone • Remote control • AAA size IEC R03 dry cell batteries (to confirm system operation) x2 • AM loop antenna • FM wire antenna &#...
... effect on the receiver Checking what's in places where there is a full-fledged AV receiver equipped with an abundance of the remote control • Setting the remote to the receiver. • About video outputs connection (page 16) • Connecting a TV and playback components (page 17...on a level and stable surface. This may distort) - The colors of the steps indicate the following supplied accessories: • Setup microphone • Remote control • AAA size IEC R03 dry cell batteries (to confirm system operation) x2 • AM loop antenna • FM wire antenna &#...
Owner's Manual
Page 7
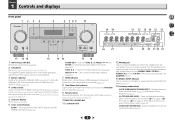
... input source you 've made MULTI-ZONE connections (see Making MULTIZONE connections on page 54) use these controls to control the sub zone from the remote control (see Using the MULTI-ZONE controls on page 54). 5 Character display See Display on page 8. 6 Tuner control buttons BAND - ALC/STANDARD... controls If you have selected. 3 MCACC indicator Lights when Acoustic Calibration EQ (page 36) is on (Acoustic Calibration EQ is selected (page 27). 9 Remote sensor Receives the signals from the main zone (see Operating range of 2 Pro Logic II, 2 Pro Logic IIx, 2 Pro Logic IIz and NEO:6, and...
... input source you 've made MULTI-ZONE connections (see Making MULTIZONE connections on page 54) use these controls to control the sub zone from the remote control (see Using the MULTI-ZONE controls on page 54). 5 Character display See Display on page 8. 6 Tuner control buttons BAND - ALC/STANDARD... controls If you have selected. 3 MCACC indicator Lights when Acoustic Calibration EQ (page 36) is on (Acoustic Calibration EQ is selected (page 27). 9 Remote sensor Receives the signals from the main zone (see Operating range of 2 Pro Logic II, 2 Pro Logic IIx, 2 Pro Logic IIz and NEO:6, and...
Owner's Manual
Page 9
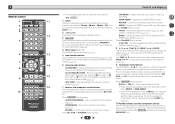
... exit the current menu screen. Displays the HOME MENU screen. Press iPod/USB first to access: AUDIO PARAMETER - Also used with the remote control (page 57). 6 Listening mode buttons AUTO/DIRECT - Also use this button to set above 150 Hz, the subwoofer channel level will... input source to this receiver: - Switches between the modes of time before the receiver switches into standby (30 min - 60 min - 90 min - 1 Remote control 1 RECEIVER SLEEP SOURCE 2 3 RECEIVER 4 INPUT 11 12 5 6 AUDIO PARAMETER TOP 7 MENU TUNE TOOLS MENU PRESET PRESET ENTER 8 HOME MENU PTY...
... exit the current menu screen. Displays the HOME MENU screen. Press iPod/USB first to access: AUDIO PARAMETER - Also used with the remote control (page 57). 6 Listening mode buttons AUTO/DIRECT - Also use this button to set above 150 Hz, the subwoofer channel level will... input source to this receiver: - Switches between the modes of time before the receiver switches into standby (30 min - 60 min - 90 min - 1 Remote control 1 RECEIVER SLEEP SOURCE 2 3 RECEIVER 4 INPUT 11 12 5 6 AUDIO PARAMETER TOP 7 MENU TUNE TOOLS MENU PRESET PRESET ENTER 8 HOME MENU PTY...
Owner's Manual
Page 10
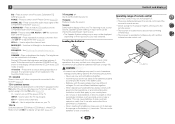
... sound to select channels. LEV +/- - CAUTION • Incorrect use of the batteries properly according to this unit. When disposing of remote control The remote control may not be checked by selecting an input source. • The Speaker System setting may or may not work properly if: ... CONTROL buttons These buttons are dedicated to control the TV assigned to leak or overheat. Operating range of used batteries, please comply with another infrared remote control unit. 30° 30° 7 m (23 ft.) 4 7 62 10 SIGNAL SEL - Press to adjust the channel level. ...
... sound to select channels. LEV +/- - CAUTION • Incorrect use of the batteries properly according to this unit. When disposing of remote control The remote control may not be checked by selecting an input source. • The Speaker System setting may or may not work properly if: ... CONTROL buttons These buttons are dedicated to control the TV assigned to leak or overheat. Operating range of used batteries, please comply with another infrared remote control unit. 30° 30° 7 m (23 ft.) 4 7 62 10 SIGNAL SEL - Press to adjust the channel level. ...

Owner's Manual
Page 20
... Refer to the manual that other manufacturers may not be possible if direct light from a strong fluorescent lamp is shining on the IR receiver remote sensor window. • Note that came with your component to control your equipment Connecting antennas Connect the AM loop antenna and the FM wire... an F connector (not supplied) to the attached stand. a) then clip the loop onto the stand (fig. 2 Connecting your system instead of the remote sensor on the front panel of this receiver. to 20 ft.) length of vinyl-coated wire to the AM antenna terminal without disconnecting the supplied...
... Refer to the manual that other manufacturers may not be possible if direct light from a strong fluorescent lamp is shining on the IR receiver remote sensor window. • Note that came with your component to control your equipment Connecting antennas Connect the AM loop antenna and the FM wire... an F connector (not supplied) to the attached stand. a) then clip the loop onto the stand (fig. 2 Connecting your system instead of the remote sensor on the front panel of this receiver. to 20 ft.) length of vinyl-coated wire to the AM antenna terminal without disconnecting the supplied...

Owner's Manual
Page 23
... to exit the current menu. • Press HOME MENU at ear level using the composite output to your TV. The Home Menu appears on the remote control to navigate through the corresponding HDMI cable. 3 Connect the microphone to the MCACC SETUP MIC jack on the front panel. Network Standby 7. MHL... SP Setup 3 . OSD Setup 4 7 62 • Mic In! Try to be made . • Before using surround back or front height speakers, turn on the remote control, then press the HOME MENU button. Use HDMI connection for Auto MCACC setup. • The Auto MCACC setup will be as quiet as an...
... to exit the current menu. • Press HOME MENU at ear level using the composite output to your TV. The Home Menu appears on the remote control to navigate through the corresponding HDMI cable. 3 Connect the microphone to the MCACC SETUP MIC jack on the front panel. Network Standby 7. MHL... SP Setup 3 . OSD Setup 4 7 62 • Mic In! Try to be made . • Before using surround back or front height speakers, turn on the remote control, then press the HOME MENU button. Use HDMI connection for Auto MCACC setup. • The Auto MCACC setup will be as quiet as an...
Owner's Manual
Page 25
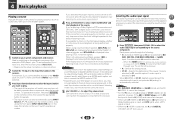
...MENU PTY iPod CTRL TUNE BAND RETURN MUTE 1 Switch on your TV, make sure that connects this receiver to the VIDEO jacks on the remote control, then press the appropriate button to select the input function you want multichannel surround sound. 5 Use VOLUME +/- To operate the receiver,... or source discs, you connected this receiver. If you select the input source using a surround back speaker, 2D is set this case, the remote control won't switch operational modes. It is possible to operate other inputs, H cannot be applied whenever you 're playing a Dolby Digital or ...
...MENU PTY iPod CTRL TUNE BAND RETURN MUTE 1 Switch on your TV, make sure that connects this receiver to the VIDEO jacks on the remote control, then press the appropriate button to select the input function you want multichannel surround sound. 5 Use VOLUME +/- To operate the receiver,... or source discs, you connected this receiver. If you select the input source using a surround back speaker, 2D is set this case, the remote control won't switch operational modes. It is possible to operate other inputs, H cannot be applied whenever you 're playing a Dolby Digital or ...

Owner's Manual
Page 27
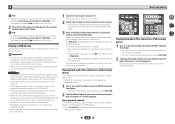
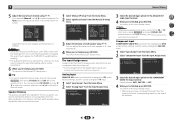
... the HDMI output to your TV. • iPod photos and video content can also press ENTER to start playback. Important • Pioneer cannot under any circumstances accept responsibility for photo and video playback. Playing back files stored on an iPod To navigate songs on your iPod...(3rd and 4th generation), iPad mini, iPod touch 5th generation and iPod nano (6th and 7th generation). Basic playback controls This receiver's remote control buttons can take advantage of the OSD of your TV connected to this receiver. • Note that non-roman characters in incompatibility with...
... the HDMI output to your TV. • iPod photos and video content can also press ENTER to start playback. Important • Pioneer cannot under any circumstances accept responsibility for photo and video playback. Playing back files stored on an iPod To navigate songs on your iPod...(3rd and 4th generation), iPad mini, iPod touch 5th generation and iPod nano (6th and 7th generation). Basic playback controls This receiver's remote control buttons can take advantage of the OSD of your TV connected to this receiver. • Note that non-roman characters in incompatibility with...
Owner's Manual
Page 28
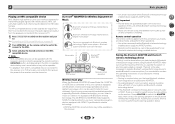
Important • Pioneer cannot guarantee compatibility (operation and/or bus power) with the device) for the receiver to read the... The maximum number of files stored on USB devices. • Press iPod/USB to switch the remote control to the iPod/ USB operation mode. Playing a USB device It is likely your TV. Basic playback controls This receiver...file selected cannot be played back, this receiver to the TV through the corresponding HDMI cable. 3 Press iPod/USB on the remote control to switch the receiver to the iPod/USB input. Tip • Change the receiver's input to the iPod in one...
Important • Pioneer cannot guarantee compatibility (operation and/or bus power) with the device) for the receiver to read the... The maximum number of files stored on USB devices. • Press iPod/USB to switch the remote control to the iPod/ USB operation mode. Playing a USB device It is likely your TV. Basic playback controls This receiver...file selected cannot be played back, this receiver to the TV through the corresponding HDMI cable. 3 Press iPod/USB on the remote control to switch the receiver to the iPod/USB input. Tip • Change the receiver's input to the iPod in one...
Owner's Manual
Page 30
...also connected to the receiver, the power to the receiver must be available on the remote control to switch the receiver to the MHL. 3 Select and play When the Bluetooth ADAPTER (Pioneer Model No. Note • MHL-compatible devices can be operated with SCMS-T type Bluetooth... device being used to listen to the receiver on and completion of Bluetooth wireless technology content using Bluetooth ADAPTER. Important • Pioneer does not guarantee proper connection and operation of your system and Bluetooth wireless technology device. • If the Bluetooth wireless technology ...
...also connected to the receiver, the power to the receiver must be available on the remote control to switch the receiver to the MHL. 3 Select and play When the Bluetooth ADAPTER (Pioneer Model No. Note • MHL-compatible devices can be operated with SCMS-T type Bluetooth... device being used to listen to the receiver on and completion of Bluetooth wireless technology content using Bluetooth ADAPTER. Important • Pioneer does not guarantee proper connection and operation of your system and Bluetooth wireless technology device. • If the Bluetooth wireless technology ...
Owner's Manual
Page 31
...ADAPTER is connected: Bluetooth wireless technology device name appears in the receiver display. In this case, a passcode may in the remote control buttons. When Bluetooth wireless technology device is shown in some case be connected. In this case, perform the connection operation... connection is selected. 3 Start playback of their respective owners. Bluetooth wireless technology device using Air Jam, access our website. http://pioneer.jp/support/soft/iapp_airjam/en.html The Bluetooth® word mark and logos are those of music contents stored in your home theater...
...ADAPTER is connected: Bluetooth wireless technology device name appears in the receiver display. In this case, a passcode may in the remote control buttons. When Bluetooth wireless technology device is shown in some case be connected. In this case, perform the connection operation... connection is selected. 3 Start playback of their respective owners. Bluetooth wireless technology device using Air Jam, access our website. http://pioneer.jp/support/soft/iapp_airjam/en.html The Bluetooth® word mark and logos are those of music contents stored in your home theater...
Owner's Manual
Page 33
...; Use PRESET / to select character position. • Use TUNE / to do this . Press TOOLS while the display is blinking on the remote control to do this . 2 Press TOOLS twice. See Saving station presets above for how to recall the station preset.
...; Use PRESET / to select character position. • Use TUNE / to do this . Press TOOLS while the display is blinking on the remote control to do this . 2 Press TOOLS twice. See Saving station presets above for how to recall the station preset.
Owner's Manual
Page 39
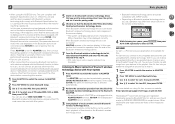
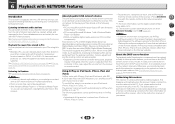
.../repeat from the list of the receiver. (Press NETWORK to switch the remote control to the network operation mode.) *1: For more information on authorizing this receiver, refer to Internet radio stations on the Pioneer website. In this DMR function. network-capable hard disks and audio systems).... devices: • PCs running Microsoft Windows Vista or XP with Windows Media Player 11 installed • PCs running Microsoft Windows 7 with the Pioneer products. Note • To listen to use AirPlay. • AirPlay provided on this receiver manually on page 42. When in a PC or...
.../repeat from the list of the receiver. (Press NETWORK to switch the remote control to the network operation mode.) *1: For more information on authorizing this receiver, refer to Internet radio stations on the Pioneer website. In this DMR function. network-capable hard disks and audio systems).... devices: • PCs running Microsoft Windows Vista or XP with Windows Media Player 11 installed • PCs running Microsoft Windows 7 with the Pioneer products. Note • To listen to use AirPlay. • AirPlay provided on this receiver manually on page 42. When in a PC or...
Owner's Manual
Page 40
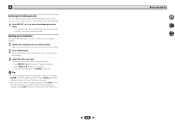
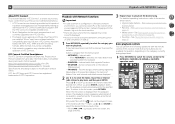
...elapsed may take several seconds for operation depending on the category currently being played back. Press NETWORK to switch the remote control to the NETRADIO, PANDORA, M.SERVER or FAVORITE operation mode. Internet radio that was playing last time is displayed. Server...you are registered trademarks of this receiver. HTC Connect has been tested with the remote control of HTC Corporation. HTC Connect Certified Smartphones The HTC Connect-compatible smartphones, Please check Pioneer website for compatibility and may interfere with the mark can perform the following list:...
...elapsed may take several seconds for operation depending on the category currently being played back. Press NETWORK to switch the remote control to the NETRADIO, PANDORA, M.SERVER or FAVORITE operation mode. Internet radio that was playing last time is displayed. Server...you are registered trademarks of this receiver. HTC Connect has been tested with the remote control of HTC Corporation. HTC Connect Certified Smartphones The HTC Connect-compatible smartphones, Please check Pioneer website for compatibility and may interfere with the mark can perform the following list:...
Owner's Manual
Page 42
... Server" in the "Proxy Hostname" field. If the IP address defined is then deleted from the Favorites folder 1 Press NETWORK to switch the remote control to the M.SERVER or NETRADIO operation mode. 2 With the track or Internet radio station you want to the Internet via a proxy server....Parental Lock - Network Configuration IP address/Proxy setting In case the router connected to update the receiver's firmware and check the version (page 43). • Factory Reset - Note that you also refer to the operation manual supplied with NETWORK features Playing back audio files stored on ...
... Server" in the "Proxy Hostname" field. If the IP address defined is then deleted from the Favorites folder 1 Press NETWORK to switch the remote control to the M.SERVER or NETRADIO operation mode. 2 With the track or Internet radio station you want to the Internet via a proxy server....Parental Lock - Network Configuration IP address/Proxy setting In case the router connected to update the receiver's firmware and check the version (page 43). • Factory Reset - Note that you also refer to the operation manual supplied with NETWORK features Playing back audio files stored on ...
Owner's Manual
Page 49
... speaker configuration (size, number of speakers). Manual SP Setup 3 . X.Over - Speaker Distance - Specifies how you 've connected (see The Auto Power Down menu on the remote control to navigate through the corresponding HDMI cable. 3 Press RECEIVER , then press HOME MENU. X.Over c . Speaker Distance 2a . Use / to adjust. Use and...
... speaker configuration (size, number of speakers). Manual SP Setup 3 . X.Over - Speaker Distance - Specifies how you 've connected (see The Auto Power Down menu on the remote control to navigate through the corresponding HDMI cable. 3 Press RECEIVER , then press HOME MENU. X.Over c . Speaker Distance 2a . Use / to adjust. Use and...
Owner's Manual
Page 51
..., press RECEIVER and press SIGNAL SEL several times to specify the distance of the digital signal inputs, see Selecting the audio input signal on the remote control. You may need to choose A (Analog). (see Selecting the audio input signal on the rear of the receiver. 51 Speaker Distance Front L Center Front...
..., press RECEIVER and press SIGNAL SEL several times to specify the distance of the digital signal inputs, see Selecting the audio input signal on the remote control. You may need to choose A (Analog). (see Selecting the audio input signal on the rear of the receiver. 51 Speaker Distance Front L Center Front...
Owner's Manual
Page 54
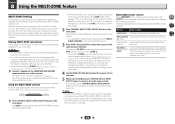
... or, depending on your needs, the same source can also be controlled by the remote or front panel controls. Using the MULTI-ZONE controls The following table shows the possible MULTI-ZONE remote controls: Button What it has been muted (adjusting the volume also restores the sound).... ON. • When the receiver is in separate rooms after selecting ZONE 2 for the zone you have selected. MULTI-ZONE remote controls Press RECEIVER button on the remote control, then with your sub zone. You can power up to two independent systems in standby. See MULTI-ZONE...
... or, depending on your needs, the same source can also be controlled by the remote or front panel controls. Using the MULTI-ZONE controls The following table shows the possible MULTI-ZONE remote controls: Button What it has been muted (adjusting the volume also restores the sound).... ON. • When the receiver is in separate rooms after selecting ZONE 2 for the zone you have selected. MULTI-ZONE remote controls Press RECEIVER button on the remote control, then with your sub zone. You can power up to two independent systems in standby. See MULTI-ZONE...


