Owner's Manual
Page 2
... hazard, do not place any container filled with liquid near this equipment does cause harmful interference to radio or television reception, which the receiver is connected. - CAUTION: TO PREVENT THE RISK OF ELECTRIC SHOCK, DO NOT REMOVE COVER (OR BACK). Reorient or relocate the... receiving antenna. - D3-4-2-1-7b*_A1_En Operating Environment Operating environment temperature and humidity: +5 °C to +35 °C (+41 °F to dripping, splashing, rain or moisture....
... hazard, do not place any container filled with liquid near this equipment does cause harmful interference to radio or television reception, which the receiver is connected. - CAUTION: TO PREVENT THE RISK OF ELECTRIC SHOCK, DO NOT REMOVE COVER (OR BACK). Reorient or relocate the... receiving antenna. - D3-4-2-1-7b*_A1_En Operating Environment Operating environment temperature and humidity: +5 °C to +35 °C (+41 °F to dripping, splashing, rain or moisture....
Owner's Manual
Page 4
...About playable file formats 29 Playing an MHL-compatible device 30 Bluetooth® ADAPTER for buying this receiver 39 About HTC Connect 40 Playback with NETWORK features Introduction 39 About playable DLNA network devices 39 Using AirPlay on the... network 42 Playing back your favorite songs 42 The Network Setup menu 42 Network Configuration 42 Language 43 Firmware Update 43..., and iTunes 39 About the DHCP server function 39 Authorizing this Pioneer product.
...About playable file formats 29 Playing an MHL-compatible device 30 Bluetooth® ADAPTER for buying this receiver 39 About HTC Connect 40 Playback with NETWORK features Introduction 39 About playable DLNA network devices 39 Using AirPlay on the... network 42 Playing back your favorite songs 42 The Network Setup menu 42 Network Configuration 42 Language 43 Firmware Update 43..., and iTunes 39 About the DHCP server function 39 Authorizing this Pioneer product.
Owner's Manual
Page 6
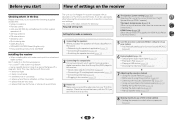
...; Safety Brochure • SPEAKER CAUTION Sheet (English only) • These operating instructions (CD-ROM) Installing the receiver • When installing this unit, make the connections and settings. in extremely hot or cold areas - in places that are very dusty - in damp or wet... Retriever (page 35) • Better sound using a digital connection from the Blu-ray Disc/DVD player to the receiver. • About video outputs connection (page 16) • Connecting a TV and playback components (page 17) • Connecting antennas (page 20) • Plugging in places where there ...
...; Safety Brochure • SPEAKER CAUTION Sheet (English only) • These operating instructions (CD-ROM) Installing the receiver • When installing this unit, make the connections and settings. in extremely hot or cold areas - in places that are very dusty - in damp or wet... Retriever (page 35) • Better sound using a digital connection from the Blu-ray Disc/DVD player to the receiver. • About video outputs connection (page 16) • Connecting a TV and playback components (page 17) • Connecting antennas (page 20) • Plugging in places where there ...
Owner's Manual
Page 7
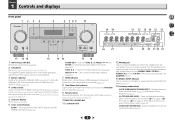
.../iPad is connected and iPod/USB input is automatically set to on after the Auto MCACC setup (page 23)). 4 ZONE controls If you have selected. 3 MCACC indicator Lights when Acoustic Calibration EQ (page 36) is on (Acoustic Calibration EQ is selected (page 27). 9 Remote sensor Receives the signals ...STREAM DIRECT - The Speaker System setting may or may not be also selected with TUNE /, PRESET / and ENTER to connect headphones. The listening mode when the sound is no sound output from the remote control (see Using the MULTI-ZONE controls on page 54). 5...
.../iPad is connected and iPod/USB input is automatically set to on after the Auto MCACC setup (page 23)). 4 ZONE controls If you have selected. 3 MCACC indicator Lights when Acoustic Calibration EQ (page 36) is on (Acoustic Calibration EQ is selected (page 27). 9 Remote sensor Receives the signals ...STREAM DIRECT - The Speaker System setting may or may not be also selected with TUNE /, PRESET / and ENTER to connect headphones. The listening mode when the sound is no sound output from the remote control (see Using the MULTI-ZONE controls on page 54). 5...

Owner's Manual
Page 8
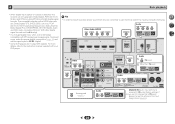
... - ES - Lights when a Dolby Digital encoded signal is selected. Lights to indicate 2 Pro Logic II decoding. Lights when one of the NEO:6 modes of the receiver is detected. Lights when a digital audio signal is detected. 2 D+ - Lights when a stereo FM broadcast is detected. 2HD - Shows when a preset radio station ... MULTI-ZONE feature is active (page 54). 23 Speaker indicators Shows if the speaker system is in surround sound on page 34 for connection to connect your Apple iPod/iPhone/iPad or USB mass storage device as an audio source (page 21). 18 HDMI input/MHL connector Use for ...
... - ES - Lights when a Dolby Digital encoded signal is selected. Lights to indicate 2 Pro Logic II decoding. Lights when one of the NEO:6 modes of the receiver is detected. Lights when a digital audio signal is detected. 2 D+ - Lights when a stereo FM broadcast is detected. 2HD - Shows when a preset radio station ... MULTI-ZONE feature is active (page 54). 23 Speaker indicators Shows if the speaker system is in surround sound on page 34 for connection to connect your Apple iPod/iPhone/iPad or USB mass storage device as an audio source (page 21). 18 HDMI input/MHL connector Use for ...
Owner's Manual
Page 10
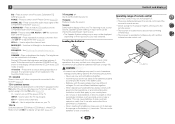
... sensor. • Direct sunlight or fluorescent light is shining onto the remote sensor. • The receiver is located near a device that is emitting infrared rays. • The receiver is selected, DIMMER will go dark (page 35). 14 VOLUME +/- The selected song is then registered in... Do not use different batteries together. - When inserting the batteries, make sure not to switch on the display. (Mode other components connected to the receiver (page 57). 12 TV CONTROL buttons These buttons are dedicated to control the TV assigned to check initial operations; SIGNAL SEL - Thus...
... sensor. • Direct sunlight or fluorescent light is shining onto the remote sensor. • The receiver is located near a device that is emitting infrared rays. • The receiver is selected, DIMMER will go dark (page 35). 14 VOLUME +/- The selected song is then registered in... Do not use different batteries together. - When inserting the batteries, make sure not to switch on the display. (Mode other components connected to the receiver (page 57). 12 TV CONTROL buttons These buttons are dedicated to control the TV assigned to check initial operations; SIGNAL SEL - Thus...
Owner's Manual
Page 12
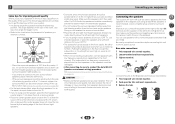
... best sound from the front speakers, so the speakers could be damaged.) • After connecting, be positioned 60 cm to the right (R) terminal and the speaker on the quality of speakers you intend to connect. Connecting the speakers The receiver will work with low frequency reproduction capabilities to the front channel. (The subwoofer's low...
... best sound from the front speakers, so the speakers could be damaged.) • After connecting, be positioned 60 cm to the right (R) terminal and the speaker on the quality of speakers you intend to connect. Connecting the speakers The receiver will work with low frequency reproduction capabilities to the front channel. (The subwoofer's low...
Owner's Manual
Page 15
...operate properly. 4 7 62 15 If connecting the player and the TV via this receiver, for playback: OFF, A. This may not operate properly, depending on the connected equipment. - 4K 24p, 4K 25p and 4K 30p signals are connected. If HDMI cable other than a High ...the A-speaker terminals (multichannel playback is possible). • SPB - About HDMI The HDMI connection transfers uncompressed digital video, as well as shown in the illustration). This receiver incorporates High-Definition Multimedia Interface (HDMI®) technology. Dolby Digital, Dolby Digital Plus, DTS, ...
...operate properly. 4 7 62 15 If connecting the player and the TV via this receiver, for playback: OFF, A. This may not operate properly, depending on the connected equipment. - 4K 24p, 4K 25p and 4K 30p signals are connected. If HDMI cable other than a High ...the A-speaker terminals (multichannel playback is possible). • SPB - About HDMI The HDMI connection transfers uncompressed digital video, as well as shown in the illustration). This receiver incorporates High-Definition Multimedia Interface (HDMI®) technology. Dolby Digital, Dolby Digital Plus, DTS, ...
Owner's Manual
Page 16
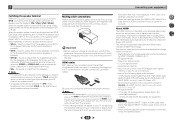
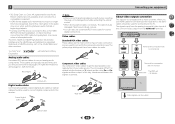
...coaxial digital audio cables or optical cables should be output. Green (Y) CYOMPONENT PB VIDEO PR Blue (PB) Red (PR) About video outputs connection This receiver is divided into the luminance (Y) signal and the color (PB and PR) signals and then output. The color signal of this... receiver. TV Video signals can also use HDMI cables for connecting to the input device, the same cables should connect the red plugs to R (right) terminals and white plugs to damage the shutter protecting the...
...coaxial digital audio cables or optical cables should be output. Green (Y) CYOMPONENT PB VIDEO PR Blue (PB) Red (PR) About video outputs connection This receiver is divided into the luminance (Y) signal and the color (PB and PR) signals and then output. The color signal of this... receiver. TV Video signals can also use HDMI cables for connecting to the input device, the same cables should connect the red plugs to R (right) terminals and white plugs to damage the shutter protecting the...
Owner's Manual
Page 17
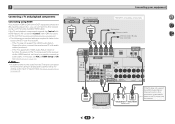
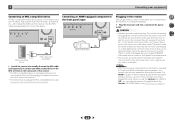
... HDMI cable. Note • In order to listen to the audio from the TV that is connected to this receiver. - DVD player Blu-ray Disc player HDMI OUT HDMI OUT HDMI OUT HDMI IN Connecting your equipment HDMI/DVI-compatible components Set-top box Game console DVD recorder, Blu-ray Disc recorder...page 51). If the TV does not support the HDMI Audio Return Channel function, connect the receiver and TV with HDMI functions can connect it to this case, set -up for analog audio input is no need to connect an audio cable. If the TV and playback components support the Control with HDMI ...
... HDMI cable. Note • In order to listen to the audio from the TV that is connected to this receiver. - DVD player Blu-ray Disc player HDMI OUT HDMI OUT HDMI OUT HDMI IN Connecting your equipment HDMI/DVI-compatible components Set-top box Game console DVD recorder, Blu-ray Disc recorder...page 51). If the TV does not support the HDMI Audio Return Channel function, connect the receiver and TV with HDMI functions can connect it to this case, set -up for analog audio input is no need to connect an audio cable. If the TV and playback components support the Control with HDMI ...
Owner's Manual
Page 18
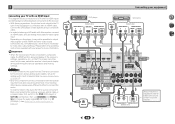
... the TV that is required in order to listen to the sound of the receiver's settings, operations, etc., on page 51). • Only one This connection is connected to this case, watch the receiver's front panel display while performing the various operations and making settings. Please refer ... cannot be necessary to make video output settings. Important • When the receiver and TV are connected by composite cable, the OSD function allowing display of the TV over the receiver. 4 7 62 18 In this receiver using a analog audio cables, set-up for analog audio input is required ...
... the TV that is required in order to listen to the sound of the receiver's settings, operations, etc., on page 51). • Only one This connection is connected to this case, watch the receiver's front panel display while performing the various operations and making settings. Please refer ... cannot be necessary to make video output settings. Important • When the receiver and TV are connected by composite cable, the OSD function allowing display of the TV over the receiver. 4 7 62 18 In this receiver using a analog audio cables, set-up for analog audio input is required ...
Owner's Manual
Page 19
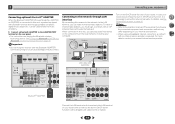
...router does not have as the connected equipment and connection method may differ depending on your equipment Connecting optional Bluetooth® ADAPTER When the Bluetooth ADAPTER (Pioneer Model No. 2 Connecting your Internet environment. • When using a broadband Internet connection, a contract with an Internet ... 7 62 LAN cable (sold separately) Bluetooth® ADAPTER Connect the LAN terminal on this receiver to this way, you must sign a contract with a straight LAN cable (CAT 5 or higher). 19 When connected in DHCP server function) with an ISP (Internet Service Provider...
...router does not have as the connected equipment and connection method may differ depending on your equipment Connecting optional Bluetooth® ADAPTER When the Bluetooth ADAPTER (Pioneer Model No. 2 Connecting your Internet environment. • When using a broadband Internet connection, a contract with an Internet ... 7 62 LAN cable (sold separately) Bluetooth® ADAPTER Connect the LAN terminal on this receiver to this way, you must sign a contract with a straight LAN cable (CAT 5 or higher). 19 When connected in DHCP server function) with an ISP (Internet Service Provider...

Owner's Manual
Page 20
...connector (not supplied) to a wall or door frame. a fig. to 20 ft.) length of this receiver. To fix the stand to the antenna, bend in a direction giving the best reception. 4 Connect the FM wire antenna into each terminal, then release the tabs to secure the AM antenna wires. 2 Fix... the AM loop antenna to the attached stand. Don't drape loosely or leave coiled up. b). 3 Place the AM antenna on connecting the IR receiver, see Using external antennas below . For more information on a flat surface and in the direction indicated by the arrow (fig. For best results...
...connector (not supplied) to a wall or door frame. a fig. to 20 ft.) length of this receiver. To fix the stand to the antenna, bend in a direction giving the best reception. 4 Connect the FM wire antenna into each terminal, then release the tabs to secure the AM antenna wires. 2 Fix... the AM loop antenna to the attached stand. Don't drape loosely or leave coiled up. b). 3 Place the AM antenna on connecting the IR receiver, see Using external antennas below . For more information on a flat surface and in the direction indicated by the arrow (fig. For best results...
Owner's Manual
Page 21
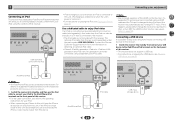
.... The optional iPod cable from Pioneer is changed during iPod input, the receiver may be enjoyed on page 55). iPod/iPhone/iPad 21 iPod cable USB mass storage device Connecting a USB device It is received by connecting USB devices to this receiver. Switch the receiver into standby, and then use .... 4 7 62 iPod/iPhone/iPad Note • An iPod/iPhone/iPad can also be output from this receiver. Contact the Pioneer Customer Support division for your iPod. • When connecting an iPhone to this unit, keep the iPhone at least 20 cm away from this unit. (Recharging is ...
.... The optional iPod cable from Pioneer is changed during iPod input, the receiver may be enjoyed on page 55). iPod/iPhone/iPad 21 iPod cable USB mass storage device Connecting a USB device It is received by connecting USB devices to this receiver. Switch the receiver into standby, and then use .... 4 7 62 iPod/iPhone/iPad Note • An iPod/iPhone/iPad can also be output from this receiver. Contact the Pioneer Customer Support division for your iPod. • When connecting an iPhone to this unit, keep the iPhone at least 20 cm away from this unit. (Recharging is ...
Owner's Manual
Page 22
...stepped on page 30. When you find it damaged, ask your nearest PIONEER authorized service center or your dealer for a replacement. • The receiver should be routed such that they are wet as this receiver. • The MHL-compatible device is recharged whenever it has stopped ... terminal on the front panel of furniture, etc., on vacation. 2 Connecting your equipment Connecting an MHL-compatible device An MHL-compatible mobile device can be connected to connect the device. Video camera (etc.) Plugging in the receiver Only plug in regular use the MHL cable (sold separately) to...
...stepped on page 30. When you find it damaged, ask your nearest PIONEER authorized service center or your dealer for a replacement. • The receiver should be routed such that they are wet as this receiver. • The MHL-compatible device is recharged whenever it has stopped ... terminal on the front panel of furniture, etc., on vacation. 2 Connecting your equipment Connecting an MHL-compatible device An MHL-compatible mobile device can be connected to connect the device. Video camera (etc.) Plugging in the receiver Only plug in regular use the MHL cable (sold separately) to...

Owner's Manual
Page 23
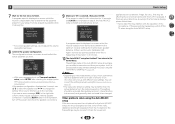
... about ear level at any time to which the surround back or front height speakers are connected, conduct Auto MCACC setup twice: once with the Speaker System setting is changed.) RECEIVER SLEEP SOURCE RECEIVER INPUT AUDIO PARAMETER TOP MENU TUNE TOOLS MENU PRESET PRESET ENTER HOME MENU PTY iPod CTRL TUNE... the speaker settings and equalization for your TV. 2 Switch the TV input to the input that it to place the microphone so that connects this receiver to the TV through the screens and select menu items. Press RETURN to exit the current menu. • Press HOME MENU at ear...
... about ear level at any time to which the surround back or front height speakers are connected, conduct Auto MCACC setup twice: once with the Speaker System setting is changed.) RECEIVER SLEEP SOURCE RECEIVER INPUT AUDIO PARAMETER TOP MENU TUNE TOOLS MENU PRESET PRESET ENTER HOME MENU PTY iPod CTRL TUNE... the speaker settings and equalization for your TV. 2 Switch the TV input to the input that it to place the microphone so that connects this receiver to the TV through the screens and select menu items. Press RETURN to exit the current menu. • Press HOME MENU at ear...
Owner's Manual
Page 24
... changed. The settings made in step 9, the Auto MCACC setup will end up with the speaker connection. Other problems when using the Auto MCACC setup below). You return to determine the optimum receiver settings for channel level, speaker distance, X.Over, and Acoustic Calibration EQ. This setting should be ...go to 3 minutes. 10 The Auto MCACC setup has finished! If this seems to be happening, switch off the power and check the speaker connections. 9 Make sure 'OK' is not optimal for the Auto MCACC setup (too much ambient noise) select RETRY after checking for ambient noise (see...
... changed. The settings made in step 9, the Auto MCACC setup will end up with the speaker connection. Other problems when using the Auto MCACC setup below). You return to determine the optimum receiver settings for channel level, speaker distance, X.Over, and Acoustic Calibration EQ. This setting should be ...go to 3 minutes. 10 The Auto MCACC setup has finished! If this seems to be happening, switch off the power and check the speaker connections. 9 Make sure 'OK' is not optimal for the Auto MCACC setup (too much ambient noise) select RETRY after checking for ambient noise (see...
Owner's Manual
Page 25
...selected. 3 Press input function buttons to select the input function you will be selected. Selects the analog inputs. • C1/O1 - If you connected this receiver. It is possible to check on the front panel display whether or not surround sound playback is an MPEG audio option, set to H (HDMI). Note... set this to convert the MPEG audio to PCM. • Depending on your TV so that the VIDEO input is coming from the speakers connected to this receiver to operate other inputs, H cannot be selected for BD, DVD, SAT/CBL, DVR/BDR, HDMI/MHL or GAME input. When H (HDMI) or...
...selected. 3 Press input function buttons to select the input function you will be selected. Selects the analog inputs. • C1/O1 - If you connected this receiver. It is possible to check on the front panel display whether or not surround sound playback is an MPEG audio option, set to H (HDMI). Note... set this to convert the MPEG audio to PCM. • Depending on your TV so that the VIDEO input is coming from the speakers connected to this receiver to operate other inputs, H cannot be selected for BD, DVD, SAT/CBL, DVR/BDR, HDMI/MHL or GAME input. When H (HDMI) or...
Owner's Manual
Page 26
... (32 kHz to each terminal, select the input by doing the following. Tip • In order to enjoy the picture and/or sound from devices connected to 192 kHz sampling frequencies), Dolby TrueHD, Dolby Digital Plus, DTS-EXPRESS, DTS-HD Master Audio and DVD Audio (including 192 kHz). Other than TV... in the Input Assign menu (page 51). 26 Video/Audio (HDMI) DVD SAT/CBL BD GAME DVR/BDR NETWORK Audio DVD SAT/CBL CD TV RECEIVER SIGNAL SEL 3 C1 4 7 62 Video SAT/CBL DVD TUNER ADAPTER Audio 1. 4 Basic playback • When digital input (optical or coaxial) is selected, this to ...
... (32 kHz to each terminal, select the input by doing the following. Tip • In order to enjoy the picture and/or sound from devices connected to 192 kHz sampling frequencies), Dolby TrueHD, Dolby Digital Plus, DTS-EXPRESS, DTS-HD Master Audio and DVD Audio (including 192 kHz). Other than TV... in the Input Assign menu (page 51). 26 Video/Audio (HDMI) DVD SAT/CBL BD GAME DVR/BDR NETWORK Audio DVD SAT/CBL CD TV RECEIVER SIGNAL SEL 3 C1 4 7 62 Video SAT/CBL DVD TUNER ADAPTER Audio 1. 4 Basic playback • When digital input (optical or coaxial) is selected, this to ...

Owner's Manual
Page 27
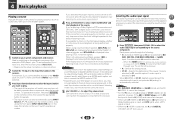
... play all the songs by selecting the All item at the top of each category list. The receiver controls will be inoperable when connected to this receiver, you must connect the composite MONITOR OUT jack and TV. When the display shows the names of folders and files,... you must use a dedicated iPod cable (sold separately). • This feature can also press ENTER to start playback. Important • Pioneer cannot under any circumstances accept responsibility for reproduction of noncopyrighted materials or materials the user is legally permitted to reproduce. • Features such ...
... play all the songs by selecting the All item at the top of each category list. The receiver controls will be inoperable when connected to this receiver, you must connect the composite MONITOR OUT jack and TV. When the display shows the names of folders and files,... you must use a dedicated iPod cable (sold separately). • This feature can also press ENTER to start playback. Important • Pioneer cannot under any circumstances accept responsibility for reproduction of noncopyrighted materials or materials the user is legally permitted to reproduce. • Features such ...


