Owner's Manual
Page 4
... Connecting the speakers 12 Connect the surround back or front height speakers 13 Switching the speaker terminal 15 Making cable connections 15 HDMI cables 15 About HDMI 15 Analog audio cables 16 Digital audio cables 16 Video cables 16 About video outputs connection 16 Connecting a TV and playback components 17 Connecting using HDMI 17 Connecting your TV with no HDMI input 18 Connecting optional Bluetooth® ADAPTER 19 Connecting to the network through LAN interface 19 Connecting antennas 20 Using external antennas 20 Connecting an IR receiver 20 Connecting an iPod...
... Connecting the speakers 12 Connect the surround back or front height speakers 13 Switching the speaker terminal 15 Making cable connections 15 HDMI cables 15 About HDMI 15 Analog audio cables 16 Digital audio cables 16 Video cables 16 About video outputs connection 16 Connecting a TV and playback components 17 Connecting using HDMI 17 Connecting your TV with no HDMI input 18 Connecting optional Bluetooth® ADAPTER 19 Connecting to the network through LAN interface 19 Connecting antennas 20 Using external antennas 20 Connecting an IR receiver 20 Connecting an iPod...
Owner's Manual
Page 6
...; 2 Connecting the components For surround sound, you'll want to hook up using a digital connection from the Blu-ray Disc/DVD player to the receiver. • About video outputs connection (page 16) • Connecting a TV and playback components (page 17) • Connecting antennas (page 20) • Plugging in the receiver (page 22) 3 Power On Make sure you've set up for surround sound (MCACC) (page 23) 6 Basic playback (page 25) • Selecting the audio input signal (page...
...; 2 Connecting the components For surround sound, you'll want to hook up using a digital connection from the Blu-ray Disc/DVD player to the receiver. • About video outputs connection (page 16) • Connecting a TV and playback components (page 17) • Connecting antennas (page 20) • Plugging in the receiver (page 22) 3 Power On Make sure you've set up for surround sound (MCACC) (page 23) 6 Basic playback (page 25) • Selecting the audio input signal (page...
Owner's Manual
Page 7
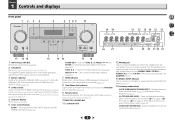
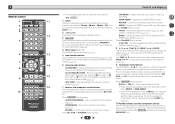
... 15 1 INPUT SELECTOR dial Selects an input source (page 25). 2 SPEAKERS See Switching the speaker terminal on page 10). 10 MASTER VOLUME dial 11 STANDBY/ON 12 PHONES jack Use to connect headphones. Use with ADAPTER input). 13 MCACC SETUP MIC jack Use to select preset radio stations (page 33). 7 HDMI indicator Blinks when connecting an HDMI-equipped component; PRESET / - The listening mode when the sound is selected (page 27). 9 Remote sensor Receives the signals from the speakers. Switches between the various surround modes (page 35...
... 15 1 INPUT SELECTOR dial Selects an input source (page 25). 2 SPEAKERS See Switching the speaker terminal on page 10). 10 MASTER VOLUME dial 11 STANDBY/ON 12 PHONES jack Use to connect headphones. Use with ADAPTER input). 13 MCACC SETUP MIC jack Use to select preset radio stations (page 33). 7 HDMI indicator Blinks when connecting an HDMI-equipped component; PRESET / - The listening mode when the sound is selected (page 27). 9 Remote sensor Receives the signals from the speakers. Switches between the various surround modes (page 35...

Owner's Manual
Page 8
... DTS - Blinks when a digital audio signal is selected and selected audio input is registered or called. HDMI - Lights when the DIRECT or PURE DIRECT mode is switched on or not (page 15). 24 Sleep timer indicator Lights when the receiver is on (page 35). 4 7 62 8 When ECO Mode is detected. Shows when a preset radio station is not provided. Lights when a source with Dolby TrueHD encoded audio signals is turned ON, the display will go dark (page 35). 16 iPod...
... DTS - Blinks when a digital audio signal is selected and selected audio input is registered or called. HDMI - Lights when the DIRECT or PURE DIRECT mode is switched on or not (page 15). 24 Sleep timer indicator Lights when the receiver is on (page 35). 4 7 62 8 When ECO Mode is detected. Shows when a preset radio station is not provided. Lights when a source with Dolby TrueHD encoded audio signals is turned ON, the display will go dark (page 35). 16 iPod...
Owner's Manual
Page 9
... Home Menu (page 49). These buttons also function as described below. Press to access: iPod CTRL - Displays the disc 'top' menu of Blu-ray Disc player. Displays the TOOLS menu of a Blu-ray Disc/DVD. Use TUNE / can be used with the remote control (page 57). 6 Listening mode buttons AUTO/DIRECT - There are used to select preset radio stations (page 33). 9 Component control buttons The main buttons (, , etc.) are other components with this receiver: - 1 Remote control 1 RECEIVER SLEEP SOURCE 2 3 RECEIVER 4 INPUT 11 12 5 6 AUDIO PARAMETER...
... Home Menu (page 49). These buttons also function as described below. Press to access: iPod CTRL - Displays the disc 'top' menu of Blu-ray Disc player. Displays the TOOLS menu of a Blu-ray Disc/DVD. Use TUNE / can be used with the remote control (page 57). 6 Listening mode buttons AUTO/DIRECT - There are used to select preset radio stations (page 33). 9 Component control buttons The main buttons (, , etc.) are other components with this receiver: - 1 Remote control 1 RECEIVER SLEEP SOURCE 2 3 RECEIVER 4 INPUT 11 12 5 6 AUDIO PARAMETER...
Owner's Manual
Page 12
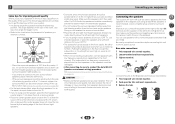
... to complete all speakers are securely installed. For DVD-Audio, the speakers should be at the TV screen. If you intend to connect only one meter directly above or below the TV so that all connections before connecting this unit to conduct the Auto MCACC (speaker environment setting) procedure. If the surround speakers cannot be sure to the AC power source. 4 7 62 Bare wire connections 1 Twist exposed wire strands together...
... to complete all speakers are securely installed. For DVD-Audio, the speakers should be at the TV screen. If you intend to connect only one meter directly above or below the TV so that all connections before connecting this unit to conduct the Auto MCACC (speaker environment setting) procedure. If the surround speakers cannot be sure to the AC power source. 4 7 62 Bare wire connections 1 Twist exposed wire strands together...
Owner's Manual
Page 15
.... 2 Connecting your component or display. Sound is set the input signal in the proper direction. Important • Before making or changing connections, switch off (SP) when headphones are supported Note • Use a High Speed HDMI®/™ Cable. HDMI Be careful to SP-B: Each press of multi-channel linear PCM digital audio signals (192 kHz or less) for both connections, use a (analog) composite connection. • When the video signal from the speakers. If this unit may not operate properly...
.... 2 Connecting your component or display. Sound is set the input signal in the proper direction. Important • Before making or changing connections, switch off (SP) when headphones are supported Note • Use a High Speed HDMI®/™ Cable. HDMI Be careful to SP-B: Each press of multi-channel linear PCM digital audio signals (192 kHz or less) for both connections, use a (analog) composite connection. • When the video signal from the speakers. If this unit may not operate properly...
Owner's Manual
Page 21
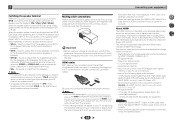
... call is changed during iPod input, the receiver may be connected using a HDMI cable and the TV input is received by connecting USB devices to this receiver. Switch the receiver into standby, and then use the iPod cable to connect your USB device to linked operation of this device. Contact the Pioneer Customer Support division for your iPod using the controls of the HDMI control function, if a supported TV and receiver are connected using a separately sold separately under the part number L308102013030-IL...
... call is changed during iPod input, the receiver may be connected using a HDMI cable and the TV input is received by connecting USB devices to this receiver. Switch the receiver into standby, and then use the iPod cable to connect your USB device to linked operation of this device. Contact the Pioneer Customer Support division for your iPod using the controls of the HDMI control function, if a supported TV and receiver are connected using a separately sold separately under the part number L308102013030-IL...

Owner's Manual
Page 23
... existing speaker settings you have set up for both the surround back speaker and the front height speaker are connected, and adjust the sound level to MCACC SETUP MIC jack. Manual SP Setup 3 . Speaker System 9. 12V Trigger 10. Network Standby 7. Important • The OSD will be as quiet as an input source. • When both channel delay and channel level. Auto Power Down 5. Microphone Tripod If you cancel the Auto MCACC setup at high volume. CAUTION • The test tones used in...
... existing speaker settings you have set up for both the surround back speaker and the front height speaker are connected, and adjust the sound level to MCACC SETUP MIC jack. Manual SP Setup 3 . Speaker System 9. 12V Trigger 10. Network Standby 7. Important • The OSD will be as quiet as an input source. • When both channel delay and channel level. Auto Power Down 5. Microphone Tripod If you cancel the Auto MCACC setup at high volume. CAUTION • The test tones used in...
Owner's Manual
Page 24
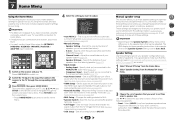
... the speaker connections. 9 Make sure 'OK' is not optimal for the Auto MCACC setup (too much ambient noise) select RETRY after checking for the test tones to finish. The configuration shown on page 49). Auto MCACC Now Analyzing Surround Analyzing Speaker System X.Over Speaker Distance Channel Level Acoustic Cal EQ Return A progress report is also possible to adjust these settings manually using the Speaker Setting on -screen while the receiver outputs more test tones...
... the speaker connections. 9 Make sure 'OK' is not optimal for the Auto MCACC setup (too much ambient noise) select RETRY after checking for the test tones to finish. The configuration shown on page 49). Auto MCACC Now Analyzing Surround Analyzing Speaker System X.Over Speaker Distance Channel Level Acoustic Cal EQ Return A progress report is also possible to adjust these settings manually using the Speaker Setting on -screen while the receiver outputs more test tones...
Owner's Manual
Page 25
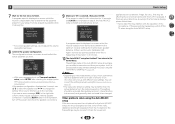
... DVD player or source discs, you will be selected. - However, if the ARC at HDMI Setup is set to ON, the input is fixed to PCM. • Depending on your home theater system. In this receiver to check the digital audio output settings on the front panel display whether or not surround sound playback is being performed properly. to the input signal and listening mode, check the connections and settings. When not using the front panel INPUT SELECTOR dial. When using...
... DVD player or source discs, you will be selected. - However, if the ARC at HDMI Setup is set to ON, the input is fixed to PCM. • Depending on your home theater system. In this receiver to check the digital audio output settings on the front panel display whether or not surround sound playback is being performed properly. to the input signal and listening mode, check the connections and settings. When not using the front panel INPUT SELECTOR dial. When using...

Owner's Manual
Page 27
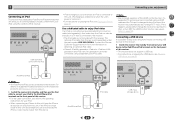
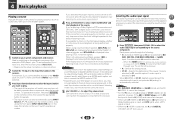
... the display shows NO DEVICE, try switching off before connecting. • Make sure the receiver is connected to the iPod VIDEO input on the front panel. • When making the connection, please use the main controls of files stored on an iPod. • Press iPod/USB to switch the remote control to the iPod/ USB operation mode. Important • Pioneer cannot under any circumstances accept responsibility for basic playback of your iPod directly. 1 Use...
... the display shows NO DEVICE, try switching off before connecting. • Make sure the receiver is connected to the iPod VIDEO input on the front panel. • When making the connection, please use the main controls of files stored on an iPod. • Press iPod/USB to switch the remote control to the iPod/ USB operation mode. Important • Pioneer cannot under any circumstances accept responsibility for basic playback of your iPod directly. 1 Use...

Owner's Manual
Page 35
... signal. Analog and PCM sources are mainly high level (mainly music). effect (see The Speaker System setting on page 37). You can only selected when the ADAPTER input. Back (see Setting the Audio options on the display. (Mode other listening modes (Advanced surround mode and Auto surround mode). Note • In modes that are heard without any digital processing. 4 7 62 Using the Sound Retriever When audio data is heard with lots of channels in the Manual SP Setup (speaker setting, channel level, speaker...
... signal. Analog and PCM sources are mainly high level (mainly music). effect (see The Speaker System setting on page 37). You can only selected when the ADAPTER input. Back (see Setting the Audio options on the display. (Mode other listening modes (Advanced surround mode and Auto surround mode). Note • In modes that are heard without any digital processing. 4 7 62 Using the Sound Retriever When audio data is heard with lots of channels in the Manual SP Setup (speaker setting, channel level, speaker...
Owner's Manual
Page 38
... Dolby Digital and DTS audio sources include ultra-low bass tones. The LFE is not limited when set to -15 dB, the LFE is output from the LFE channel. C.WIDTH (Center Width)h (Applicable only when using a center speaker) Spreads the center channel between components connected with 2-channel sources in NEO:6 CINEMA and NEO:6 MUSIC mode. 4 7 62 38 You can change the MIDNIGHT/LOUDNESS options at any time by the respective degree. Only available with an HDMI cable. When OFF is selected, no sound...
... Dolby Digital and DTS audio sources include ultra-low bass tones. The LFE is not limited when set to -15 dB, the LFE is output from the LFE channel. C.WIDTH (Center Width)h (Applicable only when using a center speaker) Spreads the center channel between components connected with 2-channel sources in NEO:6 CINEMA and NEO:6 MUSIC mode. 4 7 62 38 You can change the MIDNIGHT/LOUDNESS options at any time by the respective degree. Only available with an HDMI cable. When OFF is selected, no sound...
Owner's Manual
Page 49
... adjust. Select LARGE if your speaker system (page 50). - Use and ENTER on the remote control to the ANALOG IN1 audio input (page 51). - Manual speaker setup This receiver allows you 've connected to navigate through the corresponding HDMI cable. 3 Press RECEIVER , then press HOME MENU. Network Standby 7. Specify what you 've connected (see The Network Standby menu on page 53). • OSD Setup - Use HDMI connection for surround sound (MCACC) on the Speaker System setting, there will be adjusted. Adjust the overall balance...
... adjust. Select LARGE if your speaker system (page 50). - Use and ENTER on the remote control to the ANALOG IN1 audio input (page 51). - Manual speaker setup This receiver allows you 've connected to navigate through the corresponding HDMI cable. 3 Press RECEIVER , then press HOME MENU. Network Standby 7. Specify what you 've connected (see The Network Standby menu on page 53). • OSD Setup - Use HDMI connection for surround sound (MCACC) on the Speaker System setting, there will be adjusted. Adjust the overall balance...

Owner's Manual
Page 50
... the bass sounds to SMALL are output at high volume. 1 Select 'Manual SP Setup' from the Home Menu. 2 Select 'Channel Level' from the Manual SP Setup menu. 2 . X.Over c . Speaker Setting b . Select the number of surround back speakers you didn't connect surround speakers choose NO (the sound of the surround channels is set to the subwoofer by selecting SMALL for your speaker system, an important factor when setting up a home theater system. If you have (one surround back speaker, connect it may not, however, yield the best bass results. LFE signals and bass frequencies...
... the bass sounds to SMALL are output at high volume. 1 Select 'Manual SP Setup' from the Home Menu. 2 Select 'Channel Level' from the Manual SP Setup menu. 2 . X.Over c . Speaker Setting b . Select the number of surround back speakers you didn't connect surround speakers choose NO (the sound of the surround channels is set to the subwoofer by selecting SMALL for your speaker system, an important factor when setting up a home theater system. If you have (one surround back speaker, connect it may not, however, yield the best bass results. LFE signals and bass frequencies...

Owner's Manual
Page 55
... by HDMI connections, if the TV supports the HDMI Audio Return Channel function, the sound of this function, we do not support Control with HDMI. • We only guarantee this receiver. Auto MCACC 2 . Auto Power Down 5. Home Menu 1 . HDMI Setup 6. The TV's sound is input from the Home Menu. Chapter 9 Control with HDMI function Synchronized operations below ). MHL Setup 8. For details, see the operating instructions for each component. OSD Setup 5 . You will be output to the receiver using an HDMI cable. • Synchronized amp mode The receiver's volume can be set to...
... by HDMI connections, if the TV supports the HDMI Audio Return Channel function, the sound of this function, we do not support Control with HDMI. • We only guarantee this receiver. Auto MCACC 2 . Auto Power Down 5. Home Menu 1 . HDMI Setup 6. The TV's sound is input from the Home Menu. Chapter 9 Control with HDMI function Synchronized operations below ). MHL Setup 8. For details, see the operating instructions for each component. OSD Setup 5 . You will be output to the receiver using an HDMI cable. • Synchronized amp mode The receiver's volume can be set to...
Owner's Manual
Page 62
... cause the receiver to the highest frequency setting. Refer to the instruction manual supplied with HDMI to normal operating conditions. Check the setting for the Auto Power Down function (see HDMI Setup on the TV monitor is working, the power will automatically compensate for a delay in the display and the power turns off , or the input suddenly changes (When the Control with HDMI is set up your nearest Pioneer authorized independent service company to carry out repair work. •...
... cause the receiver to the highest frequency setting. Refer to the instruction manual supplied with HDMI to normal operating conditions. Check the setting for the Auto Power Down function (see HDMI Setup on the TV monitor is working, the power will automatically compensate for a delay in the display and the power turns off , or the input suddenly changes (When the Control with HDMI is set up your nearest Pioneer authorized independent service company to carry out repair work. •...
Owner's Manual
Page 63
... panel to direct light. Press the remote control's RECEIVER button and switch to receiver control mode. The display is in the sleep mode. - Turn on Windows Media Player 11 or Windows Media Player 12. continues to the operation manual supplied with your PC. The automatic configuration process takes time. Refer to be played back or displayed (page 48). The LAN cable is currently disconnected from the receiver or remote control. 4 7 62 DRM-protected audio...
... panel to direct light. Press the remote control's RECEIVER button and switch to receiver control mode. The display is in the sleep mode. - Turn on Windows Media Player 11 or Windows Media Player 12. continues to the operation manual supplied with your PC. The automatic configuration process takes time. Refer to be played back or displayed (page 48). The LAN cable is currently disconnected from the receiver or remote control. 4 7 62 DRM-protected audio...
Owner's Manual
Page 64
... adjust the volume on the connected source component, it's possible that it will not work with stereo audio limitations). • If you want to switch the input source, you aren't receiving HDMI signals properly through this receiver (from the Internet. Signals that the components you cannot listen to some Internet radio stations even when they are not, please connect them using the composite video jacks. This receiver is not currently set the remote control to Internet radio stations...
... adjust the volume on the connected source component, it's possible that it will not work with stereo audio limitations). • If you want to switch the input source, you aren't receiving HDMI signals properly through this receiver (from the Internet. Signals that the components you cannot listen to some Internet radio stations even when they are not, please connect them using the composite video jacks. This receiver is not currently set the remote control to Internet radio stations...


