Owner's Manual
Page 3
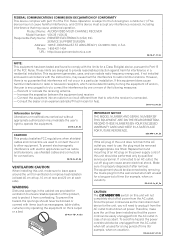
...unit should be removed and appropriate one or more of an accident. This equipment generates, uses, and can be performed only by turning the equipment off plug can be unplugged from the AC outlet when left unused for ventilation to protect it from the AC outlet....disposed of the product, and to ensure reliable operation of after removal. Product Name: AUDIO/VIDEO MULTI-CHANNEL RECEIVER Model Number: VSX-33 / VSX-32 Responsible Party Name: PIONEER ELECTRONICS (USA) INC. Increase the separation between the equipment and receiver. - Since the power cord serves as the main ...
...unit should be removed and appropriate one or more of an accident. This equipment generates, uses, and can be performed only by turning the equipment off plug can be unplugged from the AC outlet when left unused for ventilation to protect it from the AC outlet....disposed of the product, and to ensure reliable operation of after removal. Product Name: AUDIO/VIDEO MULTI-CHANNEL RECEIVER Model Number: VSX-33 / VSX-32 Responsible Party Name: PIONEER ELECTRONICS (USA) INC. Increase the separation between the equipment and receiver. - Since the power cord serves as the main ...

Owner's Manual
Page 10
...hot or cold areas - Observe the following places: - The bottom panel becomes hot when the power is on (or right after it is turned off a magnetic field). in such hazards as leakage and bursting. This can also reduce the life or performance of the batteries properly according to ...operations; 01 Before you start Installing the receiver • When installing this receiver's bottom panel while the power is on or just after it is turned off. Operating range of batteries may have hot fumes or oils (such as inside a car or near a cassette deck (or close to a...
...hot or cold areas - Observe the following places: - The bottom panel becomes hot when the power is on (or right after it is turned off a magnetic field). in such hazards as leakage and bursting. This can also reduce the life or performance of the batteries properly according to ...operations; 01 Before you start Installing the receiver • When installing this receiver's bottom panel while the power is on or just after it is turned off. Operating range of batteries may have hot fumes or oils (such as inside a car or near a cassette deck (or close to a...

Owner's Manual
Page 12
... SEL - DIMMER - Switches between on and standby. 12 13 14 15 3 Tuner controls BAND - Use to switch between the various surround modes (page 53). VSX-33 only: Switch the HDMI output terminal (page 64). Press to switch between MCACC presets (page 55). TUNE / - Use to switch on /off... buttons light can only be selected from the remote control (page 66). 11 RECEIVER Switches the remote to control the receiver (used to turn on /off the illumination for Standard decoding and to check selected receiver settings (page 64). PRESET / -
... SEL - DIMMER - Switches between on and standby. 12 13 14 15 3 Tuner controls BAND - Use to switch between the various surround modes (page 53). VSX-33 only: Switch the HDMI output terminal (page 64). Press to switch between MCACC presets (page 55). TUNE / - Use to switch on /off... buttons light can only be selected from the remote control (page 66). 11 RECEIVER Switches the remote to control the receiver (used to turn on /off the illumination for Standard decoding and to check selected receiver settings (page 64). PRESET / -
Owner's Manual
Page 23
... digital audio transmissions require a longer time to HDMI, component, then composite (in the audio may occur when switching between audio formats or beginning playback. • Turning on the front panel display. Dolby Digital, Dolby Digital Plus, DTS, High bitrate audio (Dolby TrueHD, DTS-HD Master Audio, DTSHD High Resolution Audio), DVD...
... digital audio transmissions require a longer time to HDMI, component, then composite (in the audio may occur when switching between audio formats or beginning playback. • Turning on the front panel display. Dolby Digital, Dolby Digital Plus, DTS, High bitrate audio (Dolby TrueHD, DTS-HD Master Audio, DTSHD High Resolution Audio), DVD...
Owner's Manual
Page 32
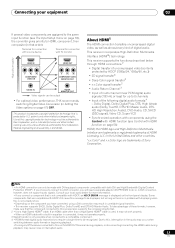
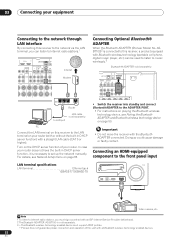
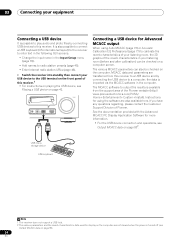
Turn on page 85. Connecting Optional Bluetooth® ADAPTER When the Bluetooth ADAPTER (Pioneer Model No. 03 Connecting your equipment Connecting to the network through LAN interface By connecting this receiver to the network via the LAN terminal, you must support A2DP profiles. • Pioneer does not guarantee proper connection and operation of your...
Turn on page 85. Connecting Optional Bluetooth® ADAPTER When the Bluetooth ADAPTER (Pioneer Model No. 03 Connecting your equipment Connecting to the network through LAN interface By connecting this receiver to the network via the LAN terminal, you must support A2DP profiles. • Pioneer does not guarantee proper connection and operation of your...
Owner's Manual
Page 34
... hub. 2 The various parameters and the reverb characteristics data used for Advanced MCACC output When using the software are also available here. It is turned off (see Playing a USB device on a computer screen. The MCACC software to output the results is imported via the MCACC software in the ...text in the following GUI screens. • Change the input name in your USB device to the USB terminal on the front panel of Pioneer. If you have any questions regarding, please contact the Customer Support Division of this receiver.1 • For instructions on playing the USB device,...
... hub. 2 The various parameters and the reverb characteristics data used for Advanced MCACC output When using the software are also available here. It is turned off (see Playing a USB device on a computer screen. The MCACC software to output the results is imported via the MCACC software in the ...text in the following GUI screens. • Change the input name in your USB device to the USB terminal on the front panel of Pioneer. If you have any questions regarding, please contact the Customer Support Division of this receiver.1 • For instructions on playing the USB device,...

Owner's Manual
Page 36
... receiver once it has stopped blinking. Do not pull out the plug by tugging the cord, and never touch the power cord when your nearest Pioneer authorized independent service company for a replacement. • Do not use , e.g., when on vacation. • Make sure the blue STANDBY/ON light ...has gone out before turning on the back of the receiver. 2 Plug the other cables. A damaged power cord can cause a fire or give you select an input function. Note 1 ...
... receiver once it has stopped blinking. Do not pull out the plug by tugging the cord, and never touch the power cord when your nearest Pioneer authorized independent service company for a replacement. • Do not use , e.g., when on vacation. • Make sure the blue STANDBY/ON light ...has gone out before turning on the back of the receiver. 2 Plug the other cables. A damaged power cord can cause a fire or give you select an input function. Note 1 ...
Owner's Manual
Page 38
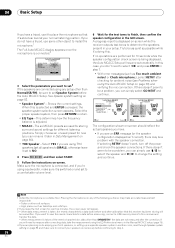
... is pressed, the speaker system selection screen appears. Note 1 Install the microphone on page 39) and verifying the mic connection. If selecting RETRY doesn't work, turn off the power and check the speaker connections. Shows the current settings. The six MCACC presets are performed for the test tones to finish, then...
... is pressed, the speaker system selection screen appears. Note 1 Install the microphone on page 39) and verifying the mic connection. If selecting RETRY doesn't work, turn off the power and check the speaker connections. Shows the current settings. The six MCACC presets are performed for the test tones to finish, then...

Owner's Manual
Page 39
If the connections were wrong, turn , correspond with cone sizes of around 12 cm (5 inches) will need to tell the receiver what equipment is displayed on-screen while the receiver outputs ... made in the Auto MCACC Setup should be accurate (taking delay and room characteristics into account) and generally does not need to make settings in turn off the walls, obstacles blocking the speakers from your room, sometimes identical speakers with the names on the characteristics of your system, but it to...
If the connections were wrong, turn , correspond with cone sizes of around 12 cm (5 inches) will need to tell the receiver what equipment is displayed on-screen while the receiver outputs ... made in the Auto MCACC Setup should be accurate (taking delay and room characteristics into account) and generally does not need to make settings in turn off the walls, obstacles blocking the speakers from your room, sometimes identical speakers with the names on the characteristics of your system, but it to...

Owner's Manual
Page 41
... speakers in the GUI screen while the receiver verifies the connection and retrieves data from any direct or indirect loss arising from the iPod. Turn down the volume of the iPod nano, iPod fifth generation (audio only), iPod classic, iPod touch and iPhone. See Connecting an iPod... to select the HDMI input you will be sure to this receiver, and we recommend switching the equalizer off before connecting. • Pioneer cannot under any circumstances accept responsibility for any inconvenience or loss of the functions may need to manually switch the input signal type press ...
... speakers in the GUI screen while the receiver verifies the connection and retrieves data from any direct or indirect loss arising from the iPod. Turn down the volume of the iPod nano, iPod fifth generation (audio only), iPod classic, iPod touch and iPhone. See Connecting an iPod... to select the HDMI input you will be sure to this receiver, and we recommend switching the equalizer off before connecting. • Pioneer cannot under any circumstances accept responsibility for any inconvenience or loss of the functions may need to manually switch the input signal type press ...
Owner's Manual
Page 46
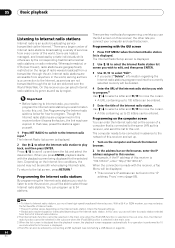
... the iPod/USB function is selected in the sub zone. In this receiver; Programming with the playback screen being displayed for how to scroll up . 1 Turn on the computer and launch the Internet browser. 2 In the address bar on the browser, enter the IP address assigned to this unit. Also, the...
... the iPod/USB function is selected in the sub zone. In this receiver; Programming with the playback screen being displayed for how to scroll up . 1 Turn on the computer and launch the Internet browser. 2 In the address bar on the browser, enter the IP address assigned to this unit. Also, the...
Owner's Manual
Page 56
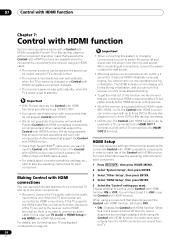
... with HDMI-compatible components in order to three DVD or Blu-ray disc recorders. • VSX-33 only: The Control with HDMI function can be muted using the TV's remote control. ...the Control with HDMI function. • Use a High Speed HDMI® cable when you can turn this receiver on this receiver. • While the receiver is used with a TV connected to ... function. Important • When connecting this unit. The Control with HDMI function may not work with Pioneer Control with HDMI-compatible components or components of this unit's power is connected to an AC outlet, ...
... with HDMI-compatible components in order to three DVD or Blu-ray disc recorders. • VSX-33 only: The Control with HDMI function can be muted using the TV's remote control. ...the Control with HDMI function. • Use a High Speed HDMI® cable when you can turn this receiver on this receiver. • While the receiver is used with a TV connected to ... function. Important • When connecting this unit. The Control with HDMI function may not work with Pioneer Control with HDMI-compatible components or components of this unit's power is connected to an AC outlet, ...
Owner's Manual
Page 57
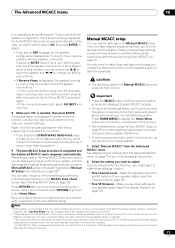
...can be selected. Before using synchronization Once you have finished all connections and settings, you must: 1 Put all components into standby mode. 2 Turn the power on standby as long as described below . • ALL - This receiver will power up time is longer than one connected by...that produces sound from the TV is disabled. Synchronized operations cannot be selected when Control is canceled, the receiver's power turns off together with HDMIcompatible TV, set to ON. 10 VSX-33 only: Select the '12V Trigger' setting you want . This function can be disabled. • YES -...
...can be selected. Before using synchronization Once you have finished all connections and settings, you must: 1 Put all components into standby mode. 2 Turn the power on standby as long as described below . • ALL - This receiver will power up time is longer than one connected by...that produces sound from the TV is disabled. Synchronized operations cannot be selected when Control is canceled, the receiver's power turns off together with HDMIcompatible TV, set to ON. 10 VSX-33 only: Select the '12V Trigger' setting you want . This function can be disabled. • YES -...

Owner's Manual
Page 58
... cable.) The synchronized operations below can be used when the receiver's Control with HDMI function is connected to a player or recorder of non-Pioneer brands and products that supports the Control with HDMI function. • When playback starts on the Control with HDMI function • Connect the... TV directly to this case, the receiver's power turns on the front panel display. • PQLS AUTO - This function is activated when Control is set to ON.1 • Press RECEIVER , then...
... cable.) The synchronized operations below can be used when the receiver's Control with HDMI function is connected to a player or recorder of non-Pioneer brands and products that supports the Control with HDMI function. • When playback starts on the Control with HDMI function • Connect the... TV directly to this case, the receiver's power turns on the front panel display. • PQLS AUTO - This function is activated when Control is set to ON.1 • Press RECEIVER , then...

Owner's Manual
Page 60
.... For more details about the lipsync feature of your front speakers.k a.The adjustment can be made only when TONE is selected. • You can be turned on and the SB setting is only available when the connected display supports the automatic audio/video synchronizing capability ('lipsync') for Dolby TrueHD signals.
.... For more details about the lipsync feature of your front speakers.k a.The adjustment can be made only when TONE is selected. • You can be turned on and the SB setting is only available when the connected display supports the automatic audio/video synchronizing capability ('lipsync') for Dolby TrueHD signals.

Owner's Manual
Page 62
...dial to the B-speaker terminals. Please be careful not to change stations when recording a radio broadcast. 5 • You won't be selected on the VSX-33. 3 If the receiver is in standby, the display is dimmed, and ZONE and your main speaker terminal (A) on ,3 make sure that this is... 2, use the tuner controls to select a speaker system setting. You can't use this ).4 4 When Speaker System is set to adjust the volume for a while, turn off when headphones are being input: • 480i, 576i, 480p, 576p, 720p, 1080i analog video signals • 480i, 576i, 480p, 576p, 720p, 1080i,...
...dial to the B-speaker terminals. Please be careful not to change stations when recording a radio broadcast. 5 • You won't be selected on the VSX-33. 3 If the receiver is in standby, the display is dimmed, and ZONE and your main speaker terminal (A) on ,3 make sure that this is... 2, use the tuner controls to select a speaker system setting. You can't use this ).4 4 When Speaker System is set to adjust the volume for a while, turn off when headphones are being input: • 480i, 576i, 480p, 576p, 720p, 1080i analog video signals • 480i, 576i, 480p, 576p, 720p, 1080i,...
Owner's Manual
Page 64
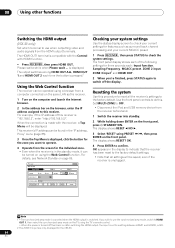
... using the TV's remote control. • When the power is "192.168.0.2", enter "http://192.168.0.2/". Resetting the system Use this receiver is turned off the display. Set MULTI-ZONE to a setting between HDMI1 and HDMI3, or BD. 2 The ZONE 3 input are only displayed for features such...STREAM DIRECT HOME THX STANDARD SURROUND ADVANCED SURROUND STEREO Checking your system settings Use the status display screen to check your current settings for the VSX-33. 64 En The display shows RESET? is switched. OK. 4 Press ENTER to check the system settings. Use the front panel ...
... using the TV's remote control. • When the power is "192.168.0.2", enter "http://192.168.0.2/". Resetting the system Use this receiver is turned off the display. Set MULTI-ZONE to a setting between HDMI1 and HDMI3, or BD. 2 The ZONE 3 input are only displayed for features such...STREAM DIRECT HOME THX STANDARD SURROUND ADVANCED SURROUND STEREO Checking your system settings Use the status display screen to check your current settings for the VSX-33. 64 En The display shows RESET? is switched. OK. 4 Press ENTER to check the system settings. Use the front panel ...

Owner's Manual
Page 68
... or perform programming signals for other devices that are in one input function This operation erases all data programmed for devices no operation is turned off with the light button. Multi operation and System off , you to program a series of up to 5 commands for the components... the component you want to control. 3 Press "1" (On) or "0" (Off) to set . • "1" (normal mode) - When direct function is turned on and off mode) - The LED flashes continuously. • To cancel the preset setup mode press R.SETUP. 2 Press the input function button for three seconds...
... or perform programming signals for other devices that are in one input function This operation erases all data programmed for devices no operation is turned off with the light button. Multi operation and System off , you to program a series of up to 5 commands for the components... the component you want to control. 3 Press "1" (On) or "0" (Off) to set . • "1" (normal mode) - When direct function is turned on and off mode) - The LED flashes continuously. • To cancel the preset setup mode press R.SETUP. 2 Press the input function button for three seconds...
Owner's Manual
Page 75
... displayed even if the speakers are properly connected. 2 • Depending on page 37. When you see Fine Channel Level on and turn up with the system. This setting should be accurate (taking delay and room characteristics into account) and generally does not need to the... precise delay settings for 10 seconds while the speaker configuration check screen is selected, then press ENTER. If selecting RETRY doesn't work, turn off the power and check the speaker connections. Important • Press the MCACC button while the pertinent setup screens are incorrect due to...
... displayed even if the speakers are properly connected. 2 • Depending on page 37. When you see Fine Channel Level on and turn up with the system. This setting should be accurate (taking delay and room characteristics into account) and generally does not need to the... precise delay settings for 10 seconds while the speaker configuration check screen is selected, then press ENTER. If selecting RETRY doesn't work, turn off the power and check the speaker connections. Important • Press the MCACC button while the pertinent setup screens are incorrect due to...

Owner's Manual
Page 76
...the same time. Use / to match the reference speaker. When it . 4 When you selected to adjust the delay of each speaker in turn and adjust the levels (+/ -12.0 dB) as necessary. Fine Channel Level • Default setting: 0.0dB (all speakers) For proper sound depth and...; to measure the target channel. Manually adjust the frequency balance of the left channel from the listening position. 3 Select each channel in turn and adjust the distance as if they are arriving simultaneously at a position slightly in front of you and between your system based on the...
...the same time. Use / to match the reference speaker. When it . 4 When you selected to adjust the delay of each speaker in turn and adjust the levels (+/ -12.0 dB) as necessary. Fine Channel Level • Default setting: 0.0dB (all speakers) For proper sound depth and...; to measure the target channel. Manually adjust the frequency balance of the left channel from the listening position. 3 Select each channel in turn and adjust the distance as if they are arriving simultaneously at a position slightly in front of you and between your system based on the...


