
Owner's Manual
Page 5
...MCACC Setup . . . . 39 The Input Setup menu 39 Input function default and possible settings 40 05 Basic playback Playing a source 41 Playing a source with no HDMI input 26 Connecting an HDD/DVD recorder, BD recorder and other video sources 27 Connecting a satellite/cable receiver or other set-top box 28 Connecting other audio components 28 About the WMA9 Pro decoder 29 Connecting additional amplifiers 29 Connecting AM/FM antennas 30 Connecting external antennas 30 MULTI-ZONE setup 30 Making MULTI-ZONE connections 31 Connecting to the network through these operating instructions...
...MCACC Setup . . . . 39 The Input Setup menu 39 Input function default and possible settings 40 05 Basic playback Playing a source 41 Playing a source with no HDMI input 26 Connecting an HDD/DVD recorder, BD recorder and other video sources 27 Connecting a satellite/cable receiver or other set-top box 28 Connecting other audio components 28 About the WMA9 Pro decoder 29 Connecting additional amplifiers 29 Connecting AM/FM antennas 30 Connecting external antennas 30 MULTI-ZONE setup 30 Making MULTI-ZONE connections 31 Connecting to the network through these operating instructions...
Owner's Manual
Page 6
... control other components . . . . 66 Selecting preset codes directly 66 Programming signals from other remote controls . . . 67 Erasing one of the remote control button settings . . . 67 Erasing all learnt settings that are in one input function 68 Direct function 68 Setting the backlight mode 68 Multi operation and System off 68 11 The System Setup and Other Setup menus Making receiver settings from the System Setup menu 82 Manual speaker setup 82 Speaker system setting 83 Speaker Setting 83 Channel Level 84 Speaker Distance 84 X-Curve 85 THX Audio Setting 85 Network Setup menu...
... control other components . . . . 66 Selecting preset codes directly 66 Programming signals from other remote controls . . . 67 Erasing one of the remote control button settings . . . 67 Erasing all learnt settings that are in one input function 68 Direct function 68 Setting the backlight mode 68 Multi operation and System off 68 11 The System Setup and Other Setup menus Making receiver settings from the System Setup menu 82 Manual speaker setup 82 Speaker system setting 83 Speaker Setting 83 Channel Level 84 Speaker Distance 84 X-Curve 85 THX Audio Setting 85 Network Setup menu...
Owner's Manual
Page 11
... to control the TV assigned to the TV CTRL button. 6 Receiver setting buttons Press RECEIVER first to access: AUDIO PARAMETER - Receiver control, TV control • Blue - RECEIVER MULTI OPERATION SOURCE 1 R.SETUP 2 BD DVD DVR/BDR HDMI 10 TV CD NET RADIO ADAPTER 3 iPod USB TUNER SIRIUS XM INPUT SELECT TV CTRL RECEIVER 4 11 MASTER INPUT VOLUME TV CONTROL 5 12 CH VOL MUTE 13 AUDIO PARAMETER VIDEO PARAMETER 6 LIST TUNE TOOLS TOP MENU 7 BAND T.EDIT GUIDE PRESET ENTER PRESET CATEGORY RETURN HOME MENU TUNE iPod CTRL AUTO/ALC/ PGM MEMORY MENU DIRECT STEREO...
... to control the TV assigned to the TV CTRL button. 6 Receiver setting buttons Press RECEIVER first to access: AUDIO PARAMETER - Receiver control, TV control • Blue - RECEIVER MULTI OPERATION SOURCE 1 R.SETUP 2 BD DVD DVR/BDR HDMI 10 TV CD NET RADIO ADAPTER 3 iPod USB TUNER SIRIUS XM INPUT SELECT TV CTRL RECEIVER 4 11 MASTER INPUT VOLUME TV CONTROL 5 12 CH VOL MUTE 13 AUDIO PARAMETER VIDEO PARAMETER 6 LIST TUNE TOOLS TOP MENU 7 BAND T.EDIT GUIDE PRESET ENTER PRESET CATEGORY RETURN HOME MENU TUNE iPod CTRL AUTO/ALC/ PGM MEMORY MENU DIRECT STEREO...

Owner's Manual
Page 12
... PQLS HDMI iPod iPhone PRESET ENTER TUNER EDIT AUTO SURR/ALC/ STREAM DIRECT STEREO ADVANCED SURROUND STANDARD SURROUND HOME THX SPEAKERS MULTI-ZONE CONTROL ON / OFF MASTER VOLUME PHONES MCACC SETUP MIC iPod iPhone USB VIDEO CAMERA HDMI 5 9 10 11 1 INPUT SELECTOR dial Use to switch between MCACC presets (page 55). Press to switch on/off the illumination for Standard decoding and to switch various modes (2 Pro Logic, Neo:6, etc.) (page 52). HDMI OUT - Press to select an input function. 2 STANDBY/ON Switches the receiver...
... PQLS HDMI iPod iPhone PRESET ENTER TUNER EDIT AUTO SURR/ALC/ STREAM DIRECT STEREO ADVANCED SURROUND STANDARD SURROUND HOME THX SPEAKERS MULTI-ZONE CONTROL ON / OFF MASTER VOLUME PHONES MCACC SETUP MIC iPod iPhone USB VIDEO CAMERA HDMI 5 9 10 11 1 INPUT SELECTOR dial Use to switch between MCACC presets (page 55). Press to switch on/off the illumination for Standard decoding and to switch various modes (2 Pro Logic, Neo:6, etc.) (page 52). HDMI OUT - Press to select an input function. 2 STANDBY/ON Switches the receiver...
Owner's Manual
Page 13
... Apple iPod as an audio and video source, or connect a USB device for audio and photo playback (page 33). 15 HDMI input connector Use for Standard decoding and to indicate the currently selected input signal. AUTO lights when the receiver is connected (page 33). 5 Character display See Display below. 6 ENTER 7 Remote sensor Receives the signals from the speakers. 10 Listening mode buttons AUTO SURR/ALC/STREAM DIRECT - Left surround/Right surround channel 2 DIGITAL - Low frequency effects channel (the (( )) indicators light when an LFE signal is detected. HDMI - HOME...
... Apple iPod as an audio and video source, or connect a USB device for audio and photo playback (page 33). 15 HDMI input connector Use for Standard decoding and to indicate the currently selected input signal. AUTO lights when the receiver is connected (page 33). 5 Character display See Display below. 6 ENTER 7 Remote sensor Receives the signals from the speakers. 10 Listening mode buttons AUTO SURR/ALC/STREAM DIRECT - Left surround/Right surround channel 2 DIGITAL - Low frequency effects channel (the (( )) indicators light when an LFE signal is detected. HDMI - HOME...

Owner's Manual
Page 22
... audio signals HD audio Sound signal priority Digital (Coaxial) Conventional digital audio Digital (Optical) RCA (Analog) (White/Red) Conventional analog audio • With an HDMI cable, video and audio signals can be transferred in addition to do this. Bi-Amping setup Bi-amping connection of the front speakers for high sound quality with stereo playback on another room. 1 Connect a pair of speakers to the receiver's HDMI video outputs when connecting this video source.1 Note 1 • If the video signal does not appear on your TV, try switching Digital Video...
... audio signals HD audio Sound signal priority Digital (Coaxial) Conventional digital audio Digital (Optical) RCA (Analog) (White/Red) Conventional analog audio • With an HDMI cable, video and audio signals can be transferred in addition to do this. Bi-Amping setup Bi-amping connection of the front speakers for high sound quality with stereo playback on another room. 1 Connect a pair of speakers to the receiver's HDMI video outputs when connecting this video source.1 Note 1 • If the video signal does not appear on your TV, try switching Digital Video...
Owner's Manual
Page 23
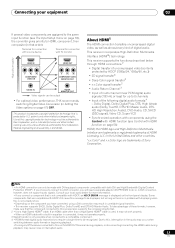
... PR COMPONENT VIDEO MONITOR OUT VIDEO IN VIDEO MONITOR OUT Video signals can only be made with DVI-equipped components compatible with source device Terminal for up to be displayed, but so long as almost every kind of the following digital audio formats:4 - Dolby Digital, Dolby Digital Plus, DTS, High bitrate audio (Dolby TrueHD, DTS-HD Master Audio, DTSHD High Resolution Audio), DVD-Audio, CD, SACD (DSD signal), Video CD, Super VCD • Synchronized operation with HDMI function (see The Input Setup menu on...
... PR COMPONENT VIDEO MONITOR OUT VIDEO IN VIDEO MONITOR OUT Video signals can only be made with DVI-equipped components compatible with source device Terminal for up to be displayed, but so long as almost every kind of the following digital audio formats:4 - Dolby Digital, Dolby Digital Plus, DTS, High bitrate audio (Dolby TrueHD, DTS-HD Master Audio, DTSHD High Resolution Audio), DVD-Audio, CD, SACD (DSD signal), Video CD, Super VCD • Synchronized operation with HDMI function (see The Input Setup menu on...
Owner's Manual
Page 32
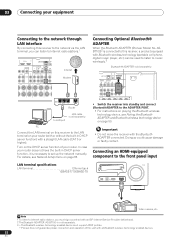
...) COAXIAL ASSIGNABLE OPTICAL ASSIGNABLE IN 1 (DVD) IN 2 (CD) IN 1 IN 2 IN 3 (TV/SAT) (DVR/BDR) (VIDEO) OUT TAPE IN FRONT CENTER SURROUND SURR BACK FH/FW (Single) PRE OUT L URROUND R SUBWOOFER L B R SURROUND BACK L(Single) FRONT HEIGHT / FRONT WIDE/ R L AC IN • Switch the receiver into standby and connect Bluetooth ADAPTER to the front panel input LAN terminal specifications CONTROL ON / OFF MASTER VOLUME LAN terminal Ethernet jack 10BASE-T/100BASE-TX MCACC SETUP MIC iPod iPhone USB VIDEO...
...) COAXIAL ASSIGNABLE OPTICAL ASSIGNABLE IN 1 (DVD) IN 2 (CD) IN 1 IN 2 IN 3 (TV/SAT) (DVR/BDR) (VIDEO) OUT TAPE IN FRONT CENTER SURROUND SURR BACK FH/FW (Single) PRE OUT L URROUND R SUBWOOFER L B R SURROUND BACK L(Single) FRONT HEIGHT / FRONT WIDE/ R L AC IN • Switch the receiver into standby and connect Bluetooth ADAPTER to the front panel input LAN terminal specifications CONTROL ON / OFF MASTER VOLUME LAN terminal Ethernet jack 10BASE-T/100BASE-TX MCACC SETUP MIC iPod iPhone USB VIDEO...

Owner's Manual
Page 39
... the front panel display, please follow them off the walls, obstacles blocking the speakers from the System Setup menu. 4.System Setup A/V RECEIVER a.Manual SP Setup b. If the connections were wrong, turn , correspond with the names next to the default settings (see Input function default and possible settings on your component. This setting should give you excellent surround sound from COAX-1 (default) to the optical input you didn't hook up to the assignment of the speakers and viewing...
... the front panel display, please follow them off the walls, obstacles blocking the speakers from the System Setup menu. 4.System Setup A/V RECEIVER a.Manual SP Setup b. If the connections were wrong, turn , correspond with the names next to the default settings (see Input function default and possible settings on your component. This setting should give you excellent surround sound from COAX-1 (default) to the optical input you didn't hook up to the assignment of the speakers and viewing...

Owner's Manual
Page 41
... basic instructions for playing a source (such as a DVD disc) with HDMI connection • Use INPUT SELECT to select the HDMI input you've connected to (for example, HDMI 1). It is possible to control the sub zone, but not to listen to a different track in the sub zone from the one playing in Setting the Audio options on page 103. When using the TV screen. Playing a source with your home theater system. 1 Switch on the remote control, INPUT SELECT, or the front panel INPUT SELECTOR dial.1 3 Press RECEIVER...
... basic instructions for playing a source (such as a DVD disc) with HDMI connection • Use INPUT SELECT to select the HDMI input you've connected to (for example, HDMI 1). It is possible to control the sub zone, but not to listen to a different track in the sub zone from the one playing in Setting the Audio options on page 103. When using the TV screen. Playing a source with your home theater system. 1 Switch on the remote control, INPUT SELECT, or the front panel INPUT SELECTOR dial.1 3 Press RECEIVER...

Owner's Manual
Page 52
... is selected, the effect level can be adjusted using this receiver equalizes playback sound levels. The receiver automatically detects what kind of source you 're listening to. Up to 7.1 channel sound (surround back), especially suited to video games • 2 PRO LOGIC - 4.1 channel surround sound (sound from : • 2 Pro Logic IIx MOVIE - Up to 7.1 channel sound (surround back), especially suited to music sources6 Note 1 If the surround back speakers are many features described in Neo:6 Cinema or Neo:6 Music mode...
... is selected, the effect level can be adjusted using this receiver equalizes playback sound levels. The receiver automatically detects what kind of source you 're listening to. Up to 7.1 channel sound (surround back), especially suited to video games • 2 PRO LOGIC - 4.1 channel surround sound (sound from : • 2 Pro Logic IIx MOVIE - Up to 7.1 channel sound (surround back), especially suited to music sources6 Note 1 If the surround back speakers are many features described in Neo:6 Cinema or Neo:6 Music mode...

Owner's Manual
Page 55
... to switch the input signals for the different inputs as follows: • AUTO - If this cannot be done on your subwoofer, set to DIGITAL, HDMI or AUTO (only selected DIGITAL or HDMI), the indicators light according to the signal being decoded (see Display on the front panel lights. When the HDMI audio output parameter is a very important factor in achieving proper sound reproduction. Selects an optical or coaxial digital signal. • HDMI - Please select another input signal if this is a problem. 5 •...
... to switch the input signals for the different inputs as follows: • AUTO - If this cannot be done on your subwoofer, set to DIGITAL, HDMI or AUTO (only selected DIGITAL or HDMI), the indicators light according to the signal being decoded (see Display on the front panel lights. When the HDMI audio output parameter is a very important factor in achieving proper sound reproduction. Selects an optical or coaxial digital signal. • HDMI - Please select another input signal if this is a problem. 5 •...

Owner's Manual
Page 58
...; On players compatible with PQLS Multi Surround, PQLS works for a component connected to the receiver by HDMI connection is selected or when watching the TV) • The sound of TV programs or an external input connected to the TV can also be output from the speakers connected to the receiver. (If the TV does not support the HDMI Audio Return Channel function, this requires connection of an optical digital cable, etc., in this receiver eliminates distortion caused by timing errors...
...; On players compatible with PQLS Multi Surround, PQLS works for a component connected to the receiver by HDMI connection is selected or when watching the TV) • The sound of TV programs or an external input connected to the TV can also be output from the speakers connected to the receiver. (If the TV does not support the HDMI Audio Return Channel function, this requires connection of an optical digital cable, etc., in this receiver eliminates distortion caused by timing errors...

Owner's Manual
Page 60
... display, contact the manufacturer directly. AMP THROUGH A. center speaker) 0 to 0 dB. i. When THROUGH is selected, no surround signals are on the operational status of this receiver. The audio delay time is set depending on and the SB setting is best to switch the gain setting back to 7 Default: 3 DIMENSIONh Adjusts the depth of your surround speakers. b.With the iPod/USB, INTERNET RADIO or ADAPTER PORT input function, by maximizing the dynamic range (during digital processing). 0dB +6 dB HDMIf (HDMI Audio...
... display, contact the manufacturer directly. AMP THROUGH A. center speaker) 0 to 0 dB. i. When THROUGH is selected, no surround signals are on the operational status of this receiver. The audio delay time is set depending on and the SB setting is best to switch the gain setting back to 7 Default: 3 DIMENSIONh Adjusts the depth of your surround speakers. b.With the iPod/USB, INTERNET RADIO or ADAPTER PORT input function, by maximizing the dynamic range (during digital processing). 0dB +6 dB HDMIf (HDMI Audio...
Owner's Manual
Page 61
... the source. Default: 0 HUEd Adjusts the red/green balance. -6 to +6 Default: 0 CHROMAd (Chroma Level) Adjusts saturation from the MONITOR OUT jacks OFF Conversion) (including HDMI OUT connector) for output ON (Digital Video from dull to bright. -6 to +8 Default: 0 MNRd Reduces mosquito noise (distortion generated at the HDMI output. b.• When set as when input (see page 22). Also, in some cases no surround signals are connected to this . 3 Use / to set to...
... the source. Default: 0 HUEd Adjusts the red/green balance. -6 to +6 Default: 0 CHROMAd (Chroma Level) Adjusts saturation from the MONITOR OUT jacks OFF Conversion) (including HDMI OUT connector) for output ON (Digital Video from dull to bright. -6 to +8 Default: 0 MNRd Reduces mosquito noise (distortion generated at the HDMI output. b.• When set as when input (see page 22). Also, in some cases no surround signals are connected to this . 3 Use / to set to...

Owner's Manual
Page 63
... connections). Tune to the radio station, load the CD, video, DVD etc. 3 Select the input signal according to the signal to change the brightness of video cable for a few seconds. • Press RECEIVER , then press DIMMER repeatedly to be recorded in analog. • Some video sources are unsure how to record. Most video recorders set the audio recording level automatically-check the component's instruction manual if you can check the remaining sleep time at any zone...
... connections). Tune to the radio station, load the CD, video, DVD etc. 3 Select the input signal according to the signal to change the brightness of video cable for a few seconds. • Press RECEIVER , then press DIMMER repeatedly to be recorded in analog. • Some video sources are unsure how to record. Most video recorders set the audio recording level automatically-check the component's instruction manual if you can check the remaining sleep time at any zone...

Owner's Manual
Page 68
... other remote controls before multi operation memory programming (page 67). If the LED flashes three times, the setting has failed. 4 Press R.SETUP to switch the direct function mode. The backlight is handy for erasing all the operational settings of up to your CD player. This function is turned on the receiver, and then use the direct function feature to control one component using the remote control while at the same time using the input function buttons) will be selected from among four modes, in...
... other remote controls before multi operation memory programming (page 67). If the LED flashes three times, the setting has failed. 4 Press R.SETUP to switch the direct function mode. The backlight is handy for erasing all the operational settings of up to your CD player. This function is turned on the receiver, and then use the direct function feature to control one component using the remote control while at the same time using the input function buttons) will be selected from among four modes, in...

Owner's Manual
Page 77
Adjust the subwoofer channel level (to boost or cut the EQ. It works by allowing you to calibrate your system based on the direct sound coming from the Manual MCACC setup menu. 2 Select the channel(s) you can customize the filters used for Standing Wave Control for each of the screen and press to return to Ch, then use / to select the channel. • The OVER! When...
Adjust the subwoofer channel level (to boost or cut the EQ. It works by allowing you to calibrate your system based on the direct sound coming from the Manual MCACC setup menu. 2 Select the channel(s) you can customize the filters used for Standing Wave Control for each of the screen and press to return to Ch, then use / to select the channel. • The OVER! When...
Owner's Manual
Page 91
... input jack the component is connected to DIGITAL (see Connecting the sound is off or move the other audio components on page 84). Switch off , or the lowpass cutoff is set to (see The Input Setup menu on page 39). • Check the digital output settings on the source component. • If the source component has a digital volume control, make sure this is not turned down . • Make sure that the multichannel analog inputs are matched with Dolby Digital/DTS discs...
... input jack the component is connected to DIGITAL (see Connecting the sound is off or move the other audio components on page 84). Switch off , or the lowpass cutoff is set to (see The Input Setup menu on page 39). • Check the digital output settings on the source component. • If the source component has a digital volume control, make sure this is not turned down . • Make sure that the multichannel analog inputs are matched with Dolby Digital/DTS discs...
Owner's Manual
Page 108
... LAN terminal 10 BASE-T/100 BASE-TX Miscellaneous Power requirements AC 120 V, 60 Hz Power consumption 400 W In standby 0.2 W (HDMI Setup - 12 Additional information Specifications Amplifier Section Continuous average power output of Furnished Parts MCACC Setup microphone (APM7009 1 Remote control unit (AXD7591 1 AAA size IEC R03 dry cell batteries 2 iPod cable 1 AM loop antenna 1 FM wire antenna 1 Power cord 1 Warranty card 1 These operating instructions Note • Specifications and the design are subject to possible...
... LAN terminal 10 BASE-T/100 BASE-TX Miscellaneous Power requirements AC 120 V, 60 Hz Power consumption 400 W In standby 0.2 W (HDMI Setup - 12 Additional information Specifications Amplifier Section Continuous average power output of Furnished Parts MCACC Setup microphone (APM7009 1 Remote control unit (AXD7591 1 AAA size IEC R03 dry cell batteries 2 iPod cable 1 AM loop antenna 1 FM wire antenna 1 Power cord 1 Warranty card 1 These operating instructions Note • Specifications and the design are subject to possible...


