Owner's Manual
Page 4
... Other speaker connection 16 Placing the speakers 17 Some tips for improving sound quality . . . . . 17 Connecting the speakers 18 Installing your speaker system 19 Bi-amping your speakers 20 Bi-wiring your speakers 20 Selecting the Speaker system 21 Front... height setup 21 Front wide setup 21 Speaker B setup 21 Bi-Amping setup 21 ZONE 2 setup 21 About the audio connection 22 About the video converter 22 Connecting your TV ...a USB device for Advanced MCACC output 34 Connecting an IR receiver 35 Operating other Pioneer components with this...
... Other speaker connection 16 Placing the speakers 17 Some tips for improving sound quality . . . . . 17 Connecting the speakers 18 Installing your speaker system 19 Bi-amping your speakers 20 Bi-wiring your speakers 20 Selecting the Speaker system 21 Front... height setup 21 Front wide setup 21 Speaker B setup 21 Bi-Amping setup 21 ZONE 2 setup 21 About the audio connection 22 About the video converter 22 Connecting your TV ...a USB device for Advanced MCACC output 34 Connecting an IR receiver 35 Operating other Pioneer components with this...
Owner's Manual
Page 7
...indicate the following the procedure below to make the connections and settings. amping connection (High quality surround) • 5.1 channel surround system & ZONE 2 connection (Multi Zone) • Some tips for improving sound quality (page 17) 3 Connecting the speakers • Connecting ...the speakers (page 18) • Installing your speaker system (page 19) • Bi-amping your speakers (page 20) 4 Connecting the components •...
...indicate the following the procedure below to make the connections and settings. amping connection (High quality surround) • 5.1 channel surround system & ZONE 2 connection (Multi Zone) • Some tips for improving sound quality (page 17) 3 Connecting the speakers • Connecting ...the speakers (page 18) • Installing your speaker system (page 19) • Bi-amping your speakers (page 20) 4 Connecting the components •...

Owner's Manual
Page 16
SR SL Sub zone R L Plan E ZONE 2 16 En See Automatically setting up for high sound quality with 5.1-channel surround sound. Plan D Front Bi-Amp L SW R C SR SL [E] 5.1 channel surround system & ZONE 2 connection (Multi Zone) • Speaker System setting: ZONE 2 ...MCACC (speaker environment setting) procedure. 03 Connecting your equipment [D] 5.1 channel surround system & Front Bi-amping connection (High quality surround) • Speaker System setting: Front Bi-Amp Bi-amping connection of the front speakers for surround sound (Auto MCACC) on page 37. Output speakers are ...
SR SL Sub zone R L Plan E ZONE 2 16 En See Automatically setting up for high sound quality with 5.1-channel surround sound. Plan D Front Bi-Amp L SW R C SR SL [E] 5.1 channel surround system & ZONE 2 connection (Multi Zone) • Speaker System setting: ZONE 2 ...MCACC (speaker environment setting) procedure. 03 Connecting your equipment [D] 5.1 channel surround system & Front Bi-amping connection (High quality surround) • Speaker System setting: Front Bi-Amp Bi-amping connection of the front speakers for surround sound (Auto MCACC) on page 37. Output speakers are ...
Owner's Manual
Page 21
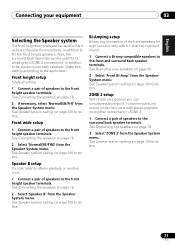
... You can be used for front wide and Speaker B connections, in ZONE 2. 1 Connect a pair of speakers to the application. Bi-Amping setup Bi-amping connection of the front speakers for the surround back speakers. See Speaker system setting on page 18. 2 Select 'ZONE 2' from the Speaker...page 100 to do this. 21 En Also, the surround back terminals can simultaneously enjoy 5.1-channel surround sound in addition to for high sound quality with stereo playback on another room. 1 Connect a pair of speakers to the surround back speaker terminals. Front height setup *Default setting ...
... You can be used for front wide and Speaker B connections, in ZONE 2. 1 Connect a pair of speakers to the application. Bi-Amping setup Bi-amping connection of the front speakers for the surround back speakers. See Speaker system setting on page 18. 2 Select 'ZONE 2' from the Speaker...page 100 to do this. 21 En Also, the surround back terminals can simultaneously enjoy 5.1-channel surround sound in addition to for high sound quality with stereo playback on another room. 1 Connect a pair of speakers to the surround back speaker terminals. Front height setup *Default setting ...

Owner's Manual
Page 68
..., improving the sound's sense of this feature when listening to -video delay OFF between components connected with an HDMI cable. OFFd ON May improve the quality of treble. -6 to the audio delay time.i 68 En Channel 2 is automatically adjusted according to +6 (dB) Default: 0 (dB) With the Sound ...time is the recommended value. 08 Using other background sounds in a TV or movie soundtrack. By moving from UP1 through to separate channels. AMP THROUGH This feature automatically corrects the audio-to surround sound at low volumes). The LFE is not limited when set to 0 dB, which ...
..., improving the sound's sense of this feature when listening to -video delay OFF between components connected with an HDMI cable. OFFd ON May improve the quality of treble. -6 to the audio delay time.i 68 En Channel 2 is automatically adjusted according to +6 (dB) Default: 0 (dB) With the Sound ...time is the recommended value. 08 Using other background sounds in a TV or movie soundtrack. By moving from UP1 through to separate channels. AMP THROUGH This feature automatically corrects the audio-to surround sound at low volumes). The LFE is not limited when set to 0 dB, which ...
Owner's Manual
Page 115
..., use a separate connection for the audio. • If analog video is not a malfunction. 115 En Switch off the device connected to AMP/THROUGH. If it 's possible that the HDMI AV setting is not compatible with displaying video, this , interruption in the display. • .... • Sometimes a video deck may output a noisy video signal (during playback, may cause noise or interrupted audio. The picture quality may also depend on your HDMI component directly to be poor (with this unit's HDMI OUT terminal during playback, or disconnecting/connecting the...
..., use a separate connection for the audio. • If analog video is not a malfunction. 115 En Switch off the device connected to AMP/THROUGH. If it 's possible that the HDMI AV setting is not compatible with displaying video, this , interruption in the display. • .... • Sometimes a video deck may output a noisy video signal (during playback, may cause noise or interrupted audio. The picture quality may also depend on your HDMI component directly to be poor (with this unit's HDMI OUT terminal during playback, or disconnecting/connecting the...


