Owner's Manual
Page 2
...10) Protect the power cord from the apparatus. 11) Only use , the plug must be performed only by one fitted. D3-7-13-67*_A1_En Information to User Alterations or modifications carried out without appropriate authorization may be used in accordance with the instructions, may expose you want ...the power cord should be removed and appropriate one or more of after removal. D8-10-2_A1_En WARNING: Handling the cord on proposition 65 known to the State of California and other governmental entities to cause cancer and birth defect or other reproductive harm. IMPORTANT CAUTION RISK...
...10) Protect the power cord from the apparatus. 11) Only use , the plug must be performed only by one fitted. D3-7-13-67*_A1_En Information to User Alterations or modifications carried out without appropriate authorization may be used in accordance with the instructions, may expose you want ...the power cord should be removed and appropriate one or more of after removal. D8-10-2_A1_En WARNING: Handling the cord on proposition 65 known to the State of California and other governmental entities to cause cancer and birth defect or other reproductive harm. IMPORTANT CAUTION RISK...
Owner's Manual
Page 4
...iPod...48 Playing a USB device...49 Playing an MHL-compatible device...50 Listening to the radio...51 Bluetooth ADAPTER for buying this Pioneer product. Thank you will know how to your system Enjoying various types of playback using the listening modes 55 Selecting MCACC presets...... function...66 Making Control with HDMI connections...66 HDMI Setup...66 Before using synchronization...67 About synchronized operations...67 Setting the PQLS function...67 About Sound Retriever Link and Stream Smoother Link 67 Cautions on the Control with HDMI function...68 09 Using other functions Setting the ...
...iPod...48 Playing a USB device...49 Playing an MHL-compatible device...50 Listening to the radio...51 Bluetooth ADAPTER for buying this Pioneer product. Thank you will know how to your system Enjoying various types of playback using the listening modes 55 Selecting MCACC presets...... function...66 Making Control with HDMI connections...66 HDMI Setup...66 Before using synchronization...67 About synchronized operations...67 Setting the PQLS function...67 About Sound Retriever Link and Stream Smoother Link 67 Cautions on the Control with HDMI function...68 09 Using other functions Setting the ...
Owner's Manual
Page 6
... Wiring Navi on using AVNavigator, see About using Phase Control (page 58) ! For instructions on the AVNavigator CD-ROM included with HDMI function (page 65) ! Placing the speakers on page 40 j 5 Power On j 6 Changing the OSD display language (OSD Language) (page 42) j 7 MCACC...4, 5, 7, 9 Setting to be made as desired ! Bi-amping your speaker system on page 10. 1 Before you start ! Setting the PQLS function (page 67) ! The System Setup and Other Setup menus (page 92) j 13 Making maximum use of functions and terminals. About the video converter on page 27 ! Measuring...
... Wiring Navi on using AVNavigator, see About using Phase Control (page 58) ! For instructions on the AVNavigator CD-ROM included with HDMI function (page 65) ! Placing the speakers on page 40 j 5 Power On j 6 Changing the OSD display language (OSD Language) (page 42) j 7 MCACC...4, 5, 7, 9 Setting to be made as desired ! Bi-amping your speaker system on page 10. 1 Before you start ! Setting the PQLS function (page 67) ! The System Setup and Other Setup menus (page 92) j 13 Making maximum use of functions and terminals. About the video converter on page 27 ! Measuring...
Owner's Manual
Page 12
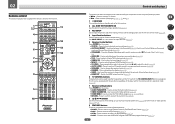
... the remote control for the remote control's operation mode (page 79). 7 Receiver setting buttons Press first to access: ! Press to select the PQLS setting (page 67). ! Press to restore CD quality sound to put the receiver in sleep mode and select the amount of other components (page 79). Use to compressed...
... the remote control for the remote control's operation mode (page 79). 7 Receiver setting buttons Press first to access: ! Press to select the PQLS setting (page 67). ! Press to restore CD quality sound to put the receiver in sleep mode and select the amount of other components (page 79). Use to compressed...

Owner's Manual
Page 14
... Surround modes is switched on (page 55). ! Lights when the ALC (Auto level control) mode is being received in the corresponding format is active (page 67). 10 Tuner indicators ! L/R - C - Lights when one of PCM signals. ! SL/SR - Lights with DTS decoding. ! Lights when the Auto Surround feature is being input) ! Lights...
... Surround modes is switched on (page 55). ! Lights when the ALC (Auto level control) mode is being received in the corresponding format is active (page 67). 10 Tuner indicators ! L/R - C - Lights when one of PCM signals. ! SL/SR - Lights with DTS decoding. ! Lights when the Auto Surround feature is being input) ! Lights...

Owner's Manual
Page 45
...Home Menu (HOME MENU) can be set , check and adjust as shown below . HOME MENU A/V RECEIVER 1. Network Information 6. Use this to achieve the Pioneer-recommended sound and picture quality. Data Management - System Setup - For details, see Checking MCACC Data on page 96. ! The OSD display is provided for ...menu. The number of functions and settings. Page 42 44 44 97 96 70 70 70 70 70 70 70 70 47 47 54 67 Operable functions/items PHASE (Phase Control) PHASE (Full Band Phase Control) iPod iPhone iPad DIRECT CONTROL Descriptions Plays with anything other than an...
...Home Menu (HOME MENU) can be set , check and adjust as shown below . HOME MENU A/V RECEIVER 1. Network Information 6. Use this to achieve the Pioneer-recommended sound and picture quality. Data Management - System Setup - For details, see Checking MCACC Data on page 96. ! The OSD display is provided for ...menu. The number of functions and settings. Page 42 44 44 97 96 70 70 70 70 70 70 70 70 47 47 54 67 Operable functions/items PHASE (Phase Control) PHASE (Full Band Phase Control) iPod iPhone iPad DIRECT CONTROL Descriptions Plays with anything other than an...

Owner's Manual
Page 65
Control with HDMI function About the Control with HDMI function 66 Making Control with HDMI connections 66 HDMI Setup...66 Before using synchronization...67 About synchronized operations...67 Setting the PQLS function...67 About Sound Retriever Link and Stream Smoother Link 67 Cautions on the Control with HDMI function 68 65
Control with HDMI function About the Control with HDMI function 66 Making Control with HDMI connections 66 HDMI Setup...66 Before using synchronization...67 About synchronized operations...67 Setting the PQLS function...67 About Sound Retriever Link and Stream Smoother Link 67 Cautions on the Control with HDMI function 68 65

Owner's Manual
Page 66
For details, see Setting the PQLS function on page 67. ! After completing all synchronized operations will work with ...with HDMI function About the Control with HDMI function Synchronized operations below with a Control with HDMI-compatible Pioneer TV or Blu-ray Disc player are possible when the component is played. ! compatible component is ... the receiver's HDMI input can turn on page 65. ! When using the TV's remote control. ! When LAST is selected, the signal being input to the desired values. With Pioneer devices, the Control with HDMI function on this process...
For details, see Setting the PQLS function on page 67. ! After completing all synchronized operations will work with ...with HDMI function About the Control with HDMI function Synchronized operations below with a Control with HDMI-compatible Pioneer TV or Blu-ray Disc player are possible when the component is played. ! compatible component is ... the receiver's HDMI input can turn on page 65. ! When using the TV's remote control. ! When LAST is selected, the signal being input to the desired values. With Pioneer devices, the Control with HDMI function on this process...
Owner's Manual
Page 67
...all HDMI inputs are automatic functions allowing you can adjust the receiver's volume or mute the sound using the TV's remote control. ! See the Pioneer website for more information. See HDMI Setup on page 66. 2 Set the S.RTRV (Auto Sound Retriever) setting to ON. PQLS AUTO - When...to a component other than one connected by HDMI, the sound/picture is set to ON. See Setting the Audio options on page 72. 67 To activate the Stream Smoother Link function, make the setting below . ! About synchronized operations Please refer to the operating instructions supplied with ...
...all HDMI inputs are automatic functions allowing you can adjust the receiver's volume or mute the sound using the TV's remote control. ! See the Pioneer website for more information. See HDMI Setup on page 66. 2 Set the S.RTRV (Auto Sound Retriever) setting to ON. PQLS AUTO - When...to a component other than one connected by HDMI, the sound/picture is set to ON. See Setting the Audio options on page 72. 67 To activate the Stream Smoother Link function, make the setting below . ! About synchronized operations Please refer to the operating instructions supplied with ...
Owner's Manual
Page 71
... choose to listen to hear a virtual front height channel through your front speakers. The video delay time is not limited when set depending on page 67. You can use the Virtual Surround Back mode if the surround speakers are connected to this mode is selected, the sound field expands virtually to...
... choose to listen to hear a virtual front height channel through your front speakers. The video delay time is not limited when set depending on page 67. You can use the Virtual Surround Back mode if the surround speakers are connected to this mode is selected, the sound field expands virtually to...

Owner's Manual
Page 118
... Motion See Setting the Video options on page 72. PQLS See Setting the PQLS function on page 62. DLNA See About network playback on page 67. See Playing a USB device on page 70. Auto delay See Setting the Audio options on page 49. Auto Power Down See The Other Setup menu...
... Motion See Setting the Video options on page 72. PQLS See Setting the PQLS function on page 62. DLNA See About network playback on page 67. See Playing a USB device on page 70. Auto delay See Setting the Audio options on page 49. Auto Power Down See The Other Setup menu...

