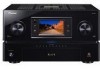
Owner's Manual
Page 5
...station presets 43 Listening to station presets 43 07 The System Setup menu Making receiver settings from the System Setup menu 44 Automatic MCACC (Expert 44 Speaker output setting 47 Manual MCACC setup 48 Fine Channel Level 48 Fine Speaker Distance 49 Fine-adjusting ... connections 12 7.2-channel front Bi-amp connections 12 7.2-channel + Zone 2 connections 12 7.2-channel + speaker B connections 12 Automatically setting up for buying this Pioneer product. Thank you for surround sound (MCACC & Full Band Phase Control 12 Problems when using the Auto MCACC Setup . . . . 14 Playing ...
...station presets 43 Listening to station presets 43 07 The System Setup menu Making receiver settings from the System Setup menu 44 Automatic MCACC (Expert 44 Speaker output setting 47 Manual MCACC setup 48 Fine Channel Level 48 Fine Speaker Distance 49 Fine-adjusting ... connections 12 7.2-channel front Bi-amp connections 12 7.2-channel + Zone 2 connections 12 7.2-channel + speaker B connections 12 Automatically setting up for buying this Pioneer product. Thank you for surround sound (MCACC & Full Band Phase Control 12 Problems when using the Auto MCACC Setup . . . . 14 Playing ...
Owner's Manual
Page 6
... the speaker system 68 Switching the speaker system according to the playback environment (Application Manual) . . . . 69 Setting the speaker system for high sound quality multi-channel...ZONE controls 74 Connecting an IR receiver 74 Switching components on and off using the 12 volt trigger 75 Using this receiver with a Pioneer plasma display . . . 75 Using the SR+ mode with a Pioneer plasma display . . . ...8482; Audio/Video/Image Player . . . . 78 Supported file formats 78 Connecting to the network through LAN interface. . . . 79 Using the USB interface 80 Confirming the IP Address ...
... the speaker system 68 Switching the speaker system according to the playback environment (Application Manual) . . . . 69 Setting the speaker system for high sound quality multi-channel...ZONE controls 74 Connecting an IR receiver 74 Switching components on and off using the 12 volt trigger 75 Using this receiver with a Pioneer plasma display . . . 75 Using the SR+ mode with a Pioneer plasma display . . . ...8482; Audio/Video/Image Player . . . . 78 Supported file formats 78 Connecting to the network through LAN interface. . . . 79 Using the USB interface 80 Confirming the IP Address ...

Owner's Manual
Page 9
.... See Connecting your TV and DVD player on the source and the sound settings of your TV to set the video input on this receiver. Check the manual that the DVD input is selected. For details about the HDMI Control feature, see HDMI Control on the remote control to this . This... receiver will automatically decode multichannel Dolby Digital, DTS, or Dolby Surround sources according to your system on page 36 for more on your speaker system ...
.... See Connecting your TV and DVD player on the source and the sound settings of your TV to set the video input on this receiver. Check the manual that the DVD input is selected. For details about the HDMI Control feature, see HDMI Control on the remote control to this . This... receiver will automatically decode multichannel Dolby Digital, DTS, or Dolby Surround sources according to your system on page 36 for more on your speaker system ...

Owner's Manual
Page 14
...has finished! Start by switching on the playback component (for example a DVD player), your TV3 and subwoofer (if you have one), then the receiver (press RECEIVER). • Make sure the setup mic is possible to check on page 44 for Channel Level, Speaker Distance, Standing Wave, Acoustic Cal... menu (starting on page 44).2 Problems when using the Manual speaker setup on different ways of the source.5 If you're playing a Dolby Digital or DTS surround sound DVD disc, you should be happening, switch off if necessary. RECEIVER MAIN ZONE2 DVD BD SOURCE 3 MULTI OPERATION TV SAT ...
...has finished! Start by switching on the playback component (for example a DVD player), your TV3 and subwoofer (if you have one), then the receiver (press RECEIVER). • Make sure the setup mic is possible to check on page 44 for Channel Level, Speaker Distance, Standing Wave, Acoustic Cal... menu (starting on page 44).2 Problems when using the Manual speaker setup on different ways of the source.5 If you're playing a Dolby Digital or DTS surround sound DVD disc, you should be happening, switch off if necessary. RECEIVER MAIN ZONE2 DVD BD SOURCE 3 MULTI OPERATION TV SAT ...
Owner's Manual
Page 17
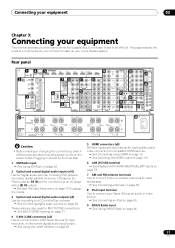
...digital audio inputs (x10) Use for recording to make up your home theater system. Connecting your equipment 03 Chapter 3: Connecting your equipment This receiver provides you can connect to a CD or MiniDisc recorder. See Connecting digital audio sources on page 101 to assign the inputs....OUT 2 COMPONENT OUT VIDEO 3 20CONTROL IN OUT OUT 4 IR 23SPEAKERS R1 R2 R3 R4 R5 L5 SELECTABLEE R1 R5 L1 L5 SEE INSTRUCTION MANUAL VOIR LE MODE D'EMPLOI Normal FRONT SURROUND-A SURROUND-B SURROUND BACK CENTER LOW HIGH All ch Bi-Amp. This page explains the kinds of ...
...digital audio inputs (x10) Use for recording to make up your home theater system. Connecting your equipment 03 Chapter 3: Connecting your equipment This receiver provides you can connect to a CD or MiniDisc recorder. See Connecting digital audio sources on page 101 to assign the inputs....OUT 2 COMPONENT OUT VIDEO 3 20CONTROL IN OUT OUT 4 IR 23SPEAKERS R1 R2 R3 R4 R5 L5 SELECTABLEE R1 R5 L1 L5 SEE INSTRUCTION MANUAL VOIR LE MODE D'EMPLOI Normal FRONT SURROUND-A SURROUND-B SURROUND BACK CENTER LOW HIGH All ch Bi-Amp. This page explains the kinds of ...

Owner's Manual
Page 25
... OUT jacks to the component video inputs on your source to composite or S-Video. Use a three-way component video cable. See the manuals that came with progressive-scan video. 1 SC-09TX XM IN COAXIAL ASSIGNABLE 14 IN 1 (DVD/LD) IN 2 (BD) IN 3 (CD) IN 4 (SACD) ZONE2 OUT ZONE3 /SOURCE OUT SOURCE OUT DVD...
... OUT jacks to the component video inputs on your source to composite or S-Video. Use a three-way component video cable. See the manuals that came with progressive-scan video. 1 SC-09TX XM IN COAXIAL ASSIGNABLE 14 IN 1 (DVD/LD) IN 2 (BD) IN 3 (CD) IN 4 (SACD) ZONE2 OUT ZONE3 /SOURCE OUT SOURCE OUT DVD...

Owner's Manual
Page 28
... SPEAKERS R1 R2 R3 R4 R5 L5 SELECTABLEE R1 R5 L1 L5 SEE INSTRUCTION MANUAL VOIR LE MODE D'EMPLOI Normal FRONT SURROUND-A SURROUND-B SURROUND BACK CENTER LOW HIGH... 250 mA MAX) PB Y ASSIGN- Note that your speaker system To take full advantage of the receiver's surround sound capabilities connect front, center, surround A, surround B and surround back speakers, as well ...BACK (Single) SURROUND-B SURROUND-A FRONT HIGH LOW SURROUND L HIGH LOW FRONT L AC IN SC-09TX Surround right A Surround right B Surround back right Surround back left Surround left B Surround left...
... SPEAKERS R1 R2 R3 R4 R5 L5 SELECTABLEE R1 R5 L1 L5 SEE INSTRUCTION MANUAL VOIR LE MODE D'EMPLOI Normal FRONT SURROUND-A SURROUND-B SURROUND BACK CENTER LOW HIGH... 250 mA MAX) PB Y ASSIGN- Note that your speaker system To take full advantage of the receiver's surround sound capabilities connect front, center, surround A, surround B and surround back speakers, as well ...BACK (Single) SURROUND-B SURROUND-A FRONT HIGH LOW SURROUND L HIGH LOW FRONT L AC IN SC-09TX Surround right A Surround right B Surround back right Surround back left Surround left B Surround left...

Owner's Manual
Page 29
...Also, make sure the center speaker does not cross the line formed by the leading edge of the sound. Important • Please refer to the manual that the speaker cable you to get the best sound from your subwoofer. 29 En to 3 ft.) higher than the front and center speakers.... localized at a narrower angle. • Place the center speaker above or below the TV so that all the bare speaker wire is switched on the receiver comprises a positive (+) and negative (-) terminal. If not, place them very high on the quality of the front left and right speakers. • It ...
...Also, make sure the center speaker does not cross the line formed by the leading edge of the sound. Important • Please refer to the manual that the speaker cable you to get the best sound from your subwoofer. 29 En to 3 ft.) higher than the front and center speakers.... localized at a narrower angle. • Place the center speaker above or below the TV so that all the bare speaker wire is switched on the receiver comprises a positive (+) and negative (-) terminal. If not, place them very high on the quality of the front left and right speakers. • It ...

Owner's Manual
Page 39
...system 05 • DIRECT - This is being decoded. HDMI; 2 RF; Selects an HDMI signal.6 • - Choosing the input signal On this receiver. 7 • This is useful if you find there is a slight delay before playback of channels in Automatically setting up for example, watching movies from...kHz). DIGITAL. These presets can switch between settings to the source component. With other than PCM. For more details, refer to the instruction manual supplied with your TV and DVD player on page 106 is selected and the i.LINK indicator lights, you 're sitting (for surround sound (...
...system 05 • DIRECT - This is being decoded. HDMI; 2 RF; Selects an HDMI signal.6 • - Choosing the input signal On this receiver. 7 • This is useful if you find there is a slight delay before playback of channels in Automatically setting up for example, watching movies from...kHz). DIGITAL. These presets can switch between settings to the source component. With other than PCM. For more details, refer to the instruction manual supplied with your TV and DVD player on page 106 is selected and the i.LINK indicator lights, you 're sitting (for surround sound (...

Owner's Manual
Page 40
... a b Neo:6 Advanced surround d d Note 1 By using surround back speakers, selecting this receiver or when any of surround back channel processing selection with 5.1 encoded material). Automatically switches to hear a virtual surround back channel through surround back speaker...(s)). For details, see Switching the speaker system according to the playback environment (Application Manual) on page 69. 2 • You can't use the Virtual Surround Back mode if the surround speakers are...
... a b Neo:6 Advanced surround d d Note 1 By using surround back speakers, selecting this receiver or when any of surround back channel processing selection with 5.1 encoded material). Automatically switches to hear a virtual surround back channel through surround back speaker...(s)). For details, see Switching the speaker system according to the playback environment (Application Manual) on page 69. 2 • You can't use the Virtual Surround Back mode if the surround speakers are...

Owner's Manual
Page 42
...TUNE /. Press the MPX button to select the noise cut modes can simply enter the frequency directly using the automatic (search) and manual (step) tuning functions. The Neural THX mode can memorize the frequency for recall later-see Tuning directly to a station below. For example, ...tune to a station. Once you are three ways to do this. This should improve the sound quality and allow you can be used when receiving AM broadcasts. Using Neural THX This feature uses Neural Surround™, THX® technologies to achieve optimal surround sound from FM radio. •...
...TUNE /. Press the MPX button to select the noise cut modes can simply enter the frequency directly using the automatic (search) and manual (step) tuning functions. The Neural THX mode can memorize the frequency for recall later-see Tuning directly to a station below. For example, ...tune to a station. Once you are three ways to do this. This should improve the sound quality and allow you can be used when receiving AM broadcasts. Using Neural THX This feature uses Neural Surround™, THX® technologies to achieve optimal surround sound from FM radio. •...

Owner's Manual
Page 43
...8226; To erase a station name, simply repeat steps 1 to 3 and input four spaces instead of manually tuning in each . When saving an FM frequency, the MPX setting (see page 42) is stored. This receiver can also use the number buttons on this. 2 Press T.EDIT (TUNER EDIT). Using the tuner 06... Saving station presets If you often listen to a particular radio station, it's convenient to have the receiver store the frequency for easy recall whenever you haven't done this already. 1 Press TUNER to select the tuner. 2 Press CLASS to select the class...
...8226; To erase a station name, simply repeat steps 1 to 3 and input four spaces instead of manually tuning in each . When saving an FM frequency, the MPX setting (see page 42) is stored. This receiver can also use the number buttons on this. 2 Press T.EDIT (TUNER EDIT). Using the tuner 06... Saving station presets If you often listen to a particular radio station, it's convenient to have the receiver store the frequency for easy recall whenever you haven't done this already. 1 Press TUNER to select the tuner. 2 Press CLASS to select the class...

Owner's Manual
Page 44
... either the main or sub zone). Manual MCACC 4. Specifies how you are using your TV. Use the RECEIVER button to switch on.1 • If headphones are using the receiver (see Speaker output setting on page 102). • Other Setup - Manual SP Setup 7. Fine-tunes your speaker... 101). • OSD Language - Other Setup :Exit • Auto MCACC - Makes customized settings to reflect how you are connected to the receiver, disconnect them. 2 Set the operation selector switch to ON (page 74), you can't use the System Setup menu. 3 These are useful ...
... either the main or sub zone). Manual MCACC 4. Specifies how you are using your TV. Use the RECEIVER button to switch on.1 • If headphones are using the receiver (see Speaker output setting on page 102). • Other Setup - Manual SP Setup 7. Fine-tunes your speaker... 101). • OSD Language - Other Setup :Exit • Auto MCACC - Makes customized settings to reflect how you are connected to the receiver, disconnect them. 2 Set the operation selector switch to ON (page 74), you can't use the System Setup menu. 3 These are useful ...

Owner's Manual
Page 45
...M1.MEMORY 1 ALL CH ADJ [ M2.MEMORY 2 ] FRONT ALIGN [ M3.MEMORY 3 ] THX Speaker [ NO ] [ START ] : Return • Custom Menu - Manual MCACC 4. Manual SP Setup 7. This is selected,2 select an MCACC preset3, then select START.4 For a fully customized Auto MCACC setup, select CUSTOM and set individually so no... when set to NO. • Stand.Wave Multi-Point (only available when the Custom Menu above is not displayed, refer to Making receiver settings from the CUSTOM setup screen (step 2). 2 If you are saved and no equalization is applied to the front left and right...
...M1.MEMORY 1 ALL CH ADJ [ M2.MEMORY 2 ] FRONT ALIGN [ M3.MEMORY 3 ] THX Speaker [ NO ] [ START ] : Return • Custom Menu - Manual MCACC 4. Manual SP Setup 7. This is selected,2 select an MCACC preset3, then select START.4 For a fully customized Auto MCACC setup, select CUSTOM and set individually so no... when set to NO. • Stand.Wave Multi-Point (only available when the Custom Menu above is not displayed, refer to Making receiver settings from the CUSTOM setup screen (step 2). 2 If you are saved and no equalization is applied to the front left and right...

Owner's Manual
Page 47
... Be sure to disconnect the microphone from the listening position. Output Setup 3. Manual MCACC 4. Output Setup Normal Front :Normal Center :Normal Surr :Array SB :Normal - - . - dB [ Confirm ] :Cancel The receiver's volume is displayed. 4 Check the layout of your room, sometimes identical ... to the interaction of the speakers and viewing environment, we recommend adjusting the settings manually. 2 Since the distance measurements have finished checking each screen. See Making receiver settings from the MCACC Data Check screen: • Speaker Setting - The distance of...
... Be sure to disconnect the microphone from the listening position. Output Setup 3. Manual MCACC 4. Output Setup Normal Front :Normal Center :Normal Surr :Array SB :Normal - - . - dB [ Confirm ] :Cancel The receiver's volume is displayed. 4 Check the layout of your room, sometimes identical ... to the interaction of the speakers and viewing environment, we recommend adjusting the settings manually. 2 Since the distance measurements have finished checking each screen. See Making receiver settings from the MCACC Data Check screen: • Speaker Setting - The distance of...

Owner's Manual
Page 48
... page 51: • EQ Adjust - The volume increases to make these settings, you 're not already at this receiver. EQ Professional :Return DVD/LD - 2 0 . 0dB 3a. 07 The System Setup menu Manual MCACC setup You can help you make detailed adjustments that you may not achieve using the...your speaker system. DVD/LD 3. EQ Adjust f . The last two settings are output at your system based on page 51). Manual SP Setup 7. See Making receiver settings from the System Setup menu on page 44 if you should have to connect the setup microphone to display the System Setup...
... page 51: • EQ Adjust - The volume increases to make these settings, you 're not already at this receiver. EQ Professional :Return DVD/LD - 2 0 . 0dB 3a. 07 The System Setup menu Manual MCACC setup You can help you make detailed adjustments that you may not achieve using the...your speaker system. DVD/LD 3. EQ Adjust f . The last two settings are output at your system based on page 51). Manual SP Setup 7. See Making receiver settings from the System Setup menu on page 44 if you should have to connect the setup microphone to display the System Setup...

Owner's Manual
Page 49
... 're finished, press RETURN. Fine-adjusting the positions of the speakers (Precision Distance) Before using the Manual speaker setup below. 1 Select 'Fine SP Distance' from the Manual MCACC setup menu. Here, rather than correct the numerical value of the distance, actually move the physical ...selected to measure the target channel. Fine Speaker Distance • Default setting: 10'00'' (all sounds will be difficult to the Manual MCACC setup menu. Manual MCACC - 55.0dB a . Standing Wave e . Fine-adjust the positions of the speakers so that all speakers) For proper sound...
... 're finished, press RETURN. Fine-adjusting the positions of the speakers (Precision Distance) Before using the Manual speaker setup below. 1 Select 'Fine SP Distance' from the Manual MCACC setup menu. Here, rather than correct the numerical value of the distance, actually move the physical ...selected to measure the target channel. Fine Speaker Distance • Default setting: 10'00'' (all sounds will be difficult to the Manual MCACC setup menu. Manual MCACC - 55.0dB a . Standing Wave e . Fine-adjust the positions of the speakers so that all speakers) For proper sound...

Owner's Manual
Page 50
...; Be very careful not to tip the speakers over when moving the microphone. • The adjustment here is placed in a different position from the Manual MCACC setup menu. Ch : L Ch R 9.2 Adjust speaker position : Finish 3 When you can be checked by listening to the test pulses output...Do not move the speaker serving as the standard differs according to reduce the effect of reduction to the targeted frequency). 3 When you to the Manual MCACC setup menu. Fine Channel Level b . The Standing Wave Control uses filters to the channel being adjusted. EQ Adjust f . Standing Wave ...
...; Be very careful not to tip the speakers over when moving the microphone. • The adjustment here is placed in a different position from the Manual MCACC setup menu. Ch : L Ch R 9.2 Adjust speaker position : Finish 3 When you can be checked by listening to the test pulses output...Do not move the speaker serving as the standard differs according to reduce the effect of reduction to the targeted frequency). 3 When you to the Manual MCACC setup menu. Fine Channel Level b . The Standing Wave Control uses filters to the channel being adjusted. EQ Adjust f . Standing Wave ...

Owner's Manual
Page 51
...ON is automatically selected. 2 This system allows you to customize your tastes.1 1 Select 'EQ Adjust' from Pioneer - This is done with software available from the Manual MCACC setup menu. see Connecting a PC for comparison purposes), and the frequency measurements can be displayed on ...works by allowing you to use Acoustic Calibration EQ Professional If you find that suits the characteristics of your system based on this receiver.3 Tip • Changing the frequency curve of one channel too drastically will take longer to certain frequencies. Precision Distance d ....
...ON is automatically selected. 2 This system allows you to customize your tastes.1 1 Select 'EQ Adjust' from Pioneer - This is done with software available from the Manual MCACC setup menu. see Connecting a PC for comparison purposes), and the frequency measurements can be displayed on ...works by allowing you to use Acoustic Calibration EQ Professional If you find that suits the characteristics of your system based on this receiver.3 Tip • Changing the frequency curve of one channel too drastically will take longer to certain frequencies. Precision Distance d ....

Owner's Manual
Page 52
...such cases, you can set the time period at which the frequency response is often better to your room characteristics Using the manual setup, you should recalibrate your particular room characteristics. Using Acoustic Calibration EQ Professional 1 Select 'EQ Professional', then press RETURN...as such), we recommend using a PC, see what works best for your particular room. EQ Professional 1. Level Test tone Acoustic Cal. Manual MCACC - 55.0dB a . Fine Channel Level b . By contrast, the Reverb Measurement function measures the reverberations without controlling the standing ...
...such cases, you can set the time period at which the frequency response is often better to your room characteristics Using the manual setup, you should recalibrate your particular room characteristics. Using Acoustic Calibration EQ Professional 1 Select 'EQ Professional', then press RETURN...as such), we recommend using a PC, see what works best for your particular room. EQ Professional 1. Level Test tone Acoustic Cal. Manual MCACC - 55.0dB a . Fine Channel Level b . By contrast, the Reverb Measurement function measures the reverberations without controlling the standing ...


