
Owner's Manual
Page 3
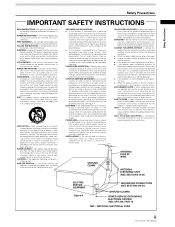
... technician to perform safety checks to . POWER-CORD PROTECTION - For added protection for example, near a swimming pool; POWER LINES - NATIONAL ELECTRICAL CODE iii PRO-1000HD / PRO-800HD or near a bathtub, wash bowl, kitchen sink, or laundry tub; POWER SOURCES - See Figure A. Adjust only ... storm, or when it will fit into the outlet, try reversing the plug. Do not defeat the safety purpose of power supply to qualified service personnel. Safety Precautions Safety Precautions IMPORTANT SAFETY INSTRUCTIONS READ INSTRUCTIONS - Never clean with furniture wax, benzine,...
... technician to perform safety checks to . POWER-CORD PROTECTION - For added protection for example, near a swimming pool; POWER LINES - NATIONAL ELECTRICAL CODE iii PRO-1000HD / PRO-800HD or near a bathtub, wash bowl, kitchen sink, or laundry tub; POWER SOURCES - See Figure A. Adjust only ... storm, or when it will fit into the outlet, try reversing the plug. Do not defeat the safety purpose of power supply to qualified service personnel. Safety Precautions Safety Precautions IMPORTANT SAFETY INSTRUCTIONS READ INSTRUCTIONS - Never clean with furniture wax, benzine,...
Owner's Manual
Page 5
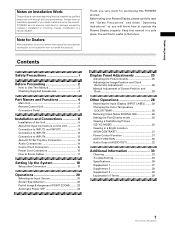
... 20 Screen Size Selection 22 Partial Image Enlargement (POINT ZOOM) ......... 23 Automatic Power OFF 24 Display Panel Adjustments 25 Adjusting the Picture Quality 25 Adjusting the Image ...39 1 PRO-1000HD / PRO-800HD Contents Safety Precautions i Before Proceeding 2 How to handle the product. Note for purchasing this manual to the customer and explain to the customer how to Use This Manual 2 Checking Supplied Accessories 3...be sure to deliver this PIONEER product. PIONEER cannot assume liabilities for damage caused by qualified personnel with enough skill and competence.
... 20 Screen Size Selection 22 Partial Image Enlargement (POINT ZOOM) ......... 23 Automatic Power OFF 24 Display Panel Adjustments 25 Adjusting the Picture Quality 25 Adjusting the Image ...39 1 PRO-1000HD / PRO-800HD Contents Safety Precautions i Before Proceeding 2 How to handle the product. Note for purchasing this manual to the customer and explain to the customer how to Use This Manual 2 Checking Supplied Accessories 3...be sure to deliver this PIONEER product. PIONEER cannot assume liabilities for damage caused by qualified personnel with enough skill and competence.

Owner's Manual
Page 7
Before Proceeding Before Proceeding The following accessories were supplied. 1 Power cord 2 Remote control unit 3 AA (R6) batteries (x 2) VIDEO S-VIDEO SELECT SET ENTER MENU EXIT 3 Press 5/∞ to select the item to...E V E L B. ENHANCE :0 :0 : +60 : +60 : +60 :0 :0 SET UP INPUT1 OPTION RE S ET SELECT SET ENTER MENU EXIT 2 Press 3 to adjust the value. ÷ Operating Instructions ÷ Warranty 3 PRO-1000HD / PRO-800HD POS I T I ON : 0 ADJUST MENU SET EXIT SET 5 Press 5/∞/2/3 to select SCREEN. Please familiarize yourself with the rest of the screen.
Before Proceeding Before Proceeding The following accessories were supplied. 1 Power cord 2 Remote control unit 3 AA (R6) batteries (x 2) VIDEO S-VIDEO SELECT SET ENTER MENU EXIT 3 Press 5/∞ to select the item to...E V E L B. ENHANCE :0 :0 : +60 : +60 : +60 :0 :0 SET UP INPUT1 OPTION RE S ET SELECT SET ENTER MENU EXIT 2 Press 3 to adjust the value. ÷ Operating Instructions ÷ Warranty 3 PRO-1000HD / PRO-800HD POS I T I ON : 0 ADJUST MENU SET EXIT SET 5 Press 5/∞/2/3 to select SCREEN. Please familiarize yourself with the rest of the screen.
Owner's Manual
Page 11
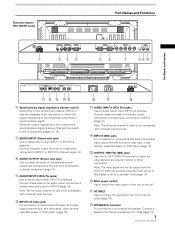
... made at INPUT2, it may be output from the OUTPUT (INPUT4) terminal when the main power of this switch to obtain sound when INPUT3 is selected. Connect the audio output terminal of components...the output impedance of an external left audio channel (L) jack is off . $ AC INLET Use to connect the supplied power cord to an external monitor or other component. Connect these terminals to the audio output connectors of components that have an... components connected to the audio output connectors of 8 -16 Ω (page 14). 7 PRO-1000HD / PRO-800HD Illustration depicts PRO-1000HD model.
... made at INPUT2, it may be output from the OUTPUT (INPUT4) terminal when the main power of this switch to obtain sound when INPUT3 is selected. Connect the audio output terminal of components...the output impedance of an external left audio channel (L) jack is off . $ AC INLET Use to connect the supplied power cord to an external monitor or other component. Connect these terminals to the audio output connectors of components that have an... components connected to the audio output connectors of 8 -16 Ω (page 14). 7 PRO-1000HD / PRO-800HD Illustration depicts PRO-1000HD model.
Owner's Manual
Page 17
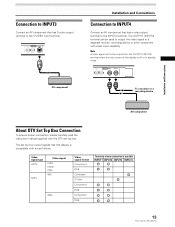
... monitor or a recording device Installation and Connections AV component About DTV Set Top Box Connection To ensure proper connection, please carefully read the instruction manual supplied with video input capability. Connection to INPUT3 Connect an AV component that has a video output terminal to the INPUT4 terminal. The set top box. AUDIO...to output the video signal to the S-VIDEO input terminal. The OUTPUT (INPUT4) terminal can be output from the OUTPUT (INPUT4) terminal when the main power of this display is possible INPUT1 INPUT2 INPUT3 INPUT4 13 PRO-1000HD / PRO-800HD
... monitor or a recording device Installation and Connections AV component About DTV Set Top Box Connection To ensure proper connection, please carefully read the instruction manual supplied with video input capability. Connection to INPUT3 Connect an AV component that has a video output terminal to the INPUT4 terminal. The set top box. AUDIO...to output the video signal to the S-VIDEO input terminal. The OUTPUT (INPUT4) terminal can be output from the OUTPUT (INPUT4) terminal when the main power of this display is possible INPUT1 INPUT2 INPUT3 INPUT4 13 PRO-1000HD / PRO-800HD
Owner's Manual
Page 19
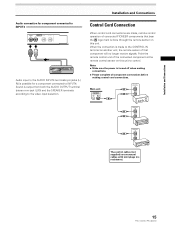
... CONTROL IN OUT CONTROL IN OUT CONTROL IN OUT The control cables (not supplied) are made to INPUT4. Installation and Connections Control Cord Connection When control cord... with mini plugs (no longer receive signals. Notes ÷ Make sure the power is turned off when making connections. ÷ Please complete all component connections before... When the connection is made , remote control operation of connected PIONEER components that component will no resistance). 15 PRO-1000HD / PRO-800HD Installation and Connections Audio connection for component connected to INPUT4 ...
... CONTROL IN OUT CONTROL IN OUT CONTROL IN OUT The control cables (not supplied) are made to INPUT4. Installation and Connections Control Cord Connection When control cord... with mini plugs (no longer receive signals. Notes ÷ Make sure the power is turned off when making connections. ÷ Please complete all component connections before... When the connection is made , remote control operation of connected PIONEER components that component will no resistance). 15 PRO-1000HD / PRO-800HD Installation and Connections Audio connection for component connected to INPUT4 ...

Owner's Manual
Page 20
...unit. 2 Plug the power cord into a power outlet. CAUTION ÷ Use only the power cord provided. ÷ Do not use an outlet with a ground terminal is properly grounded. If you use a power source converter plug, use a power supply voltage other than that... the cord is used for efficiency protection. Always be sure to connect the power cord to this may cause fire or electric shock. ÷ For the plasma display, a three-core power cord with a ground terminal and screw down the ground line. 16 PRO-1000HD / PRO...
...unit. 2 Plug the power cord into a power outlet. CAUTION ÷ Use only the power cord provided. ÷ Do not use an outlet with a ground terminal is properly grounded. If you use a power source converter plug, use a power supply voltage other than that... the cord is used for efficiency protection. Always be sure to connect the power cord to this may cause fire or electric shock. ÷ For the plasma display, a three-core power cord with a ground terminal and screw down the ground line. 16 PRO-1000HD / PRO...
Owner's Manual
Page 37
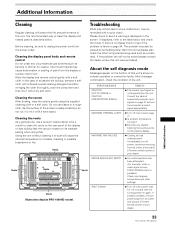
... turn off main power, wait for cleaner. SHUT DOWN ¶ Turn off power, remove power plug from its outlet, and consult a Pioneer service center or your dealer. 33 PRO-1000HD / PRO-800HD Additional Information ...Additional Information Cleaning Regular cleaning will cause the internal temperature to increase, resulting in possible breakdown or fire. Cleaning the screen After dusting, wipe the screen gently using the supplied...
... turn off main power, wait for cleaner. SHUT DOWN ¶ Turn off power, remove power plug from its outlet, and consult a Pioneer service center or your dealer. 33 PRO-1000HD / PRO-800HD Additional Information ...Additional Information Cleaning Regular cleaning will cause the internal temperature to increase, resulting in possible breakdown or fire. Cleaning the screen After dusting, wipe the screen gently using the supplied...
Owner's Manual
Page 40
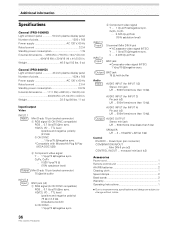
... ON SYNC ... 1 Vp-p/75 Ω/negative sync. 36 PRO-1000HD / PRO-800HD 2 Component video signal Y ... 1 Vp-p/75 Ω/negative sync. HD/CS, VD ... monaural mini jack (x2) Accessories Power cord 1 Remote control unit 1 AA (R6) batteries 2 ...16 Ω/2W +2W (at 8 Ω) Control RS-232C ... Additional Information Specifications General (PRO-1000HD) Light emission panel 50 inch plasma display panel Number of pixels 1024 x 768 Power supply AC 120 V, 60 Hz Rated current 2.5 A Standby power consumption 0.9 W External dimensions ...... 1111 (W) x 692 (H) x 104 (D) mm 43-3/4 (W) x...
... ON SYNC ... 1 Vp-p/75 Ω/negative sync. 36 PRO-1000HD / PRO-800HD 2 Component video signal Y ... 1 Vp-p/75 Ω/negative sync. HD/CS, VD ... monaural mini jack (x2) Accessories Power cord 1 Remote control unit 1 AA (R6) batteries 2 ...16 Ω/2W +2W (at 8 Ω) Control RS-232C ... Additional Information Specifications General (PRO-1000HD) Light emission panel 50 inch plasma display panel Number of pixels 1024 x 768 Power supply AC 120 V, 60 Hz Rated current 2.5 A Standby power consumption 0.9 W External dimensions ...... 1111 (W) x 692 (H) x 104 (D) mm 43-3/4 (W) x...


