
Owner's Manual
Page 5
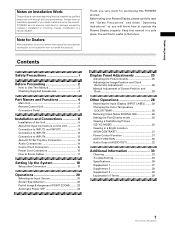
... liabilities for purchasing this PIONEER product. Note for Dealers: After installation, be sure to deliver this manual in a safe place. Keep this manual to the customer and explain to the customer how to handle the product. Thank you will find.... Contents Safety Precautions i Before Proceeding 2 How to Use This Manual 2 Checking Supplied Accessories 3 Part Names and Functions 4 Main Unit 4 Remote Control Unit 5 Connection Panel 6 Installation and Connections 8 Installation of Terms 39 1 PRO-1000HD / PRO-800HD Before using your dealer install and set up the product. ...
... liabilities for purchasing this PIONEER product. Note for Dealers: After installation, be sure to deliver this manual in a safe place. Keep this manual to the customer and explain to the customer how to handle the product. Thank you will find.... Contents Safety Precautions i Before Proceeding 2 How to Use This Manual 2 Checking Supplied Accessories 3 Part Names and Functions 4 Main Unit 4 Remote Control Unit 5 Connection Panel 6 Installation and Connections 8 Installation of Terms 39 1 PRO-1000HD / PRO-800HD Before using your dealer install and set up the product. ...
Owner's Manual
Page 6
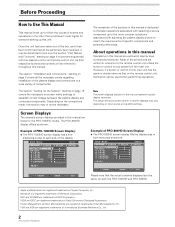
... and connections to a wide variety of International Business Machines Co., Inc. 2 PRO-1000HD / PRO-800HD Most of specific components and personal preferences. R. L E V E L B. The remainder of the sections in this manual represent typical display examples. The actual items and contents seen in this manual is dedicated to the basic operations associated with selecting a source component up...
... and connections to a wide variety of International Business Machines Co., Inc. 2 PRO-1000HD / PRO-800HD Most of specific components and personal preferences. R. L E V E L B. The remainder of the sections in this manual represent typical display examples. The actual items and contents seen in this manual is dedicated to the basic operations associated with selecting a source component up...

Owner's Manual
Page 7
... the horizontal and vertical positions of this manual. 1 Press MENU to select SCREEN. MAIN MENU PICTURE SCREEN POS I T I ON : CL OCK / PHASE : SET UP 0/ 0 0/ 0 INPUT1 OPTION RE S ET SELECT SET ENTER MENU EXIT 4 Press SET to adjust the value. ÷ Operating Instructions ÷ Warranty 3 PRO-1000HD / PRO-800HD Before Proceeding Before Proceeding The following...
... the horizontal and vertical positions of this manual. 1 Press MENU to select SCREEN. MAIN MENU PICTURE SCREEN POS I T I ON : CL OCK / PHASE : SET UP 0/ 0 0/ 0 INPUT1 OPTION RE S ET SELECT SET ENTER MENU EXIT 4 Press SET to adjust the value. ÷ Operating Instructions ÷ Warranty 3 PRO-1000HD / PRO-800HD Before Proceeding Before Proceeding The following...
Owner's Manual
Page 12
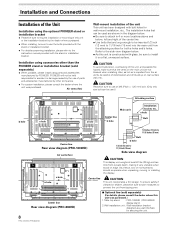
...Also, as a wall interface for wall-mount installation, etc.. Installation and Connections Installation of the Unit Installation using the optional PIONEER stand or installation bracket ÷ Please be sure to request installation or mounting of this unit or the installation bracket by... to the instruction manual provided with glass, be sure to install it very unstable when stood on edge. Installation using accessories other companies. ÷ For custom installation, please consult the dealer where the unit was purchased.) 1 Table top stand : PRO-1000HD / PRO-800HD display stand....
...Also, as a wall interface for wall-mount installation, etc.. Installation and Connections Installation of the Unit Installation using the optional PIONEER stand or installation bracket ÷ Please be sure to request installation or mounting of this unit or the installation bracket by... to the instruction manual provided with glass, be sure to install it very unstable when stood on edge. Installation using accessories other companies. ÷ For custom installation, please consult the dealer where the unit was purchased.) 1 Table top stand : PRO-1000HD / PRO-800HD display stand....
Owner's Manual
Page 15
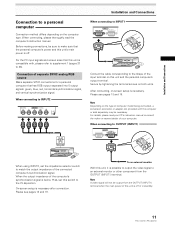
... unit and the personal computer's output terminal. Please see pages 18 and 19. For details, please read the computer's instruction manual. When connecting, please thoroughly read your computer. Secure by tightening the terminal screws on the computer type. When connecting to OUTPUT... the output impedance of computer model being connected, a conversion connector or adapter etc. On-screen setup is off or in standby. 11 PRO-1000HD / PRO-800HD When connecting to INPUT2 (ON SYNC) G B INPUT2 (H/V SYNC) R HD VD 7Ω5Ô2k.Ω2 Installation and Connections ...
... unit and the personal computer's output terminal. Please see pages 18 and 19. For details, please read the computer's instruction manual. When connecting, please thoroughly read your computer. Secure by tightening the terminal screws on the computer type. When connecting to OUTPUT... the output impedance of computer model being connected, a conversion connector or adapter etc. On-screen setup is off or in standby. 11 PRO-1000HD / PRO-800HD When connecting to INPUT2 (ON SYNC) G B INPUT2 (H/V SYNC) R HD VD 7Ω5Ô2k.Ω2 Installation and Connections ...
Owner's Manual
Page 17
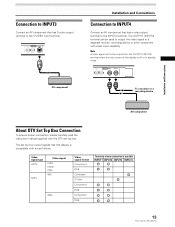
... recording device Installation and Connections AV component About DTV Set Top Box Connection To ensure proper connection, please carefully read the instruction manual supplied with the DTV set top box output signals that has S-video output terminal to the S-VIDEO input terminal. Video signal type...480p Video signal format Component RGB Composite S Video Component RGB Component RGB Terminals where connection is possible INPUT1 INPUT2 INPUT3 INPUT4 13 PRO-1000HD / PRO-800HD The OUTPUT (INPUT4) terminal can be output from the OUTPUT (INPUT4) terminal when the main power of this display is...
... recording device Installation and Connections AV component About DTV Set Top Box Connection To ensure proper connection, please carefully read the instruction manual supplied with the DTV set top box output signals that has S-video output terminal to the S-VIDEO input terminal. Video signal type...480p Video signal format Component RGB Composite S Video Component RGB Component RGB Terminals where connection is possible INPUT1 INPUT2 INPUT3 INPUT4 13 PRO-1000HD / PRO-800HD The OUTPUT (INPUT4) terminal can be output from the OUTPUT (INPUT4) terminal when the main power of this display is...
Owner's Manual
Page 23
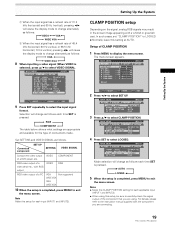
... connections made. Set SETTING and VIDEO SIGNAL as follows each time SET is pressed. For details, please refer to the instruction manual supplied with the component you are connecting. 19 PRO-1000HD / PRO-800HD Setting Up the System 1 When the input signal has a refresh rate of 31.5 kHz (horizontal) and 60 Hz (vertical), pressing...
... connections made. Set SETTING and VIDEO SIGNAL as follows each time SET is pressed. For details, please refer to the instruction manual supplied with the component you are connecting. 19 PRO-1000HD / PRO-800HD Setting Up the System 1 When the input signal has a refresh rate of 31.5 kHz (horizontal) and 60 Hz (vertical), pressing...
Owner's Manual
Page 30
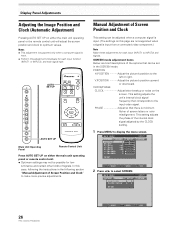
...MAIN MENU PICTURE SCREEN CONT RAST BR I ON : CL OCK / PHASE : SET UP 0/ 0 0/ 0 RE S ET INPUT1 OPTION 26 PRO-1000HD / PRO-800HD SELECT SET ENTER MENU EXIT SCREEN mode adjustment items Below are not supported when a signal is input. (The settings on this adjustment individually for... frequency that there is input. ÷ Perform this page are brief descriptions of the options that can be set in the following section "Manual Adjustment of the internal clock signal adjusted by the CLOCK setting. 1 Press MENU to make more precise adjustments. R. MAIN MENU PICTURE SCREEN...
...MAIN MENU PICTURE SCREEN CONT RAST BR I ON : CL OCK / PHASE : SET UP 0/ 0 0/ 0 RE S ET INPUT1 OPTION 26 PRO-1000HD / PRO-800HD SELECT SET ENTER MENU EXIT SCREEN mode adjustment items Below are not supported when a signal is input. (The settings on this adjustment individually for... frequency that there is input. ÷ Perform this page are brief descriptions of the options that can be set in the following section "Manual Adjustment of the internal clock signal adjusted by the CLOCK setting. 1 Press MENU to make more precise adjustments. R. MAIN MENU PICTURE SCREEN...


