
Operating Instructions
Page 2
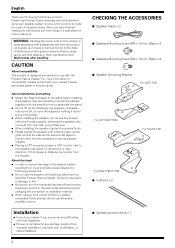
...product is not liable for buying this product or cords associated with accessories sold with the Pioneer Plasma Display. Please read through these operating instructions before installing the speakers. See the Operating Instructions packed together with the stand for use with the product will... reading the instructions, put them away in interference or color distortion. If this installation. ÷ Pioneer is designed exclusively for how to the speaker system resulting from the speaker. About the input ÷ In order to prevent damage to assemble the stand. ÷ Do...
...product is not liable for buying this product or cords associated with accessories sold with the Pioneer Plasma Display. Please read through these operating instructions before installing the speakers. See the Operating Instructions packed together with the stand for use with the product will... reading the instructions, put them away in interference or color distortion. If this installation. ÷ Pioneer is designed exclusively for how to the speaker system resulting from the speaker. About the input ÷ In order to prevent damage to assemble the stand. ÷ Do...
Operating Instructions
Page 3
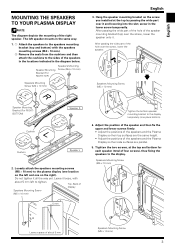
...positions of the hole over the screw, lower the speaker onto it and lowering into the slot; Speaker Mounting Bracket (For RIGHT-TOP) Speakers Mounting Screw (M4 × 10 mm) Speakers Mounting Screw (M4 × 10 mm) English 3. Speakers Mounting Screw (M5 × 10 mm) Leave...four screws), thus fixing the speakers to the display. Loosely attach the speakers mounting screws (M5 × 10 mm) to tighten. Leave it all the way yet. Speakers Mounting Screw (M5 × 10 mm) Speaker Mounting Bracket (For RIGHTBOTTOM) Cushion Speaker R Cushion Speaker L 2. Top, Back ...
...positions of the hole over the screw, lower the speaker onto it and lowering into the slot; Speaker Mounting Bracket (For RIGHT-TOP) Speakers Mounting Screw (M4 × 10 mm) Speakers Mounting Screw (M4 × 10 mm) English 3. Speakers Mounting Screw (M5 × 10 mm) Leave...four screws), thus fixing the speakers to the display. Loosely attach the speakers mounting screws (M5 × 10 mm) to tighten. Leave it all the way yet. Speakers Mounting Screw (M5 × 10 mm) Speaker Mounting Bracket (For RIGHTBOTTOM) Cushion Speaker R Cushion Speaker L 2. Top, Back ...

Operating Instructions
Page 4
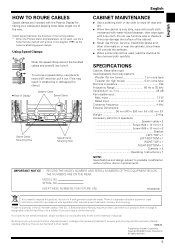
...tugging on the cable after making connections. (The gray line represents the red terminal) Connecting your Speaker Cables (to the speaker) Gray line Red Black White Push the lever, insert the end of the speaker cable into the hole, and release the lever. Pay attention to the polarity of the...an exposed lead wire, excessive load may be applied to the Plasma Display, resulting in interrupted operation or malfunction. • Incorrect connections of the speaker cable to the · terminals. Gray line White Gray line Red Black Red NOTE: • Press the lever and insert the end of ...
...tugging on the cable after making connections. (The gray line represents the red terminal) Connecting your Speaker Cables (to the speaker) Gray line Red Black White Push the lever, insert the end of the speaker cable into the hole, and release the lever. Pay attention to the polarity of the...an exposed lead wire, excessive load may be applied to the Plasma Display, resulting in interrupted operation or malfunction. • Incorrect connections of the speaker cable to the · terminals. Gray line White Gray line Red Black Red NOTE: • Press the lever and insert the end of ...
Operating Instructions
Page 5
...to wipe off dust and dirt. ÷ When the cabinet is not used electronic products free of the running cables. * When the Pioneer stand, sold separately, is very dirty, wipe with a soft cloth moistened with water-diluted cleanser; All rights reserved. 5 Attach speed ... hole A. input 13 W Rated input 4 W Crossover frequency 4 kHz External Dimensions 90 mm (W) × 880 mm (H) × 92 mm (D) Weight 2.4 kg Accessory parts (for 2 speakers Speaker cable × 2 Screw (M4 × 10 mm) × 8 Screw (M5 × 10 mm) × 8 Bracket LEFT-TOP × 1 LEFT-BOTTOM × 1 RIGHT...
...to wipe off dust and dirt. ÷ When the cabinet is not used electronic products free of the running cables. * When the Pioneer stand, sold separately, is very dirty, wipe with a soft cloth moistened with water-diluted cleanser; All rights reserved. 5 Attach speed ... hole A. input 13 W Rated input 4 W Crossover frequency 4 kHz External Dimensions 90 mm (W) × 880 mm (H) × 92 mm (D) Weight 2.4 kg Accessory parts (for 2 speakers Speaker cable × 2 Screw (M4 × 10 mm) × 8 Screw (M5 × 10 mm) × 8 Bracket LEFT-TOP × 1 LEFT-BOTTOM × 1 RIGHT...