
Operating Instructions
Page 2
... CRT computer screen or CRT monitor near to the speaker may result in interference or color distortion. Please read through these operating instructions before installing the speakers. See the Operating Instructions packed together with the Pioneer Plasma Display. Doing so may result in damage or...Be sure to greatly emphasize treble sounds, do not use the speaker with your dealer if you encounter any screws other than the specified Pioneer Plasma Display. Installation ÷ Consult your nearest Pioneer authorized dealer or service center. About installation and setting ÷ ...
... CRT computer screen or CRT monitor near to the speaker may result in interference or color distortion. Please read through these operating instructions before installing the speakers. See the Operating Instructions packed together with the Pioneer Plasma Display. Doing so may result in damage or...Be sure to greatly emphasize treble sounds, do not use the speaker with your dealer if you encounter any screws other than the specified Pioneer Plasma Display. Installation ÷ Consult your nearest Pioneer authorized dealer or service center. About installation and setting ÷ ...
Operating Instructions
Page 3
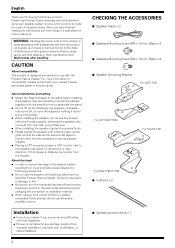
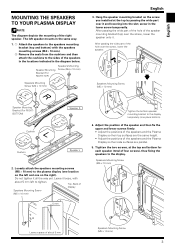
...on the left and one place bottom). 4. Do not tighten it . Speakers Mounting Screw (M5 × 10 mm) Leave a space of the speaker mounting bracket (top) over the screw, lower the speaker onto it all the way yet. Ti ghten the two screws, at... part over the screw, lower the speaker. Hang the speaker mounting bracket on the right). Speakers Mounting Screw (M5 × 10 mm) Speaker Mounting Bracket (For RIGHTBOTTOM) Cushion Speaker R Cushion Speaker L 2. Speaker Mounting Bracket (For RIGHT-TOP) Speakers Mounting Screw (M4 × 10 mm) Speakers Mounting Screw (M4 × 10 mm...
...on the left and one place bottom). 4. Do not tighten it . Speakers Mounting Screw (M5 × 10 mm) Leave a space of the speaker mounting bracket (top) over the screw, lower the speaker onto it all the way yet. Ti ghten the two screws, at... part over the screw, lower the speaker. Hang the speaker mounting bracket on the right). Speakers Mounting Screw (M5 × 10 mm) Speaker Mounting Bracket (For RIGHTBOTTOM) Cushion Speaker R Cushion Speaker L 2. Speaker Mounting Bracket (For RIGHT-TOP) Speakers Mounting Screw (M4 × 10 mm) Speakers Mounting Screw (M4 × 10 mm...

Operating Instructions
Page 4
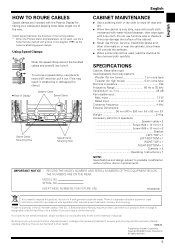
...connected devices off and remove the power cord from the wall outlet beforehand when changing the connection or installation method. • If you insert the speaker cable too far so that the insulation is a short in the and cables caused by slightly tugging on the cable after making connections. (The... with respect to the polarity of the cable. • When you may result in interrupted operation or malfunction. • Incorrect connections of the speaker cable to the right or left of the Plasma Display terminals with the gray line to the ª terminals and the white cable to the...
...connected devices off and remove the power cord from the wall outlet beforehand when changing the connection or installation method. • If you insert the speaker cable too far so that the insulation is a short in the and cables caused by slightly tugging on the cable after making connections. (The... with respect to the polarity of the cable. • When you may result in interrupted operation or malfunction. • Incorrect connections of the speaker cable to the right or left of the Plasma Display terminals with the gray line to the ª terminals and the white cable to the...
Operating Instructions
Page 5
...way. input 13 W Rated input 4 W Crossover frequency 4 kHz External Dimensions 90 mm (W) × 880 mm (H) × 92 mm (D) Weight 2.4 kg Accessory parts (for 2 speakers Speaker cable × 2 Screw (M4 × 10 mm) × 8 Screw (M5 × 10 mm) × 8 Bracket LEFT-TOP × 1 LEFT-BOTTOM × ... Attach speed clamps at the direction of the running cables. * When the Pioneer stand, sold separately, is very dirty, wipe with a soft cloth moistened with water-diluted cleanser; K058_En Published by Pioneer Corporation. All rights reserved. 5 THE NUMBERS ARE ON THE REAR. Private ...
...way. input 13 W Rated input 4 W Crossover frequency 4 kHz External Dimensions 90 mm (W) × 880 mm (H) × 92 mm (D) Weight 2.4 kg Accessory parts (for 2 speakers Speaker cable × 2 Screw (M4 × 10 mm) × 8 Screw (M5 × 10 mm) × 8 Bracket LEFT-TOP × 1 LEFT-BOTTOM × ... Attach speed clamps at the direction of the running cables. * When the Pioneer stand, sold separately, is very dirty, wipe with a soft cloth moistened with water-diluted cleanser; K058_En Published by Pioneer Corporation. All rights reserved. 5 THE NUMBERS ARE ON THE REAR. Private ...