Owner's Manual
Page 3
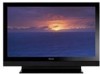
... the future of seeing and hearing like never before. An experience that set the KURO apart. We hope you enjoy the experience of owning the KURO and invite you to enter a new world of Pioneer flat-panel displays. We are felt and sounds can be tasted. English... the Speaker Cables ...20 2.3 Wall/Ceiling Mounting...22 2.4 Mount the Flat Panel TV ...24 2.5 Connect to Broadcast TV & Other Devices (DVR, Receiver, BDR, etc 26 2.5.1 Add Analog (conventional) and Digital TV Channels 26 2.5.2 Connect Your Other Pioneer Equipment...26 2.5.3 Connect the Power Cord to the Panel ...29 2.6 Route then ...
... the future of seeing and hearing like never before. An experience that set the KURO apart. We hope you enjoy the experience of owning the KURO and invite you to enter a new world of Pioneer flat-panel displays. We are felt and sounds can be tasted. English... the Speaker Cables ...20 2.3 Wall/Ceiling Mounting...22 2.4 Mount the Flat Panel TV ...24 2.5 Connect to Broadcast TV & Other Devices (DVR, Receiver, BDR, etc 26 2.5.1 Add Analog (conventional) and Digital TV Channels 26 2.5.2 Connect Your Other Pioneer Equipment...26 2.5.3 Connect the Power Cord to the Panel ...29 2.6 Route then ...

Owner's Manual
Page 4
...black bars on sides 59 4.3.2 Select a PureCinema Level for High Quality Image 60 4.4 View in Multi-Screen ...61 4.4.1 Split/Swap/Shift the Screen...61 4.5... Apply Sound Effect Settings ...67 4.7.5 Use Auto Volume Control (AVC)...67 4.8 Manage the Power ...67 5 Use Other Equipment With Your Flat Panel TV 69 5.1 Program the... Remote Control to Operate Other Equipment 69 5.1.1 Assign a Manufacturing Code to the Remote Control 69 5.1.2 Issue a Library Search for a Manufacturer Code 69 5.1.3 Clear Added Manufacturer Codes from the Remote Control 70 5.1.4 Control a Pioneer...
...black bars on sides 59 4.3.2 Select a PureCinema Level for High Quality Image 60 4.4 View in Multi-Screen ...61 4.4.1 Split/Swap/Shift the Screen...61 4.5... Apply Sound Effect Settings ...67 4.7.5 Use Auto Volume Control (AVC)...67 4.8 Manage the Power ...67 5 Use Other Equipment With Your Flat Panel TV 69 5.1 Program the... Remote Control to Operate Other Equipment 69 5.1.1 Assign a Manufacturing Code to the Remote Control 69 5.1.2 Issue a Library Search for a Manufacturer Code 69 5.1.3 Clear Added Manufacturer Codes from the Remote Control 70 5.1.4 Control a Pioneer...

Owner's Manual
Page 12
...the remote control. A later section entitled "5 Use Other Equipment With Your Flat Panel TV" explains how to use the remote to control other equipment such as an input source AV SELECTION: 4 Select audio/video settings AV Source: OPTIMUM, PERFORMANCE, DYNAMIC, MOVIE, GAME, SPORT, Standard PC Source: ...function Number buttons 0 thru 9: 7 Select a channel •(dot): 8 Enter a dot for selecting a sub-channel VOL +/-: 9 Set the volume EXIT: 10 Exit the menu to return to right) TV : 1 Turn On or place panel in Standby INPUT: 2 Select a source (INPUT 1 thru INPUT 7) PC: 3 Select the...
...the remote control. A later section entitled "5 Use Other Equipment With Your Flat Panel TV" explains how to use the remote to control other equipment such as an input source AV SELECTION: 4 Select audio/video settings AV Source: OPTIMUM, PERFORMANCE, DYNAMIC, MOVIE, GAME, SPORT, Standard PC Source: ...function Number buttons 0 thru 9: 7 Select a channel •(dot): 8 Enter a dot for selecting a sub-channel VOL +/-: 9 Set the volume EXIT: 10 Exit the menu to return to right) TV : 1 Turn On or place panel in Standby INPUT: 2 Select a source (INPUT 1 thru INPUT 7) PC: 3 Select the...
Owner's Manual
Page 26
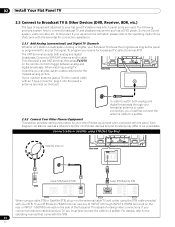
...you connect an antenna cable directly to TV, you can also be unavailable. When watching analog TV channels, you must first connect the antenna cable to a splitter. 2.5.2 Connect Your Other Pioneer Equipment This section provides cabling information for your other Pioneer equipment when combined with the panel....the Rear view clearest analog picture. Each diagram can also use any of INPUT 4 through your STB. Connect cable or Satellite using STB (Set Top Box): T T W W Satellite antenna Rear view SAT IN Cable STB/Satellite STB HDMI OUT AUDIO OUT COMPONENT VIDEO OUTPUT Y PB...
...you connect an antenna cable directly to TV, you can also be unavailable. When watching analog TV channels, you must first connect the antenna cable to a splitter. 2.5.2 Connect Your Other Pioneer Equipment This section provides cabling information for your other Pioneer equipment when combined with the panel....the Rear view clearest analog picture. Each diagram can also use any of INPUT 4 through your STB. Connect cable or Satellite using STB (Set Top Box): T T W W Satellite antenna Rear view SAT IN Cable STB/Satellite STB HDMI OUT AUDIO OUT COMPONENT VIDEO OUTPUT Y PB...

Owner's Manual
Page 32
... appearing on the left side of the panel. 3.2.2 Explore the Home Menu The Home Menu is set to TV. Most commands and settings are programmed through options for that describe a function. 1) Press HOME MENU on the remote control. Home Menu screen Channel Favorites Input Home Media ... channel type and how to use the Home Menu for each programming option. 3.2.1 Choose Analog or Digital TV Channels To choose a channel setting, note the antenna input terminal connected to the back of the panel. The following section describes a typical method for more than a single option. 7) ...
... appearing on the left side of the panel. 3.2.2 Explore the Home Menu The Home Menu is set to TV. Most commands and settings are programmed through options for that describe a function. 1) Press HOME MENU on the remote control. Home Menu screen Channel Favorites Input Home Media ... channel type and how to use the Home Menu for each programming option. 3.2.1 Choose Analog or Digital TV Channels To choose a channel setting, note the antenna input terminal connected to the back of the panel. The following section describes a typical method for more than a single option. 7) ...

Owner's Manual
Page 33
... Sensor 52 Screen Protection 40 Label Input System Setup 35 Auto Installation 36 Analog TV Setup 38 Digital Tuner Setup 47 Parental Control 64 Closed Captions 111 Digital Audio ... Favorites 39 - Option 112 Auto Setup 112 Manual Setup 74 HDMI Input 81 HDMI Control Setting 53 Orbiter 40 Label Input Favorites Setup 39 Channel Mode 40 Sort Favorites 33 En English AV...Setup Picture 54 AV Selection 58 Contrast* 58 Brightness* 58 Color* 58 Tint* 58 Sharpness* 60 PureCinema 46 Sound Control** 45 OPTIMUM Performance** 58 Reset Sound 46 Treble 46 Bass 46 Balance...
... Sensor 52 Screen Protection 40 Label Input System Setup 35 Auto Installation 36 Analog TV Setup 38 Digital Tuner Setup 47 Parental Control 64 Closed Captions 111 Digital Audio ... Favorites 39 - Option 112 Auto Setup 112 Manual Setup 74 HDMI Input 81 HDMI Control Setting 53 Orbiter 40 Label Input Favorites Setup 39 Channel Mode 40 Sort Favorites 33 En English AV...Setup Picture 54 AV Selection 58 Contrast* 58 Brightness* 58 Color* 58 Tint* 58 Sharpness* 60 PureCinema 46 Sound Control** 45 OPTIMUM Performance** 58 Reset Sound 46 Treble 46 Bass 46 Balance...

Owner's Manual
Page 35
...to take advantage of Channels This section describes how to add/remove channels. Follow the steps below to set up TV channels. Auto Installation Auto Installation searches for and adds TV channels to the list, simply delete any unwanted channels. Note: If the panel's power cord is.... 3.2.5 Create the List of many built-in features such as Time Zone and D.S.T. (Daylight Saving Time) activation for digital TV broadcast. This section provides steps to search for and set the clock. 1 ) Access the System Setup through the Setup. 2 ) Select Auto Installation from the System Setup menu....
...to take advantage of Channels This section describes how to add/remove channels. Follow the steps below to set up TV channels. Auto Installation Auto Installation searches for and adds TV channels to the list, simply delete any unwanted channels. Note: If the panel's power cord is.... 3.2.5 Create the List of many built-in features such as Time Zone and D.S.T. (Daylight Saving Time) activation for digital TV broadcast. This section provides steps to search for and set the clock. 1 ) Access the System Setup through the Setup. 2 ) Select Auto Installation from the System Setup menu....

Owner's Manual
Page 38
... to or highlight an unwanted channel number. 4 ) Press ENTER to reverse the status for that are unwanted or are not age-appropriate for your TV service provider. To set this option, follow the steps below to change a channel's status. 1 ) Access the System Setup through the Setup. 2 ) Select Digital Tuner Setup from the...
... to or highlight an unwanted channel number. 4 ) Press ENTER to reverse the status for that are unwanted or are not age-appropriate for your TV service provider. To set this option, follow the steps below to change a channel's status. 1 ) Access the System Setup through the Setup. 2 ) Select Digital Tuner Setup from the...

Owner's Manual
Page 39
...INPUT 6 XXXXXX XXXXXX XXXXXX XXXXXX PC XXXXXX XXXXXX XXXXXX XXXXXX 1/2 00001.000 00004.000 00007.000 00009.000 00013.002 00015.000 00024.000 Set Favorite Channels Select up to ten (10) channels per list page, up to a desired channel: Favorites List, Channel List and Input List.... follow the directions below . 1 ) Press HOME MENU. 2 ) Select Channel from the Channel Mode menu. • To assign all analog/digital TV channels in the Favorites List. To assign the registered channels, select Favorites. 39 En Channel List: Display all channels, select All. To assign channels ...
...INPUT 6 XXXXXX XXXXXX XXXXXX XXXXXX PC XXXXXX XXXXXX XXXXXX XXXXXX 1/2 00001.000 00004.000 00007.000 00009.000 00013.002 00015.000 00024.000 Set Favorite Channels Select up to ten (10) channels per list page, up to a desired channel: Favorites List, Channel List and Input List.... follow the directions below . 1 ) Press HOME MENU. 2 ) Select Channel from the Channel Mode menu. • To assign all analog/digital TV channels in the Favorites List. To assign the registered channels, select Favorites. 39 En Channel List: Display all channels, select All. To assign channels ...
Owner's Manual
Page 41
...press MUTING. The Sleep Timer places the panel in the order needed for that your flat panel TV, try using the Sleep Timer for occasions when the panel may simply lack the time to set the Sleep Timer, follow the steps below. 1 ) Access the Sleep Timer through the rest of..., 4. To watch a sub-channel, use the number buttons (0 through 9). To silence all that channel. To set when first installing the panel. Each press of 30, 60, 90, or 120 minutes. A recent addition to TV viewing is digital and has three active sub-channels, enter 5 . 2 to station. A single press of number...
...press MUTING. The Sleep Timer places the panel in the order needed for that your flat panel TV, try using the Sleep Timer for occasions when the panel may simply lack the time to set the Sleep Timer, follow the steps below. 1 ) Access the Sleep Timer through the rest of..., 4. To watch a sub-channel, use the number buttons (0 through 9). To silence all that channel. To set when first installing the panel. Each press of 30, 60, 90, or 120 minutes. A recent addition to TV viewing is digital and has three active sub-channels, enter 5 . 2 to station. A single press of number...

Owner's Manual
Page 42
... Picture and Sound Adjustment Options" and "4.7 Select Alternatives for/to your room and automatically adjusts the screen brightness for Your Room Lighting The flat panel TV senses the amount of the menu. The sections below . 1 ) Access the Option through the Setup. 2 ) Select Room Light Sensor from the Option...sensor On/Off. However, the Video Pattern timer has priority over the sleep timer. Video Pattern is set , "Remain ---min" appears at the top of the flat panel TV lights orange when the Sleep Timer is explained fully later in your program without losing the Sleep Timer...
... Picture and Sound Adjustment Options" and "4.7 Select Alternatives for/to your room and automatically adjusts the screen brightness for Your Room Lighting The flat panel TV senses the amount of the menu. The sections below . 1 ) Access the Option through the Setup. 2 ) Select Room Light Sensor from the Option...sensor On/Off. However, the Video Pattern timer has priority over the sleep timer. Video Pattern is set , "Remain ---min" appears at the top of the flat panel TV lights orange when the Sleep Timer is explained fully later in your program without losing the Sleep Timer...

Owner's Manual
Page 43
... electronic signal static can reduce video noise from an analog TV channel, depending on an analog TV channel. 1 ) Access the System Setup through the Setup. 2 ) Select an item to exit the menu. 43 En Only analog channels set using Auto Installation are manually adjustable. 4 ) Select Program Entry. 5 ) Select a channel number to all AV...
... electronic signal static can reduce video noise from an analog TV channel, depending on an analog TV channel. 1 ) Access the System Setup through the Setup. 2 ) Select an item to exit the menu. 43 En Only analog channels set using Auto Installation are manually adjustable. 4 ) Select Program Entry. 5 ) Select a channel number to all AV...

Owner's Manual
Page 44
... the Before screen when selecting another option, the Before data is selected, video settings for OPTIMUM, AV Selection menus, and Sound Control settings return to another parameter/option only from the Picture menu. 2 ) Press ENTER to adjust the flat panel TV's picture. 03 Basic Operations For Television Viewing Picture Image Position Each input...
... the Before screen when selecting another option, the Before data is selected, video settings for OPTIMUM, AV Selection menus, and Sound Control settings return to another parameter/option only from the Picture menu. 2 ) Press ENTER to adjust the flat panel TV's picture. 03 Basic Operations For Television Viewing Picture Image Position Each input...

Owner's Manual
Page 45
... Performance [OPTIMUM] On OPTIMUM On/Off [Analyzer] Histogram RGB Room Light [Picture] Contrast Brightness Color Sharpness Color Temp Gamma [Sound] 60 1k 12k(Hz) To display OPTIMUM Performance, follow the procedure below to show OPTIMUM Performance. Basic Operations For Television Viewing 03 English &#...; Moving/changing the AV Selection parameter/option stores the option setting in memory (button continues to memory. Note: if no selections are made within 60 seconds, the menu closes automatically and the current settings are saved to work). Note: When OPTIMUM is selected, press...
... Performance [OPTIMUM] On OPTIMUM On/Off [Analyzer] Histogram RGB Room Light [Picture] Contrast Brightness Color Sharpness Color Temp Gamma [Sound] 60 1k 12k(Hz) To display OPTIMUM Performance, follow the procedure below to show OPTIMUM Performance. Basic Operations For Television Viewing 03 English &#...; Moving/changing the AV Selection parameter/option stores the option setting in memory (button continues to memory. Note: if no selections are made within 60 seconds, the menu closes automatically and the current settings are saved to work). Note: When OPTIMUM is selected, press...

Owner's Manual
Page 46
...the factory default. 46 En Restore Default Sound Settings To restore the factory default sound settings, follow the directions below. 1 ) Highlight Reset from an AV source or on TV. Others like a more balanced sound. Note: The Auto Volume Control (AVC) setting cannot be returned to the factory defaults. ...3 ) Use the arrow buttons to highlight Yes. 4 ) Press ENTER to restore all sound settings to exit the menu. This...
...the factory default. 46 En Restore Default Sound Settings To restore the factory default sound settings, follow the directions below. 1 ) Highlight Reset from an AV source or on TV. Others like a more balanced sound. Note: The Auto Volume Control (AVC) setting cannot be returned to the factory defaults. ...3 ) Use the arrow buttons to highlight Yes. 4 ) Press ENTER to restore all sound settings to exit the menu. This...

Owner's Manual
Page 49
...TV rating TV-PG (Parental guidance suggested) automatically blocks TV-14 (Parents strongly cautioned) and TV-MA (Mature audiences only). Program Rating of "None" The flat panel TV also provides a rating setting that rating system. 5 ) Press ENTER to reverse the blocked status for that blocks programs with a None rating level. The US TV... Block Block Status : MPAA Ratings TV Parental Guidelines Canadian English Ratings Canadian French Ratings Unavailable Ratings : Digital Regional Ratings Off View TV Parental Guidelines menu TV-None TV-Y TV-Y7 TV-G TV-PG TV-14 TV-MA FV D L S V...
...TV rating TV-PG (Parental guidance suggested) automatically blocks TV-14 (Parents strongly cautioned) and TV-MA (Mature audiences only). Program Rating of "None" The flat panel TV also provides a rating setting that rating system. 5 ) Press ENTER to reverse the blocked status for that blocks programs with a None rating level. The US TV... Block Block Status : MPAA Ratings TV Parental Guidelines Canadian English Ratings Canadian French Ratings Unavailable Ratings : Digital Regional Ratings Off View TV Parental Guidelines menu TV-None TV-Y TV-Y7 TV-G TV-PG TV-14 TV-MA FV D L S V...

Owner's Manual
Page 50
Note: Your flat panel TV ships with this rating system to be blocked automatically. Change the Parental Control settings to exit the menu. When first tuning to one of available ratings appears. 4 ) Select from the available ratings. 5 ) Select a level ...(for Various Audience Classifications)" for Digital Broadcasts Some Digital broadcasts carry new ratings that are not compatible with the panel's original Parental Control settings. Otherwise, previous blocked ratings may become unblocked. To block these broadcasts, the Digital Regional Ratings menu appears on screen. Note: Adding ...
Note: Your flat panel TV ships with this rating system to be blocked automatically. Change the Parental Control settings to exit the menu. When first tuning to one of available ratings appears. 4 ) Select from the available ratings. 5 ) Select a level ...(for Various Audience Classifications)" for Digital Broadcasts Some Digital broadcasts carry new ratings that are not compatible with the panel's original Parental Control settings. Otherwise, previous blocked ratings may become unblocked. To block these broadcasts, the Digital Regional Ratings menu appears on screen. Note: Adding ...

Owner's Manual
Page 52
... section differ, depending upon the menu. This section explains how to extend the life of the screeen. The setting is selected for AV Selection) 4 ) Press HOME MENU to the available selections even while watching a program. When showing two screens, the ...TELEVISION TOOLS All Sound Random Play Mode : Single A-B Repeat Time Search Repeat The TOOLS Menu provides short-cuts to toggle between options. Your flat panel TV includes the Screen Protection option. Use the arrow buttons to the selectable menu options while watching a program. The following functions below . 1 ) Access...
... section differ, depending upon the menu. This section explains how to extend the life of the screeen. The setting is selected for AV Selection) 4 ) Press HOME MENU to the available selections even while watching a program. When showing two screens, the ...TELEVISION TOOLS All Sound Random Play Mode : Single A-B Repeat Time Search Repeat The TOOLS Menu provides short-cuts to toggle between options. Your flat panel TV includes the Screen Protection option. Use the arrow buttons to the selectable menu options while watching a program. The following functions below . 1 ) Access...

Owner's Manual
Page 53
... this function, select Off in is on screen. While the Video Pattern screen is set to Mode 1 or Mode 2, the image may be hidden at a minimum. To cancel the Video Pattern screen, press the remote's TV ( a ) or press the panel's STANDBY/ON. Basic Operations For Television Viewing 03... To activate the Orbiter, follow the steps below . Note: The farthest edges of one hour after -image ghosts or burnin. The recommended setting, Energy Save Mode 1, extends the life of the picture imperceptibly while the image is the Orbiter function. To activate the Video Pattern screen,...
... this function, select Off in is on screen. While the Video Pattern screen is set to Mode 1 or Mode 2, the image may be hidden at a minimum. To cancel the Video Pattern screen, press the remote's TV ( a ) or press the panel's STANDBY/ON. Basic Operations For Television Viewing 03... To activate the Orbiter, follow the steps below . Note: The farthest edges of one hour after -image ghosts or burnin. The recommended setting, Energy Save Mode 1, extends the life of the picture imperceptibly while the image is the Orbiter function. To activate the Video Pattern screen,...

Owner's Manual
Page 54
...shared by external input and TV input sources) for movies (shared by external input and TV input sources) for sports programs (shared by external input and TV input sources) lowers image brightness for easier viewing (shared by external input and TV input sources) allows customizing settings as desired. 4.1 Choose... an AV Option (Video, Game, etc.) Similar to set the mode for the best image from an external AV Source. Use either an AV ...
...shared by external input and TV input sources) for movies (shared by external input and TV input sources) for sports programs (shared by external input and TV input sources) lowers image brightness for easier viewing (shared by external input and TV input sources) allows customizing settings as desired. 4.1 Choose... an AV Option (Video, Game, etc.) Similar to set the mode for the best image from an external AV Source. Use either an AV ...


