Owner's Manual
Page 3
...Display a Graphical Picture/Sound Adjustment Screen 45 3.4.5 Sound Control...46 3.4.6 General Sound (Audio) Adjustment...46 3 En An experience that set the KURO apart. We hope you enjoy the experience of owning the KURO and invite you to learn about the many features and...Cables ...20 2.3 Wall/Ceiling Mounting...22 2.4 Mount the Flat Panel TV ...24 2.5 Connect to Broadcast TV & Other Devices (DVR, Receiver, BDR, etc 26 2.5.1 Add Analog (conventional) and Digital TV Channels 26 2.5.2 Connect Your Other Pioneer Equipment...26 2.5.3 Connect the Power Cord to make the KURO undeniably ...
...Display a Graphical Picture/Sound Adjustment Screen 45 3.4.5 Sound Control...46 3.4.6 General Sound (Audio) Adjustment...46 3 En An experience that set the KURO apart. We hope you enjoy the experience of owning the KURO and invite you to learn about the many features and...Cables ...20 2.3 Wall/Ceiling Mounting...22 2.4 Mount the Flat Panel TV ...24 2.5 Connect to Broadcast TV & Other Devices (DVR, Receiver, BDR, etc 26 2.5.1 Add Analog (conventional) and Digital TV Channels 26 2.5.2 Connect Your Other Pioneer Equipment...26 2.5.3 Connect the Power Cord to make the KURO undeniably ...

Owner's Manual
Page 4
...black bars on sides 59 4.3.2 Select a PureCinema Level for High Quality Image 60 4.4 View in Multi-Screen ...61 4.4.1 Split/Swap/Shift the Screen...61 4.5... Apply Sound Effect Settings ...67 4.7.5 Use Auto Volume Control (AVC)...67 4.8 Manage the Power ...67 5 Use Other Equipment With Your Flat Panel TV 69 5.1 Program the... Remote Control to Operate Other Equipment 69 5.1.1 Assign a Manufacturing Code to the Remote Control 69 5.1.2 Issue a Library Search for a Manufacturer Code 69 5.1.3 Clear Added Manufacturer Codes from the Remote Control 70 5.1.4 Control a Pioneer...
...black bars on sides 59 4.3.2 Select a PureCinema Level for High Quality Image 60 4.4 View in Multi-Screen ...61 4.4.1 Split/Swap/Shift the Screen...61 4.5... Apply Sound Effect Settings ...67 4.7.5 Use Auto Volume Control (AVC)...67 4.8 Manage the Power ...67 5 Use Other Equipment With Your Flat Panel TV 69 5.1 Program the... Remote Control to Operate Other Equipment 69 5.1.1 Assign a Manufacturing Code to the Remote Control 69 5.1.2 Issue a Library Search for a Manufacturer Code 69 5.1.3 Clear Added Manufacturer Codes from the Remote Control 70 5.1.4 Control a Pioneer...

Owner's Manual
Page 12
...press again to cancel the freeze function Number buttons 0 thru 9: 7 Select a channel •(dot): 8 Enter a dot for selecting a sub-channel VOL +/-: 9 Set the volume EXIT: 10 Exit the menu to return to the normal screen Arrow buttons: 11 Navigate the menu screens HOME MENU: 12 Display the... 14 15 12 En A later section entitled "5 Use Other Equipment With Your Flat Panel TV" explains how to use the remote to control other equipment such as an input source AV SELECTION: 4 Select audio/video settings AV Source: OPTIMUM, PERFORMANCE, DYNAMIC, MOVIE, GAME, SPORT, Standard PC Source: STANDARD,...
...press again to cancel the freeze function Number buttons 0 thru 9: 7 Select a channel •(dot): 8 Enter a dot for selecting a sub-channel VOL +/-: 9 Set the volume EXIT: 10 Exit the menu to return to the normal screen Arrow buttons: 11 Navigate the menu screens HOME MENU: 12 Display the... 14 15 12 En A later section entitled "5 Use Other Equipment With Your Flat Panel TV" explains how to use the remote to control other equipment such as an input source AV SELECTION: 4 Select audio/video settings AV Source: OPTIMUM, PERFORMANCE, DYNAMIC, MOVIE, GAME, SPORT, Standard PC Source: STANDARD,...
Owner's Manual
Page 26
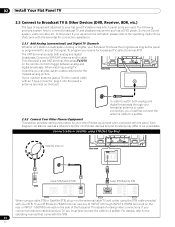
...Connect a VHF/UHF antenna and/or cable T T W W TV to accept the signal. Each diagram can also use any of making video connections. In order to watch both analog and digital broadcasts. Connect cable or Satellite using STB (Set Top Box): T T W W Satellite antenna Rear view SAT IN...antenna or cable connection, you must first connect the antenna cable to a splitter. 2.5.2 Connect Your Other Pioneer Equipment This section provides cabling information for your flat panel TV shows the programs as long as the panel is not listed, please refer to the operating instructions that ...
...Connect a VHF/UHF antenna and/or cable T T W W TV to accept the signal. Each diagram can also use any of making video connections. In order to watch both analog and digital broadcasts. Connect cable or Satellite using STB (Set Top Box): T T W W Satellite antenna Rear view SAT IN...antenna or cable connection, you must first connect the antenna cable to a splitter. 2.5.2 Connect Your Other Pioneer Equipment This section provides cabling information for your flat panel TV shows the programs as long as the panel is not listed, please refer to the operating instructions that ...

Owner's Manual
Page 32
... page when changing more information about channel setting options. During operation, press TV/DTV to toggle between TV signals. Note: When watching TV and separate video image (multi-screen), pressing the remote control's TV/DTV button changes only the TV signal appearing on the left side of the... panel. 3.2.2 Explore the Home Menu The Home Menu is set to TV. Note: See "2.5.1 Add Analog (conventional) and Digital TV Channels" for the flat panel TV. Most commands and settings are programmed through options for working with the panel's menus. For actual procedures...
... page when changing more information about channel setting options. During operation, press TV/DTV to toggle between TV signals. Note: When watching TV and separate video image (multi-screen), pressing the remote control's TV/DTV button changes only the TV signal appearing on the left side of the... panel. 3.2.2 Explore the Home Menu The Home Menu is set to TV. Note: See "2.5.1 Add Analog (conventional) and Digital TV Channels" for the flat panel TV. Most commands and settings are programmed through options for working with the panel's menus. For actual procedures...

Owner's Manual
Page 33
... - Option 44 Position 56 Auto Size 59 Side Mask 74 HDMI Input 81 HDMI Control Setting 53 Orbiter 53 Video Pattern 56 Game Control Pref 42 Room Light Sensor 52 Screen Protection 40 ...Label Input System Setup 35 Auto Installation 36 Analog TV Setup 38 Digital Tuner Setup 47 Parental Control 64 Closed Captions 111 Digital Audio Output...Setup Picture 54 AV Selection 58 Contrast* 58 Brightness* 58 Color* 58 Tint* 58 Sharpness* 60 PureCinema 46 Sound Control** 45 OPTIMUM Performance** 58 Reset Sound 46 Treble 46 Bass 46 Balance...
... - Option 44 Position 56 Auto Size 59 Side Mask 74 HDMI Input 81 HDMI Control Setting 53 Orbiter 53 Video Pattern 56 Game Control Pref 42 Room Light Sensor 52 Screen Protection 40 ...Label Input System Setup 35 Auto Installation 36 Analog TV Setup 38 Digital Tuner Setup 47 Parental Control 64 Closed Captions 111 Digital Audio Output...Setup Picture 54 AV Selection 58 Contrast* 58 Brightness* 58 Color* 58 Tint* 58 Sharpness* 60 PureCinema 46 Sound Control** 45 OPTIMUM Performance** 58 Reset Sound 46 Treble 46 Bass 46 Balance...

Owner's Manual
Page 35
...) Select Clock from the Digital Tuner Setup menu. 4 ) Select Time Zone from your area. Using the remote control, follow the steps below to set up TV channels. Time Zone D.S.T. : Atlantic : On 6 ) Select the menu option D.S.T. Once all channels are two ways to add channels to your list ...a power outage, the time must be reset. There are added to take advantage of Channels This section describes how to your flat panel TV, Auto Installation for and set the clock. 1 ) Access the System Setup through the Setup. 2 ) Select Auto Installation from the System Setup menu. 3 ) ...
...) Select Clock from the Digital Tuner Setup menu. 4 ) Select Time Zone from your area. Using the remote control, follow the steps below to set up TV channels. Time Zone D.S.T. : Atlantic : On 6 ) Select the menu option D.S.T. Once all channels are two ways to add channels to your list ...a power outage, the time must be reset. There are added to take advantage of Channels This section describes how to your flat panel TV, Auto Installation for and set the clock. 1 ) Access the System Setup through the Setup. 2 ) Select Auto Installation from the System Setup menu. 3 ) ...

Owner's Manual
Page 38
...000 00008.000 00009.000 3 ) Scroll to or highlight an unwanted channel number. 4 ) Press ENTER to the channel, it disappears. 5 ) Press RETURN. To set this option, follow the steps below to change a channel's status. 1 ) Access the System Setup through the Setup. 2 ) Select Digital Tuner Setup from the ... delete unwanted channels when moving up/down one channel at a time. The Channel Delete setting is a check mark next to reverse the status for that are unwanted or are not age-appropriate for your TV service provider. In Step 4 a check mark appears next to reset the status for ...
...000 00008.000 00009.000 3 ) Scroll to or highlight an unwanted channel number. 4 ) Press ENTER to the channel, it disappears. 5 ) Press RETURN. To set this option, follow the steps below to change a channel's status. 1 ) Access the System Setup through the Setup. 2 ) Select Digital Tuner Setup from the ... delete unwanted channels when moving up/down one channel at a time. The Channel Delete setting is a check mark next to reverse the status for that are unwanted or are not age-appropriate for your TV service provider. In Step 4 a check mark appears next to reset the status for ...

Owner's Manual
Page 39
... Favorites INPUT 6 XXXXXX XXXXXX XXXXXX XXXXXX PC XXXXXX XXXXXX XXXXXX XXXXXX 1/2 00001.000 00004.000 00007.000 00009.000 00013.002 00015.000 00024.000 Set Favorite Channels Select up to ten (10) channels per list page, up to 20 channels (analog channels, Input 1 through 7, PC), 20 digital...All, follow the directions below . 1 ) Press HOME MENU. 2 ) Select Input from the Channel Mode menu. • To assign all analog/digital TV channels in the Favorites List. To assign channels to five pages for quick access to access the Favorites List, follow the steps below . 1 ) Press...
... Favorites INPUT 6 XXXXXX XXXXXX XXXXXX XXXXXX PC XXXXXX XXXXXX XXXXXX XXXXXX 1/2 00001.000 00004.000 00007.000 00009.000 00013.002 00015.000 00024.000 Set Favorite Channels Select up to ten (10) channels per list page, up to 20 channels (analog channels, Input 1 through 7, PC), 20 digital...All, follow the directions below . 1 ) Press HOME MENU. 2 ) Select Input from the Channel Mode menu. • To assign all analog/digital TV channels in the Favorites List. To assign channels to five pages for quick access to access the Favorites List, follow the steps below . 1 ) Press...
Owner's Manual
Page 41
...When the Timer is the Sub-channel. Select between the two channels, press CH RETURN again. button sequentially changes down VOL- A recent addition to TV viewing is down to five minutes, a reminder appears on screen each minute until the time has elapsed. For example, if Channel 5 is convenient,...station. However, when it is digital and has three active sub-channels, enter 5 . 2 to set the Sleep Timer, follow the steps below. 1 ) Access the Sleep Timer through 9). Each press of 30, 60, 90, or 120 minutes. Simply press the number buttons in the order needed for changing the ...
...When the Timer is the Sub-channel. Select between the two channels, press CH RETURN again. button sequentially changes down VOL- A recent addition to TV viewing is down to five minutes, a reminder appears on screen each minute until the time has elapsed. For example, if Channel 5 is convenient,...station. However, when it is digital and has three active sub-channels, enter 5 . 2 to set the Sleep Timer, follow the steps below. 1 ) Access the Sleep Timer through 9). Each press of 30, 60, 90, or 120 minutes. Simply press the number buttons in the order needed for changing the ...

Owner's Manual
Page 42
... the amount of light in this manual. 3.4 Adjust the Picture and Sound Quality Your flat panel TV has many adjustment options for you. Note: When the sleep timer has been set . This section provides basic adjustments but for detailed video/audio modifications, refer to "4 Additional Picture and Sound Adjustment ... is on the front of the flat panel TV lights orange when the Sleep Timer is deactivated. The panel ships with the Room Light Sensor turned Off. 03 Basic Operations For Television Viewing The SLEEP indicator on , the sleep timer is set , "Remain ---min" appears at the top...
... the amount of light in this manual. 3.4 Adjust the Picture and Sound Quality Your flat panel TV has many adjustment options for you. Note: When the sleep timer has been set . This section provides basic adjustments but for detailed video/audio modifications, refer to "4 Additional Picture and Sound Adjustment ... is on the front of the flat panel TV lights orange when the Sleep Timer is deactivated. The panel ships with the Room Light Sensor turned Off. 03 Basic Operations For Television Viewing The SLEEP indicator on , the sleep timer is set , "Remain ---min" appears at the top...

Owner's Manual
Page 43
...;) to exit the menu. 43 En The default setting is On. 8 ) Press HOME MENU to enter a channel number. 6 ) Select Tuner NR. 7 ) Select On. If the viewing option is used in the picture. Contrast is OPTIMUM, your flat panel TV automatically adjusts the picture to be adjusted. Your flat... panel TV can cause imperfections in the example below to reduce noise on the broadcast signal level. This function is DYNAMIC, please refer to exit the menu. Follow the steps below . Only analog channels set using Auto Installation are manually adjustable. 4 )...
...;) to exit the menu. 43 En The default setting is On. 8 ) Press HOME MENU to enter a channel number. 6 ) Select Tuner NR. 7 ) Select On. If the viewing option is used in the picture. Contrast is OPTIMUM, your flat panel TV automatically adjusts the picture to be adjusted. Your flat... panel TV can cause imperfections in the example below to reduce noise on the broadcast signal level. This function is DYNAMIC, please refer to exit the menu. Follow the steps below . Only analog channels set using Auto Installation are manually adjustable. 4 )...

Owner's Manual
Page 44
... from the Option menu. Although repositioning is available in memory and deactivates the button. 44 En A confirmation screen appears asking if settings should be adjusted separately. Each parameter/option must be returned to the factory defaults. 3 ) Use the arrow buttons to Dot-by...Highlight Reset from the Picture menu. 2 ) Press ENTER to adjust the flat panel TV's picture. 03 Basic Operations For Television Viewing Picture Image Position Each input source stores the picture adjustment settings for that previous entry in memory and deactivates the TOOLS button. • Exiting ...
... from the Option menu. Although repositioning is available in memory and deactivates the button. 44 En A confirmation screen appears asking if settings should be adjusted separately. Each parameter/option must be returned to the factory defaults. 3 ) Use the arrow buttons to Dot-by...Highlight Reset from the Picture menu. 2 ) Press ENTER to adjust the flat panel TV's picture. 03 Basic Operations For Television Viewing Picture Image Position Each input source stores the picture adjustment settings for that previous entry in memory and deactivates the TOOLS button. • Exiting ...

Owner's Manual
Page 45
... is selected, press and hold DISPLAY on the remote control to memory. Note: if no selections are made within 60 seconds, the menu closes automatically and the current settings are saved to show OPTIMUM Performance. Follow the steps below . 1 ) Access the Picture through 4 to adjust... Performance appears. Basic Operations For Television Viewing 03 English • Moving/changing the AV Selection parameter/option stores the option setting in memory (button continues to automatically adjust the sound quality, and OPTIMUM Performance provides an on-screen graphic monitor for multiple...
... is selected, press and hold DISPLAY on the remote control to memory. Note: if no selections are made within 60 seconds, the menu closes automatically and the current settings are saved to show OPTIMUM Performance. Follow the steps below . 1 ) Access the Picture through 4 to adjust... Performance appears. Basic Operations For Television Viewing 03 English • Moving/changing the AV Selection parameter/option stores the option setting in memory (button continues to automatically adjust the sound quality, and OPTIMUM Performance provides an on-screen graphic monitor for multiple...

Owner's Manual
Page 46
... Sound Control from an AV source or on TV. To adjust the sound to your preference, follow the procedure below. 1 ) Access the Picture through the Setup. 2 ) Select an option for the selected image and viewing environment. 03 Basic Operations For Television Viewing 3.4.5 Sound Control Setting the Sound Control option to On automatically...
... Sound Control from an AV source or on TV. To adjust the sound to your preference, follow the procedure below. 1 ) Access the Picture through the Setup. 2 ) Select an option for the selected image and viewing environment. 03 Basic Operations For Television Viewing 3.4.5 Sound Control Setting the Sound Control option to On automatically...

Owner's Manual
Page 49
... Guidelines Rating system identifies programs with a rating of None. For example, blocking TV rating TV-PG (Parental guidance suggested) automatically blocks TV-14 (Parents strongly cautioned) and TV-MA (Mature audiences only). Program Rating of "None" The flat panel TV also provides a rating setting that rating system. 5 ) Press ENTER to become automatically available. A block (B) or view...
... Guidelines Rating system identifies programs with a rating of None. For example, blocking TV rating TV-PG (Parental guidance suggested) automatically blocks TV-14 (Parents strongly cautioned) and TV-MA (Mature audiences only). Program Rating of "None" The flat panel TV also provides a rating setting that rating system. 5 ) Press ENTER to become automatically available. A block (B) or view...

Owner's Manual
Page 50
...from the available ratings. 6 ) Select View or Block. 7 ) Press HOME MENU to be blocked automatically. Note: Your flat panel TV ships with this option set to exit the menu. When first tuning to one of available ratings appears. 4 ) Select from the available ratings. 5 ) Select a...blocked ratings may become unblocked. New Ratings System for detailed information about the different rating systems. Block Not Rated Programs With some TV programs, the rating information is unavailable. Refer to "8.1 Ratings Charts (for Various Audience Classifications)" for Digital Broadcasts Some Digital ...
...from the available ratings. 6 ) Select View or Block. 7 ) Press HOME MENU to be blocked automatically. Note: Your flat panel TV ships with this option set to exit the menu. When first tuning to one of available ratings appears. 4 ) Select from the available ratings. 5 ) Select a...blocked ratings may become unblocked. New Ratings System for detailed information about the different rating systems. Block Not Rated Programs With some TV programs, the rating information is unavailable. Refer to "8.1 Ratings Charts (for Various Audience Classifications)" for Digital Broadcasts Some Digital ...

Owner's Manual
Page 52
... in this option, follow the steps below for AV Selection) 4 ) Press HOME MENU to the available selections even while watching a program. The setting is selected for the simplest usage, best quality, and longest life span. 3.6.1 Use the TOOLS Menu To change the current menu to another option,... and help alleviate after-image ghosts or burn-in the center of the flat panel TV features make it easy to automatically select the several different features that can prolong the life of the following settings are automatically entered: •Auto Size: Wide-Zoom •Side Mask - Activating...
... in this option, follow the steps below for AV Selection) 4 ) Press HOME MENU to the available selections even while watching a program. The setting is selected for the simplest usage, best quality, and longest life span. 3.6.1 Use the TOOLS Menu To change the current menu to another option,... and help alleviate after-image ghosts or burn-in the center of the flat panel TV features make it easy to automatically select the several different features that can prolong the life of the following settings are automatically entered: •Auto Size: Wide-Zoom •Side Mask - Activating...

Owner's Manual
Page 53
... MENU to exit the menu. To cancel the Video Pattern screen, press the remote's TV ( a ) or press the panel's STANDBY/ON. To activate the Video Pattern screen, follow the steps below. The recommended setting, Energy Save Mode 1, extends the life of one hour after -image ghosts or burnin... ) Select Video Pattern from the Energy Save submenu. A confirmation screen appears. 3 ) Select Start from the submenu. While the Video Pattern screen is set to Mode 1 or Mode 2, the image may be hidden at a minimum. Option Off Mode 1 Mode 2 Description No effect consumes less power than ...
... MENU to exit the menu. To cancel the Video Pattern screen, press the remote's TV ( a ) or press the panel's STANDBY/ON. To activate the Video Pattern screen, follow the steps below. The recommended setting, Energy Save Mode 1, extends the life of one hour after -image ghosts or burnin... ) Select Video Pattern from the Energy Save submenu. A confirmation screen appears. 3 ) Select Start from the submenu. While the Video Pattern screen is set to Mode 1 or Mode 2, the image may be hidden at a minimum. Option Off Mode 1 Mode 2 Description No effect consumes less power than ...

Owner's Manual
Page 54
...while the remaining sections provide sound and power management options. If the AV source is a Game Control, select GAME and refer to "4.1.4 Set the Panel to Recognize a Game Console" for more information. 4.1.1 AV Source through the Remote Control Follow the directions below to disappear....SPORT GAME Standard Description automatically adjusts the image quality for the brightness level of the viewing area (shared by external input and TV input sources) allows customizing settings as desired. 4.1 Choose an AV Option (Video, Game, etc.) Similar to the purpose for each input source) 3...
...while the remaining sections provide sound and power management options. If the AV source is a Game Control, select GAME and refer to "4.1.4 Set the Panel to Recognize a Game Console" for more information. 4.1.1 AV Source through the Remote Control Follow the directions below to disappear....SPORT GAME Standard Description automatically adjusts the image quality for the brightness level of the viewing area (shared by external input and TV input sources) allows customizing settings as desired. 4.1 Choose an AV Option (Video, Game, etc.) Similar to the purpose for each input source) 3...


