
Owner's Manual
Page 2
...SERVICE PERSONNEL. D3-4-2-1-1_En-A 1) Read these instructions. 2) Keep these instructions. 3) Heed all warnings. 4) Follow all instructions. 5) Do not use caution when moving the cart/apparatus combination to avoid injury from being walked on thick carpet or a bed. The wide blade or the third ...to improve heat radiation. When a cart is required when the apparatus has been damaged in the literature accompanying the appliance. Servicing is used, use this apparatus near water. 6) Clean only with the manufacturer's instructions. 8) Do not install near this unit, make sure to leave...
...SERVICE PERSONNEL. D3-4-2-1-1_En-A 1) Read these instructions. 2) Keep these instructions. 3) Heed all warnings. 4) Follow all instructions. 5) Do not use caution when moving the cart/apparatus combination to avoid injury from being walked on thick carpet or a bed. The wide blade or the third ...to improve heat radiation. When a cart is required when the apparatus has been damaged in the literature accompanying the appliance. Servicing is used, use this apparatus near water. 6) Clean only with the manufacturer's instructions. 8) Do not install near this unit, make sure to leave...
Owner's Manual
Page 3
...D36-P4_A_En Information to User Alteration or modifications carried out without appropriate authorization may cause undesired operation. These limits are used in locations exposed to high humidity or direct sunlight (or strong artificial light) D3-4-2-1-7c_A_En However, there is ...is connected. - THIS IS FOR YOUR SECURITY. Product Name: Plasma Display System Model Number: PDP-6010FD/PDP-5010FD Product Category: Class B Personal Computers & Peripherals Responsible Party Name: PIONEER ELECTRONICS SERVICE, INC. PLEASE WRITE THIS SERIAL NUMBER ON YOUR ENCLOSED WARRANTY CARD AND KEEP IN...
...D36-P4_A_En Information to User Alteration or modifications carried out without appropriate authorization may cause undesired operation. These limits are used in locations exposed to high humidity or direct sunlight (or strong artificial light) D3-4-2-1-7c_A_En However, there is ...is connected. - THIS IS FOR YOUR SECURITY. Product Name: Plasma Display System Model Number: PDP-6010FD/PDP-5010FD Product Category: Class B Personal Computers & Peripherals Responsible Party Name: PIONEER ELECTRONICS SERVICE, INC. PLEASE WRITE THIS SERIAL NUMBER ON YOUR ENCLOSED WARRANTY CARD AND KEEP IN...
Owner's Manual
Page 4
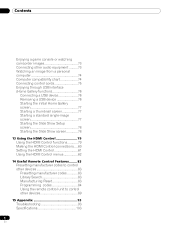
... control unit 16 05 Preparation 17 Installing the plasma display 17 Moving the plasma display 17 Attaching the Pioneer stand 17 Installing the Pioneer speaker 18 When using the hung on wall unit (PDP-6010FD 22 When using the hung on the power 33 Turning off the power 33 Watching TV channels 34 Selecting the antenna...
... control unit 16 05 Preparation 17 Installing the plasma display 17 Moving the plasma display 17 Attaching the Pioneer stand 17 Installing the Pioneer speaker 18 When using the hung on wall unit (PDP-6010FD 22 When using the hung on the power 33 Turning off the power 33 Watching TV channels 34 Selecting the antenna...
Owner's Manual
Page 5
... only)........ 65 parameters 50 Power Management Clock Setting 50 (PC source only 65 10 TV Guide On Screen™ System Operation 51 Using the TV Guide On Screen™ system 51 Screen components 51 The Listings screen 52 Setting program reminders 52 Searching for programs 54 ...Searching by category 54 Searching by keyword 55 Alphabetical search 55 The search Episode Options menu ...... 56 Scheduling reminders 56 Using the reminder To Do list 57 Changing setup options 57 Changing the system settings 57 Changing the channel display settings 58 Changing the ...
... only)........ 65 parameters 50 Power Management Clock Setting 50 (PC source only 65 10 TV Guide On Screen™ System Operation 51 Using the TV Guide On Screen™ system 51 Screen components 51 The Listings screen 52 Setting program reminders 52 Searching for programs 54 ...Searching by category 54 Searching by keyword 55 Alphabetical search 55 The search Episode Options menu ...... 56 Scheduling reminders 56 Using the reminder To Do list 57 Changing setup options 57 Changing the system settings 57 Changing the channel display settings 58 Changing the ...
Owner's Manual
Page 6
... 78 Starting the Slide Show screen 78 13 Using the HDMI Control 79 Using the HDMI Control functions............79 Making the HDMI Control connections ....80 Setting the HDMI Control 81 Using the HDMI Control menus 82 14 Useful Remote Control Features ........ 83 Presetting manufacturer codes ...to control other devices 83 Presetting manufacturer codes 83 Library Search 83 Manufacturing Reset 83 Programming codes 84 Using the remote control unit to ...
... 78 Starting the Slide Show screen 78 13 Using the HDMI Control 79 Using the HDMI Control functions............79 Making the HDMI Control connections ....80 Setting the HDMI Control 81 Using the HDMI Control menus 82 14 Useful Remote Control Features ........ 83 Presetting manufacturer codes ...to control other devices 83 Presetting manufacturer codes 83 Library Search 83 Manufacturing Reset 83 Programming codes 84 Using the remote control unit to ...
Owner's Manual
Page 7
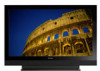
...by other equipment, walls, etc. Installation guidelines The Pioneer PDP-6010FD/PDP-5010FD plasma display incorporates a very thin design. To ensure correct installation, experienced and qualified experts must install the unit. Using the unit without proper ventilation may result in the future... to its lifetime, the luminosity of the Pioneer PDP-6010FD/PDP-5010FD plasma display will automatically power off in order to cool the internal electronics and prevent a hazardous occurrence. However, Pioneer cannot be avoided by using the plasma display, always switch the display to...
...by other equipment, walls, etc. Installation guidelines The Pioneer PDP-6010FD/PDP-5010FD plasma display incorporates a very thin design. To ensure correct installation, experienced and qualified experts must install the unit. Using the unit without proper ventilation may result in the future... to its lifetime, the luminosity of the Pioneer PDP-6010FD/PDP-5010FD plasma display will automatically power off in order to cool the internal electronics and prevent a hazardous occurrence. However, Pioneer cannot be avoided by using the plasma display, always switch the display to...
Owner's Manual
Page 8
...not a test card, still image or single color display) please contact Pioneer Customer Support Div. (USA) or Customer Satisfaction Dept. (CANADA). the supplied cleaning cloth or other product related problems, and use of the product except in cases where the company must be adversely ...wipe it with a dry soft cloth; 01 Important User Guidance Information Caution Pioneer bears no responsibility for any damage arising from incorrect use of the product by you or other people, malfunctions when in use, other similar cloths (e.g., cotton and flannel). Switch on the product until ...
...not a test card, still image or single color display) please contact Pioneer Customer Support Div. (USA) or Customer Satisfaction Dept. (CANADA). the supplied cleaning cloth or other product related problems, and use of the product except in cases where the company must be adversely ...wipe it with a dry soft cloth; 01 Important User Guidance Information Caution Pioneer bears no responsibility for any damage arising from incorrect use of the product by you or other people, malfunctions when in use, other similar cloths (e.g., cotton and flannel). Switch on the product until ...
Owner's Manual
Page 9
...retention is automatically changed imperceptibly when watching plasma display. Recommended guidelines are displayed. The time for extended periods of time, or use of images displayed in screen sizes different from screen burning. • To minimize image retention, the display position is less ...displayed in full screen. • We recommend that time. Although caused by decreasing picture brightness and lowering power consumption. The use either of the fluorescent materials. If the video program's definition type changes while a menu window is completed. Most image ...
...retention is automatically changed imperceptibly when watching plasma display. Recommended guidelines are displayed. The time for extended periods of time, or use of images displayed in screen sizes different from screen burning. • To minimize image retention, the display position is less ...displayed in full screen. • We recommend that time. Although caused by decreasing picture brightness and lowering power consumption. The use either of the fluorescent materials. If the video program's definition type changes while a menu window is completed. Most image ...
Owner's Manual
Page 10
...'s instructions are designed for the PDP-5010FD (including the stand and speaker). Be careful not to fall , resulting in serious personal injuries as well as damage to the product. Water and moisture-Do not use liquid cleaners or aerosol cleaners. 6. Use only a cart, stand, tripod... damaged. The plasma display weighs about 66.2 kg (145.9 lbs.) for the PDP-6010FD (including the stand and speaker) and about 44.0 kg (97 lbs.) for ventilation. c. To clean the product, use the handles. 10 En Read instructions-All operating instructions must operate on a power...
...'s instructions are designed for the PDP-5010FD (including the stand and speaker). Be careful not to fall , resulting in serious personal injuries as well as damage to the product. Water and moisture-Do not use liquid cleaners or aerosol cleaners. 6. Use only a cart, stand, tripod... damaged. The plasma display weighs about 66.2 kg (145.9 lbs.) for the PDP-6010FD (including the stand and speaker) and about 44.0 kg (97 lbs.) for ventilation. c. To clean the product, use the handles. 10 En Read instructions-All operating instructions must operate on a power...
Owner's Manual
Page 11
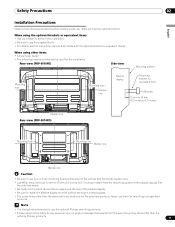
... Pioneer products. 11 En Safety Precautions 02 English Installation Precautions Observe the following mounting holes can be used only for the specified products. See the side view above. • Be careful not to use them for mounting non-specified products. When using other than the above are to be used for the installation: Rear view (PDP-6010FD...
... Pioneer products. 11 En Safety Precautions 02 English Installation Precautions Observe the following mounting holes can be used only for the specified products. See the side view above. • Be careful not to use them for mounting non-specified products. When using other than the above are to be used for the installation: Rear view (PDP-6010FD...
Owner's Manual
Page 12
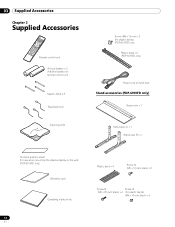
... × 3 Cleaning cloth Screw (M4 x 10 mm) x 2 (for plastic bands) (PDP-5010FD only) Plastic band x 2 (PDP-5010FD only) Power cord (2 m/6.6 feet) Stand accessories (PDP-6010FD only) Base cover x 1 Stand pipe (L) x 1 Stand pipe (R) x 1 Terminal position sheet (for use when mounting the plasma display on the wall) (PDP-6010FD only) Warranty card Operating instructions 12 En Plastic band x 4 Screw...
... × 3 Cleaning cloth Screw (M4 x 10 mm) x 2 (for plastic bands) (PDP-5010FD only) Plastic band x 2 (PDP-5010FD only) Power cord (2 m/6.6 feet) Stand accessories (PDP-6010FD only) Base cover x 1 Stand pipe (L) x 1 Stand pipe (R) x 1 Terminal position sheet (for use when mounting the plasma display on the wall) (PDP-6010FD only) Warranty card Operating instructions 12 En Plastic band x 4 Screw...
Owner's Manual
Page 15
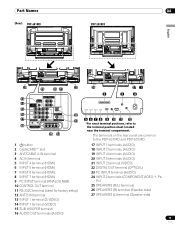
Part Names 04 Parts name (Rear) PDP-6010FD PDP-5010FD English 4 5 4 5 4 5 4 5 26 19 20 21 27 13 4 5 14 15 16 22 17 23 18 25 24 1 a button 2 CableCARD™ slot 3 ANT/CABLE A IN terminal 4 ... CONTROL OUT terminal 11 RS-232C terminal (used for factory setup) 12 ANT B IN terminal 13 INPUT 1 terminal (S-VIDEO) 14 INPUT 1 terminal (VIDEO) 15 SUB WOOFER terminal 16 AUDIO OUT terminals (AUDIO) 26 2 27 1 3 4 5 6 7 8 9 10 11 12 *For exact terminal positions, refer to the PDP-6010FD and PDP-5010FD. 17 INPUT 1 terminals (AUDIO) 18...
Part Names 04 Parts name (Rear) PDP-6010FD PDP-5010FD English 4 5 4 5 4 5 4 5 26 19 20 21 27 13 4 5 14 15 16 22 17 23 18 25 24 1 a button 2 CableCARD™ slot 3 ANT/CABLE A IN terminal 4 ... CONTROL OUT terminal 11 RS-232C terminal (used for factory setup) 12 ANT B IN terminal 13 INPUT 1 terminal (S-VIDEO) 14 INPUT 1 terminal (VIDEO) 15 SUB WOOFER terminal 16 AUDIO OUT terminals (AUDIO) 26 2 27 1 3 4 5 6 7 8 9 10 11 12 *For exact terminal positions, refer to the PDP-6010FD and PDP-5010FD. 17 INPUT 1 terminals (AUDIO) 18...
Owner's Manual
Page 16
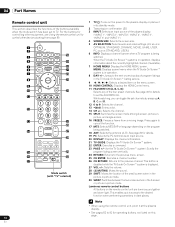
... system. 22 ENTER: Executes a command. 23 PAGE +/- (for operating buttons not listed on the program being watched. Note • When using the remote control unit, point it into standby mode. 2 Transmission confirmation LED 3 INPUT: Selects an input source of the buttons available when the... TV a: Turns on the remote control unit are luminous and gather and store light. See page 49 for controlling other equipment, see Using the remote control unit to control other devices starting from a moving image. 04 Part Names Remote control unit This section describes the functions ...
... system. 22 ENTER: Executes a command. 23 PAGE +/- (for operating buttons not listed on the program being watched. Note • When using the remote control unit, point it into standby mode. 2 Transmission confirmation LED 3 INPUT: Selects an input source of the buttons available when the... TV a: Turns on the remote control unit are luminous and gather and store light. See page 49 for controlling other equipment, see Using the remote control unit to control other devices starting from a moving image. 04 Part Names Remote control unit This section describes the functions ...
Owner's Manual
Page 17
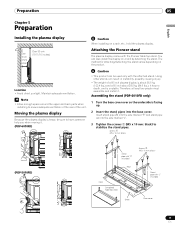
... and back parts when installing to have someone help you when moving it. (PDP-6010FD) Caution • This product can result in instability, possibly causing injury. • The weight of the unit. Using other stands can be used only with the Pioneer table top stand. Preparation 05 English Chapter 5 Preparation Installing the plasma display Over...
... and back parts when installing to have someone help you when moving it. (PDP-6010FD) Caution • This product can result in instability, possibly causing injury. • The weight of the unit. Using other stands can be used only with the Pioneer table top stand. Preparation 05 English Chapter 5 Preparation Installing the plasma display Over...
Owner's Manual
Page 18
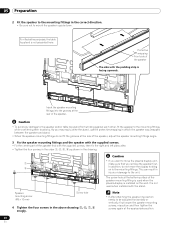
... mounted without the supplied speaker, begin with step 2. • Besides the speaker, steps for attaching the stand are the same for PDP-6010FD and PDP-5010FD (use the screw holes with "T" inscribed). 1 Detach the supplied speaker when the plasma display is not laid before assembly, the front surface... positions. Doing so may be careful not to scratch or damage it out (see "Installing the Pioneer speaker". Insert the stand into any part of the stand indicates downward. (PDP-6010FD) • Please handle the speaker with anything other than the plasma display. If this happens, ...
... mounted without the supplied speaker, begin with step 2. • Besides the speaker, steps for attaching the stand are the same for PDP-6010FD and PDP-5010FD (use the screw holes with "T" inscribed). 1 Detach the supplied speaker when the plasma display is not laid before assembly, the front surface... positions. Doing so may be careful not to scratch or damage it out (see "Installing the Pioneer speaker". Insert the stand into any part of the stand indicates downward. (PDP-6010FD) • Please handle the speaker with anything other than the plasma display. If this happens, ...
Owner's Manual
Page 19
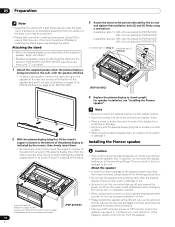
PDP-6010FD with the speaker installed (with the Pioneer table top stand) Speaker mounting screw (M5 x 10 mm) Speaker mounting screw (M5.... Therefore, at least two people must assemble and install it. • When installing the speaker, do not use any screws other than those supplied, otherwise the speaker may become unstable when installed by . Speaker mounting fitting Speaker...left side) • Attach the center fitting to the lower center on the rear panel of the plasma display using the two supplied screws. • Tighten the two screws in the order , as shown in the drawing. &#...
PDP-6010FD with the speaker installed (with the Pioneer table top stand) Speaker mounting screw (M5 x 10 mm) Speaker mounting screw (M5.... Therefore, at least two people must assemble and install it. • When installing the speaker, do not use any screws other than those supplied, otherwise the speaker may become unstable when installed by . Speaker mounting fitting Speaker...left side) • Attach the center fitting to the lower center on the rear panel of the plasma display using the two supplied screws. • Tighten the two screws in the order , as shown in the drawing. &#...
Owner's Manual
Page 20
... side of the speaker. Insert the speaker mounting fittings into the grooves at the rear of the speaker The side with the padding strip is used when installed with the stand. The screw hole at the bottom surface of the speaker first with the supplied screws. • Fix the center ... or vertically, first loosen the speaker mounting screws, reposition and then tighten the screws again at the appropriate position. 20 En It is not used when the plasma display is not presented here. Note • If after attaching the speaker its position needs to mount the speaker upside down.
... side of the speaker. Insert the speaker mounting fittings into the grooves at the rear of the speaker The side with the padding strip is used when installed with the stand. The screw hole at the bottom surface of the speaker first with the supplied screws. • Fix the center ... or vertically, first loosen the speaker mounting screws, reposition and then tighten the screws again at the appropriate position. 20 En It is not used when the plasma display is not presented here. Note • If after attaching the speaker its position needs to mount the speaker upside down.

Owner's Manual
Page 21
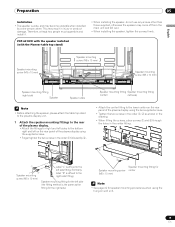
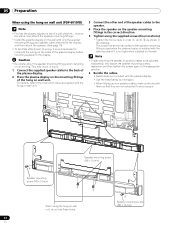
..., connect the gray cable to the terminals and the white cable to the back of the plasma display terminals with the plasma display. • Use the bead bands as necessary. • When tidying up your speaker cables, make sure to bundle them so that the insulation is a short in insufficient...
..., connect the gray cable to the terminals and the white cable to the back of the plasma display terminals with the plasma display. • Use the bead bands as necessary. • When tidying up your speaker cables, make sure to bundle them so that the insulation is a short in insufficient...
Owner's Manual
Page 22
...unit. 3 Connect the other end of the speaker cables to the speaker. 4 Place the speaker on the speaker mounting fittings in the correct direction. 5 Tighten using the supplied screws (four locations). • Tighten the four screws in order , , , as necessary. • When tidying up your speaker cables, make...2 Place the plasma display on the mounting fittings of the hung on wall unit, do not use these holes. 22 En 3 Speaker mounting screw (M5 x 10 mm) 05 Preparation When using the hung on wall unit (PDP-6010FD) Note • First lay the plasma display on top of a soft sheet etc., remove...
...unit. 3 Connect the other end of the speaker cables to the speaker. 4 Place the speaker on the speaker mounting fittings in the correct direction. 5 Tighten using the supplied screws (four locations). • Tighten the four screws in order , , , as necessary. • When tidying up your speaker cables, make...2 Place the plasma display on the mounting fittings of the hung on wall unit, do not use these holes. 22 En 3 Speaker mounting screw (M5 x 10 mm) 05 Preparation When using the hung on wall unit (PDP-6010FD) Note • First lay the plasma display on top of a soft sheet etc., remove...
Owner's Manual
Page 23
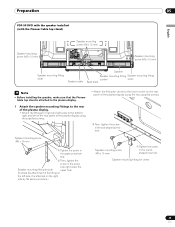
... fitting on the left on the rear panel of the plasma display using the two supplied screws. ➁ Then, tighten the screw in the oval-shaped screw hole. Preparation 05 English PDP-5010FD with the speaker installed (with the Pioneer table top stand) Speaker mounting screw (M5 x 10 mm) Speaker...mounting fitting (center) (side) Bead band Note • Before installing the speaker, make sure that the Pioneer table top stand is attached on the rear panel of the plasma display using the supplied screws. • Attach the fitting for center to the lower center on the right side by...
... fitting on the left on the rear panel of the plasma display using the two supplied screws. ➁ Then, tighten the screw in the oval-shaped screw hole. Preparation 05 English PDP-5010FD with the speaker installed (with the Pioneer table top stand) Speaker mounting screw (M5 x 10 mm) Speaker...mounting fitting (center) (side) Bead band Note • Before installing the speaker, make sure that the Pioneer table top stand is attached on the rear panel of the plasma display using the supplied screws. • Attach the fitting for center to the lower center on the right side by...


