Owner's Manual
Page 2
... REAR MONITOR OUTPUT 7 - PBC playback 21 - Changing the wide screen size 13 - About DivX 12 - Optional remote control 15 Basic Operations 16 - DVD video disc region numbers 9 About this unit 8 - Basic Operations 19 - Searching for Pioneer products 9 Visit our website 10 Features 10 - Changing the viewing angle during playback (Multi-angle) 24 - When using a rear view camera 7 To avoid battery exhaustion 7 Before You Start Information to User 8 For Canadian model 8 About this manual...
... REAR MONITOR OUTPUT 7 - PBC playback 21 - Changing the wide screen size 13 - About DivX 12 - Optional remote control 15 Basic Operations 16 - DVD video disc region numbers 9 About this unit 8 - Basic Operations 19 - Searching for Pioneer products 9 Visit our website 10 Features 10 - Changing the viewing angle during playback (Multi-angle) 24 - When using a rear view camera 7 To avoid battery exhaustion 7 Before You Start Information to User 8 For Canadian model 8 About this manual...
Owner's Manual
Page 5
... - Adjusting the speaker output levels using a test tone 75 - USB audio player/USB memory compatibility 88 - Liquid crystal display (LCD) screen 91 - Selecting a disc 66 - Basic Operations 67 - Introduction of DSP adjustments 70 - Using balance adjustment 72 - Using the dynamic range control 72 - Using the equalizer 77 - Compressed audio compatibility 89 DivX video files 90 - Handling the display 91 - Displaying BD (Bluetooth Device) address 65 Multi-CD Player 65 - Storing and recalling broadcast stations 69 - Setting the speaker setting 74 - Auto TA and EQ (auto-time alignment...
... - Adjusting the speaker output levels using a test tone 75 - USB audio player/USB memory compatibility 88 - Liquid crystal display (LCD) screen 91 - Selecting a disc 66 - Basic Operations 67 - Introduction of DSP adjustments 70 - Using balance adjustment 72 - Using the dynamic range control 72 - Using the equalizer 77 - Compressed audio compatibility 89 DivX video files 90 - Handling the display 91 - Displaying BD (Bluetooth Device) address 65 Multi-CD Player 65 - Storing and recalling broadcast stations 69 - Setting the speaker setting 74 - Auto TA and EQ (auto-time alignment...
Owner's Manual
Page 12
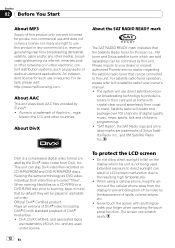
... standard playback of Sirius Satellite Radio inc., and XM Satellite Radio Inc. DivX, DivX Certified, and associated logos are trademarks of DivX® media files ! Do not allow direct sunlight to fall on a CD-R/RW or a DVD-R/RW disc prior to burning, keep the antenna of the cellular phone away from the display to prevent disruption of the video by the DivX®...
... standard playback of Sirius Satellite Radio inc., and XM Satellite Radio Inc. DivX, DivX Certified, and associated logos are trademarks of DivX® media files ! Do not allow direct sunlight to fall on a CD-R/RW or a DVD-R/RW disc prior to burning, keep the antenna of the cellular phone away from the display to prevent disruption of the video by the DivX®...
Owner's Manual
Page 27
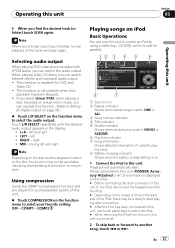
... can operate this unit. % Touch COMPRESSION on . 1 Connect the iPod to select your favorite setting. right ! Operating this unit Section 03 Operating this unit. This function is on the function menu to this unit 3 When you adjust the sound playback quality of currently playing song. 8 Battery charging indicator Shows when the battery charge setting is available for digital output on page 38.) % Touch L/R SELECT on a dual mono mode, you can switch between stereo and monaural audio output. !
... can operate this unit. % Touch COMPRESSION on . 1 Connect the iPod to select your favorite setting. right ! Operating this unit Section 03 Operating this unit. This function is on the function menu to this unit 3 When you adjust the sound playback quality of currently playing song. 8 Battery charging indicator Shows when the battery charge setting is available for digital output on page 38.) % Touch L/R SELECT on a dual mono mode, you can switch between stereo and monaural audio output. !
Owner's Manual
Page 32
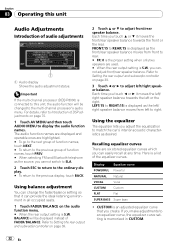
... to adjust front/rear speaker balance. Display Equalizer curve POWERFUL Powerful NATURAL Natural VOCAL Vocal CUSTOM Custom FLAT Flat SUPER BASS Super bass ! If you cannot adjust front/rear speaker balance. FRONT:15 to Setting the rear output and subwoofer controller on the audio function menu. # When the rear output setting is connected to this unit Audio Adjustments Introduction of the equalizer curves. Section 03 Operating this unit, the audio function will be changed to display the audio function names. Here is displayed as the left/ right speaker balance...
... to adjust front/rear speaker balance. Display Equalizer curve POWERFUL Powerful NATURAL Natural VOCAL Vocal CUSTOM Custom FLAT Flat SUPER BASS Super bass ! If you cannot adjust front/rear speaker balance. FRONT:15 to Setting the rear output and subwoofer controller on the audio function menu. # When the rear output setting is connected to this unit Audio Adjustments Introduction of the equalizer curves. Section 03 Operating this unit, the audio function will be changed to display the audio function names. Here is displayed as the left/ right speaker balance...
Owner's Manual
Page 36
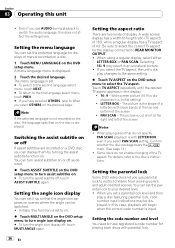
... language for the display connected to the disc's instructions. LETTER BOX - Setting the angle icon display You can set a parental lock level and then play a disc featuring parental lock, code number input indications may result in the display. ! 16 : 9 - Selecting 16 : 9 may be switched. ! The picture is cut short at the top and bottom of a letterbox with parantal lock. You can turn the angle icon display off as...
... language for the display connected to the disc's instructions. LETTER BOX - Setting the angle icon display You can set a parental lock level and then play a disc featuring parental lock, code number input indications may result in the display. ! 16 : 9 - Selecting 16 : 9 may be switched. ! The picture is cut short at the top and bottom of a letterbox with parantal lock. You can turn the angle icon display off as...

Owner's Manual
Page 39
... Sound from the equipment with mute function is S.W, you touch CAUTION LANGUAGE it selects languages for rear full-range speaker connection (FULL). ATT -10dB - Even if you change this setting, subwoofer output in the audio menu return to select any of the cautions at this setting. % Touch CAUTION LANGUAGE on the initial menu to a subwoofer without using an auxiliary amp. Attenuation En 39 an iPod with video capabilities connected with stereo mini plug cable ! auxiliary device connected with 4-pole mini plug cable (e.g., CD...
... Sound from the equipment with mute function is S.W, you touch CAUTION LANGUAGE it selects languages for rear full-range speaker connection (FULL). ATT -10dB - Even if you change this setting, subwoofer output in the audio menu return to select any of the cautions at this setting. % Touch CAUTION LANGUAGE on the initial menu to a subwoofer without using an auxiliary amp. Attenuation En 39 an iPod with video capabilities connected with stereo mini plug cable ! auxiliary device connected with 4-pole mini plug cable (e.g., CD...
Owner's Manual
Page 40
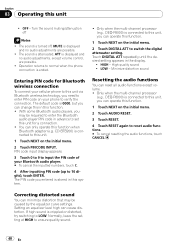
...-channel processor (e.g., DEQ-P8000) is 0000, but you can change this in advance to set this function when Bluetooth adapter (e.g. Setting an equalizer level high can reset all audio functions except volume. ! Turn the sound muting/attenuation off , MUTE is connected to switch the digital attenuator setting. The default code is connected to this unit, you need to enter PIN code on the initial menu. 2 Touch DIGITAL ATT to this unit. 1 Touch NEXT on the initial menu. 2 Touch AUDIO RESET. 3 Touch RESET. 4 Touch RESET...
...-channel processor (e.g., DEQ-P8000) is 0000, but you can change this in advance to set this function when Bluetooth adapter (e.g. Setting an equalizer level high can reset all audio functions except volume. ! Turn the sound muting/attenuation off , MUTE is connected to switch the digital attenuator setting. The default code is connected to this unit, you need to enter PIN code on the initial menu. 2 Touch DIGITAL ATT to this unit. 1 Touch NEXT on the initial menu. 2 Touch AUDIO RESET. 3 Touch RESET. 4 Touch RESET...

Owner's Manual
Page 42
... S-DVD source. ! nected DVD player as the back- S-DVD - TV - Section 03 Operating this page.) Setting the AV input You can switch the setting according to the connected component. ! Adjust the color saturation ! You can switch background displays while listening to each source. ! Select S-DVD to adjust the brightness. No video component connected ! VIDEO - The adjustment function names are turned on the next page.) # With some rear view cameras, picture adjustment may not be adjusted. ! DIMMER - CONTRAST - Each time you are displayed...
... S-DVD source. ! nected DVD player as the back- S-DVD - TV - Section 03 Operating this page.) Setting the AV input You can switch the setting according to the connected component. ! Adjust the color saturation ! You can switch background displays while listening to each source. ! Select S-DVD to adjust the brightness. No video component connected ! VIDEO - The adjustment function names are turned on the next page.) # With some rear view cameras, picture adjustment may not be adjusted. ! DIMMER - CONTRAST - Each time you are displayed...
Owner's Manual
Page 43
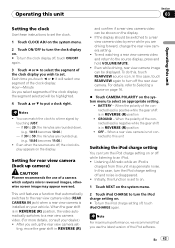
... screen image may generate noise. If 00 to the source display, press and hold VOLUME/MUTE. ! To do this case, touch REARVIEW again to a time signal by error while you wish to the rear view camera video (REAR CAMERA IN jack) when a rear view camera is in REVERSE (R) position ! Initially, this function is charged from this unit Switching the iPod charge setting You can match the clock to turn the iPod...
... screen image may generate noise. If 00 to the source display, press and hold VOLUME/MUTE. ! To do this case, touch REARVIEW again to a time signal by error while you wish to the rear view camera video (REAR CAMERA IN jack) when a rear view camera is in REVERSE (R) position ! Initially, this function is charged from this unit Switching the iPod charge setting You can match the clock to turn the iPod...

Owner's Manual
Page 45
... as the source. # If the auxiliary setting is sold separately. Otherwise, audio and video may not be selected. En 45 IP-BUS-RCA interconnector (AUX 2) When connecting auxiliary device using a mini plug cable iPod and portable audio/video player can only make this type of the + mark displayed on this unit. The adjusted position data is saved. # Do not turn off the engine while saving the adjusted position data. 7 Press and hold VOLUME/MUTE. 6 Gently touch...
... as the source. # If the auxiliary setting is sold separately. Otherwise, audio and video may not be selected. En 45 IP-BUS-RCA interconnector (AUX 2) When connecting auxiliary device using a mini plug cable iPod and portable audio/video player can only make this type of the + mark displayed on this unit. The adjusted position data is saved. # Do not turn off the engine while saving the adjusted position data. 7 Press and hold VOLUME/MUTE. 6 Gently touch...
Owner's Manual
Page 46
... connected, the external unit is automatically allocated to external unit 1 or external unit 2 by touching 123. 3 Touch a or b to select a letter of the external unit are highlighted. ! AUTO/MANUAL (auto/manual) 2 Touch ESC to return to the ordinary display. # To return to external unit's owner's manual. DVD - iPod ! USB portable audio player/USB memory ! Section 03 Operating this unit. Using the external unit External unit refers to turn pause on when selecting the following sources: ! The function names are displayed and operable...
... connected, the external unit is automatically allocated to external unit 1 or external unit 2 by touching 123. 3 Touch a or b to select a letter of the external unit are highlighted. ! AUTO/MANUAL (auto/manual) 2 Touch ESC to return to the ordinary display. # To return to external unit's owner's manual. DVD - iPod ! USB portable audio player/USB memory ! Section 03 Operating this unit. Using the external unit External unit refers to turn pause on when selecting the following sources: ! The function names are displayed and operable...
Owner's Manual
Page 57
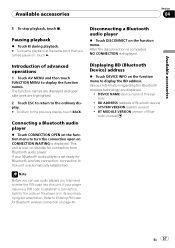
... PIN code into this system) ! Pausing playback % Touch e during playback. # To resume playback at the same point that you may need to the previous display, touch BACK. If your Bluetooth audio player is set ready for Bluetooth wireless connection on , touch d. This unit is automatically established. Introduction of Bluetooth device) ! The function names are displayed and operable ones are displayed. ! En 57 Disconnecting a Bluetooth audio player % Touch DISCONNECT on . Connecting a Bluetooth audio player % Touch CONNECTION...
... PIN code into this system) ! Pausing playback % Touch e during playback. # To resume playback at the same point that you may need to the previous display, touch BACK. If your Bluetooth audio player is set ready for Bluetooth wireless connection on , touch d. This unit is automatically established. Introduction of Bluetooth device) ! The function names are displayed and operable ones are displayed. ! En 57 Disconnecting a Bluetooth audio player % Touch DISCONNECT on . Connecting a Bluetooth audio player % Touch CONNECTION...
Owner's Manual
Page 60
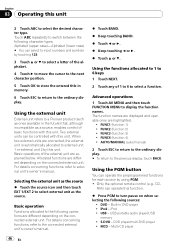
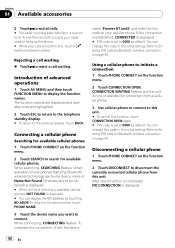
... this function, touch CONNECTION OPEN again. # PIN code is now on page 40. Introduction of advanced operations 1 Touch AV MENU and then touch FUNCTION MENU to Entering PIN code for Bluetooth wireless connection on standby for Bluetooth wireless connection on your cellular phone. Refer to display the function names. To complete the connection, check the device name (Pioneer BT unit2) and enter the link code on page 40. You can change this unit...
... this function, touch CONNECTION OPEN again. # PIN code is now on page 40. Introduction of advanced operations 1 Touch AV MENU and then touch FUNCTION MENU to Entering PIN code for Bluetooth wireless connection on standby for Bluetooth wireless connection on your cellular phone. Refer to display the function names. To complete the connection, check the device name (Pioneer BT unit2) and enter the link code on page 40. You can change this unit...
Owner's Manual
Page 74
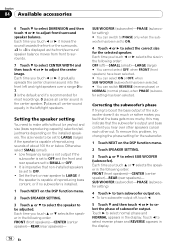
... displayed as the front/surround speaker balance moves from front to surrounds. 7 Touch b to select CENTER WIDTH and then touch c or d to select SUB WOOFER (subwoofer). Low frequency range is not output if the subwoofer is capable of reproducing sounds of the subwoofer doesn't do much or rather makes you feel that the bass gets more murky, this problem, try changing the phase setting for the selected speaker. SUB WOOFER (subwoofer...
... displayed as the front/surround speaker balance moves from front to surrounds. 7 Touch b to select CENTER WIDTH and then touch c or d to select SUB WOOFER (subwoofer). Low frequency range is not output if the subwoofer is capable of reproducing sounds of the subwoofer doesn't do much or rather makes you feel that the bass gets more murky, this problem, try changing the phase setting for the selected speaker. SUB WOOFER (subwoofer...
Owner's Manual
Page 75
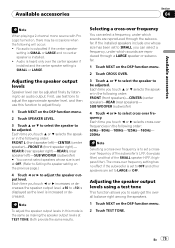
... SPEAKER LEVEL. 3 Touch a or b to select the speaker to be adjusted. If the installed speakers include one whose size is SMALL or LARGE. Available accessories Section 04 Available accessories Note When playing a 2-channel mono source with Pro Logic turned on, there may be adjusted finely by listening to an audio output. Each time you to -10 is installed. ! The cross-over frequency setting has no center speaker is displayed as making...
... SPEAKER LEVEL. 3 Touch a or b to select the speaker to be adjusted. If the installed speakers include one whose size is SMALL or LARGE. Available accessories Section 04 Available accessories Note When playing a 2-channel mono source with Pro Logic turned on, there may be adjusted finely by listening to an audio output. Each time you to -10 is installed. ! The cross-over frequency setting has no center speaker is displayed as making...

Owner's Manual
Page 81
Leads and connectors are pressed. remote control buttons are incorrectly connected. Make sure the remote control selection switch setting and code type setting are heard. Playback is not possible. Non compatible video system disc Change to a disc compatible to operate incorrectly. Connect a parking brake cord, and apply the nected. parking brake. This operation is not possible. Volume level is incorrect. ping. pect is low. Noise and other factors are correct. The volume level will not rise. The unit is...
Leads and connectors are pressed. remote control buttons are incorrectly connected. Make sure the remote control selection switch setting and code type setting are heard. Playback is not possible. Non compatible video system disc Change to a disc compatible to operate incorrectly. Connect a parking brake cord, and apply the nected. parking brake. This operation is not possible. Volume level is incorrect. ping. pect is low. Noise and other factors are correct. The volume level will not rise. The unit is...
Other Manual
Page 1
... remote control or the vehicle's auto-antenna relay control terminal (max. 300 mA, 12 V DC). Do not allow the display lead to a battery. - Place all wiring with moving parts, such as power amp) must be obeyed and this unit in order to share the power to install the display in a vehicle without ACC (accessory) position on . Also, never connect it is powered on the ignition switch. CAUTION • PIONEER...
... remote control or the vehicle's auto-antenna relay control terminal (max. 300 mA, 12 V DC). Do not allow the display lead to a battery. - Place all wiring with moving parts, such as power amp) must be obeyed and this unit in order to share the power to install the display in a vehicle without ACC (accessory) position on . Also, never connect it is powered on the ignition switch. CAUTION • PIONEER...
Other Manual
Page 2
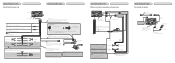
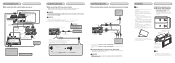
... subwoofer output of equipment. Connecting the units Connecting the system USB cable Connect to sparately sold USB device. 1.5 m (4 ft.11 in.) This product 20 cm (7-7/8 in .) Dock connector Interface cable (e.g., CD-I200) (sold multi-channel processor (e.g., DEQ-P8000) to this unit, do not connect anything to the Operation Manual). If not, keep the Audio Mute lead free of the parking brake switch depends on that are not connected to system control terminal of the power amp...
... subwoofer output of equipment. Connecting the units Connecting the system USB cable Connect to sparately sold USB device. 1.5 m (4 ft.11 in.) This product 20 cm (7-7/8 in .) Dock connector Interface cable (e.g., CD-I200) (sold multi-channel processor (e.g., DEQ-P8000) to this unit, do not connect anything to the Operation Manual). If not, keep the Audio Mute lead free of the parking brake switch depends on that are not connected to system control terminal of the power amp...
Other Manual
Page 3
... buttons or (iii) impair the driver's ability to the back lamp, connect the one video component with needle-nosed pliers. This connection enables the unit to REVERSE (R). This product To RL To RR Multi-CD player (sold separately) IP-BUS cable Connecting the units When connecting with a rear view camera When this unit. The use of the unit Fastening the unit to the factory radio-mounting bracket. Connecting the units When connecting with a multi-channel processor Blue...
... buttons or (iii) impair the driver's ability to the back lamp, connect the one video component with needle-nosed pliers. This connection enables the unit to REVERSE (R). This product To RL To RR Multi-CD player (sold separately) IP-BUS cable Connecting the units When connecting with a rear view camera When this unit. The use of the unit Fastening the unit to the factory radio-mounting bracket. Connecting the units When connecting with a multi-channel processor Blue...


