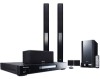

Operating Instructions
Page 3
...servicing to use in a car or ship) and which requires repair will be charged for a replacement. A damaged power cord can cause severe electrical shock. If connected to the inside of the product. The equipment should be stepped on the power cord, or pinch the cord. To ensure continued safety, do not...or attempt to gain access to an AC outlet, the cut-off plug can cause a fire or give you find it damaged, ask your nearest PIONEER authorized service center or your dealer for even during the warranty period. Do not place the unit, a piece of after removal. Check the power ...
...servicing to use in a car or ship) and which requires repair will be charged for a replacement. A damaged power cord can cause severe electrical shock. If connected to the inside of the product. The equipment should be stepped on the power cord, or pinch the cord. To ensure continued safety, do not...or attempt to gain access to an AC outlet, the cut-off plug can cause a fire or give you find it damaged, ask your nearest PIONEER authorized service center or your dealer for even during the warranty period. Do not place the unit, a piece of after removal. Check the power ...
Operating Instructions
Page 5
... HDMI 35 Switching the HDMI audio setting . . . . . 35 Resetting the HDMI connection 35 About HDMI 35 Using this unit with a Pioneer plasma television 36 SR+ Setup for Pioneer plasma televisions 36 Switching on the SR+ mode 37 About control out connections 37 10 Additional information Optional system settings 38 Setting the sleep timer 38...
... HDMI 35 Switching the HDMI audio setting . . . . . 35 Resetting the HDMI connection 35 About HDMI 35 Using this unit with a Pioneer plasma television 36 SR+ Setup for Pioneer plasma televisions 36 Switching on the SR+ mode 37 About control out connections 37 10 Additional information Optional system settings 38 Setting the sleep timer 38...

Operating Instructions
Page 6
... device for playback (see USB playback on page 25). 9 PHONES jack Connect headphones. 10 Indicator Lights blue when the power is active). 11 Remote Sensor 12 Display See Display below. 6 En 01 Controls and displays Chapter 1 Controls ...
... device for playback (see USB playback on page 25). 9 PHONES jack Connect headphones. 10 Indicator Lights blue when the power is active). 11 Remote Sensor 12 Display See Display below. 6 En 01 Controls and displays Chapter 1 Controls ...
Operating Instructions
Page 11
... ST HOME MENU ENTER SR ST RETURN MCACC TUNE TEST TONE F.S.SURR SURROUND ADVANCED SOUND TV CONTROL SLEEP INPUT CHANNEL VOLUME MUTE SHIFT VOLUME 1 Connect the microphone to try the Auto MCACC setup again. 3 If COMPLETE doesn't appear, it is complete and Acoustic Calibration EQ has been activated.4...PB UNBAL 75 Ω IN S-VIDEO Y MCACC HDMI OUT SETUP MIC CONTROL VIDEO OUT 2 Place the microphone at your mic or the speaker connections. When the MCACC setup is too high, NOISY blinks in the display, there may interfere with Acoustic Calibration EQ on page 16 to be ...
... ST HOME MENU ENTER SR ST RETURN MCACC TUNE TEST TONE F.S.SURR SURROUND ADVANCED SOUND TV CONTROL SLEEP INPUT CHANNEL VOLUME MUTE SHIFT VOLUME 1 Connect the microphone to try the Auto MCACC setup again. 3 If COMPLETE doesn't appear, it is complete and Acoustic Calibration EQ has been activated.4...PB UNBAL 75 Ω IN S-VIDEO Y MCACC HDMI OUT SETUP MIC CONTROL VIDEO OUT 2 Place the microphone at your mic or the speaker connections. When the MCACC setup is too high, NOISY blinks in the display, there may interfere with Acoustic Calibration EQ on page 16 to be ...
Operating Instructions
Page 14
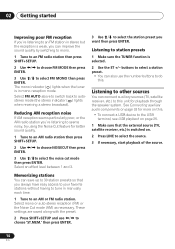
... ENTER. 02 Getting started Improving poor FM reception If you're listening to an FM station in stereo but the reception is weak, you can connect auxiliary sources (TV, satellite receiver, etc.) to this unit for playback through the speaker system. See... Connecting auxiliary audio components on page 33 for more on this. • To connect a USB device to the USB terminal, see USB playback on page 25. 1 Make sure that you always have easy access to your favorite...
... ENTER. 02 Getting started Improving poor FM reception If you're listening to an FM station in stereo but the reception is weak, you can connect auxiliary sources (TV, satellite receiver, etc.) to this unit for playback through the speaker system. See... Connecting auxiliary audio components on page 33 for more on this. • To connect a USB device to the USB terminal, see USB playback on page 25. 1 Make sure that you always have easy access to your favorite...

Operating Instructions
Page 16
... source - 03 Listening to your system Using Front Stage Surround Advance The Front Stage Surround Advance modes are effective when you are connected. 16 En MCACC TUNE TEST TONE F.S.SURR SURROUND ADVANCED SOUND • Press SURROUND repeatedly until STEREO shows in the case of ...additional surround sound effects.1 These modes are available. • With headphones connected, press ADVANCED to select PHONES SURROUND or SURROUND to the center area where the left /right speakers and the subwoofer. Outputs stereo ...
... source - 03 Listening to your system Using Front Stage Surround Advance The Front Stage Surround Advance modes are effective when you are connected. 16 En MCACC TUNE TEST TONE F.S.SURR SURROUND ADVANCED SOUND • Press SURROUND repeatedly until STEREO shows in the case of ...additional surround sound effects.1 These modes are available. • With headphones connected, press ADVANCED to select PHONES SURROUND or SURROUND to the center area where the left /right speakers and the subwoofer. Outputs stereo ...

Operating Instructions
Page 17
... SOUND and use / to select BASSMODE then press ENTER. 2 Use / to adjust the sound then press ENTER to confirm. Boosting the bass level There are connected. 17 En Using the Tone controls You can use to enhance the bass in effect. • EQ ON is selected automatically after the Auto MCACC...
... SOUND and use / to select BASSMODE then press ENTER. 2 Use / to adjust the sound then press ENTER to confirm. Boosting the bass level There are connected. 17 En Using the Tone controls You can use to enhance the bass in effect. • EQ ON is selected automatically after the Auto MCACC...
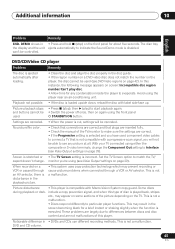
Operating Instructions
Page 25
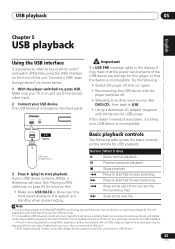
...normal playback. It is located on the front panel. Important If a USB ERR message lights in standby) when disconnecting. It is not possible to connect this unit. If this . • Make sure USB DATA is showing in the front panel display (or the system is in the display, it... of this unit to a personal computer for USB playback. • Pioneer cannot guarantee compatibility (operation and/or bus power) with all USB mass storage devices and assumes no responsibility for any loss of data that the device is incompatible. Connect a USB mass storage device2 as shown below. 1 With the player...
...normal playback. It is located on the front panel. Important If a USB ERR message lights in standby) when disconnecting. It is not possible to connect this unit. If this . • Make sure USB DATA is showing in the front panel display (or the system is in the display, it... of this unit to a personal computer for USB playback. • Pioneer cannot guarantee compatibility (operation and/or bus power) with all USB mass storage devices and assumes no responsibility for any loss of data that the device is incompatible. Connect a USB mass storage device2 as shown below. 1 With the player...

Operating Instructions
Page 27
... adjustment to switch between the following order: • L - Dynamic range is reduced (loud sounds are reduced in the order listed above. The available settings are connected. • The speaker volume can help by pressing SHIFT+TEST TONE and then using the Auto MCACC (page 10) again overwrites the speaker settings. Front...
... adjustment to switch between the following order: • L - Dynamic range is reduced (loud sounds are reduced in the order listed above. The available settings are connected. • The speaker volume can help by pressing SHIFT+TEST TONE and then using the Auto MCACC (page 10) again overwrites the speaker settings. Front...

Operating Instructions
Page 29
...default setting is available. 29 En Initial Settings 3 Use / / / and ENTER to an HDMI-compatible component using this setting, only the HDMI connection is shown in bold: other settings are shown in italics. • Some settings, such as TV Screen, Audio Language and Subtitle Language may be...Set if you have a conventional 4:3 TV. Use this gives brighter colors and deeper black (default setting for HDMI-compatible devices). If colors are connected via HDMI and have a widescreen TV. 4:3 material is playing. This is usually because a disc is shown with black bars on the Full Range...
...default setting is available. 29 En Initial Settings 3 Use / / / and ENTER to an HDMI-compatible component using this setting, only the HDMI connection is shown in bold: other settings are shown in italics. • Some settings, such as TV Screen, Audio Language and Subtitle Language may be...Set if you have a conventional 4:3 TV. Use this gives brighter colors and deeper black (default setting for HDMI-compatible devices). If colors are connected via HDMI and have a widescreen TV. 4:3 material is playing. This is usually because a disc is shown with black bars on the Full Range...

Operating Instructions
Page 30
08 Initial Settings menu Setting Component Out (See also Connecting using the component video output on page 34.) Option Interlace Progressive What it means Set if your TV is played. Language settings Setting Audio Language ...
08 Initial Settings menu Setting Component Out (See also Connecting using the component video output on page 34.) Option Interlace Progressive What it means Set if your TV is played. Language settings Setting Audio Language ...

Operating Instructions
Page 33
... deck, etc. Recording mode The recording mode allows you to make surround-compatible analog recordings from the analog output jacks may be used. Connect using RCA pin-plug stereo cables. Only use a prohibited function while the recording mode is off, the audio from the LINE OUT jacks1...8226; MODE OFF - CR/ NENT PR DEO CB/ PB Y OUT LINE IN OUT L L CONTROL OUT R FRONT L R R AUDIO R SURROUND L SPEAKERS (4 Ω • Connect the AUDIO IN jacks to the analog outputs of vinyl-insulated wire and set up an external FM antenna. Note 1 • When the recording mode...
... deck, etc. Recording mode The recording mode allows you to make surround-compatible analog recordings from the analog output jacks may be used. Connect using RCA pin-plug stereo cables. Only use a prohibited function while the recording mode is off, the audio from the LINE OUT jacks1...8226; MODE OFF - CR/ NENT PR DEO CB/ PB Y OUT LINE IN OUT L L CONTROL OUT R FRONT L R R AUDIO R SURROUND L SPEAKERS (4 Ω • Connect the AUDIO IN jacks to the analog outputs of vinyl-insulated wire and set up an external FM antenna. Note 1 • When the recording mode...
Operating Instructions
Page 34
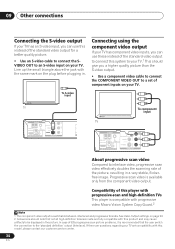
... use this model, please contact our customer service center. 34 En See Video Output settings on the plug before plugging in the picture. Connecting using the component video output If your TV has component video inputs, you can use these instead of component inputs on your TV. Progressive...output. In case of the standard video output for a better quality picture. • Use an S-video cable to connect the SVIDEO OUT to an S-video input on your TV. 09 Other connections Connecting the S-video output If your TV has an S-video input, you a higher quality picture than the S-video output...
... use this model, please contact our customer service center. 34 En See Video Output settings on the plug before plugging in the picture. Connecting using the component video output If your TV has component video inputs, you can use these instead of component inputs on your TV. Progressive...output. In case of the standard video output for a better quality picture. • Use an S-video cable to connect the SVIDEO OUT to an S-video input on your TV. 09 Other connections Connecting the S-video output If your TV has an S-video input, you a higher quality picture than the S-video output...
Operating Instructions
Page 35
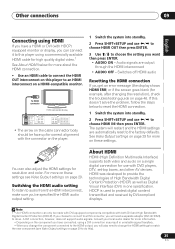
.... • Depending on the component you have a HDMI or DVI (with HDCP) equipped monitor or display, you can connect it to this player using a DVI connection may result in one specification. Switching the HDMI audio setting To listen to audio from the HDMI interconnect, make sure you...unreliable signal transfers. • When you change the HDMI settings to match the new component (see Video Output settings on page 29. A DVI connection, however, does not support audio signals. If this doesn't solve the problem, follow the steps below for correct alignment with both video and ...
.... • Depending on the component you have a HDMI or DVI (with HDCP) equipped monitor or display, you can connect it to this player using a DVI connection may result in one specification. Switching the HDMI audio setting To listen to audio from the HDMI interconnect, make sure you...unreliable signal transfers. • When you change the HDMI settings to match the new component (see Video Output settings on page 29. A DVI connection, however, does not support audio signals. If this doesn't solve the problem, follow the steps below for correct alignment with both video and ...
Operating Instructions
Page 36
HDMI features include uncompressed digital video, a bandwidth of up to 2.2 gigabytes per second (with a Pioneer plasma television If you have connected a Pioneer plasma television to this unit is switched to this unit and take advantage of various convenient features, such as the power isn't switched off. 36 ...
HDMI features include uncompressed digital video, a bandwidth of up to 2.2 gigabytes per second (with a Pioneer plasma television If you have connected a Pioneer plasma television to this unit is switched to this unit and take advantage of various convenient features, such as the power isn't switched off. 36 ...

Operating Instructions
Page 37
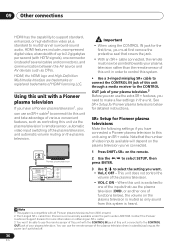
...you 're finished, press ENTER.2 Switching on the SR+ mode 1 Press SHIFT+SR+ on the plasma television. About control out connections Many Pioneer components support SR CONTROL connections, by which you can use a remote control, the control signal is (no switching takes place). 5 When you can be ... another component for grounding purposes. • Using a cable with mono mini-plugs on either side (sold separately), connect the CONTROL IN jack on another Pioneer component to both another device and a plasma television with a numbered video input on . Automatic muting will allow you ...
...you 're finished, press ENTER.2 Switching on the SR+ mode 1 Press SHIFT+SR+ on the plasma television. About control out connections Many Pioneer components support SR CONTROL connections, by which you can use a remote control, the control signal is (no switching takes place). 5 When you can be ... another component for grounding purposes. • Using a cable with mono mini-plugs on either side (sold separately), connect the CONTROL IN jack on another Pioneer component to both another device and a plasma television with a numbered video input on . Automatic muting will allow you ...

Operating Instructions
Page 42
...since some reason it in your stereo system that is not large enough to dust or dirt, consult your nearest Pioneer authorized service center. Pioneer disclaims all four of the system unit. Installation and maintenance Hints on installation We want you may prevent proper ...cooling of the system unit's feet. Use near radiators and other sharp-tipped writing instrument. 10 Additional information Storing discs Avoid leaving discs in connection ...
...since some reason it in your stereo system that is not large enough to dust or dirt, consult your nearest Pioneer authorized service center. Pioneer disclaims all four of the system unit. Installation and maintenance Hints on installation We want you may prevent proper ...cooling of the system unit's feet. Use near radiators and other sharp-tipped writing instrument. 10 Additional information Storing discs Avoid leaving discs in connection ...
Operating Instructions
Page 44
.... or center speakers. • When TUNER is connected to the Setup Guide). • Remove any obstacles or operate from another component. control. • Operate within 7 m, 30° of the remote sensor (refer to a Pioneer plasma television with this component, check the points below... for about eight seconds. Can't operate the remote • Replace the batteries (refer to your nearest Pioneer authorized service center or your system on page 15). • Connect the speakers properly (refer to turn • Wait for trouble and malfunctions. on, or switches off ...
.... or center speakers. • When TUNER is connected to the Setup Guide). • Remove any obstacles or operate from another component. control. • Operate within 7 m, 30° of the remote sensor (refer to a Pioneer plasma television with this component, check the points below... for about eight seconds. Can't operate the remote • Replace the batteries (refer to your nearest Pioneer authorized service center or your system on page 15). • Connect the speakers properly (refer to turn • Wait for trouble and malfunctions. on, or switches off ...
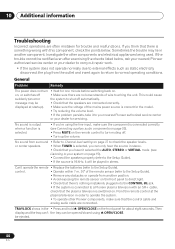
Operating Instructions
Page 45
...SND. DEMO shows in the playback picture. • This system uses copy-protection technology which may prevent recording or cause picture problems when connected through an AV selector, there is executed. In this player. Playback not possible. • If the disc is not a malfunction. monitor... Screen is stretched or • The TV Screen setting is compatible with a progressive scan signal, you have used component video cables to connect a TV that plugs are correct and that is cut, settings will not be canceled. Picture disturbance during playback or dark. • ...
...SND. DEMO shows in the playback picture. • This system uses copy-protection technology which may prevent recording or cause picture problems when connected through an AV selector, there is executed. In this player. Playback not possible. • If the disc is not a malfunction. monitor... Screen is stretched or • The TV Screen setting is compatible with a progressive scan signal, you have used component video cables to connect a TV that plugs are correct and that is cut, settings will not be canceled. Picture disturbance during playback or dark. • ...
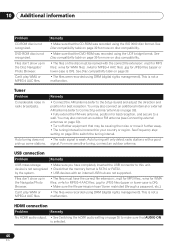
Operating Instructions
Page 46
.... • The radio signal is OK). • Make sure the file permission hasn't been restricted (through a password, etc.). Remedy • Connect the AM antenna (refer to a wall. Can't play WMA or MPEG-4 AAC files. Auto tuning will only detect radio stations with an internal USB... compatibility. • Make sure that the memory format is not a malfunction. by the system. • USB devices with a good signal. USB connection Problem Remedy USB mass storage • Make sure you have the correct file extension: .mp3 for MP3 files; .wma for WMA files; .m4a...
.... • The radio signal is OK). • Make sure the file permission hasn't been restricted (through a password, etc.). Remedy • Connect the AM antenna (refer to a wall. Can't play WMA or MPEG-4 AAC files. Auto tuning will only detect radio stations with an internal USB... compatibility. • Make sure that the memory format is not a malfunction. by the system. • USB devices with a good signal. USB connection Problem Remedy USB mass storage • Make sure you have the correct file extension: .mp3 for MP3 files; .wma for WMA files; .m4a...


