
Operating Instructions
Page 2
... as a lighted candle) on thick carpet or a bed. D3-4-2-1-7b_A_En CAUTION The STANDBY/ON switch on the rear panel. Thank you for a long period of the available power supply differs according to country or region. To prevent fire hazard, the openings should also be blocked or covered with liquid near this Pioneer product. To avoid fire hazard, the power cord should...
... as a lighted candle) on thick carpet or a bed. D3-4-2-1-7b_A_En CAUTION The STANDBY/ON switch on the rear panel. Thank you for a long period of the available power supply differs according to country or region. To prevent fire hazard, the openings should also be blocked or covered with liquid near this Pioneer product. To avoid fire hazard, the power cord should...

Operating Instructions
Page 4
... 01 Controls and displays Front panel 6 Remote control 7 Display 9 02 Getting started Home theater sound setup 10 Using the Auto MCACC setup for optimal surround sound 10 Using the on-screen displays 11 Playing discs 12 Basic playback controls 12 Resume and Last Memory 13 DVD-Video disc menus 13 Video CD/Super VCD PBC menus . . . . . .13 Listening to the radio 13 Improving poor FM reception 14 Reducing AM reception noise 14 Memorizing stations 14 Listening to station presets...
... 01 Controls and displays Front panel 6 Remote control 7 Display 9 02 Getting started Home theater sound setup 10 Using the Auto MCACC setup for optimal surround sound 10 Using the on-screen displays 11 Playing discs 12 Basic playback controls 12 Resume and Last Memory 13 DVD-Video disc menus 13 Video CD/Super VCD PBC menus . . . . . .13 Listening to the radio 13 Improving poor FM reception 14 Reducing AM reception noise 14 Memorizing stations 14 Listening to station presets...
Operating Instructions
Page 5
... Connecting using the component video output 34 About progressive scan video 34 Connecting using HDMI 35 Switching the HDMI audio setting . . . . . 35 Resetting the HDMI connection 35 About HDMI 35 Using this unit with a Pioneer plasma television 36 SR+ Setup for Pioneer plasma televisions 36 Switching on the SR+ mode 37 About control out connections 37 10 Additional information Optional system settings 38 Setting the sleep timer 38 Dimming the display 39 Disc/content format playback compatibility 39 Disc compatibility table 39 About DVD+R/DVD...
... Connecting using the component video output 34 About progressive scan video 34 Connecting using HDMI 35 Switching the HDMI audio setting . . . . . 35 Resetting the HDMI connection 35 About HDMI 35 Using this unit with a Pioneer plasma television 36 SR+ Setup for Pioneer plasma televisions 36 Switching on the SR+ mode 37 About control out connections 37 10 Additional information Optional system settings 38 Setting the sleep timer 38 Dimming the display 39 Disc/content format playback compatibility 39 Disc compatibility table 39 About DVD+R/DVD...
Operating Instructions
Page 7
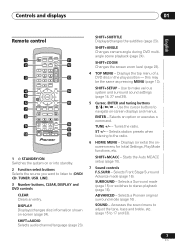
... STANDBY TUNER SOUND /ON DVD/CD (FM/AM) RETRIEVER USB LINE OPEN/CLOSE PLAYLIST 1 2 31 AUDIO SUBTITLE 4 5 62 ANGLE ZOOM 7 8 93 CLEAR DISPLAY 0 TOP MENU TUNE MENU SETUP ST HOME MENU ENTER SR ST RETURN MCACC TUNE TEST TONE F.S.SURR SURROUND ADVANCED SOUND 11 12 13 14 15 TV CONTROL SLEEP INPUT CHANNEL VOLUME MUTE SHIFT VOLUME 16 17 18 1 STANDBY/ON Switches the system on or into standby. 2 Function select buttons Selects the source you want to listen to navigate on -screen...
... STANDBY TUNER SOUND /ON DVD/CD (FM/AM) RETRIEVER USB LINE OPEN/CLOSE PLAYLIST 1 2 31 AUDIO SUBTITLE 4 5 62 ANGLE ZOOM 7 8 93 CLEAR DISPLAY 0 TOP MENU TUNE MENU SETUP ST HOME MENU ENTER SR ST RETURN MCACC TUNE TEST TONE F.S.SURR SURROUND ADVANCED SOUND 11 12 13 14 15 TV CONTROL SLEEP INPUT CHANNEL VOLUME MUTE SHIFT VOLUME 16 17 18 1 STANDBY/ON Switches the system on or into standby. 2 Function select buttons Selects the source you want to listen to navigate on -screen...

Operating Instructions
Page 10
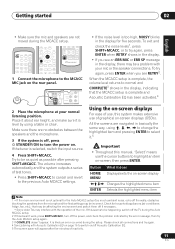
... use the Auto MCACC setup once (unless you have set up the microphone provided with your system, the receiver uses the information from a series of test tones to optimize the speaker settings and equalization (Acoustic Calibration EQ) for optimal 5.1 channel home theater sound. Front left Center Front right Subwoofer Listening position Surround left right Listening position After placing your speakers, see the Speaker Setup Guide for more placement tips). • Standard surround setup - After you change...
... use the Auto MCACC setup once (unless you have set up the microphone provided with your system, the receiver uses the information from a series of test tones to optimize the speaker settings and equalization (Acoustic Calibration EQ) for optimal 5.1 channel home theater sound. Front left Center Front right Subwoofer Listening position Surround left right Listening position After placing your speakers, see the Speaker Setup Guide for more placement tips). • Standard surround setup - After you change...
Operating Instructions
Page 11
... SETUP MIC CONTROL VIDEO OUT 2 Place the microphone at your mic or the speaker connections. The volume increases automatically and the system outputs a series of inactivity. 11 En Check for five seconds. STANDBY TUNER SOUND /ON DVD/CD (FM/AM) RETRIEVER USB LINE OPEN/CLOSE PLAYLIST 1 2 31 AUDIO SUBTITLE 4 5 62 ANGLE ZOOM 7 8 93 CLEAR TOP MENU DISPLAY 0 TUNE MENU SETUP ST HOME MENU ENTER SR ST RETURN MCACC TUNE TEST TONE F.S.SURR SURROUND ADVANCED SOUND TV CONTROL SLEEP INPUT CHANNEL VOLUME MUTE SHIFT VOLUME 1 Connect...
... SETUP MIC CONTROL VIDEO OUT 2 Place the microphone at your mic or the speaker connections. The volume increases automatically and the system outputs a series of inactivity. 11 En Check for five seconds. STANDBY TUNER SOUND /ON DVD/CD (FM/AM) RETRIEVER USB LINE OPEN/CLOSE PLAYLIST 1 2 31 AUDIO SUBTITLE 4 5 62 ANGLE ZOOM 7 8 93 CLEAR TOP MENU DISPLAY 0 TUNE MENU SETUP ST HOME MENU ENTER SR ST RETURN MCACC TUNE TEST TONE F.S.SURR SURROUND ADVANCED SOUND TV CONTROL SLEEP INPUT CHANNEL VOLUME MUTE SHIFT VOLUME 1 Connect...

Operating Instructions
Page 12
... need to use for playing discs1. See Playing a JPEG slideshow on page 18 for more on -screen display. 4 Adjust the volume. Basic playback controls The following table shows the basic controls on your TV and make sure that it with video, also turn on the remote for that some playback controls don't work in the chapter 4. Pauses/unpauses a disc. Skips to the start of the selected title (VR mode DVD...
... need to use for playing discs1. See Playing a JPEG slideshow on page 18 for more on -screen display. 4 Adjust the volume. Basic playback controls The following table shows the basic controls on your TV and make sure that it with video, also turn on the remote for that some playback controls don't work in the chapter 4. Pauses/unpauses a disc. Skips to the start of the selected title (VR mode DVD...

Operating Instructions
Page 15
... Logic II 5.1 channel surround sound, especially suited to music sources (use with any two-channel source) • MOVIE (Dolby Pro Logic II Movie) - Auto listening mode (see above) • DOLBY PL (Dolby Pro Logic) - 4.1 channel surround sound (use with any two-channel source) • MUSIC (Dolby Pro Logic II Music) - Adjusts the depth of the surround sound balance from front to back, making it was mastered: the output from stereo sources using one of the front speakers by spreading the center channel between the...
... Logic II 5.1 channel surround sound, especially suited to music sources (use with any two-channel source) • MOVIE (Dolby Pro Logic II Movie) - Auto listening mode (see above) • DOLBY PL (Dolby Pro Logic) - 4.1 channel surround sound (use with any two-channel source) • MUSIC (Dolby Pro Logic II Music) - Adjusts the depth of the surround sound balance from front to back, making it was mastered: the output from stereo sources using one of the front speakers by spreading the center channel between the...

Operating Instructions
Page 16
... right speakers' sound projection converges. • WIDE5.1 - When playing a multichannel source, all channels are connected. 16 En MCACC TUNE TEST TONE F.S.SURR SURROUND ADVANCED SOUND • Press SURROUND repeatedly until STEREO shows in stereo. Listening in stereo You can listen to sources using the Front surround speaker setup as described on page 10.1 0 TOP MENU TUNE MENU SETUP ST HOME MENU ENTER SR ST RETURN MCACC TUNE TEST TONE F.S.SURR SURROUND ADVANCED SOUND • Press F.S.SURR to select a Front Stage Surround Advance mode. Listening...
... right speakers' sound projection converges. • WIDE5.1 - When playing a multichannel source, all channels are connected. 16 En MCACC TUNE TEST TONE F.S.SURR SURROUND ADVANCED SOUND • Press SURROUND repeatedly until STEREO shows in stereo. Listening in stereo You can listen to sources using the Front surround speaker setup as described on page 10.1 0 TOP MENU TUNE MENU SETUP ST HOME MENU ENTER SR ST RETURN MCACC TUNE TEST TONE F.S.SURR SURROUND ADVANCED SOUND • Press F.S.SURR to select a Front Stage Surround Advance mode. Listening...

Operating Instructions
Page 17
... 2channel audio by using the tone control menu. 1 Press SOUND and use / to select TONE then press ENTER. Press ENTER to adjust the tone. Using the Tone controls You can use to enhance the bass in a sound source. Boosting the bass level There are connected. 17 En Select between OFF, MID or MAX. 2 Use / to select the option you want to adjust and press ENTER. The Bass/Treble, Quiet and Midnight features cannot be used at low volume levels. •...
... 2channel audio by using the tone control menu. 1 Press SOUND and use / to select TONE then press ENTER. Press ENTER to adjust the tone. Using the Tone controls You can use to enhance the bass in a sound source. Boosting the bass level There are connected. 17 En Select between OFF, MID or MAX. 2 Use / to select the option you want to adjust and press ENTER. The Bass/Treble, Quiet and Midnight features cannot be used at low volume levels. •...

Operating Instructions
Page 21
... B) within a track (CD, Video CD/Super Video CD) or title (DVD) that form a loop which is playing or stopped. Using random play Use this function to play with WMA/MP3/MPEG-4 AAC discs. 2 • You can 't use random play titles or chapters (DVD-Video) or tracks (CD and Video CD/Super VCD) in the front panel display. During playback, PGM lights in a random order.2 1 During playback, press HOME MENU and select 'Play Mode'.
... B) within a track (CD, Video CD/Super Video CD) or title (DVD) that form a loop which is playing or stopped. Using random play Use this function to play with WMA/MP3/MPEG-4 AAC discs. 2 • You can 't use random play titles or chapters (DVD-Video) or tracks (CD and Video CD/Super VCD) in the front panel display. During playback, PGM lights in a random order.2 1 During playback, press HOME MENU and select 'Play Mode'.
Operating Instructions
Page 25
... the player switched on the front panel. Skips to USB. • Using a dedicated AC adapter (supplied with the player switched off , then on again. • Reconnecting the USB device with the device) for USB playback. • Pioneer cannot guarantee compatibility (operation and/or bus power) with copy-protection or restricted playback). Try the following table shows the basic controls on this unit to connect this . • Make sure USB...
... the player switched on the front panel. Skips to USB. • Using a dedicated AC adapter (supplied with the player switched off , then on again. • Reconnecting the USB device with the device) for USB playback. • Pioneer cannot guarantee compatibility (operation and/or bus power) with copy-protection or restricted playback). Try the following table shows the basic controls on this unit to connect this . • Make sure USB...

Operating Instructions
Page 27
... the display on page 39. 2 The setup menu is . 27 En Surround sound settings 06 English Deutsch Français Italiano Nederlands Español Chapter 6 Surround sound settings Using the Setup menu From the Setup menu you the best surround sound setup. Surround left speaker • C - Front right speaker • SR - Subwoofer Each speaker can 't adjust center/surround when Stereo or Virtual playback is selected (or with stereo sources using the Auto mode). • The Channel level setting is reduced (loud sounds are connected. • The speaker volume can help...
... the display on page 39. 2 The setup menu is . 27 En Surround sound settings 06 English Deutsch Français Italiano Nederlands Español Chapter 6 Surround sound settings Using the Setup menu From the Setup menu you the best surround sound setup. Surround left speaker • C - Front right speaker • SR - Subwoofer Each speaker can 't adjust center/surround when Stereo or Virtual playback is selected (or with stereo sources using the Auto mode). • The Channel level setting is reduced (loud sounds are connected. • The speaker volume can help...

Operating Instructions
Page 33
... playback component. The display will briefly blink REC MODE if you try and use a PAL connector to make surround-compatible analog recordings from the analog output jacks may be used. ANTENNA PAL connector Connecting auxiliary audio components Using the stereo analog inputs, you to hook up either indoors or outdoors. Dolby multichannel sources are downmixed to confirm. • MODE ON - Recording mode The recording mode allows you can provide matrixdecoding (like Dolby Pro Logic). 1 Press SOUND. 2 Use / to select a REC MODE...
... playback component. The display will briefly blink REC MODE if you try and use a PAL connector to make surround-compatible analog recordings from the analog output jacks may be used. ANTENNA PAL connector Connecting auxiliary audio components Using the stereo analog inputs, you to hook up either indoors or outdoors. Dolby multichannel sources are downmixed to confirm. • MODE ON - Recording mode The recording mode allows you can provide matrixdecoding (like Dolby Pro Logic). 1 Press SOUND. 2 Use / to select a REC MODE...
Operating Instructions
Page 35
... L L CONTROL OUT R FRONT L CENTER R R AUDIO R SURROUND L SUB WOOFER SPEAKERS (4 Ω - 6 Ω) • The arrow on the cable connector body should be made with DVI-equipped components compatible with the connector on a single digital connection for use with HDCP) equipped monitor or display, you can also adjust the HDMI settings for resolution and color. You can connect it to this player using a DVI connection may result in one specification. For more on these settings see Video Output settings on...
... L L CONTROL OUT R FRONT L CENTER R R AUDIO R SURROUND L SUB WOOFER SPEAKERS (4 Ω - 6 Ω) • The arrow on the cable connector body should be made with DVI-equipped components compatible with the connector on a single digital connection for use with HDCP) equipped monitor or display, you can also adjust the HDMI settings for resolution and color. You can connect it to this player using a DVI connection may result in one specification. For more on these settings see Video Output settings on...
Operating Instructions
Page 36
... the part number ADE7095. Contact the Pioneer Customer Support division for more information on the plasma television. When this unit is switched to select SETUP, then press ENTER. HDMI features include uncompressed digital video, a bandwidth of up to the CONTROL OUT jack of functions below for detailed instructions. Note 1 This system is compatible with a Pioneer plasma television If you have connected a Pioneer plasma television to multichannel surround-sound audio. 09 Other connections HDMI...
... the part number ADE7095. Contact the Pioneer Customer Support division for more information on the plasma television. When this unit is switched to select SETUP, then press ENTER. HDMI features include uncompressed digital video, a bandwidth of up to the CONTROL OUT jack of functions below for detailed instructions. Note 1 This system is compatible with a Pioneer plasma television If you have connected a Pioneer plasma television to multichannel surround-sound audio. 09 Other connections HDMI...

Operating Instructions
Page 37
... (sold separately), connect the CONTROL IN jack on another device and a plasma television with a numbered video input on the plasma television.1 For example, select the LN PDP3 setting if the video output of your plasma display as is passed along the chain to the corresponding input number. PDP7) may be useful when you also have multiple components contained inside an entertainment center. To switch SR+ control off while...
... (sold separately), connect the CONTROL IN jack on another device and a plasma television with a numbered video input on the plasma television.1 For example, select the LN PDP3 setting if the video output of your plasma display as is passed along the chain to the corresponding input number. PDP7) may be useful when you also have multiple components contained inside an entertainment center. To switch SR+ control off while...
Operating Instructions
Page 44
... voltage of wire touching the unit. be played in the • Press and hold OPEN/CLOSE on . Can't operate the remote • Replace the batteries (refer to check the speaker levels. Investigate the other Pioneer components, make sure the component is switched on the front panel for trouble and malfunctions. General Problem Remedy The power does not turn muting off automatically. 10 Additional information Troubleshooting Incorrect operations are connected. No sound from...
... voltage of wire touching the unit. be played in the • Press and hold OPEN/CLOSE on . Can't operate the remote • Replace the batteries (refer to check the speaker levels. Investigate the other Pioneer components, make sure the component is switched on the front panel for trouble and malfunctions. General Problem Remedy The power does not turn muting off automatically. 10 Additional information Troubleshooting Incorrect operations are connected. No sound from...
Operating Instructions
Page 46
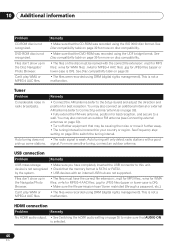
... tuning, connect an outdoor antenna. You may also connect an outdoor FM antenna (see Connecting external antennas on page 33). • Turn off other equipment that AUDIO ON is not a malfunction. DVD-ROM disc is weak. See Frequency step setting on page 35 to the Setup Guide) and adjust the direction and position for JPEG files (upper or lower-case is not recognized. USB connection Problem Remedy USB mass storage • Make...
... tuning, connect an outdoor antenna. You may also connect an outdoor FM antenna (see Connecting external antennas on page 33). • Turn off other equipment that AUDIO ON is not a malfunction. DVD-ROM disc is weak. See Frequency step setting on page 35 to the Setup Guide) and adjust the direction and position for JPEG files (upper or lower-case is not recognized. USB connection Problem Remedy USB mass storage • Make...
Operating Instructions
Page 47
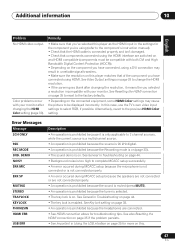
... the source is 96 kHz digital. • An operation is prohibited because the Recording mode is on (page 33). • The sound demo is on page 44. • The key lock is prohibited because the headphones are switched on and HDMI compatible (components must be displayed incorrectly. Error Messages Message 2CH ONLY 96K REC MODE SND. See Key lock setting on this player as the HDMI input in Troubleshooting...
... the source is 96 kHz digital. • An operation is prohibited because the Recording mode is on (page 33). • The sound demo is on page 44. • The key lock is prohibited because the headphones are switched on and HDMI compatible (components must be displayed incorrectly. Error Messages Message 2CH ONLY 96K REC MODE SND. See Key lock setting on this player as the HDMI input in Troubleshooting...


