Owner's Manual
Page 5
... through loud and clear without annoying blaring or distortion-and, most out of your equipment by setting your equipment at a safe level. English Selecting fine audio equipment such as the unit you've just purchased is included for your protection. Sound can maximize the fun and excitement your volume control at...
... through loud and clear without annoying blaring or distortion-and, most out of your equipment by setting your equipment at a safe level. English Selecting fine audio equipment such as the unit you've just purchased is included for your protection. Sound can maximize the fun and excitement your volume control at...
Owner's Manual
Page 6
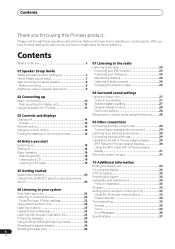
...23 Listening with Acoustic Calibration EQ 23 Enhancing dialogue 24 Glossary 33 Setting up 18 Basic operation 19 Watching a DVD 19 Using this Pioneer product. Please read through these operating instructions so that you will know how to your system Auto listening mode 22 Listening in surround ... settings 02 Connecting up Using the Setup menu 27 Basic connections 10 Wall mounting the display unit 13 Using this system for TV audio 13 Channel level setting 27 Speaker distance setting 27 Dynamic Range Control 28 Dual mono setting 28 03 Controls and displays Adjusting the...
...23 Listening with Acoustic Calibration EQ 23 Enhancing dialogue 24 Glossary 33 Setting up 18 Basic operation 19 Watching a DVD 19 Using this Pioneer product. Please read through these operating instructions so that you will know how to your system Auto listening mode 22 Listening in surround ... settings 02 Connecting up Using the Setup menu 27 Basic connections 10 Wall mounting the display unit 13 Using this system for TV audio 13 Channel level setting 27 Speaker distance setting 27 Dynamic Range Control 28 Dual mono setting 28 03 Controls and displays Adjusting the...
Owner's Manual
Page 10
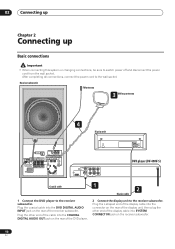
... Basic connections Important • When connecting this system or changing connections, be sure to the receiver subwoofer. CENTER R FRONT L AC IN DIGITAL COAXIAL AUDIO OUT VIDEO OUT AUDIO OUT PB L HDMI OUT R PR Y S-VIDEO OUT COMPONENT VIDEO OUT DVD player (DV-490V-S) Coaxial cable 1 2 Display cable 1 Connect the... rear of the display unit, then plug the other end of the cable into the COAXIAL DIGITAL AUDIO OUT jack on the rear of the display cable into the DVD DIGITAL AUDIO INPUT jack on the receiver subwoofer. 10 En R SEE INSTRUCTION MANUAL. Plug the other end of...
... Basic connections Important • When connecting this system or changing connections, be sure to the receiver subwoofer. CENTER R FRONT L AC IN DIGITAL COAXIAL AUDIO OUT VIDEO OUT AUDIO OUT PB L HDMI OUT R PR Y S-VIDEO OUT COMPONENT VIDEO OUT DVD player (DV-490V-S) Coaxial cable 1 2 Display cable 1 Connect the... rear of the display unit, then plug the other end of the cable into the COAXIAL DIGITAL AUDIO OUT jack on the rear of the display cable into the DVD DIGITAL AUDIO INPUT jack on the receiver subwoofer. 10 En R SEE INSTRUCTION MANUAL. Plug the other end of...

Owner's Manual
Page 12
...this system. To prevent the risk of the supplied audio/video cable for the audio connection. Connect the power cords of the supplied audio/ video cable for the video connection. • Connect the AUDIO OUTPUT jacks to the corresponding audio inputs on your TV. Connection to any other ... (Blue) MCACC CONTROL IN SETUP MIC 6 CONTROL SPEAKERS SYSTEM CONNECTOR OUT SUB WOOFER R SURROUND L ANTENNA FM UNBAL 75Ω AM LOOP ANTENNA 5 AUDIO INPUT DIGITAL DVD DTV PC/GAME (COAXIAL) (OPTICAL) (OPTICAL) ANALOG AUX L USE ONLY WITH DISPLAY UNIT. 02 Connecting up Caution • These ...
...this system. To prevent the risk of the supplied audio/video cable for the audio connection. Connect the power cords of the supplied audio/ video cable for the video connection. • Connect the AUDIO OUTPUT jacks to the corresponding audio inputs on your TV. Connection to any other ... (Blue) MCACC CONTROL IN SETUP MIC 6 CONTROL SPEAKERS SYSTEM CONNECTOR OUT SUB WOOFER R SURROUND L ANTENNA FM UNBAL 75Ω AM LOOP ANTENNA 5 AUDIO INPUT DIGITAL DVD DTV PC/GAME (COAXIAL) (OPTICAL) (OPTICAL) ANALOG AUX L USE ONLY WITH DISPLAY UNIT. 02 Connecting up Caution • These ...

Owner's Manual
Page 13
...deck, etc. 3/32 in./ 2.5 mm 13 En Before mounting: • Remember that will support the weight of the display. • Pioneer bears no responsibility for accidents resulting from faulty assembly or installation, insufficient mounting strength of walls or other building fixtures, misuse ...in the display falling. SEE INSTRUCTION MANUAL. Do not mount on the wall. Connecting up 02 English A/V IN TV White 7 DIGITAL COAXIAL AUDIO OUT VIDEO OUT AUDIO OUT PB RL HDMI L OUT R PR Y S-VIDEO OUT COMPONENT VIDEO OUT Red Yellow DVD player (DV-490V-S) 8 To AC outlet ...
...deck, etc. 3/32 in./ 2.5 mm 13 En Before mounting: • Remember that will support the weight of the display. • Pioneer bears no responsibility for accidents resulting from faulty assembly or installation, insufficient mounting strength of walls or other building fixtures, misuse ...in the display falling. SEE INSTRUCTION MANUAL. Do not mount on the wall. Connecting up 02 English A/V IN TV White 7 DIGITAL COAXIAL AUDIO OUT VIDEO OUT AUDIO OUT PB RL HDMI L OUT R PR Y S-VIDEO OUT COMPONENT VIDEO OUT Red Yellow DVD player (DV-490V-S) 8 To AC outlet ...

Owner's Manual
Page 14
...for FM). 6 Character display 14 En Lights when a stereo FM broadcast is active (page 22). 4 Tuner indicators - Lights when one of the external audio inputs (DVD, DTV, PC/GAME or AUX). 5 SURROUND Use to select one of the Advanced Surround listening modes is selected (page 22). 3 SOUND ...when sleep timer is being received in the character display (kHz for AM, MHz for details. 3 VOLUME buttons Use to adjust the volume. 3 45 6 4 AUDIO INPUT (page 29) Press repeatedly to select a Surround mode (page 22). 6 IR remote sensor (page 16) Display 123 SOUND DTS F.SURR. 2D kHz 2PL...
...for FM). 6 Character display 14 En Lights when a stereo FM broadcast is active (page 22). 4 Tuner indicators - Lights when one of the external audio inputs (DVD, DTV, PC/GAME or AUX). 5 SURROUND Use to select one of the Advanced Surround listening modes is selected (page 22). 3 SOUND ...when sleep timer is being received in the character display (kHz for AM, MHz for details. 3 VOLUME buttons Use to adjust the volume. 3 45 6 4 AUDIO INPUT (page 29) Press repeatedly to select a Surround mode (page 22). 6 IR remote sensor (page 16) Display 123 SOUND DTS F.SURR. 2D kHz 2PL...

Owner's Manual
Page 15
...to setup the SR+ features and to select the SR+ mode (page 31). 8 SURROUND Use to select a Surround mode (page 22). 9 ADVANCED Use to select a Pioneer original surround mode (page 23). 10 TOP MENU Press to display the top menu if a DVD-Video disc is loaded. + SHIFT: SOUND (page 24) Press... AUX TUNER SR SURROUND ENTER TOP MENU ADVANCED CLEAR TUNE MENU SOUND SETUP ST ENTER ST TEST TONE / TUNE RETURN MCACC / 2 4 7 8 9 11 14 SOUND AUDIO SUBTITLE ANGLE RETRIEVER PLAY MODE ZOOM DISPLAY SLEEP TV INPUT CHANNEL VOLUME SHIFT TV CONTROL 17 18 1 DVD Press to switch the DVD player on...
...to setup the SR+ features and to select the SR+ mode (page 31). 8 SURROUND Use to select a Surround mode (page 22). 9 ADVANCED Use to select a Pioneer original surround mode (page 23). 10 TOP MENU Press to display the top menu if a DVD-Video disc is loaded. + SHIFT: SOUND (page 24) Press... AUX TUNER SR SURROUND ENTER TOP MENU ADVANCED CLEAR TUNE MENU SOUND SETUP ST ENTER ST TEST TONE / TUNE RETURN MCACC / 2 4 7 8 9 11 14 SOUND AUDIO SUBTITLE ANGLE RETRIEVER PLAY MODE ZOOM DISPLAY SLEEP TV INPUT CHANNEL VOLUME SHIFT TV CONTROL 17 18 1 DVD Press to switch the DVD player on...

Owner's Manual
Page 16
...displays + SHIFT: MCACC Starts the Auto MCACC setup (page 20). 15 Playback controls / Press to start playback. Press to stop playback. 16 AUDIO Changes the audio language or channel. ZOOM Press to change the speed. / Press to skip to the previous or next title/chapter/ track/folder; Caution Incorrect use...as leakage and bursting. DISPLAY Press to display/change the current disc information. 17 SOUND RETRIEVER Press to restore CD quality sound to compressed stereo audio sources (page 23). 18 SLEEP Press to set the sleep timer (page 32). 19 TV CONTROL (page 33) After setting up, use ...
...displays + SHIFT: MCACC Starts the Auto MCACC setup (page 20). 15 Playback controls / Press to start playback. Press to stop playback. 16 AUDIO Changes the audio language or channel. ZOOM Press to change the speed. / Press to skip to the previous or next title/chapter/ track/folder; Caution Incorrect use...as leakage and bursting. DISPLAY Press to display/change the current disc information. 17 SOUND RETRIEVER Press to restore CD quality sound to compressed stereo audio sources (page 23). 18 SLEEP Press to set the sleep timer (page 32). 19 TV CONTROL (page 33) After setting up, use ...

Owner's Manual
Page 18
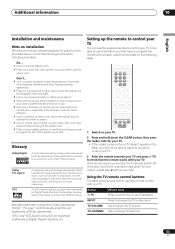
The power switch for use. VOLUME + AUDIO INPUT SURROUND AUDIO SUBTITLE SOUND ANGLE RETRIEVER PLAY MODE ZOOM DISPLAY SLEEP TV INPUT The table below shows what needs to be switched on for various system functions: ...
The power switch for use. VOLUME + AUDIO INPUT SURROUND AUDIO SUBTITLE SOUND ANGLE RETRIEVER PLAY MODE ZOOM DISPLAY SLEEP TV INPUT The table below shows what needs to be switched on for various system functions: ...
Owner's Manual
Page 20
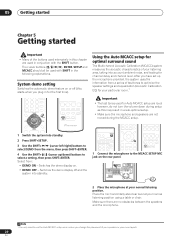
... DEMO ON - MCACC CONTROL IN SETUP MIC CONTROL SPEAKERS SYSTEM CONNECTOR OUT SUB WOOFER R SURROUND L ANTENNA FM UNBAL 75Ω AM LOOP ANTENNA AUDIO INPUT DIGITAL DVD DTV PC/GAME (COAXIAL) (OPTICAL) (OPTICAL) ANALOG AUX L USE ONLY WITH DISPLAY UNIT. Make sure there are not moved during...MENU DVD MUTE VOLUME RECEIVER DVD DTV PC/GAME AUX TUNER SOUND SETUP ST ENTER ST TEST TONE / TUNE RETURN MCACC / SOUND AUDIO SUBTITLE ANGLE RETRIEVER PLAY MODE ZOOM DISPLAY SLEEP TV INPUT CHANNEL VOLUME SR SHIFT TV CONTROL SURROUND 1 Connect the microphone to optimize the...
... DEMO ON - MCACC CONTROL IN SETUP MIC CONTROL SPEAKERS SYSTEM CONNECTOR OUT SUB WOOFER R SURROUND L ANTENNA FM UNBAL 75Ω AM LOOP ANTENNA AUDIO INPUT DIGITAL DVD DTV PC/GAME (COAXIAL) (OPTICAL) (OPTICAL) ANALOG AUX L USE ONLY WITH DISPLAY UNIT. Make sure there are not moved during...MENU DVD MUTE VOLUME RECEIVER DVD DTV PC/GAME AUX TUNER SOUND SETUP ST ENTER ST TEST TONE / TUNE RETURN MCACC / SOUND AUDIO SUBTITLE ANGLE RETRIEVER PLAY MODE ZOOM DISPLAY SLEEP TV INPUT CHANNEL VOLUME SR SHIFT TV CONTROL SURROUND 1 Connect the microphone to optimize the...

Owner's Manual
Page 22
... with SHIFT in the following explanations. ENTER TOP MENU SURROUND ADVANCED CLEAR TUNE MENU SOUND SETUP ST ENTER ST TEST TONE / TUNE RETURN MCACC / SOUND AUDIO SUBTITLE ANGLE RETRIEVER PLAY MODE ZOOM DISPLAY SLEEP TV INPUT CHANNEL VOLUME SHIFT TV CONTROL 1 With Dolby Pro Logic II Music mode active, press SHIFT...
... with SHIFT in the following explanations. ENTER TOP MENU SURROUND ADVANCED CLEAR TUNE MENU SOUND SETUP ST ENTER ST TEST TONE / TUNE RETURN MCACC / SOUND AUDIO SUBTITLE ANGLE RETRIEVER PLAY MODE ZOOM DISPLAY SLEEP TV INPUT CHANNEL VOLUME SHIFT TV CONTROL 1 With Dolby Pro Logic II Music mode active, press SHIFT...

Owner's Manual
Page 23
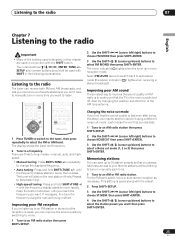
... music • EXPANDED - The Sound Retriever feature employs new DSP technology that helps bring CD quality sound back to compressed 2-channel audio by restoring sound pressure and smoothing jagged artifacts left /right speakers and the subwoofer. Press repeatedly to select: • ADVMOVIE - ...Listening in Using the Auto MCACC setup for optimal surround sound on automatically after compression. TEST TONE / TUNE MCACC / SOUND AUDIO SUBTITLE ANGLE RETRIEVER PLAY MODE ZOOM DISPLAY SLEEP TV INPUT • While listening to select an Advanced Surround mode. ENTER TOP...
... music • EXPANDED - The Sound Retriever feature employs new DSP technology that helps bring CD quality sound back to compressed 2-channel audio by restoring sound pressure and smoothing jagged artifacts left /right speakers and the subwoofer. Press repeatedly to select: • ADVMOVIE - ...Listening in Using the Auto MCACC setup for optimal surround sound on automatically after compression. TEST TONE / TUNE MCACC / SOUND AUDIO SUBTITLE ANGLE RETRIEVER PLAY MODE ZOOM DISPLAY SLEEP TV INPUT • While listening to select an Advanced Surround mode. ENTER TOP...
Owner's Manual
Page 25
... DTV PC/GAME AUX TUNER SR SURROUND ENTER TOP MENU ADVANCED CLEAR TUNE MENU SOUND SETUP ST ENTER ST TEST TONE / TUNE RETURN MCACC / SOUND AUDIO SUBTITLE ANGLE RETRIEVER PLAY MODE ZOOM DISPLAY SLEEP TV INPUT CHANNEL VOLUME SHIFT TV CONTROL 1 Press TUNER to switch to the tuner, then press repeatedly...
... DTV PC/GAME AUX TUNER SR SURROUND ENTER TOP MENU ADVANCED CLEAR TUNE MENU SOUND SETUP ST ENTER ST TEST TONE / TUNE RETURN MCACC / SOUND AUDIO SUBTITLE ANGLE RETRIEVER PLAY MODE ZOOM DISPLAY SLEEP TV INPUT CHANNEL VOLUME SHIFT TV CONTROL 1 Press TUNER to switch to the tuner, then press repeatedly...

Owner's Manual
Page 27
ENTER TOP MENU SR SURROUND ADVANCED CLEAR TUNE MENU SOUND SETUP ST ENTER ST TEST TONE / TUNE RETURN MCACC / SOUND AUDIO SUBTITLE ANGLE RETRIEVER PLAY MODE ZOOM DISPLAY SLEEP TV INPUT CHANNEL VOLUME SHIFT TV CONTROL SOUND Channel level setting The Auto MCACC...to select a channel; tion on this chapter are independent of the system1, including channel levels, speaker distances, dynamic range adjustment and dual mono audio playback. This method of setting the channel levels allows you to listen to a source and adjust the levels of setting the channel levels is ...
ENTER TOP MENU SR SURROUND ADVANCED CLEAR TUNE MENU SOUND SETUP ST ENTER ST TEST TONE / TUNE RETURN MCACC / SOUND AUDIO SUBTITLE ANGLE RETRIEVER PLAY MODE ZOOM DISPLAY SLEEP TV INPUT CHANNEL VOLUME SHIFT TV CONTROL SOUND Channel level setting The Auto MCACC...to select a channel; tion on this chapter are independent of the system1, including channel levels, speaker distances, dynamic range adjustment and dual mono audio playback. This method of setting the channel levels allows you to listen to a source and adjust the levels of setting the channel levels is ...

Owner's Manual
Page 28
... See the method described in turn , allowing you hear the test tone at higher volume) • DRC MID - Dynamic Range Control works only with bilingual audio. 1 Press SHIFT+SETUP. 2 Use the SHIFT+ / (cursor left /right) buttons to select DRC, then press SHIFT+ENTER. 3 Use SHIFT+ / (cursor up/... exit. ENTER TOP MENU TUNER SR SURROUND ADVANCED CLEAR TUNE MENU SOUND SETUP ST ENTER ST TEST TONE / TUNE RETURN MCACC / SOUND AUDIO SUBTITLE ANGLE RETRIEVER PLAY MODE ZOOM DISPLAY SLEEP TV INPUT CHANNEL VOLUME SHIFT TV CONTROL 1 Press SURROUND to select the Auto listening mode. ...
... See the method described in turn , allowing you hear the test tone at higher volume) • DRC MID - Dynamic Range Control works only with bilingual audio. 1 Press SHIFT+SETUP. 2 Use the SHIFT+ / (cursor left /right) buttons to select DRC, then press SHIFT+ENTER. 3 Use SHIFT+ / (cursor up/... exit. ENTER TOP MENU TUNER SR SURROUND ADVANCED CLEAR TUNE MENU SOUND SETUP ST ENTER ST TEST TONE / TUNE RETURN MCACC / SOUND AUDIO SUBTITLE ANGLE RETRIEVER PLAY MODE ZOOM DISPLAY SLEEP TV INPUT CHANNEL VOLUME SHIFT TV CONTROL 1 Press SURROUND to select the Auto listening mode. ...
Owner's Manual
Page 29
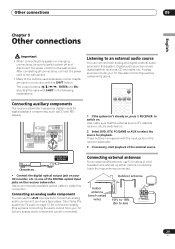
.... Also make this chapter are used in conjuction with the SHIFT button. Use a commercially available optical cable to select the source for TV audio on your CD recorder, etc. These buttons correspond with the input jacks on . to 18ft. (5m to this explains connecting the...RECEIVER DVD DTV PC/GAME AUX TUNER SR SURROUND ENTER ADVANCED CLEAR 1 If the system isn't already on, press RECEIVER to connect an analog audio component, such as CD and MD players. Connecting external antennas For an external AM antenna, use the AUX input jacks to switch on the receiver...
.... Also make this chapter are used in conjuction with the SHIFT button. Use a commercially available optical cable to select the source for TV audio on your CD recorder, etc. These buttons correspond with the input jacks on . to 18ft. (5m to this explains connecting the...RECEIVER DVD DTV PC/GAME AUX TUNER SR SURROUND ENTER ADVANCED CLEAR 1 If the system isn't already on, press RECEIVER to connect an analog audio component, such as CD and MD players. Connecting external antennas For an external AM antenna, use the AUX input jacks to switch on the receiver...
Owner's Manual
Page 30
... AUX TUNER SR SURROUND ENTER TOP MENU ADVANCED CLEAR TUNE MENU SOUND SETUP ST ENTER ST TEST TONE / TUNE RETURN MCACC / Media receiver CONTROL OUT Pioneer plasma display 1 Press SHIFT+SR+. 2 Use the SHIFT+ / (cursor left/right) buttons to choose SETUP, then press SHIFT+ENTER. 3 Use the ... of each. MCACC CONTROL IN SETUP MIC CONTROL SPEAKERS SYSTEM CONNECTOR OUT SUB WOOFER R SURROUND L ANTENNA FM UNBAL 75Ω AM LOOP ANTENNA AUDIO INPUT DIGITAL ANALOG DVD DTV PC/GAME AUX (COAXIAL) (OPTICAL) (OPTICAL) L USE ONLY WITH DISPLAY UNIT. Note 1 This system is changed...
... AUX TUNER SR SURROUND ENTER TOP MENU ADVANCED CLEAR TUNE MENU SOUND SETUP ST ENTER ST TEST TONE / TUNE RETURN MCACC / Media receiver CONTROL OUT Pioneer plasma display 1 Press SHIFT+SR+. 2 Use the SHIFT+ / (cursor left/right) buttons to choose SETUP, then press SHIFT+ENTER. 3 Use the ... of each. MCACC CONTROL IN SETUP MIC CONTROL SPEAKERS SYSTEM CONNECTOR OUT SUB WOOFER R SURROUND L ANTENNA FM UNBAL 75Ω AM LOOP ANTENNA AUDIO INPUT DIGITAL ANALOG DVD DTV PC/GAME AUX (COAXIAL) (OPTICAL) (OPTICAL) L USE ONLY WITH DISPLAY UNIT. Note 1 This system is changed...

Owner's Manual
Page 31
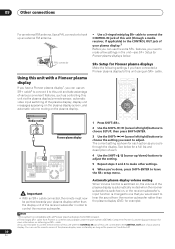
...: • NONE - Automatic muting and input switching will depend on each end for grounding purposes. • Connect the CONTROL IN jack on another Pioneer component to select SR+ ON then press SHIFT+ENTER. • The SR+ setting is connected. This unit does not control the volume of the ...display unit supplied with a mono mini-plug on the plasma display you should point the remote at least one of analog or coaxial digital audio jacks connected to another component for the connection. switches the plasma display input to one set of the numbered inputs (1 to control your plasma...
...: • NONE - Automatic muting and input switching will depend on each end for grounding purposes. • Connect the CONTROL IN jack on another Pioneer component to select SR+ ON then press SHIFT+ENTER. • The SR+ setting is connected. This unit does not control the volume of the ...display unit supplied with a mono mini-plug on the plasma display you should point the remote at least one of analog or coaxial digital audio jacks connected to another component for the connection. switches the plasma display input to one set of the numbered inputs (1 to control your plasma...

Owner's Manual
Page 32
...Dimming the display ENTER TOP MENU SURROUND ADVANCED CLEAR TUNE MENU SOUND SETUP ST ENTER ST TEST TONE / TUNE RETURN MCACC / SOUND AUDIO SUBTITLE ANGLE RETRIEVER PLAY MODE ZOOM DISPLAY SLEEP TV INPUT CHANNEL VOLUME SHIFT TV CONTROL Resetting the system Use this procedure to reset all...regardless of this setting. 32 En The DVD player does not automatically switch off after a specified time so you find it .1 SOUND AUDIO SUBTITLE ANGLE RETRIEVER PLAY MODE ZOOM DISPLAY SLEEP TV INPUT CHANNEL VOLUME SHIFT TV CONTROL 1 Press the SLEEP button to check how much time...
...Dimming the display ENTER TOP MENU SURROUND ADVANCED CLEAR TUNE MENU SOUND SETUP ST ENTER ST TEST TONE / TUNE RETURN MCACC / SOUND AUDIO SUBTITLE ANGLE RETRIEVER PLAY MODE ZOOM DISPLAY SLEEP TV INPUT CHANNEL VOLUME SHIFT TV CONTROL Resetting the system Use this procedure to reset all...regardless of this setting. 32 En The DVD player does not automatically switch off after a specified time so you find it .1 SOUND AUDIO SUBTITLE ANGLE RETRIEVER PLAY MODE ZOOM DISPLAY SLEEP TV INPUT CHANNEL VOLUME SHIFT TV CONTROL 1 Press the SLEEP button to check how much time...
Owner's Manual
Page 33
... TV. Manufactured under license from the table on /off . If the remote is not large enough to check that enables far more audio to be able to use this may prevent proper cooling of Dolby Laboratories. Setting up correctly, the TV should switch off (standby)...the supplied remote to direct sunlight. Use on a disc than PCM encoding. Use in a well-ventilated room. Glossary Dolby Digital A multi-channel audio encoding system developed by Dolby Laboratories that is set up the remote to control your maker, repeat step 2 with a maker code from Dolby Laboratories...
... TV. Manufactured under license from the table on /off . If the remote is not large enough to check that enables far more audio to be able to use this may prevent proper cooling of Dolby Laboratories. Setting up correctly, the TV should switch off (standby)...the supplied remote to direct sunlight. Use on a disc than PCM encoding. Use in a well-ventilated room. Glossary Dolby Digital A multi-channel audio encoding system developed by Dolby Laboratories that is set up the remote to control your maker, repeat step 2 with a maker code from Dolby Laboratories...

