
Owner's Manual
Page 5
... Rocket launching pad Information courtesy of sound levels is too late, this by playing it comfortably and clearly, and without distortion. After all supplied. Receiver subwoofer (SX-SW570) box: • Remote control (page 16) • AA/R6 dry cell batteries (to prevent hearing damage or loss in the box Please confirm...
... Rocket launching pad Information courtesy of sound levels is too late, this by playing it comfortably and clearly, and without distortion. After all supplied. Receiver subwoofer (SX-SW570) box: • Remote control (page 16) • AA/R6 dry cell batteries (to prevent hearing damage or loss in the box Please confirm...
Owner's Manual
Page 7
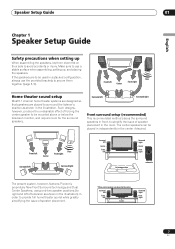
.... Front left Center Bass Front right Surround left Surround right Surround left Center Front left Listening position Surround right Center Front right Receiver subwoofer The present system, however, features Pioneer's proprietary New Front Surround technology and Dual Center Speakers, using only two speaker positions (to right and left Center Front right Home...
.... Front left Center Bass Front right Surround left Surround right Surround left Center Front left Listening position Surround right Center Front right Receiver subwoofer The present system, however, features Pioneer's proprietary New Front Surround technology and Dual Center Speakers, using only two speaker positions (to right and left Center Front right Home...

Owner's Manual
Page 8
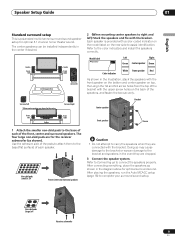
...speaker Green Color indicator White Front speaker Red Caution • Do not attempt to carry the speakers when they are for the receiver subwoofer (as shown in the event they are connected with the upper screw holes on the back of the front speaker, the two ...skid pads (small) x 24 Front, Center and Surround speakers Surround speaker Center speaker Front speaker Bracket Screw Non-skid pads (large) x 4 Receiver subwoofer 2 Stack the speakers and fix with a color-coded indicator on the model label on the surround speaker, and fasten the screws securely. After connecting ...
...speaker Green Color indicator White Front speaker Red Caution • Do not attempt to carry the speakers when they are for the receiver subwoofer (as shown in the event they are connected with the upper screw holes on the back of the front speaker, the two ...skid pads (small) x 24 Front, Center and Surround speakers Surround speaker Center speaker Front speaker Bracket Screw Non-skid pads (large) x 4 Receiver subwoofer 2 Stack the speakers and fix with a color-coded indicator on the model label on the surround speaker, and fasten the screws securely. After connecting ...
Owner's Manual
Page 9
Center Front left Listening position Center Front right Receiver subwoofer Surround left *When center speakers are for optimal 5.1 channel home theater sound. Model label Left Right...the base of the front, center and surround speakers. Each speaker is a standard multichannel surround sound speaker setup for the receiver subwoofer (as shown in the center. Bracket Center speaker Front Front left ) Stack the speakers and fix with the bracket. Doing... independently in the event they are dropped. 3 Connect the speaker system. Non-skid pads (large) x 4 Receiver subwoofer 9 En
Center Front left Listening position Center Front right Receiver subwoofer Surround left *When center speakers are for optimal 5.1 channel home theater sound. Model label Left Right...the base of the front, center and surround speakers. Each speaker is a standard multichannel surround sound speaker setup for the receiver subwoofer (as shown in the center. Bracket Center speaker Front Front left ) Stack the speakers and fix with the bracket. Doing... independently in the event they are dropped. 3 Connect the speaker system. Non-skid pads (large) x 4 Receiver subwoofer 9 En
Owner's Manual
Page 10
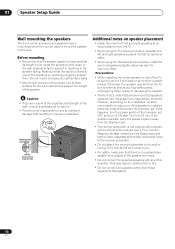
Use screws suitable for the wall material and support the weight of the wall, consult a professional for advice. • Pioneer is no exposed bare speaker wire outside of the speaker terminals. • Do not connect the supplied speakers with this happens, turn... . Precautions: • When installing the center speaker on top of a television set . • The receiver subwoofer is installed extremely close to the receiver subwoofer. • Do not attach the receiver subwoofer to this system. 10 En This may occur if the speaker is not magnetically shielded and so should also...
Use screws suitable for the wall material and support the weight of the wall, consult a professional for advice. • Pioneer is no exposed bare speaker wire outside of the speaker terminals. • Do not connect the supplied speakers with this happens, turn... . Precautions: • When installing the center speaker on top of a television set . • The receiver subwoofer is installed extremely close to the receiver subwoofer. • Do not attach the receiver subwoofer to this system. 10 En This may occur if the speaker is not magnetically shielded and so should also...

Owner's Manual
Page 11
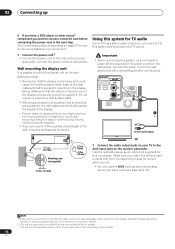
...After completing all connections, connect the power cord to the display unit and connect. Receiver subwoofer FM antenna 2 AM loop antenna 3 MCACC SETUP MIC CONTROL IN SYSTEM CONNECTOR CONTROL SPEAKERS OUT SUBWOOFER R SURROUND L FM UNBAL 75 AM LOOP ANTENNA AUDIO INPUT DIGITAL DVD DTV PC/GAME... INSTRUCTION MANUAL. Peel off and disconnect the power cord from the spacers and press the spacers onto the depressions on the receiver subwoofer. 11 En Connecting up 02 English Chapter 2 Connecting up Basic connections Important • When connecting this system or changing connections...
...After completing all connections, connect the power cord to the display unit and connect. Receiver subwoofer FM antenna 2 AM loop antenna 3 MCACC SETUP MIC CONTROL IN SYSTEM CONNECTOR CONTROL SPEAKERS OUT SUBWOOFER R SURROUND L FM UNBAL 75 AM LOOP ANTENNA AUDIO INPUT DIGITAL DVD DTV PC/GAME... INSTRUCTION MANUAL. Peel off and disconnect the power cord from the spacers and press the spacers onto the depressions on the receiver subwoofer. 11 En Connecting up 02 English Chapter 2 Connecting up Basic connections Important • When connecting this system or changing connections...

Owner's Manual
Page 12
... surround speaker cables have a colorcoded connector at one terminal to the color-coded speaker terminals on the rear-surface model label. Y-cable To Receiver subwoofer • Connect the other end. The small lug at the rear of the unit. Upper terminal Lower terminal Note 1 • Keep antenna ...described on the tab to use the supplied Ycable for the connection. Push the FM antenna3 plug onto the center pin of the receiver subwoofer. Bend the stand in the direction indicated by means of the colorcoded indicator provided on the rear of the FM antenna socket. 4 ...
... surround speaker cables have a colorcoded connector at one terminal to the color-coded speaker terminals on the rear-surface model label. Y-cable To Receiver subwoofer • Connect the other end. The small lug at the rear of the unit. Upper terminal Lower terminal Note 1 • Keep antenna ...described on the tab to use the supplied Ycable for the connection. Push the FM antenna3 plug onto the center pin of the receiver subwoofer. Bend the stand in the direction indicated by means of the colorcoded indicator provided on the rear of the FM antenna socket. 4 ...

Owner's Manual
Page 13
...degraded sound or operation. 13 En If the speakers have been fixed with different impedance values. Speaker system 5 Connect the subwoofer cable. • Just below the subwoofer speaker, to the left (White) 7 To AC outlet • When connections are designed with the brackets, fix the...multiple cables together and place the wrap over the cables from the end. To prevent the risk of center, you should see the subwoofer connecting cable. Caution • These speaker terminals carry HAZARDOUS LIVE voltage. Be sure to any amplifier other amplifier may result in malfunction...
...degraded sound or operation. 13 En If the speakers have been fixed with different impedance values. Speaker system 5 Connect the subwoofer cable. • Just below the subwoofer speaker, to the left (White) 7 To AC outlet • When connections are designed with the brackets, fix the...multiple cables together and place the wrap over the cables from the end. To prevent the risk of center, you should see the subwoofer connecting cable. Caution • These speaker terminals carry HAZARDOUS LIVE voltage. Be sure to any amplifier other amplifier may result in malfunction...
Owner's Manual
Page 14
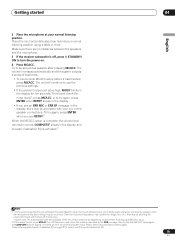
... home theater potential. AUDIO INPUT ITAL TV PC/GAME TICAL) (OPTICAL) ANALOG AUX L MCACC SETUP MIC CONTROL IN SYSTEM CONNECTOR CONTROL OUT SPEAKERS R SUBWOOFER R SURROUND L FM UNBAL 75 AM LOOP ANTENNA AUDIO INPUT DIGITAL DVD DTV PC/GAME (COAXIAL) (OPTICAL) (OPTICAL) ANALOG AUX L R USE ... jacks on your TV to the AUX input jacks on the receiver subwoofer. Connect the power cord to a wall socket. Use screws that are unsure of the qualities and strength of the display. • Pioneer bears no responsibility for advice. Important • When connecting this connection...
... home theater potential. AUDIO INPUT ITAL TV PC/GAME TICAL) (OPTICAL) ANALOG AUX L MCACC SETUP MIC CONTROL IN SYSTEM CONNECTOR CONTROL OUT SPEAKERS R SUBWOOFER R SURROUND L FM UNBAL 75 AM LOOP ANTENNA AUDIO INPUT DIGITAL DVD DTV PC/GAME (COAXIAL) (OPTICAL) (OPTICAL) ANALOG AUX L R USE ... jacks on your TV to the AUX input jacks on the receiver subwoofer. Connect the power cord to a wall socket. Use screws that are unsure of the qualities and strength of the display. • Pioneer bears no responsibility for advice. Important • When connecting this connection...

Owner's Manual
Page 16
...restore CD quality sound to compressed stereo audio sources (page 21). 13 SURROUND Use to select a Surround mode (page 20). 14 ADVANCED Use to select a Pioneer original surround mode (page 21). 15 F.S.SURR Use to select a Front Stage Surround Advance mode (page 21). 16 MCACC Starts the Auto MCACC setup (... SOUND RETRIEVER SURROUND ADVANCED F.S.SURR MCACC CHANNEL TV VOLUME INPUT TV CONTROL 6 8 11 14 15 16 RECEIVER 1 STANDBY/ON Press to switch the receiver subwoofer on or into standby. 2 MUTE Press to mute all audio from which you can adjust bass and treble, etc. 11 TEST TONE Use to output...
...restore CD quality sound to compressed stereo audio sources (page 21). 13 SURROUND Use to select a Surround mode (page 20). 14 ADVANCED Use to select a Pioneer original surround mode (page 21). 15 F.S.SURR Use to select a Front Stage Surround Advance mode (page 21). 16 MCACC Starts the Auto MCACC setup (... SOUND RETRIEVER SURROUND ADVANCED F.S.SURR MCACC CHANNEL TV VOLUME INPUT TV CONTROL 6 8 11 14 15 16 RECEIVER 1 STANDBY/ON Press to switch the receiver subwoofer on or into standby. 2 MUTE Press to mute all audio from which you can adjust bass and treble, etc. 11 TEST TONE Use to output...

Owner's Manual
Page 18
... EQ) for Auto MCACC setup are not moved during the MCACC setup. MCACC SETUP MIC MCACC SETUP MIC CONTROL IN SYSTEM CONNECTOR CONTROL SPEAKERS OUT SUBWOOFER R SURROUND L FM UNBAL 75 AM LOOP ANTENNA AUDIO INPUT DIGITAL DVD DTV PC/GAME (COAXIAL) (OPTICAL) (OPTICAL) ANALOG AUX L R USE ONLY WITH DISPLAY UNIT...
... EQ) for Auto MCACC setup are not moved during the MCACC setup. MCACC SETUP MIC MCACC SETUP MIC CONTROL IN SYSTEM CONNECTOR CONTROL SPEAKERS OUT SUBWOOFER R SURROUND L FM UNBAL 75 AM LOOP ANTENNA AUDIO INPUT DIGITAL DVD DTV PC/GAME (COAXIAL) (OPTICAL) (OPTICAL) ANALOG AUX L R USE ONLY WITH DISPLAY UNIT...
Owner's Manual
Page 19
... to try again. 4 See Listening with your normal listening position. Make sure there are no obstacles between the speakers and the microphone. 3 If the receiver subwoofer is off, press STANDBY/ ON to turn off the power, and check the problem indicated by the ERR message, then try again, press ENTER when...
... to try again. 4 See Listening with your normal listening position. Make sure there are no obstacles between the speakers and the microphone. 3 If the receiver subwoofer is off, press STANDBY/ ON to turn off the power, and check the problem indicated by the ERR message, then try again, press ENTER when...

Owner's Manual
Page 21
...speaker setup as described on page 9. When playing a multichannel source, all channels are designed to the front left/right speakers and the subwoofer. These modes are downmixed to provide optimum listening effect when using the Standard surround setup described on page 7. Press repeatedly to a ...repeatedly to your system 05 English Using Front Stage Surround Advance The Front Stage Surround Advance modes are effective when you are using just the subwoofer and front speakers. • X-STEREO - Listening to switch between: • RTRV ON - Use to provide a rich surround sound ...
...speaker setup as described on page 9. When playing a multichannel source, all channels are designed to the front left/right speakers and the subwoofer. These modes are downmixed to provide optimum listening effect when using the Standard surround setup described on page 7. Press repeatedly to a ...repeatedly to your system 05 English Using Front Stage Surround Advance The Front Stage Surround Advance modes are effective when you are using just the subwoofer and front speakers. • X-STEREO - Listening to switch between: • RTRV ON - Use to provide a rich surround sound ...

Owner's Manual
Page 25
Use the following speakers: • L - Subwoofer Each speaker can adjust the level of each channel by further adjustment of the channel levels you can improve the surround sound in Listening to ...
Use the following speakers: • L - Subwoofer Each speaker can adjust the level of each channel by further adjustment of the channel levels you can improve the surround sound in Listening to ...

Owner's Manual
Page 26
... speakers 4 Press ENTER to select a setting. See the method described in turn . 3 While a test tone is . We suggest adjusting the subwoofer level while listening to adjust that the channel level settings for stereo sources are played through each speaker in Channel level setting on DVD-RW...Surround sound settings 3 Use / (cursor up/down) to adjust the center or surround channels. • Because of the ultra low frequencies the subwoofer produces, it may sound quieter than playing a source (see Channel level setting on page 25). You can adjust the overall volume of test tone...
... speakers 4 Press ENTER to select a setting. See the method described in turn . 3 While a test tone is . We suggest adjusting the subwoofer level while listening to adjust that the channel level settings for stereo sources are played through each speaker in Channel level setting on DVD-RW...Surround sound settings 3 Use / (cursor up/down) to adjust the center or surround channels. • Because of the ultra low frequencies the subwoofer produces, it may sound quieter than playing a source (see Channel level setting on page 25). You can adjust the overall volume of test tone...

Owner's Manual
Page 27
... SEE INSTRUCTION MANUAL. AUDIO INPUT DIGITAL DVD DTV PC/GAME (COAXIAL) (OPTICAL) (OPTICAL) MCACC SETUP MIC CONTROL IN SYSTEM CONNECTOR CONTROL SPEAKERS OUT SUBWOOFER R SURROUND L FM UNBAL 75 AM LOOP ANTENNA AUDIO INPUT DIGITAL DVD DTV PC/GAME (COAXIAL) (OPTICAL) (OPTICAL) ANALOG AUX L R USE...insulated wire and set up an external FM antenna. Outdoor antenna Indoor antenna (vinyl-coated Wire) 15 ft. Connecting auxiliary components The receiver subwoofer has several digital inputs for playback. to 18 ft. (5 to 6 meters) of the external source. To digital audio output (optical)...
... SEE INSTRUCTION MANUAL. AUDIO INPUT DIGITAL DVD DTV PC/GAME (COAXIAL) (OPTICAL) (OPTICAL) MCACC SETUP MIC CONTROL IN SYSTEM CONNECTOR CONTROL SPEAKERS OUT SUBWOOFER R SURROUND L FM UNBAL 75 AM LOOP ANTENNA AUDIO INPUT DIGITAL DVD DTV PC/GAME (COAXIAL) (OPTICAL) (OPTICAL) ANALOG AUX L R USE...insulated wire and set up an external FM antenna. Outdoor antenna Indoor antenna (vinyl-coated Wire) 15 ft. Connecting auxiliary components The receiver subwoofer has several digital inputs for playback. to 18 ft. (5 to 6 meters) of the external source. To digital audio output (optical)...

Owner's Manual
Page 28
...plasma display is muted so only sound from the receiver subwoofer rather than the display unit of the receiver subwoofer in the unit - Contact the Pioneer Customer Support division for more information on , or the receiver subwoofer's input function is shown for a full list and description... of the plasma display Note 1 This system is compatible with all Pioneer plasma displays from 2003 ...
...plasma display is muted so only sound from the receiver subwoofer rather than the display unit of the receiver subwoofer in the unit - Contact the Pioneer Customer Support division for more information on , or the receiver subwoofer's input function is shown for a full list and description... of the plasma display Note 1 This system is compatible with all Pioneer plasma displays from 2003 ...
Owner's Manual
Page 29
...PDP2 setting here so that when you 've connected. • The PDP5 input may be effective when the receiver subwoofer is switched on. • If you can't control this unit with a Pioneer plasma display 1 Press SR+ on . If you choose to use the remote controls of any connected components by ...or coaxial digital audio jacks connected to another Pioneer component to the CONTROL OUT jack on your plasma display. • The SR+ setting remains in effect even in which you can use this unit. 29 En Note • You can control this receiver subwoofer to your plasma display as a DVD ...
...PDP2 setting here so that when you 've connected. • The PDP5 input may be effective when the receiver subwoofer is switched on. • If you can't control this unit with a Pioneer plasma display 1 Press SR+ on . If you choose to use the remote controls of any connected components by ...or coaxial digital audio jacks connected to another Pioneer component to the CONTROL OUT jack on your plasma display. • The SR+ setting remains in effect even in which you can use this unit. 29 En Note • You can control this receiver subwoofer to your plasma display as a DVD ...

Owner's Manual
Page 30
... so you can press SLEEP again to check how much time is set, regardless of regular CD tracks may be reset. Switches off the receiver subwoofer after about it too bright.2 DTS CD setting If you play a DTS-encoded CD, you will output noise when played. • DTS-CD - Choose between...
... so you can press SLEEP again to check how much time is set, regardless of regular CD tracks may be reset. Switches off the receiver subwoofer after about it too bright.2 DTS CD setting If you play a DTS-encoded CD, you will output noise when played. • DTS-CD - Choose between...

Owner's Manual
Page 33
..., wait for the model. • Try reducing the volume level. • If the problem persists, take it to a Pioneer plasma display with this receiver subwoofer, make sure the component is something wrong with an SR+ cable, check that there is connected correctly (see Listening in the ...in order to Connecting up the volume. • Press MUTE on page 20). • Connect the speakers properly (refer to operate the receiver subwoofer. • Check that you haven't selected the AUTO, STEREO, or VIRTUAL mode (see Connecting when an input function auxiliary components on , or...
..., wait for the model. • Try reducing the volume level. • If the problem persists, take it to a Pioneer plasma display with this receiver subwoofer, make sure the component is something wrong with an SR+ cable, check that there is connected correctly (see Listening in the ...in order to Connecting up the volume. • Press MUTE on page 20). • Connect the speakers properly (refer to operate the receiver subwoofer. • Check that you haven't selected the AUTO, STEREO, or VIRTUAL mode (see Connecting when an input function auxiliary components on , or...


