
Owner's Manual
Page 2
... appliances such as radios and televisions, use shielded cables and connectors for a Class B digital device, pursuant to operate the equipment. D8-10-3a_En NOTE: This equipment has been tested and found to comply with the instructions, may invalidate the user's right to Part 15 of the FCC Rules. Consult the dealer or an experienced radio/TV technician for help. D8-10-1-2_En...
... appliances such as radios and televisions, use shielded cables and connectors for a Class B digital device, pursuant to operate the equipment. D8-10-3a_En NOTE: This equipment has been tested and found to comply with the instructions, may invalidate the user's right to Part 15 of the FCC Rules. Consult the dealer or an experienced radio/TV technician for help. D8-10-1-2_En...
Owner's Manual
Page 3
... power lines or circuits. POWER-CORD PROTECTION - See Figure A. The product should be cleaned only with a three-wire grounding type plug, a plug having one way. CLEANING - LOCATION - ANTENNA LEAD IN WIRE GROUND CLAMP ELECTRIC SERVICE EQUIPMENT Fig. K041_En This product contains mercury. The product may result in proper operating condition. A product and cart combination should be installed in a wet basement; OUTDOOR ANTENNA GROUNDING - WALL...
... power lines or circuits. POWER-CORD PROTECTION - See Figure A. The product should be cleaned only with a three-wire grounding type plug, a plug having one way. CLEANING - LOCATION - ANTENNA LEAD IN WIRE GROUND CLAMP ELECTRIC SERVICE EQUIPMENT Fig. K041_En This product contains mercury. The product may result in proper operating condition. A product and cart combination should be installed in a wet basement; OUTDOOR ANTENNA GROUNDING - WALL...

Owner's Manual
Page 5
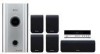
... you to confirm operation) x2 (page 16) • Display unit (page 14) • Power cord (page 12) • AM loop antenna (page 11) • FM wire antenna (page 11) • Display cable (page 11) • Coaxial cable (page 27) • Microphone (for Auto MCACC setup) (page 17) • These operating instructions • Warranty card Speakers (S-ST404) box: • Speakers (front x2, surround x2, center x1) (page 12) • Speaker cables x5 (page...
... you to confirm operation) x2 (page 16) • Display unit (page 14) • Power cord (page 12) • AM loop antenna (page 11) • FM wire antenna (page 11) • Display cable (page 11) • Coaxial cable (page 27) • Microphone (for Auto MCACC setup) (page 17) • These operating instructions • Warranty card Speakers (S-ST404) box: • Speakers (front x2, surround x2, center x1) (page 12) • Speaker cables x5 (page...
Owner's Manual
Page 6
... presets 23 Changing the frequency step 24 07 Surround sound settings Using the Setup menu 25 Channel level setting 25 Speaker distance setting 25 Dynamic Range Control 25 Dual mono setting 26 Adjusting the channel levels using the test tone. . . . .26 08 Other connections Connecting auxiliary components 27 Connecting an analog audio component 27 Listening to an external audio source 27 Connecting external antennas 27 Using this Pioneer product. Contents Thank you will know how to control your TV 31 Using the TV remote control buttons 31 Preset code list 32 Troubleshooting...
... presets 23 Changing the frequency step 24 07 Surround sound settings Using the Setup menu 25 Channel level setting 25 Speaker distance setting 25 Dynamic Range Control 25 Dual mono setting 26 Adjusting the channel levels using the test tone. . . . .26 08 Other connections Connecting auxiliary components 27 Connecting an analog audio component 27 Listening to an external audio source 27 Connecting external antennas 27 Using this Pioneer product. Contents Thank you will know how to control your TV 31 Using the TV remote control buttons 31 Preset code list 32 Troubleshooting...
Owner's Manual
Page 9
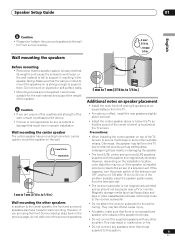
... equal distance from the television set OFF, and turn the power switch of the speaker. 5 mm to the screen of the center channel is not responsible for wall mounting. However, if you are not supplied. If the problem persists, place the speaker system away from the TV. • For optimum effect, install the rear speakers slightly above ear level. • Install the center speaker above or below the...
... equal distance from the television set OFF, and turn the power switch of the speaker. 5 mm to the screen of the center channel is not responsible for wall mounting. However, if you are not supplied. If the problem persists, place the speaker system away from the TV. • For optimum effect, install the rear speakers slightly above ear level. • Install the center speaker above or below the...
Owner's Manual
Page 12
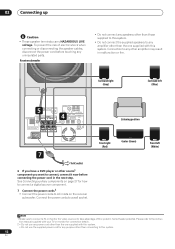
... right (Red) Center (Green) Front left (Blue) 5 MCACC CONTROL IN SETUP MIC CONTROL SPEAKERS SYSTEM CONNECTOR OUT SUB WOOFER R SURROUND L ANTENNA FM UNBAL 75Ω AM LOOP ANTENNA 4 AUDIO INPUT DIGITAL DVD DTV PC/GAME (COAXIAL) (OPTICAL) (OPTICAL) ANALOG AUX L USE ONLY WITH DISPLAY UNIT. Connection to AC inlets on the receiver subwoofer. See Connecting auxiliary components on page 27 for how to connect a digital source component. 7 Connect the power cords.2 • Connect the power cords to any purpose other than the one supplied with this system's home theater...
... right (Red) Center (Green) Front left (Blue) 5 MCACC CONTROL IN SETUP MIC CONTROL SPEAKERS SYSTEM CONNECTOR OUT SUB WOOFER R SURROUND L ANTENNA FM UNBAL 75Ω AM LOOP ANTENNA 4 AUDIO INPUT DIGITAL DVD DTV PC/GAME (COAXIAL) (OPTICAL) (OPTICAL) ANALOG AUX L USE ONLY WITH DISPLAY UNIT. Connection to AC inlets on the receiver subwoofer. See Connecting auxiliary components on page 27 for how to connect a digital source component. 7 Connect the power cords.2 • Connect the power cords to any purpose other than the one supplied with this system's home theater...

Owner's Manual
Page 14
... Lights during playback of a Dolby Digital source (page 19). 14 En SURR. Lights when a broadcast is being received. - Lights when a stereo FM broadcast is being received in the character display (kHz for AM, MHz for details. 3 VOLUME buttons Use to adjust the volume. 3 45 6 4 AUDIO INPUT (page 27) Press repeatedly to select one of the external audio inputs (DVD, DTV, PC/GAME or AUX). 5 SURROUND Use to select a Surround mode (page 19). 6 IR remote sensor (page 16) Display 123 SOUND...
... Lights during playback of a Dolby Digital source (page 19). 14 En SURR. Lights when a broadcast is being received. - Lights when a stereo FM broadcast is being received in the character display (kHz for AM, MHz for details. 3 VOLUME buttons Use to adjust the volume. 3 45 6 4 AUDIO INPUT (page 27) Press repeatedly to select one of the external audio inputs (DVD, DTV, PC/GAME or AUX). 5 SURROUND Use to select a Surround mode (page 19). 6 IR remote sensor (page 16) Display 123 SOUND...

Owner's Manual
Page 15
... (AUX) input. Controls and displays 03 English Remote control 1 2 4 5 7 9 10 12 13 16 STANDBY/ON MUTE VOLUME 3 DVD DTV PC/GAME AUX TUNER ENTER SETUP ST SOUND SOUND RETRIEVER CLEAR SLEEP SR TUNE ST ENTER TUNE TEST TONE SURROUND ADVANCED MCACC CHANNEL TV VOLUME INPUT TV CONTROL 6 8 11 14 15 1 STANDBY/ON Press to switch the receiver subwoofer on (page 17, 23, 24, 25, 30). 8 SR+ Use to setup the SR+ features and to select the SR+ mode (page 29). 9 / / / (cursor buttons...
... (AUX) input. Controls and displays 03 English Remote control 1 2 4 5 7 9 10 12 13 16 STANDBY/ON MUTE VOLUME 3 DVD DTV PC/GAME AUX TUNER ENTER SETUP ST SOUND SOUND RETRIEVER CLEAR SLEEP SR TUNE ST ENTER TUNE TEST TONE SURROUND ADVANCED MCACC CHANNEL TV VOLUME INPUT TV CONTROL 6 8 11 14 15 1 STANDBY/ON Press to switch the receiver subwoofer on (page 17, 23, 24, 25, 30). 8 SR+ Use to setup the SR+ features and to select the SR+ mode (page 29). 9 / / / (cursor buttons...

Owner's Manual
Page 17
... SEE INSTRUCTION MANUAL. STANDBY/ON MUTE VOLUME DVD DTV PC/GAME AUX TUNER SETUP ST SOUND SOUND RETRIEVER SR TUNE ST ENTER TUNE TEST TONE SURROUND ADVANCED MCACC CHANNEL VOLUME 1 Connect the microphone to select a setting, then press ENTER. Switches the demo display on. • DEMO OFF - Switches the demo display off (this may result in for the first time). MCACC CONTROL IN SETUP MIC CONTROL SPEAKERS SYSTEM CONNECTOR OUT SUB WOOFER R SURROUND L USE ONLY WITH DISPLAY UNIT. ENTER SETUP ST SOUND SOUND RETRIEVER CLEAR SLEEP SR TUNE ST ENTER TUNE TEST TONE...
... SEE INSTRUCTION MANUAL. STANDBY/ON MUTE VOLUME DVD DTV PC/GAME AUX TUNER SETUP ST SOUND SOUND RETRIEVER SR TUNE ST ENTER TUNE TEST TONE SURROUND ADVANCED MCACC CHANNEL VOLUME 1 Connect the microphone to select a setting, then press ENTER. Switches the demo display on. • DEMO OFF - Switches the demo display off (this may result in for the first time). MCACC CONTROL IN SETUP MIC CONTROL SPEAKERS SYSTEM CONNECTOR OUT SUB WOOFER R SURROUND L USE ONLY WITH DISPLAY UNIT. ENTER SETUP ST SOUND SOUND RETRIEVER CLEAR SLEEP SR TUNE ST ENTER TUNE TEST TONE...
Owner's Manual
Page 18
... RETRY2 When the MCACC setup is complete, the volume level returns to normal, COMPLETE3 shows in the display, and Acoustic Calibration EQ is activated.4 Note 1 • If the room environment is too high, NOISY blinks in the display, there may interfere with your mic or the speaker connections. If this doesn't work, press MCACC, turn the power on /off Acoustic Calibration EQ. 18 En
... RETRY2 When the MCACC setup is complete, the volume level returns to normal, COMPLETE3 shows in the display, and Acoustic Calibration EQ is activated.4 Note 1 • If the room environment is too high, NOISY blinks in the display, there may interfere with your mic or the speaker connections. If this doesn't work, press MCACC, turn the power on /off Acoustic Calibration EQ. 18 En

Owner's Manual
Page 25
... playback channel. Front left speaker • SW - Dynamic Range Control works only with Dolby Digital soundtracks and some of the dialog-can adjust the level of setting the channel levels is playing in your listening room. Use the following buttons to use the Setup menu. See Adjusting the channel levels using the test tone on page 26 for more on this. 1 Select stereo or multichannel playback for a source. 2 Press SETUP. 3 Use the / (cursor left/right) buttons to select CH LEVEL, then...
... playback channel. Front left speaker • SW - Dynamic Range Control works only with Dolby Digital soundtracks and some of the dialog-can adjust the level of setting the channel levels is playing in your listening room. Use the following buttons to use the Setup menu. See Adjusting the channel levels using the test tone on page 26 for more on this. 1 Select stereo or multichannel playback for a source. 2 Press SETUP. 3 Use the / (cursor left/right) buttons to select CH LEVEL, then...

Owner's Manual
Page 26
... test tone at the same volume from each speaker in Channel level setting on page 25. 4 When you're done, press ENTER to select a setting. Select one of the ultra low frequencies the subwoofer produces, it may sound quieter than playing a source (see Channel level setting on DVD-RW discs recorded with bilingual audio. 1 Press SETUP. 2 Use the / (cursor left/right) buttons to select DUALMONO, then press ENTER. 3 Use / (cursor up /down ) to exit test tone setup. • If you use...
... test tone at the same volume from each speaker in Channel level setting on page 25. 4 When you're done, press ENTER to select a setting. Select one of the ultra low frequencies the subwoofer produces, it may sound quieter than playing a source (see Channel level setting on DVD-RW discs recorded with bilingual audio. 1 Press SETUP. 2 Use the / (cursor left/right) buttons to select DUALMONO, then press ENTER. 3 Use / (cursor up /down ) to exit test tone setup. • If you use...
Owner's Manual
Page 27
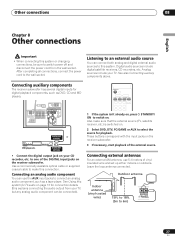
... analog audio component You can be sure to connect an analog audio component, such as DVD, CD and MD players. Also make this system or changing connections, be connected). MCACC CONTROL IN SETUP MIC CONTROL SPEAKERS SYSTEM CONNECTOR OUT SUB WOOFER R SURROUND L ANTENNA FM UNBAL 75Ω AM LOOP ANTENNA AUDIO INPUT DIGITAL DVD DTV PC/GAME (COAXIAL) (OPTICAL) (OPTICAL) ANALOG AUX L USE ONLY WITH DISPLAY UNIT. R SEE INSTRUCTION MANUAL. Connecting external antennas For an external AM antenna, use the AUX input jacks to switch power off and disconnect the power cord from...
... analog audio component You can be sure to connect an analog audio component, such as DVD, CD and MD players. Also make this system or changing connections, be connected). MCACC CONTROL IN SETUP MIC CONTROL SPEAKERS SYSTEM CONNECTOR OUT SUB WOOFER R SURROUND L ANTENNA FM UNBAL 75Ω AM LOOP ANTENNA AUDIO INPUT DIGITAL DVD DTV PC/GAME (COAXIAL) (OPTICAL) (OPTICAL) ANALOG AUX L USE ONLY WITH DISPLAY UNIT. R SEE INSTRUCTION MANUAL. Connecting external antennas For an external AM antenna, use the AUX input jacks to switch power off and disconnect the power cord from...
Owner's Manual
Page 28
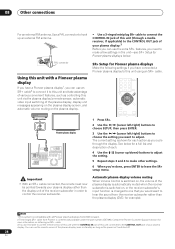
... connected a Pioneer plasma display to adjust. Contact the Pioneer Customer Support division for more information on the plasma display. Media receiver CONTROL OUT Pioneer plasma display MCACC CONTROL IN SETUP MIC CONTROL SPEAKERS SYSTEM CONNECTOR OUT SUB WOOFER R SURROUND L ANTENNA FM UNBAL 75Ω AM LOOP ANTENNA AUDIO INPUT DIGITAL ANALOG DVD DTV PC/GAME AUX (COAXIAL) (OPTICAL) (OPTICAL) L USE ONLY WITH DISPLAY UNIT. ANTENNA PAL connector Using this unit with the CONTROL IN jack of this unit connected to make other settings. 6 When you want to hear the sound...
... connected a Pioneer plasma display to adjust. Contact the Pioneer Customer Support division for more information on the plasma display. Media receiver CONTROL OUT Pioneer plasma display MCACC CONTROL IN SETUP MIC CONTROL SPEAKERS SYSTEM CONNECTOR OUT SUB WOOFER R SURROUND L ANTENNA FM UNBAL 75Ω AM LOOP ANTENNA AUDIO INPUT DIGITAL ANALOG DVD DTV PC/GAME AUX (COAXIAL) (OPTICAL) (OPTICAL) L USE ONLY WITH DISPLAY UNIT. ANTENNA PAL connector Using this unit with the CONTROL IN jack of this unit connected to make other settings. 6 When you want to hear the sound...
Owner's Manual
Page 31
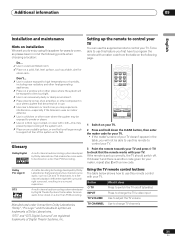
... Dolby Laboratories. Glossary Dolby Digital A multi-channel audio encoding system developed by Digital Theater Systems that becomes hot in a well-ventilated room. To be able to use this remote control with your maker, repeat step 2 with your TV. VOLUME DVD DTV PC/GAME AUX TUNER ENTER SETUP ST SOUND SOUND RETRIEVER CLEAR SR TUNE ST ENTER TUNE TEST TONE SURROUND ADVANCED MCACC CHANNEL TV VOLUME INPUT TV CONTROL 1 Switch on your TV. 2 Press and hold down the CLEAR button...
... Dolby Laboratories. Glossary Dolby Digital A multi-channel audio encoding system developed by Digital Theater Systems that becomes hot in a well-ventilated room. To be able to use this remote control with your maker, repeat step 2 with your TV. VOLUME DVD DTV PC/GAME AUX TUNER ENTER SETUP ST SOUND SOUND RETRIEVER CLEAR SR TUNE ST ENTER TUNE TEST TONE SURROUND ADVANCED MCACC CHANNEL TV VOLUME INPUT TV CONTROL 1 Switch on your TV. 2 Press and hold down the CLEAR button...
Owner's Manual
Page 32
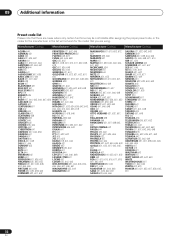
...only certain functions may be controllable after assigning the proper preset code, or the codes for the manufacturer in the list will not work for the model that you are using. Manufacturer Code(s) Manufacturer Code(s) Manufacturer Code(s) Manufacturer Code(s) ACURA ..., 649 BLAUPUNKT 631 GRAETZ 631, 642 NEC 659 BLUE SKY 641 GRANADA 607, 635, 642, 643, 648 NECKERMANN 631, 607 BLUE STAR 618 GRADIENTE 630, 657 NEI 607, 642 ... VOXSON 631 WALTHAM 643 WATSON 607 WATT RADIO 632, 642, 649 WHITE WESTINGHOUSE 607 YOKO 607, 642, 646 ZENITH 603, 620 PIONEER 600, 631, 632, 607, 636, 642, 651 32...
...only certain functions may be controllable after assigning the proper preset code, or the codes for the manufacturer in the list will not work for the model that you are using. Manufacturer Code(s) Manufacturer Code(s) Manufacturer Code(s) Manufacturer Code(s) ACURA ..., 649 BLAUPUNKT 631 GRAETZ 631, 642 NEC 659 BLUE SKY 641 GRANADA 607, 635, 642, 643, 648 NECKERMANN 631, 607 BLUE STAR 618 GRADIENTE 630, 657 NEI 607, 642 ... VOXSON 631 WALTHAM 643 WATSON 607 WATT RADIO 632, 642, 649 WHITE WESTINGHOUSE 607 YOKO 607, 642, 646 ZENITH 603, 620 PIONEER 600, 631, 632, 607, 636, 642, 651 32...
Owner's Manual
Page 33
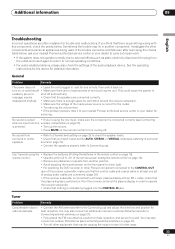
... to Connecting external antennas on . No sound from surround or center speakers. • Refer to Channel level setting on page 25 to check the speaker levels. • Check that you 're using the • Replace the batteries (Putting the batteries in another position. • Avoid exposing the remote sensor on the front panel to direct light. • For operating the DVD recorder or other Pioneer component connected to the CONTROL OUT jack of this component...
... to Connecting external antennas on . No sound from surround or center speakers. • Refer to Channel level setting on page 25 to check the speaker levels. • Check that you 're using the • Replace the batteries (Putting the batteries in another position. • Avoid exposing the remote sensor on the front panel to direct light. • For operating the DVD recorder or other Pioneer component connected to the CONTROL OUT jack of this component...

Owner's Manual
Page 35
...; Accessories Remote control 1 Display unit 1 AA/R6 dry cell batteries (to confirm operation 2 Display cable 1 AM loop antenna 1 FM wire antenna 1 Microphone (for Auto MCACC setup 1 Coaxial cable 1 Power cord 1 Warranty card 1 These operating instructions S-ST404 Speaker system (Front speakers x2, surround speakers x2, center speaker x1) • Front/Surround speakers Enclosure Closed-box bookshelf type (magnetically shielded) System 7.7 cm 1-way system Speakers 7.7 cm cone type Nominal impedance 4 Ω Frequency range 80 Hz to 20 kHz Maximum input power 100...
...; Accessories Remote control 1 Display unit 1 AA/R6 dry cell batteries (to confirm operation 2 Display cable 1 AM loop antenna 1 FM wire antenna 1 Microphone (for Auto MCACC setup 1 Coaxial cable 1 Power cord 1 Warranty card 1 These operating instructions S-ST404 Speaker system (Front speakers x2, surround speakers x2, center speaker x1) • Front/Surround speakers Enclosure Closed-box bookshelf type (magnetically shielded) System 7.7 cm 1-way system Speakers 7.7 cm cone type Nominal impedance 4 Ω Frequency range 80 Hz to 20 kHz Maximum input power 100...

Owner's Manual
Page 36
... electromagnetic interference with the instructions, may cause harmful interference to radio communications. Connect the equipment into an outlet on , the user is encouraged to try to which can radiate radio frequency energy and, if not installed and used to connect the unit to Part 15 of the FCC Rules. CAUTION RISK OF ELECTRIC SHOCK DO NOT OPEN CAUTION: TO PREVENT THE...
... electromagnetic interference with the instructions, may cause harmful interference to radio communications. Connect the equipment into an outlet on , the user is encouraged to try to which can radiate radio frequency energy and, if not installed and used to connect the unit to Part 15 of the FCC Rules. CAUTION RISK OF ELECTRIC SHOCK DO NOT OPEN CAUTION: TO PREVENT THE...
Owner's Manual
Page 37
... checks to your home, consult your obsolete outlet. Refer all servicing to lightning and power-line surges. Adjust only those controls that produce heat. Upon completion of any service or repairs to insert the plug fully into the outlet, try reversing the plug. NATIONAL ELECTRICAL CODE D1-4-2-2_En This product is operated. K057_En All the safety and operating instructions should use in a risk of...
... checks to your home, consult your obsolete outlet. Refer all servicing to lightning and power-line surges. Adjust only those controls that produce heat. Upon completion of any service or repairs to insert the plug fully into the outlet, try reversing the plug. NATIONAL ELECTRICAL CODE D1-4-2-2_En This product is operated. K057_En All the safety and operating instructions should use in a risk of...


