
Owner's Manual
Page 3
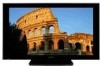
... or cords associated with accessories sold with PDK-TS23 stand. Product Name: Plasma Display Model Number: PRO-FHD1 Product Category: Class B Personal Computers & Peripherals Responsible Party Name: PIONEER ELECTRONICS SERVICE, INC. D8-10-3a_En IMPORTANT NOTICE - D1-4-2-6-1_En CAUTION: This Model PRO-FHD1 for use shielded cables and connectors for connections. Wash hands after handling. Address...
... or cords associated with accessories sold with PDK-TS23 stand. Product Name: Plasma Display Model Number: PRO-FHD1 Product Category: Class B Personal Computers & Peripherals Responsible Party Name: PIONEER ELECTRONICS SERVICE, INC. D8-10-3a_En IMPORTANT NOTICE - D1-4-2-6-1_En CAUTION: This Model PRO-FHD1 for use shielded cables and connectors for connections. Wash hands after handling. Address...
Owner's Manual
Page 4
...Connecting the power cord 18 How to operate your model properly. Please read through these operating instructions so you for buying this Pioneer product. Contents Contents Thank you will know how to route cables 19 Preparing the remote control unit ..........20 Inserting batteries 20...Safety Precautions 03 Accessories 04 Supplied Accessories 05 Part Names Main unit 13 Remote control unit 14 Connection panel 15 06 Preparation Installing the Plasma Display 16 Preventing the Plasma Display from that shown in a safe place for future reference. After you have finished reading the ...
...Connecting the power cord 18 How to operate your model properly. Please read through these operating instructions so you for buying this Pioneer product. Contents Contents Thank you will know how to route cables 19 Preparing the remote control unit ..........20 Inserting batteries 20...Safety Precautions 03 Accessories 04 Supplied Accessories 05 Part Names Main unit 13 Remote control unit 14 Connection panel 15 06 Preparation Installing the Plasma Display 16 Preventing the Plasma Display from that shown in a safe place for future reference. After you have finished reading the ...
Owner's Manual
Page 6
...PRO-FHD1 Plasma Display incorporates a very thin design. NOTE The following the recommendations listed below : Usage guidelines All phosphor-based screens (including conventional tube-type televisions) can ensure longer and satisfactory results from your Pioneer Plasma Display for a long time, please carefully read this Pioneer Plasma Display incorporates state-of inactive light cells. • Panel...screen motion video for an equal or greater amount of the Pioneer PRO-FHD1 Plasma Display will not be avoided by using the Plasma Display, always switch the display to "STANDBY" mode. ...
...PRO-FHD1 Plasma Display incorporates a very thin design. NOTE The following the recommendations listed below : Usage guidelines All phosphor-based screens (including conventional tube-type televisions) can ensure longer and satisfactory results from your Pioneer Plasma Display for a long time, please carefully read this Pioneer Plasma Display incorporates state-of inactive light cells. • Panel...screen motion video for an equal or greater amount of the Pioneer PRO-FHD1 Plasma Display will not be avoided by using the Plasma Display, always switch the display to "STANDBY" mode. ...
Owner's Manual
Page 7
...some cells can only be adversely affected. Depending on how the Plasma Display is in the discolouration or scratch of the cabinet. If this is rapidly moved from tilting over 6.2 million cells.) All Pioneer display panels are visible at a normal viewing distance of between 2.5 and 3.5.... The screen is dimmed when a still image is mostly composed of ultra-precision technology and undergo individual quality control. Pioneer Plasma Display panels contain a very large number of the product may take place on the product and wait until condensation disappears. Condensation •...
...some cells can only be adversely affected. Depending on how the Plasma Display is in the discolouration or scratch of the cabinet. If this is rapidly moved from tilting over 6.2 million cells.) All Pioneer display panels are visible at a normal viewing distance of between 2.5 and 3.5.... The screen is dimmed when a still image is mostly composed of ultra-precision technology and undergo individual quality control. Pioneer Plasma Display panels contain a very large number of the product may take place on the product and wait until condensation disappears. Condensation •...
Owner's Manual
Page 8
...; Displaying the same still images for long periods should be temporary or permanent. Image Retention When a static image is left . This plasma display system is displayed continuously for several hours, or for extended periods of time, or use one of these viewing modes repeatedly within ...may cause after-image lagging. Image retention, also known as burn-in, can be irreparable. 8 En 01 Important User Guidance Information CAUTION Panel sticking and after-image lag • Displaying the same images such as still images for a period of time may cause image retention. The...
...; Displaying the same still images for long periods should be temporary or permanent. Image Retention When a static image is left . This plasma display system is displayed continuously for several hours, or for extended periods of time, or use one of these viewing modes repeatedly within ...may cause after-image lagging. Image retention, also known as burn-in, can be irreparable. 8 En 01 Important User Guidance Information CAUTION Panel sticking and after-image lag • Displaying the same images such as still images for a period of time may cause image retention. The...
Owner's Manual
Page 9
...table. If you to perform many useful functions, but it can also cause personal injuries and property damage if improperly handled. The Plasma Display used in this manual in a safe place - Removing covers can cause the product to fall from the AC outlet before ... the product with impact. Wall or ceiling mounting - Never expose the screen of the front protection panel changes, resulting in case the Plasma Display breaks. 13. The optical characteristics of the Plasma Display to perform repairs. Because it . English 9 En Unplug the power cord from resting on...
...table. If you to perform many useful functions, but it can also cause personal injuries and property damage if improperly handled. The Plasma Display used in this manual in a safe place - Removing covers can cause the product to fall from the AC outlet before ... the product with impact. Wall or ceiling mounting - Never expose the screen of the front protection panel changes, resulting in case the Plasma Display breaks. 13. The optical characteristics of the Plasma Display to perform repairs. Because it . English 9 En Unplug the power cord from resting on...
Owner's Manual
Page 11
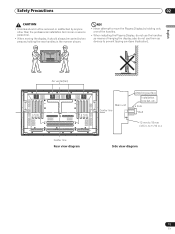
... diagram Side view diagram 11 En also do not use them as means of the handles. • When installing the Plasma Display, do not use the handles as devices to move the Plasma Display by two persons holding only one of hanging the display; to 18 mm (1/2 in. NO! • Never attempt...
... diagram Side view diagram 11 En also do not use them as means of the handles. • When installing the Plasma Display, do not use the handles as devices to move the Plasma Display by two persons holding only one of hanging the display; to 18 mm (1/2 in. NO! • Never attempt...

Owner's Manual
Page 14
... AUTO AV SIZE SETUP DISPLAY SELECTION 2 PC 8 3 INPUT 9 4 1 2 3 4 5 6 SPLIT SUB INPUT 5 VOLUME MUTING SWAP 6 10 11 12 RETURN 7 HOME MENU 13 ENTER AXD1534 14 15 PLASMA DISPLAY When handling the remote control unit • Do not drop the remote control unit or expose it to moisture. • Do not use this...
... AUTO AV SIZE SETUP DISPLAY SELECTION 2 PC 8 3 INPUT 9 4 1 2 3 4 5 6 SPLIT SUB INPUT 5 VOLUME MUTING SWAP 6 10 11 12 RETURN 7 HOME MENU 13 ENTER AXD1534 14 15 PLASMA DISPLAY When handling the remote control unit • Do not drop the remote control unit or expose it to moisture. • Do not use this...

Owner's Manual
Page 15
... has an impedance of 8 Ω to these connectors without first consulting your Pioneer installation technician. Connect a speaker that has an impedance of 8 Ω to16...factory setup) Never connect any component to 16 Ω. 15 En Part Names Connection panel R SPEAKER 8+Ω ~16Ω- 1 SERVICE ONLY CONTROL IN OUT 2 3 INPUT1...INPUT6 R L 7 89 10 English 05 AC IN SPEAKER 8Ω ~16Ω + - These connectors are used for Plasma Display setup adjustments. 3 CONTROL IN/OUT terminals 4 INPUT1 terminal (DVI-D) 5 INPUT2 terminal (HDMI) 6 INPUT3 terminal (...
... has an impedance of 8 Ω to these connectors without first consulting your Pioneer installation technician. Connect a speaker that has an impedance of 8 Ω to16...factory setup) Never connect any component to 16 Ω. 15 En Part Names Connection panel R SPEAKER 8+Ω ~16Ω- 1 SERVICE ONLY CONTROL IN OUT 2 3 INPUT1...INPUT6 R L 7 89 10 English 05 AC IN SPEAKER 8Ω ~16Ω + - These connectors are used for Plasma Display setup adjustments. 3 CONTROL IN/OUT terminals 4 INPUT1 terminal (DVI-D) 5 INPUT2 terminal (HDMI) 6 INPUT3 terminal (...
Owner's Manual
Page 16
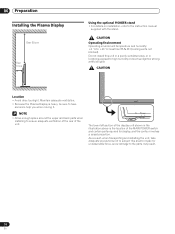
Maintain adequate ventilation. • Because the Plasma Display is the location of the MAIN POWER switch and certain parts required for display, and the contour involves a raised projection. The lower left section ...) Do not install this area to impact or unreasonable force, since damage to have someone help you when moving it. 06 Preparation Preparation Installing the Plasma Display Over 50 cm Over 10 cm Using the optional PIONEER stand • For details on installation, refer to +40 ˚C;
Maintain adequate ventilation. • Because the Plasma Display is the location of the MAIN POWER switch and certain parts required for display, and the contour involves a raised projection. The lower left section ...) Do not install this area to impact or unreasonable force, since damage to have someone help you when moving it. 06 Preparation Preparation Installing the Plasma Display Over 50 cm Over 10 cm Using the optional PIONEER stand • For details on installation, refer to +40 ˚C;

Owner's Manual
Page 17
... and cause injury. NOTE Use hooks, ropes, chains, and fittings that you do so could fall over. Failure to do not take these precautions, the Plasma Display could result in the diagram using screws that are available on the left and right sides. When installing the... 12 mm to 15 mm (1/2 in .) and that are available on a table or floor Using a wall for stabilization Stabilize the Plasma Display as earthquakes, or of 6 mm (1/4 in . Preparation 06 English Preventing the Plasma Display from Falling Over After installing the stand, be sure to take special care to ensure that the...
... and cause injury. NOTE Use hooks, ropes, chains, and fittings that you do so could fall over. Failure to do not take these precautions, the Plasma Display could result in the diagram using screws that are available on the left and right sides. When installing the... 12 mm to 15 mm (1/2 in .) and that are available on a table or floor Using a wall for stabilization Stabilize the Plasma Display as earthquakes, or of 6 mm (1/4 in . Preparation 06 English Preventing the Plasma Display from Falling Over After installing the stand, be sure to take special care to ensure that the...
Owner's Manual
Page 18
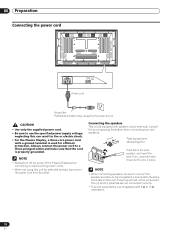
...insert the wire. neglecting this can result in place. Then, close tab firmly to secure the wire in fire or electric shock. • For the Plasma Display, a three-core power cord with 8 Ω to 16 Ω impedance. 18 En 06 Preparation Connecting the power cord AC IN SPEAKER ...8Ω ~16Ω + - Always connect the power cord to use of the Plasma Display when connecting or disconnecting power cords. • When not using this unit. CAUTION • Use only the supplied power cord. • Be ...
...insert the wire. neglecting this can result in place. Then, close tab firmly to secure the wire in fire or electric shock. • For the Plasma Display, a three-core power cord with 8 Ω to 16 Ω impedance. 18 En 06 Preparation Connecting the power cord AC IN SPEAKER ...8Ω ~16Ω + - Always connect the power cord to use of the Plasma Display when connecting or disconnecting power cords. • When not using this unit. CAUTION • Use only the supplied power cord. • Be ...
Owner's Manual
Page 20
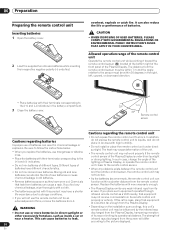
...; Do not expose the remote control unit to the (+) and (-) indicators. • Do not mix batteries of the Plasma Display is the case, place that equipment at the bottom right of the front panel of batteries have worn out. 06 Preparation Preparing the remote control unit Inserting batteries 1 Open the battery cover...
...; Do not expose the remote control unit to the (+) and (-) indicators. • Do not mix batteries of the Plasma Display is the case, place that equipment at the bottom right of the front panel of batteries have worn out. 06 Preparation Preparing the remote control unit Inserting batteries 1 Open the battery cover...
Owner's Manual
Page 21
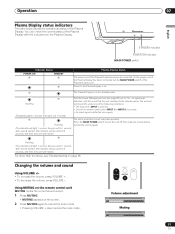
... then wait one of the following conditions: • The main unit's INPUT is pressed; • One of the Plasma Display with the result that the unit switched to the Plasma Display is detected once again. (Repeatedly lights 1 second, then goes out 1 second) Flashing The unit's protection circuit ...have operated. Using MUTING on the remote control unit MUTING mutes the current sound output. 1 Press MUTING. • MUTING appears on the Plasma Display. SPLIT VOLUME MUTING SUB INPUT Volume adjustment Muting 21 En You can check the current status of the remote control unit's INPUT 1 ...
... then wait one of the following conditions: • The main unit's INPUT is pressed; • One of the Plasma Display with the result that the unit switched to the Plasma Display is detected once again. (Repeatedly lights 1 second, then goes out 1 second) Flashing The unit's protection circuit ...have operated. Using MUTING on the remote control unit MUTING mutes the current sound output. 1 Press MUTING. • MUTING appears on the Plasma Display. SPLIT VOLUME MUTING SUB INPUT Volume adjustment Muting 21 En You can check the current status of the remote control unit's INPUT 1 ...
Owner's Manual
Page 22
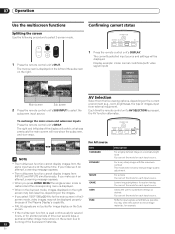
... is displayed on the left sides of the display will be displayed properly because of time over several hours, or for shorter periods of the Plasma Display's capability. For a very sharp image with video signal input) INPUT2 1080i STANDARD FULL Main screen Sub screen 2 Press the remote control unit's SUB INPUT...
... is displayed on the left sides of the display will be displayed properly because of time over several hours, or for shorter periods of the Plasma Display's capability. For a very sharp image with video signal input) INPUT2 1080i STANDARD FULL Main screen Sub screen 2 Press the remote control unit's SUB INPUT...
Owner's Manual
Page 23
... input signals. A thin side mask appears on each side, and you press SCREEN SIZE, the selection is 1920x1080). For 16:9 letterbox pictures. NOTE • The Plasma Display's imaging characteristics may also see bars on each side of video signals currently received. • Each time you may deteriorate if the following screen... viewing, it is strongly recommended to customize settings as desired. NOTE • If you have selected "DYNAMIC", you cannot select "Contrast", "Brightness", "Color", "Tint", "Sharpness", "Pro Adjust", and "Reset"; For 14:9 letterbox pictures.
... input signals. A thin side mask appears on each side, and you press SCREEN SIZE, the selection is 1920x1080). For 16:9 letterbox pictures. NOTE • The Plasma Display's imaging characteristics may also see bars on each side of video signals currently received. • Each time you may deteriorate if the following screen... viewing, it is strongly recommended to customize settings as desired. NOTE • If you have selected "DYNAMIC", you cannot select "Contrast", "Brightness", "Color", "Tint", "Sharpness", "Pro Adjust", and "Reset"; For 14:9 letterbox pictures.
Owner's Manual
Page 25
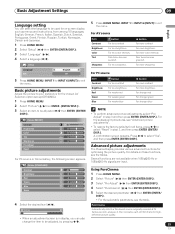
... or Home Gallery, the following screen appears. Picture STANDARD Contrast 40 Brightness 0 Advanced picture adjustments The Plasma Display provides various advanced functions for high- Red Green Blue Reset 0 2 Select "Picture" ( / then ENTER (ENTER/DISP.)). 0 3 Select "Pro Adjust" ( / then ENTER (ENTER/DISP.)). 0 4 Select "PureCinema" ( / then ENTER (ENTER/DISP.)). 5 Select the desired ... "Picture" ( / then ENTER (ENTER/DISP.)). 3 Select an item to be adjusted ( / then ENTER (ENTER/ DISP.)). Several functions are not available when 1080p@50 Hz or 1080p@60 Hz signals are input.
... or Home Gallery, the following screen appears. Picture STANDARD Contrast 40 Brightness 0 Advanced picture adjustments The Plasma Display provides various advanced functions for high- Red Green Blue Reset 0 2 Select "Picture" ( / then ENTER (ENTER/DISP.)). 0 3 Select "Pro Adjust" ( / then ENTER (ENTER/DISP.)). 0 4 Select "PureCinema" ( / then ENTER (ENTER/DISP.)). 5 Select the desired ... "Picture" ( / then ENTER (ENTER/DISP.)). 3 Select an item to be adjusted ( / then ENTER (ENTER/ DISP.)). Several functions are not available when 1080p@50 Hz or 1080p@60 Hz signals are input.

Owner's Manual
Page 29
.... 2 Select "Power Control" ( / then ENTER (ENTER/DISP.)). 3 Select "Energy Save" ( / ). 4 Select "Save 1" or "Save 2" ( / ). Power Management The Plasma Display will be automatically placed into the standby mode when no signal is received for 8 minutes. 5 Press HOME MENU, INPUT 1 to INPUT 6 (INPUT) to exit... is received for 8 minutes. 1 Press HOME MENU. 2 Select "Power Control" ( / then ENTER (ENTER/DISP.). 3 Select "No Signal off The Plasma Display will be automatically placed into the standby mode if no signal is received. 1 Press HOME MENU. 2 Select "Power Control" ( / then ENTER (...
.... 2 Select "Power Control" ( / then ENTER (ENTER/DISP.)). 3 Select "Energy Save" ( / ). 4 Select "Save 1" or "Save 2" ( / ). Power Management The Plasma Display will be automatically placed into the standby mode when no signal is received for 8 minutes. 5 Press HOME MENU, INPUT 1 to INPUT 6 (INPUT) to exit... is received for 8 minutes. 1 Press HOME MENU. 2 Select "Power Control" ( / then ENTER (ENTER/DISP.). 3 Select "No Signal off The Plasma Display will be automatically placed into the standby mode if no signal is received. 1 Press HOME MENU. 2 Select "Power Control" ( / then ENTER (...
Owner's Manual
Page 30
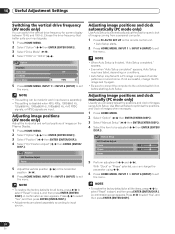
... only) Adjust the horizontal and vertical positions of images using / . 6 Press HOME MENU, INPUT 1 to INPUT 6 (INPUT) to the unit and switch it on the Plasma Display. 1 Press HOME MENU. 2 Select "Option" ( / then ENTER (ENTER/DISP.)). 3 Select "Position" ( / then ENTER (ENTER/DISP.)). 4 Select "H/V Position Adjust" ( / then ENTER (ENTER/ DISP...
... only) Adjust the horizontal and vertical positions of images using / . 6 Press HOME MENU, INPUT 1 to INPUT 6 (INPUT) to the unit and switch it on the Plasma Display. 1 Press HOME MENU. 2 Select "Option" ( / then ENTER (ENTER/DISP.)). 3 Select "Position" ( / then ENTER (ENTER/DISP.)). 4 Select "H/V Position Adjust" ( / then ENTER (ENTER/ DISP...

Owner's Manual
Page 32
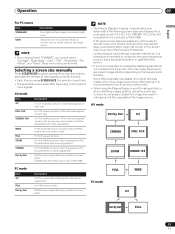
... Mode" ( / ). 4 Select "WIDE" or "4:3" ( / ). Selecting a screen size for received 4:3 aspect ratio signals (AV mode only) Specify whether the Plasma Display should choose the 4:3 mode or WIDE mode when 4:3 aspect ratio signals are received from a connected HDMI equipment (see page 33). Item WIDE 4:3 Description Wide...to exit the menu. On WIDE 32 En 10 Useful Adjustment Settings Selecting a screen size automatically (AV mode only) The Plasma Display automatically selects an appropriate screen size when video signals are received with "On" selected. Keeps the 4:3 aspect ratio ...
... Mode" ( / ). 4 Select "WIDE" or "4:3" ( / ). Selecting a screen size for received 4:3 aspect ratio signals (AV mode only) Specify whether the Plasma Display should choose the 4:3 mode or WIDE mode when 4:3 aspect ratio signals are received from a connected HDMI equipment (see page 33). Item WIDE 4:3 Description Wide...to exit the menu. On WIDE 32 En 10 Useful Adjustment Settings Selecting a screen size automatically (AV mode only) The Plasma Display automatically selects an appropriate screen size when video signals are received with "On" selected. Keeps the 4:3 aspect ratio ...


