
Owner's Manual
Page 2
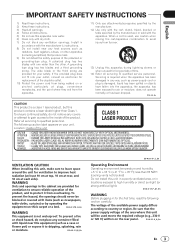
... regulations when shielded cables and connectors are designed to operate the equipment. Reorient or relocate the receiving antenna. - NO USER-SERVICEABLE PARTS INSIDE. If this Pioneer product. CAUTION: TO PREVENT THE RISK OF ELECTRIC SHOCK, DO NOT REMOVE COVER (OR BACK). IMPORTANT CAUTION RISK OF ELECTRIC SHOCK DO NOT OPEN The...
... regulations when shielded cables and connectors are designed to operate the equipment. Reorient or relocate the receiving antenna. - NO USER-SERVICEABLE PARTS INSIDE. If this Pioneer product. CAUTION: TO PREVENT THE RISK OF ELECTRIC SHOCK, DO NOT REMOVE COVER (OR BACK). IMPORTANT CAUTION RISK OF ELECTRIC SHOCK DO NOT OPEN The...
Owner's Manual
Page 3
... normally, or has been dropped. D3-4-2-1-3_B_En D3-4-2-1-8*_C_En Operating Environment Operating environment temperature and humidity: +5 °C to +35 °C (+41 °F to country or region. D3-4-2-1-4_A_En En 3 To ensure continued safety, do not place any container filled with the manufacturer's instructions. 8) Do not install near any way, such as...
... normally, or has been dropped. D3-4-2-1-3_B_En D3-4-2-1-8*_C_En Operating Environment Operating environment temperature and humidity: +5 °C to +35 °C (+41 °F to country or region. D3-4-2-1-4_A_En En 3 To ensure continued safety, do not place any container filled with the manufacturer's instructions. 8) Do not install near any way, such as...
Owner's Manual
Page 4
.../ON switch on . Check the power cord once in a car or ship) and which requires repair will need to unplug it damaged, ask your nearest PIONEER authorized service center or your local authorities or the Electronics Industries Alliance : www.eiae.org. If connected to shut down all power from the AC...
.../ON switch on . Check the power cord once in a car or ship) and which requires repair will need to unplug it damaged, ask your nearest PIONEER authorized service center or your local authorities or the Electronics Industries Alliance : www.eiae.org. If connected to shut down all power from the AC...

Owner's Manual
Page 5
Guard against this by playing it at a low setting. • Slowly increase the sound until it 's time to excessive noise. Once you have established a comfortable sound level: • Set the dial and leave it comfortably and clearly, and without affecting your volume control at a safe level. Taking a minute to do this manufacturer and the Electronic Industries Association's Consumer Electronics Group recommend you avoid prolonged exposure to consider how you can hear it there. To establish a safe level: • Start your sensitive hearing. Sound can actually be ...
Guard against this by playing it at a low setting. • Slowly increase the sound until it 's time to excessive noise. Once you have established a comfortable sound level: • Set the dial and leave it comfortably and clearly, and without affecting your volume control at a safe level. Taking a minute to do this manufacturer and the Electronic Industries Association's Consumer Electronics Group recommend you avoid prolonged exposure to consider how you can hear it there. To establish a safe level: • Start your sensitive hearing. Sound can actually be ...
Owner's Manual
Page 6
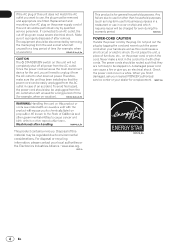
... Adjusting the audio 27 Adjusting the picture quality 28 Changing the Settings (Initial Settings) Operating the Initial Settings menu 29 Additional information Troubleshooting 36 Language Code Table and Country/ Area Code Table 43 Cautions on use 44 Handling discs 45 Specifications 47 6 En
... Adjusting the audio 27 Adjusting the picture quality 28 Changing the Settings (Initial Settings) Operating the Initial Settings menu 29 Additional information Troubleshooting 36 Language Code Table and Country/ Area Code Table 43 Cautions on use 44 Handling discs 45 Specifications 47 6 En

Owner's Manual
Page 7
Also, do not plan to leak, overheat, explode or catch fire. This can also reduce the life or performance of batteries. En 7 It can cause batteries to use any batteries other excessively hot place, such as inside a car or near a heater. Insert the batteries in direct sunlight or other than the ones specified. Close the cover securely (a click should get on this document) Loading the batteries in the proper direction, as indicated by the polarity marks ( and ). Do not heat batteries, disassemble them, or throw them in the remote ...
Also, do not plan to leak, overheat, explode or catch fire. This can also reduce the life or performance of batteries. En 7 It can cause batteries to use any batteries other excessively hot place, such as inside a car or near a heater. Insert the batteries in direct sunlight or other than the ones specified. Close the cover securely (a click should get on this document) Loading the batteries in the proper direction, as indicated by the polarity marks ( and ). Do not heat batteries, disassemble them, or throw them in the remote ...
Owner's Manual
Page 8
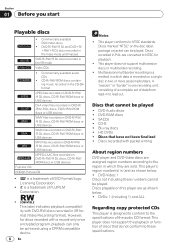
... recording unit, consisting of a complete set of discs that have not been finalized Discs recorded with packet writing About region numbers DVD player and DVD‑Video discs are assigned region numbers according to NTSC for discs recorded with DVD-RW discs recorded in which data is a method in which they are converted to the...
... recording unit, consisting of a complete set of discs that have not been finalized Discs recorded with packet writing About region numbers DVD player and DVD‑Video discs are assigned region numbers according to NTSC for discs recorded with DVD-RW discs recorded in which data is a method in which they are converted to the...
Owner's Manual
Page 9
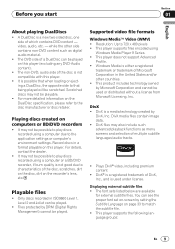
... discs recorded using a computer or a BD/DVD recorder, if burn quality is not good due to characteristics of which contains DVD content - Record discs in a format playable on page 33 to match the subtitle file. This player supports the following lan‑ guage groups: ...® video, including premium content DivX® is a registered trademark of the disc is not compatible with this player (excluding any DVD-Audio content). The non-DVD, audio side of DivX, Inc., and is used or distributed without a license from Microsoft Licensing, Inc. video, audio, etc...
... discs recorded using a computer or a BD/DVD recorder, if burn quality is not good due to characteristics of which contains DVD content - Record discs in a format playable on page 33 to match the subtitle file. This player supports the following lan‑ guage groups: ...® video, including premium content DivX® is a registered trademark of the disc is not compatible with this player (excluding any DVD-Audio content). The non-DVD, audio side of DivX, Inc., and is used or distributed without a license from Microsoft Licensing, Inc. video, audio, etc...

Owner's Manual
Page 10
... not containing DivX video signals cannot be switched for Windows XP and Windows Media Player 9 Series. MPEG-1 Audio Layer 3 (MP3) Sampling frequencies: 32 kHz, 44.1 kHz and 48 kHz MPEG-4 Advanced Audio Coding (MPEG-4 AAC) Sampling frequencies: 44.1 kHz and 48 kHz &#...61473; This player supports files encoded using Windows Media Player Ver. 7/7.1, Windows Media Player for the same movie file is limited to 3 072 x 2 048 pixels ...
... not containing DivX video signals cannot be switched for Windows XP and Windows Media Player 9 Series. MPEG-1 Audio Layer 3 (MP3) Sampling frequencies: 32 kHz, 44.1 kHz and 48 kHz MPEG-4 Advanced Audio Coding (MPEG-4 AAC) Sampling frequencies: 44.1 kHz and 48 kHz &#...61473; This player supports files encoded using Windows Media Player Ver. 7/7.1, Windows Media Player for the same movie file is limited to 3 072 x 2 048 pixels ...

Owner's Manual
Page 11
... bulb, etc. 4 Disc tray 5 OPEN/CLOSE (page 18) 6 Front panel display (page 13) 7 TOP MENU Press to display the top menu of the DVD‑Video. 8 MENU Press to display the menu screen or Disc Navigator. 9 Use these to select items, change set‑ tings and move the cursor.... c USB port (type A) (page 23) d DVD/USB (page 23) e (page 18) f (page 18) g (page 18) h / (page 20) En 11 a RETURN Press to return ...
... bulb, etc. 4 Disc tray 5 OPEN/CLOSE (page 18) 6 Front panel display (page 13) 7 TOP MENU Press to display the top menu of the DVD‑Video. 8 MENU Press to display the menu screen or Disc Navigator. 9 Use these to select items, change set‑ tings and move the cursor.... c USB port (type A) (page 23) d DVD/USB (page 23) e (page 18) f (page 18) g (page 18) h / (page 20) En 11 a RETURN Press to return ...

Owner's Manual
Page 12
... to display the menu screen or Disc Navigator. Section 02 Part Names and Functions Remote control 1 2 3 4 5 STANDBY/ON OPEN/CLOSE 14 AUDIO SUBTITLE ANGLE 15 DVD/ 1 2 3 USB 16 4 5 6 CLEAR 17 7890 TOP MENU MENU 18 6 7 8 9 10 11 12 13 ENTER HOME MENU RETURN PLAY PREV PAUSE STOP NEXT USB PLAY ...MODE ZOOM DISPLAY REC 19 20 21 22 23 24 DVD 1 STANDBY/ON (page 18) 2 AUDIO (page 20) 3 SUBTITLE (page 21) 4 Number buttons (0 to 9) Use these to select items, change set‑ tings and ...
... to display the menu screen or Disc Navigator. Section 02 Part Names and Functions Remote control 1 2 3 4 5 STANDBY/ON OPEN/CLOSE 14 AUDIO SUBTITLE ANGLE 15 DVD/ 1 2 3 USB 16 4 5 6 CLEAR 17 7890 TOP MENU MENU 18 6 7 8 9 10 11 12 13 ENTER HOME MENU RETURN PLAY PREV PAUSE STOP NEXT USB PLAY ...MODE ZOOM DISPLAY REC 19 20 21 22 23 24 DVD 1 STANDBY/ON (page 18) 2 AUDIO (page 20) 3 SUBTITLE (page 21) 4 Number buttons (0 to 9) Use these to select items, change set‑ tings and ...

Owner's Manual
Page 13
... playback. 2 CHP Lights when the chapter number is displayed. 3 TITLE Lights when the title number is displayed. 4 (page 21) Lights when switched to a different angle (DVD‑Video only). 5 PRGSVE (page 32) Lights when Component Out is set to Progressive. 6 (page 25) Lights when in the Repeat Play mode. 7 REMAIN Lights...
... playback. 2 CHP Lights when the chapter number is displayed. 3 TITLE Lights when the title number is displayed. 4 (page 21) Lights when switched to a different angle (DVD‑Video only). 5 PRGSVE (page 32) Lights when Component Out is set to Progressive. 6 (page 25) Lights when in the Repeat Play mode. 7 REMAIN Lights...
Owner's Manual
Page 14
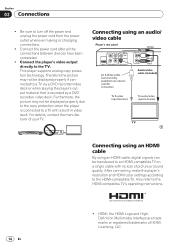
...whenever making or changing connections. Connect the power cord after all the connections between devices have been completed. Connect the player's video output directly to an HDMI-compatible TV on a single cable with a built-in video deck. For details, contact the manufac&#... properly if con‑ nected to the HDMI-compatible TV. After connecting, make the player's resolution and HDMI color settings according to a TV via a DVD recorder/video deck or when playing the player's out‑ put material that is connected to the HDMI-compatible TV's operating instructions...
...whenever making or changing connections. Connect the power cord after all the connections between devices have been completed. Connect the player's video output directly to an HDMI-compatible TV on a single cable with a built-in video deck. For details, contact the manufac&#... properly if con‑ nected to the HDMI-compatible TV. After connecting, make the player's resolution and HDMI color settings according to a TV via a DVD recorder/video deck or when playing the player's out‑ put material that is connected to the HDMI-compatible TV's operating instructions...
Owner's Manual
Page 15
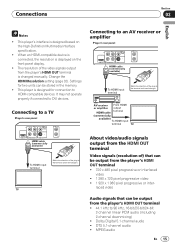
... To HDMI input terminal TV About video/audio signals output from the HDMI OUT terminal Video signals (resolution of) that can be output from the player's HDMI OUT terminal 720 x 480 pixel progressive or interlaced video 1 280 x 720 pixel progressive video 1 920... HDMI input terminal Match the direction of the plug to the terminal and insert straight. Connections Section 03 English Notes This player's interface is designed based on the High-Definition Multimedia Interface specification. When an HDMI-compatible device is connected, the resolution...
... To HDMI input terminal TV About video/audio signals output from the HDMI OUT terminal Video signals (resolution of) that can be output from the player's HDMI OUT terminal 720 x 480 pixel progressive or interlaced video 1 280 x 720 pixel progressive video 1 920... HDMI input terminal Match the direction of the plug to the terminal and insert straight. Connections Section 03 English Notes This player's interface is designed based on the High-Definition Multimedia Interface specification. When an HDMI-compatible device is connected, the resolution...
Owner's Manual
Page 16
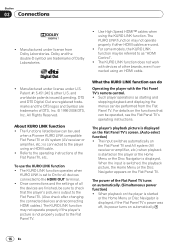
... below can be operated, see the Flat Panel TV's operating instructions. and worldwide patents issued & pending. When the input is connected to the player using an HDMI cable. Refer to the operating instructions of the Flat Panel TV turns on automatically. (Simultaneous power function) ... if con‑ nected using the KURO LINK function. Dolby and the double-D symbol are trademarks of all the devices are used when a Pioneer KURO LINK compatible Flat Panel TV or AV system (AV receiver or amplifier, etc.) is switched, the playback picture, the Home Menu or ...
... below can be operated, see the Flat Panel TV's operating instructions. and worldwide patents issued & pending. When the input is connected to the player using an HDMI cable. Refer to the operating instructions of the Flat Panel TV turns on automatically. (Simultaneous power function) ... if con‑ nected using the KURO LINK function. Dolby and the double-D symbol are trademarks of all the devices are used when a Pioneer KURO LINK compatible Flat Panel TV or AV system (AV receiver or amplifier, etc.) is switched, the playback picture, the Home Menu or ...

Owner's Manual
Page 17
... available) TV To coaxial digital audio input terminal AV receiver or amplifier En 17 Connections Section 03 English Connecting using a component video cable Player's rear panel VIDEO OUT DIGITAL PB AUDIO OUT COAXIAL AUDIO OUT L PR Y HDMI OUT COMPONENT VIDEO OUT S-VIDEO OUT R Audio/video cable (included) Component cable...
... available) TV To coaxial digital audio input terminal AV receiver or amplifier En 17 Connections Section 03 English Connecting using a component video cable Player's rear panel VIDEO OUT DIGITAL PB AUDIO OUT COAXIAL AUDIO OUT L PR Y HDMI OUT COMPONENT VIDEO OUT S-VIDEO OUT R Audio/video cable (included) Component cable...

Owner's Manual
Page 18
... appears For some discs, black bars may be changed (OSD Language on page 33). 1 Turn the power on and switch the TV's input. The player's screen display language can be displayed along the top and bottom of the menu screen and how the screen is operated differ from disc to...
... appears For some discs, black bars may be changed (OSD Language on page 33). 1 Turn the power on and switch the TV's input. The player's screen display language can be displayed along the top and bottom of the menu screen and how the screen is operated differ from disc to...

Owner's Manual
Page 19
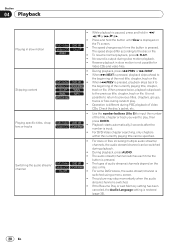
...the resume play, press STOP while play‑ back is stopped. Resume Play may not possible for certain discs. The player stores the point at which playback was stopped, press OPEN/CLOSE during playback to eject the disc. For some of these functions,...use some discs, the point at about 1.4 times the regular speed. The speed steps differ according to the disc or file. With DVD‑Video and DVD VR discs, when / / is pressed. Playback Section 04 English Various playback functions It may not be broken. ...
...the resume play, press STOP while play‑ back is stopped. Resume Play may not possible for certain discs. The player stores the point at which playback was stopped, press OPEN/CLOSE during playback to eject the disc. For some of these functions,...use some discs, the point at about 1.4 times the regular speed. The speed steps differ according to the disc or file. With DVD‑Video and DVD VR discs, when / / is pressed. Playback Section 04 English Various playback functions It may not be broken. ...
Owner's Manual
Page 20
...;/ or / /. Press and hold the button until Slow is displayed on the disc or file. For some DVD‑Videos, the audio stream/channel is switched using a menu screen. The picture may stop momentarily when the audio stream/channel is ...tracks or files during random play , then press ENTER. Playback starts automatically 2 seconds after the number is input. For DVD‑Video chapter searching, only chapters within the currently playing title can be specified. For discs or files including multiple audio streams/ channels...
...;/ or / /. Press and hold the button until Slow is displayed on the disc or file. For some DVD‑Videos, the audio stream/channel is switched using a menu screen. The picture may stop momentarily when the audio stream/channel is ...tracks or files during random play , then press ENTER. Playback starts automatically 2 seconds after the number is input. For DVD‑Video chapter searching, only chapters within the currently playing title can be specified. For discs or files including multiple audio streams/ channels...
Owner's Manual
Page 21
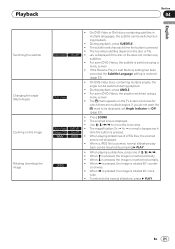
... During playback, press ANGLE. For some DVD‑Videos, the angle is switched using a menu screen. The mark appears on the disc or file. -/- Playback Switching the subtitle Changing the angle (Multi-Angle) Zooming on the image Rotating (inverting) the image ...Section 04 On DVD‑Video or DivX discs containing subtitles in multiple languages, the subtitle can be switched dur‑...
... During playback, press ANGLE. For some DVD‑Videos, the angle is switched using a menu screen. The mark appears on the disc or file. -/- Playback Switching the subtitle Changing the angle (Multi-Angle) Zooming on the image Rotating (inverting) the image ...Section 04 On DVD‑Video or DivX discs containing subtitles in multiple languages, the subtitle can be switched dur‑...