Operating Instructions
Page 4
...relocate the receiver or receiving antenna. ƒ Increase the separation between the equipment and the receiver. ƒ Plug the equipment into an outlet on the power supply cord of optical instruments with the instructions, may cause harmful interference to correct the interference by qualified service personnel. [For Canadian Model] This Class B ...this product will not occur in a residential installation. is no guarantee that may cause un-desired operation: Product Name: External DVD / CD Writer Model Numbers: DVR-X122 Responsible Party Name: PIONEER ELECTRONICS SERVICE INC.
...relocate the receiver or receiving antenna. ƒ Increase the separation between the equipment and the receiver. ƒ Plug the equipment into an outlet on the power supply cord of optical instruments with the instructions, may cause harmful interference to correct the interference by qualified service personnel. [For Canadian Model] This Class B ...this product will not occur in a residential installation. is no guarantee that may cause un-desired operation: Product Name: External DVD / CD Writer Model Numbers: DVR-X122 Responsible Party Name: PIONEER ELECTRONICS SERVICE INC.
Operating Instructions
Page 10
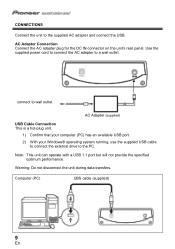
...the PC. Note: This unit can operate with a USB 1.1 port but will not provide the specified optimum performance. connect to wall outlet AC Adapter (supplied) USB Cable Connection This is a hot-plug unit. 1) Confirm that your computer (PC) has an available USB port. 2) With your Windows®...drive to the supplied AC adapter and connect the USB. Warning: Do not disconnect the unit during data transfers. AC Adapter Connection Connect the AC adapter plug for the DC IN connector on the unit's rear panel. Computer (PC) UBS cable (supplied) 9 En Use the supplied power cord to connect...
...the PC. Note: This unit can operate with a USB 1.1 port but will not provide the specified optimum performance. connect to wall outlet AC Adapter (supplied) USB Cable Connection This is a hot-plug unit. 1) Confirm that your computer (PC) has an available USB port. 2) With your Windows®...drive to the supplied AC adapter and connect the USB. Warning: Do not disconnect the unit during data transfers. AC Adapter Connection Connect the AC adapter plug for the DC IN connector on the unit's rear panel. Computer (PC) UBS cable (supplied) 9 En Use the supplied power cord to connect...

Operating Instructions
Page 12
... / Seek Time] (Random Averages) Access Time Seek Time DVD-ROM 130 ms DVD-ROM 120 ms CD-ROM 120 ms CD-ROM 110 ms [Power] AC Adapter (supplied) Source Rated Output +12 V DC / 0.9 A, +5 V DC / 1.5 A 100 - 240 V AC, 50 / 60 Hz +12 V DC / 2 A, +5 V DC / 2 A [Physical Information] Dimensions (including front panel) Weight 6.69"W x 2.28...
... / Seek Time] (Random Averages) Access Time Seek Time DVD-ROM 130 ms DVD-ROM 120 ms CD-ROM 120 ms CD-ROM 110 ms [Power] AC Adapter (supplied) Source Rated Output +12 V DC / 0.9 A, +5 V DC / 1.5 A 100 - 240 V AC, 50 / 60 Hz +12 V DC / 2 A, +5 V DC / 2 A [Physical Information] Dimensions (including front panel) Weight 6.69"W x 2.28...


