
Owner's Manual
Page 6
... . . 18 Connecting to an AV amplifier or receiver 19 Connecting other AV sources 20 Plugging in 20 03 Controls and displays Front panel 21 Display 22 Remote control 23 04 Getting started Switching on and setting up 25 Selecting the hard disk or DVD for playback and recording ...recording and playback 53 Recording from an external component 53 Automatic recording from a satellite tuner 54 Recording from a DV camcorder (DVR-520H only) . . 55 Recording from the DV output (DVR-520H only 56 Playing your recordings on other DVD players . . . . . 56 Initializing a DVD-RW disc 57 07 Copying...
... . . 18 Connecting to an AV amplifier or receiver 19 Connecting other AV sources 20 Plugging in 20 03 Controls and displays Front panel 21 Display 22 Remote control 23 04 Getting started Switching on and setting up 25 Selecting the hard disk or DVD for playback and recording ...recording and playback 53 Recording from an external component 53 Automatic recording from a satellite tuner 54 Recording from a DV camcorder (DVR-520H only) . . 55 Recording from the DV output (DVR-520H only 56 Playing your recordings on other DVD players . . . . . 56 Initializing a DVD-RW disc 57 07 Copying...

Owner's Manual
Page 10
...batteries may become unreliable if strong sunlight or fluorescent light is shining on the unit's remote sensor. • Remote controllers for different devices can result in the operating range of another Pioneer component using the CONTROL IN jack on page 106 to reset them. • Use within the operating ...range and angle, as leakage and bursting. Avoid using the remote control: • Make sure that apply in your TV...
...batteries may become unreliable if strong sunlight or fluorescent light is shining on the unit's remote sensor. • Remote controllers for different devices can result in the operating range of another Pioneer component using the CONTROL IN jack on page 106 to reset them. • Use within the operating ...range and angle, as leakage and bursting. Avoid using the remote control: • Make sure that apply in your TV...

Owner's Manual
Page 22
... (manual recording level) mode. 14 Character display 15 Channel recording indicators (page 97) Indicates which channels are recorded when Dual Mono is selected. 03 Controls and displays Display 12 3 4 56 789 10 11 12 13 14 15 16 1 / Arrows indicate the copy direction between the HDD ( ) ... mode. 5 PM Lights to indicate PM (after midday) for the clock display. 6 2 3 (page 95) Shows the remote control mode (if nothing is displayed, the remote control mode is 1). 7 REM Lights when the character display is showing the remaining available recording time. 8 (page 96) Lights when...
... (manual recording level) mode. 14 Character display 15 Channel recording indicators (page 97) Indicates which channels are recorded when Dual Mono is selected. 03 Controls and displays Display 12 3 4 56 789 10 11 12 13 14 15 16 1 / Arrows indicate the copy direction between the HDD ( ) ... mode. 5 PM Lights to indicate PM (after midday) for the clock display. 6 2 3 (page 95) Shows the remote control mode (if nothing is displayed, the remote control mode is 1). 7 REM Lights when the character display is showing the remaining available recording time. 8 (page 96) Lights when...
Owner's Manual
Page 23
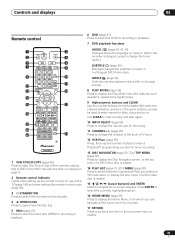
... Home Menu, from which you can also be used to enter names for track/chapter/title selection; The same buttons can navigate all on . Controls and displays 03 Remote control 1 3 5 7 9 12 13 15 16 18 19 20 22 STANDBY/ON ONE TOUCH COPY OPEN/CLOSE HDD AUDIO SUBTITLE DVD ANGLE PLAY MODE ABC... go back one level in multilingual DVD-Video discs. ANGLE (page 43) Switches camera angles on discs with a TV (page 106) and when setting the remote control mode (page 95). 3 STANDBY/ON Press to switch the recorder on/into standby. 4 OPEN/CLOSE Press to open/close the disc tray. 5 HDD (page 27...
... Home Menu, from which you can also be used to enter names for track/chapter/title selection; The same buttons can navigate all on . Controls and displays 03 Remote control 1 3 5 7 9 12 13 15 16 18 19 20 22 STANDBY/ON ONE TOUCH COPY OPEN/CLOSE HDD AUDIO SUBTITLE DVD ANGLE PLAY MODE ABC... go back one level in multilingual DVD-Video discs. ANGLE (page 43) Switches camera angles on discs with a TV (page 106) and when setting the remote control mode (page 95). 3 STANDBY/ON Press to switch the recorder on/into standby. 4 OPEN/CLOSE Press to open/close the disc tray. 5 HDD (page 27...

Owner's Manual
Page 25
...Setup Basic Tuner Video Out Audio In Audio Out Language Recording Playback Clock SLeatnguage On Screen Display Front Panel Display Remote Control SetEnglish Setup Mavigator français 4 Press ENTER again to select English or French as the OSD, subtitle, ...ENTER. ENTER DVD RECORDER Initial Setup Basic Tuner Video Out Audio In Audio Out Language Recording Playback COFrlnooncSktcrPSeaeentnelDCstDioasimprstplpaullyaseyitnegtyhoisusrerteucporbdeefro.re you Remote Control Set Start Setup Mavigator Cancel Please use the Setup Navigator before starting to retune all the channels (if you can...
...Setup Basic Tuner Video Out Audio In Audio Out Language Recording Playback Clock SLeatnguage On Screen Display Front Panel Display Remote Control SetEnglish Setup Mavigator français 4 Press ENTER again to select English or French as the OSD, subtitle, ...ENTER. ENTER DVD RECORDER Initial Setup Basic Tuner Video Out Audio In Audio Out Language Recording Playback COFrlnooncSktcrPSeaeentnelDCstDioasimprstplpaullyaseyitnegtyhoisusrerteucporbdeefro.re you Remote Control Set Start Setup Mavigator Cancel Please use the Setup Navigator before starting to retune all the channels (if you can...

Owner's Manual
Page 26
...Initial Setup Basic Tuner Video Out Audio In Audio Out Language Recording Playback Clock SCeltock Setting On Screen Display Front Panel Display Remote Control SetAuto Setup Mavigator Manual • Auto clock setting Some TV channels broadcast time signals together with progressive scan video? Off &#... Initial Setup Basic Tuner Video Out Audio In Audio Out Language Recording Playback Clock SPertogressive On Screen Display Front Panel Display Remote Control Set Compatible Setup Mavigator Not Compatible Don't Know 26 En Tuning 7/68 Cancel 6 Select 'Auto' for automatic time ...
...Initial Setup Basic Tuner Video Out Audio In Audio Out Language Recording Playback Clock SCeltock Setting On Screen Display Front Panel Display Remote Control SetAuto Setup Mavigator Manual • Auto clock setting Some TV channels broadcast time signals together with progressive scan video? Off &#... Initial Setup Basic Tuner Video Out Audio In Audio Out Language Recording Playback Clock SPertogressive On Screen Display Front Panel Display Remote Control Set Compatible Setup Mavigator Not Compatible Don't Know 26 En Tuning 7/68 Cancel 6 Select 'Auto' for automatic time ...

Owner's Manual
Page 27
... Setup Basic Tuner Video Out Audio In Audio Out Language Recording Playback Clock SAeVt Amp Digital Connect On Screen Display Front Panel Display Remote Control SetConnected Setup Mavigator Not Connected Use the / (cursor up/down) buttons to select Connected, or Not Connected, then press ENTER.... Initial Setup Basic Tuner Video Out Audio In Audio Out Language Recording Playback Clock S9e6tkHz PCM Compatible On Screen Display Front Panel Display Remote Control Set Compatible Setup Mavigator Not Compatible Don't Know Use the / (cursor up /down ) buttons to start again. Front PanEenl ...
... Setup Basic Tuner Video Out Audio In Audio Out Language Recording Playback Clock SAeVt Amp Digital Connect On Screen Display Front Panel Display Remote Control SetConnected Setup Mavigator Not Connected Use the / (cursor up/down) buttons to select Connected, or Not Connected, then press ENTER.... Initial Setup Basic Tuner Video Out Audio In Audio Out Language Recording Playback Clock S9e6tkHz PCM Compatible On Screen Display Front Panel Display Remote Control Set Compatible Setup Mavigator Not Compatible Don't Know Use the / (cursor up /down ) buttons to start again. Front PanEenl ...

Owner's Manual
Page 52
From this screen, only the recording stop time can make all the front panel and remote control buttons inoperative using the child lock feature. Basically, the program with the later start time has priority. Timer Recording Date Start Stop CH.... Timer recording FAQ Frequently Asked Questions • Even though the timer is a recordable disc loaded. Timer confirmation only works for three seconds to lock the controls. 06 Recording 2 Use the (cursor up /down) buttons to change the time. 4 Press ENTER to set most recently takes priority. • I entered a ...
From this screen, only the recording stop time can make all the front panel and remote control buttons inoperative using the child lock feature. Basically, the program with the later start time has priority. Timer Recording Date Start Stop CH.... Timer recording FAQ Frequently Asked Questions • Even though the timer is a recordable disc loaded. Timer confirmation only works for three seconds to lock the controls. 06 Recording 2 Use the (cursor up /down) buttons to change the time. 4 Press ENTER to set most recently takes priority. • I entered a ...

Owner's Manual
Page 56
... control it will not switch automatically. Try switching the DV Input setting (see Input Disc Name on a regular DVD player or computer equipped with the recorder! Recording from the DV output (DVR-520H ...fixes' the recordings in VR mode, finalized or not. A number of players (including many Pioneer models) can also play the disc. All the title menus are a number of different styles.... If it can select titles when you cannot exit the DV recording screen using the remote control supplied with the player to check what you finalize a disc. When you finalize a ...
... control it will not switch automatically. Try switching the DV Input setting (see Input Disc Name on a regular DVD player or computer equipped with the recorder! Recording from the DV output (DVR-520H ...fixes' the recordings in VR mode, finalized or not. A number of players (including many Pioneer models) can also play the disc. All the title menus are a number of different styles.... If it can select titles when you cannot exit the DV recording screen using the remote control supplied with the player to check what you finalize a disc. When you finalize a ...

Owner's Manual
Page 63
HDD to DVD Copy All HDD 1 2 3 4 HDD 10/07Wed 3:00PM 2ch LP 1/3 Recording Time 0h20m10s Add Erase DVD 1 2 3 4 Ttl Name Divide Combine Copy List Total 1h30m 1/2 Conf List 3 Select 'Yes' to confirm that you want to erase the title, or 'No' to cancel. 4 Repeat steps 2 and 3 to erase more titles from the Copy List, or press RETURN to go back to erase, then press ENTER. NO P Q R S T U VWX Y Z ( ) : ; Input Title Name 10/07Wed 3:00PM 2ch LP CAPS small ABC DE F GH I # DN O OOO O ø U U U U Y ß $% 0123456789 _& x c a 2 3 1 -o 1/4 1/2 3/4 ¿ ` ...
HDD to DVD Copy All HDD 1 2 3 4 HDD 10/07Wed 3:00PM 2ch LP 1/3 Recording Time 0h20m10s Add Erase DVD 1 2 3 4 Ttl Name Divide Combine Copy List Total 1h30m 1/2 Conf List 3 Select 'Yes' to confirm that you want to erase the title, or 'No' to cancel. 4 Repeat steps 2 and 3 to erase more titles from the Copy List, or press RETURN to go back to erase, then press ENTER. NO P Q R S T U VWX Y Z ( ) : ; Input Title Name 10/07Wed 3:00PM 2ch LP CAPS small ABC DE F GH I # DN O OOO O ø U U U U Y ß $% 0123456789 _& x c a 2 3 1 -o 1/4 1/2 3/4 ¿ ` ...

Owner's Manual
Page 77
AA A A A AÆ ç E E E E I I I I J KLM . , ? ! Editing 08 Title Name (Ttl Name) VR mode Video mode HDD You can give titles new names of up to 64 characters long for VR mode and HDD recordings and 32 characters for Video mode recordings. 1 Select 'Ttl Name' from the Disc Navigator menu options. 2 Use the / / / (cursor buttons) to select the title you want to name, then press ENTER to go to the name input screen. 3 Input a name for the selected title. NO P Q R S T U VWX Y Z ( ) : ; Input Title Name 11/04Wed 12:30PM 2ch LP CAPS small ABC DE F GH I # DN O OOO O ø U U U U Y ß...
AA A A A AÆ ç E E E E I I I I J KLM . , ? ! Editing 08 Title Name (Ttl Name) VR mode Video mode HDD You can give titles new names of up to 64 characters long for VR mode and HDD recordings and 32 characters for Video mode recordings. 1 Select 'Ttl Name' from the Disc Navigator menu options. 2 Use the / / / (cursor buttons) to select the title you want to name, then press ENTER to go to the name input screen. 3 Input a name for the selected title. NO P Q R S T U VWX Y Z ( ) : ; Input Title Name 11/04Wed 12:30PM 2ch LP CAPS small ABC DE F GH I # DN O OOO O ø U U U U Y ß...

Owner's Manual
Page 82
NO P Q R S T U VWX Y Z ( ) : ; 08 Editing 2 Select the title you want to erase, then press ENTER. Disc Navigator Play List DVD 1 2 3 Play Erase Ttl Name Chpt Edit Erase Sec Undo 11/04Wed 12:30PM 2ch LP 4 Erase Title? Input Title Name 11/04Wed 12:30PM 2ch LP CAPS small ABC DE F GH I # DN O OOO O ø U U U U Y ß $% 0123456789 _& x c a 2 3 1 -o 1/4 1/2 3/4 ¿ ` Title Name (Ttl Name) VR mode You can give titles new names of up to 64 characters long. 1 Select 'Ttl Name' from the Disc Navigator Play List menu options. 2 Select the title you erase ...
NO P Q R S T U VWX Y Z ( ) : ; 08 Editing 2 Select the title you want to erase, then press ENTER. Disc Navigator Play List DVD 1 2 3 Play Erase Ttl Name Chpt Edit Erase Sec Undo 11/04Wed 12:30PM 2ch LP 4 Erase Title? Input Title Name 11/04Wed 12:30PM 2ch LP CAPS small ABC DE F GH I # DN O OOO O ø U U U U Y ß $% 0123456789 _& x c a 2 3 1 -o 1/4 1/2 3/4 ¿ ` Title Name (Ttl Name) VR mode You can give titles new names of up to 64 characters long. 1 Select 'Ttl Name' from the Disc Navigator Play List menu options. 2 Select the title you erase ...

Owner's Manual
Page 89
..., lock the contents to prevent accidental recording and erasure, initialize and finalize discs. AA A A A AÆ ç E E E E I I I I J KLM . , ? ! Timer Recording Disc Navigator Copy Disc History PhotoViewer DVR-520H Screen Disc Setup Initial Setup Video/Audio Adjust Play Mode DV Record Basic settings Input Disc Name VR mode Video mode When you display disc...
..., lock the contents to prevent accidental recording and erasure, initialize and finalize discs. AA A A A AÆ ç E E E E I I I I J KLM . , ? ! Timer Recording Disc Navigator Copy Disc History PhotoViewer DVR-520H Screen Disc Setup Initial Setup Video/Audio Adjust Play Mode DV Record Basic settings Input Disc Name VR mode Video mode When you display disc...

Owner's Manual
Page 94
... Setup Basic Tuner Video Out Audio In Audio Out Language Recording Playback Clock Setting On Screen Display Front Panel Display Remote Control Set Setup Navigator Auto Manual • Auto clock setting Some TV channels broadcast time signals together with the program... Screen Display Video Out Audio In Front PTainmeel ZDoinspelay Remote Control Set USA Alaska Audio Out Language Setup Mavigator D.S.T. Timer Recording Disc Navigator Copy Disc History PhotoViewer Disc Setup Initial Setup Video/Audio Adjust Play Mode DV Record DVR-520H screen • Some settings can set the clock ...
... Setup Basic Tuner Video Out Audio In Audio Out Language Recording Playback Clock Setting On Screen Display Front Panel Display Remote Control Set Setup Navigator Auto Manual • Auto clock setting Some TV channels broadcast time signals together with the program... Screen Display Video Out Audio In Front PTainmeel ZDoinspelay Remote Control Set USA Alaska Audio Out Language Setup Mavigator D.S.T. Timer Recording Disc Navigator Copy Disc History PhotoViewer Disc Setup Initial Setup Video/Audio Adjust Play Mode DV Record DVR-520H screen • Some settings can set the clock ...

Owner's Manual
Page 95
...setting different for the first time (or after resetting the recorder). Remote Control Set • Default setting: Recorder1 You only need it at any other time. Tuning 7/68 Cancel 95 En There are using more than one Pioneer DVD recorder in standby when setting a timer recording, or during ...Auto Start Recording. To set to hide these displays. Change to Off to Recorder2 or Recorder3, the remote control mode is in the front panel display. When set ...
...setting different for the first time (or after resetting the recorder). Remote Control Set • Default setting: Recorder1 You only need it at any other time. Tuning 7/68 Cancel 95 En There are using more than one Pioneer DVD recorder in standby when setting a timer recording, or during ...Auto Start Recording. To set to hide these displays. Change to Off to Recorder2 or Recorder3, the remote control mode is in the front panel display. When set ...

Owner's Manual
Page 106
... 13, 33, 42 03, 20 106 En Maker Aiwa Funai GE General Goldstar Grandiente Hitachi Magnavox Mitsubishi NEC Panasonic Philips Pioneer RCA Sanyo Sharp Sony Toshiba Victor Zenith Using the TV remote control buttons The table below for your make, input the first one in the table below . 1 Press and hold STOP and... is more than one code given for the list of your TV. If it does Press to use this remote control with a maker code from the table below , you first have to program the remote with your TV doesn't appear in the list. • If the maker's name of maker codes. If the...
... 13, 33, 42 03, 20 106 En Maker Aiwa Funai GE General Goldstar Grandiente Hitachi Magnavox Mitsubishi NEC Panasonic Philips Pioneer RCA Sanyo Sharp Sony Toshiba Victor Zenith Using the TV remote control buttons The table below for your make, input the first one in the table below . 1 Press and hold STOP and... is more than one code given for the list of your TV. If it does Press to use this remote control with a maker code from the table below , you first have to program the remote with your TV doesn't appear in the list. • If the maker's name of maker codes. If the...

Owner's Manual
Page 108
...All settings are • Press STOP then restart playback. General Problem Remedy The disc is distorted, try cleaning the cable plugs. inoperative Remote control does not work . In this recorder to progressive-scan with the recorder (page 117). If the trouble cannot be rectified even after... by pressing and holding the + button (front panel) then pressing HDD. Sometimes the trouble may lie in another Pioneer product using the CONTROL IN jack, point the remote control at the other incompatible format disc (page 11). • Check that the disc is loaded properly (aligned in...
...All settings are • Press STOP then restart playback. General Problem Remedy The disc is distorted, try cleaning the cable plugs. inoperative Remote control does not work . In this recorder to progressive-scan with the recorder (page 117). If the trouble cannot be rectified even after... by pressing and holding the + button (front panel) then pressing HDD. Sometimes the trouble may lie in another Pioneer product using the CONTROL IN jack, point the remote control at the other incompatible format disc (page 11). • Check that the disc is loaded properly (aligned in...
Owner's Manual
Page 109
...copy-once protected cannot be specifically RW compatible in order to your TV using this remote control • If there is a recordable DVD loaded with your dealer or a Pioneer Service Center. Can't control your TV. To have a widescreen TV, check its aspect ratio settings. • This... recorder keeps the clock and other recorder settings to play a disc recorded using this • If the disc was recorded in the remote control code list. when a button is pressed Can't use the recorder again. Check that these limits have not been reached. • ...
...copy-once protected cannot be specifically RW compatible in order to your TV using this remote control • If there is a recordable DVD loaded with your dealer or a Pioneer Service Center. Can't control your TV. To have a widescreen TV, check its aspect ratio settings. • This... recorder keeps the clock and other recorder settings to play a disc recorded using this • If the disc was recorded in the remote control code list. when a button is pressed Can't use the recorder again. Check that these limits have not been reached. • ...

Owner's Manual
Page 110
... you could divide up to DVD in picture quality if you want to normal operating conditions. Yes. The picture freezes and the front panel and remote control buttons stop working • Press the front panel STANDBY/ON button to record both audio channels and switch them on the disc to make a high...
... you could divide up to DVD in picture quality if you want to normal operating conditions. Yes. The picture freezes and the front panel and remote control buttons stop working • Press the front panel STANDBY/ON button to record both audio channels and switch them on the disc to make a high...

Owner's Manual
Page 119
...Output 1,2 L/R During audio output 2V rms (Output impedance: less than 1.5 kΩ) Jacks RCA jacks Control input Mini jack DV input/output (DVR-520H only 4 pin (i.LINK/IEEE 1394 standard) Supplied accessories Remote control 1 Dry cell batteries (AA/R6P 2 Audio / Video cable (red/white/yellow 1 RF antenna ...HDD, DVD-Video, DVD-R/RW, Video-CD, CD, CD-R/RW (WMA, MP3, JPEG, CD-DA) Power requirements 120 V, 60 Hz Power consumption DVR-420H 45 W DVR-520H 48 W Power consumption in standby mode 0.48 W (Front panel display: off) Weight 10 lb. 6 oz. / 4.7 kg Dimensions 420 (W) x ...
...Output 1,2 L/R During audio output 2V rms (Output impedance: less than 1.5 kΩ) Jacks RCA jacks Control input Mini jack DV input/output (DVR-520H only 4 pin (i.LINK/IEEE 1394 standard) Supplied accessories Remote control 1 Dry cell batteries (AA/R6P 2 Audio / Video cable (red/white/yellow 1 RF antenna ...HDD, DVD-Video, DVD-R/RW, Video-CD, CD, CD-R/RW (WMA, MP3, JPEG, CD-DA) Power requirements 120 V, 60 Hz Power consumption DVR-420H 45 W DVR-520H 48 W Power consumption in standby mode 0.48 W (Front panel display: off) Weight 10 lb. 6 oz. / 4.7 kg Dimensions 420 (W) x ...


