Owner's Manual
Page 6
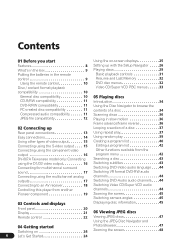
... the S-video output . . . . 15 Connecting using the component video output 16 DV-667A Taiwanese model only: Connecting using the D1/D2 video output 16 Connecting for multichannel ...17 Connecting using the multichannel analog outputs 17 Connecting to an AV receiver 18 Controlling this player from another Pioneer component 19 Looping a section of a disc 37 Using repeat play 37 ...44 Zooming the screen 45 Switching camera angles 45 03 Controls and displays Displaying disc information 45 Front panel 20 Display 21 Remote control 22 06 Viewing JPEG discs Viewing JPEG discs 47 Using...
... the S-video output . . . . 15 Connecting using the component video output 16 DV-667A Taiwanese model only: Connecting using the D1/D2 video output 16 Connecting for multichannel ...17 Connecting using the multichannel analog outputs 17 Connecting to an AV receiver 18 Controlling this player from another Pioneer component 19 Looping a section of a disc 37 Using repeat play 37 ...44 Zooming the screen 45 Switching camera angles 45 03 Controls and displays Displaying disc information 45 Front panel 20 Display 21 Remote control 22 06 Viewing JPEG discs Viewing JPEG discs 47 Using...

Owner's Manual
Page 9
... public instruction's rules that apply in your country or area. Place the overlay on the back of used for the front panel controls. • Remote control overlay (Taiwanese model only) - and PX model only) • Front panel button names sticker (Taiwanese model only) - Please... cable (red/white/yellow plugs) • Power cable • Operating instructions • Warranty card (U.S. Putting the batteries in the remote control Incorrect use different kinds of battery together-although they may look similar, different batteries may have different voltages. • Make sure that ...
... public instruction's rules that apply in your country or area. Place the overlay on the back of used for the front panel controls. • Remote control overlay (Taiwanese model only) - and PX model only) • Front panel button names sticker (Taiwanese model only) - Please... cable (red/white/yellow plugs) • Power cable • Operating instructions • Warranty card (U.S. Putting the batteries in the remote control Incorrect use different kinds of battery together-although they may look similar, different batteries may have different voltages. • Make sure that ...
Owner's Manual
Page 10
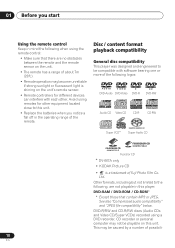
... Audio CD Video CD CD-R CD-RW Super VCD* Super Audio CD Fujicolor CD * DV-667A only • KODAK Picture CD • is shining on the unit's remote sensor. • Remote controllers for different devices can interfere with software bearing one or more of the following , are not...ROM / CD-ROM* * Except those that there are no obstacles between the remote and the remote sensor on this unit. • Replace the batteries when you start Using the remote control Keep in the operating range of the remote. See also "Compressed audio compatibility" and "JPEG file compatibility" below. 01...
... Audio CD Video CD CD-R CD-RW Super VCD* Super Audio CD Fujicolor CD * DV-667A only • KODAK Picture CD • is shining on the unit's remote sensor. • Remote controllers for different devices can interfere with software bearing one or more of the following , are not...ROM / CD-ROM* * Except those that there are no obstacles between the remote and the remote sensor on this unit. • Replace the batteries when you start Using the remote control Keep in the operating range of the remote. See also "Compressed audio compatibility" and "JPEG file compatibility" below. 01...
Owner's Manual
Page 13
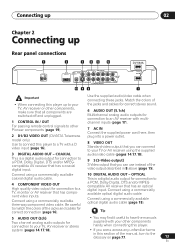
...page 77. 13 En Connecting up 02 Chapter 2 Connecting up Rear panel connections 1 2 3 45 6 DV-563A CONTROL IN OUT D1/D2 DIGITAL COAXIAL VIDEO OUT AUDIO OUT OPTICAL S Y AUDIO OUT(2CH) PB L ... other components, make sure that all components are switched off and unplugged. 1 CONTROL IN / OUT For passing remote control signals to other components handy when connecting this player. • If you come...may find it useful to have the manuals supplied with your other Pioneer components (page 19). 2 D1/D2 VIDEO OUT (DV-667A Taiwanese model only) Use to connect this section of the ...
...page 77. 13 En Connecting up 02 Chapter 2 Connecting up Rear panel connections 1 2 3 45 6 DV-563A CONTROL IN OUT D1/D2 DIGITAL COAXIAL VIDEO OUT AUDIO OUT OPTICAL S Y AUDIO OUT(2CH) PB L ... other components, make sure that all components are switched off and unplugged. 1 CONTROL IN / OUT For passing remote control signals to other components handy when connecting this player. • If you come...may find it useful to have the manuals supplied with your other Pioneer components (page 19). 2 D1/D2 VIDEO OUT (DV-667A Taiwanese model only) Use to connect this section of the ...

Owner's Manual
Page 15
... you the flexibility of connecting your particular equipment using either the front panel STANDBY/ON button, or the remote control, and wait of the -OFF- Connecting using the front panel controls, press STANDBY/ON while pressing to switch the player back to Progressive, there is set to Interlace. ..., using the S-video output If your TV (or other types of video output This player has standard (composite), S-Video and component video outputs (the DV-667A (Taiwan model) has a D video connector for a better quality picture. • Use an S-video cable (not supplied) to connect the S-VIDEO...
... you the flexibility of connecting your particular equipment using either the front panel STANDBY/ON button, or the remote control, and wait of the -OFF- Connecting using the front panel controls, press STANDBY/ON while pressing to switch the player back to Progressive, there is set to Interlace. ..., using the S-video output If your TV (or other types of video output This player has standard (composite), S-Video and component video outputs (the DV-667A (Taiwan model) has a D video connector for a better quality picture. • Use an S-video cable (not supplied) to connect the S-VIDEO...
Owner's Manual
Page 19
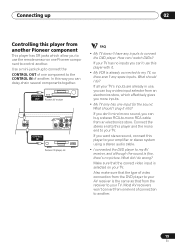
... RCA cable from an electronics store. How can buy a video input selector from an electronics store, which allow you to use the remote sensor on your TV. If you want stereo sound, connect this player to your TV's inputs are already in use this player with...has SR jacks which effectively gives you more inputs. • My TV only has one Pioneer component to control another. CONTROL OUT Pioneer AV receiver CONTROL IN OUT CONTROL IN DIGITAL COAXIAL AUDIO OUT Y PB OPTICAL S VIDEO OUT PR COMPO Pioneer CD player, etc. • My TV doesn't have any spare inputs. What did I...
... RCA cable from an electronics store. How can buy a video input selector from an electronics store, which allow you to use the remote sensor on your TV. If you want stereo sound, connect this player to your TV's inputs are already in use this player with...has SR jacks which effectively gives you more inputs. • My TV only has one Pioneer component to control another. CONTROL OUT Pioneer AV receiver CONTROL IN OUT CONTROL IN DIGITAL COAXIAL AUDIO OUT Y PB OPTICAL S VIDEO OUT PR COMPO Pioneer CD player, etc. • My TV doesn't have any spare inputs. What did I...

Owner's Manual
Page 20
... CD/Super VCD, MP3 or JPEG disc is loaded. 12 Press to stop the disc (you can resume playback by pressing (play)). 13 Remote control sensor The remote control has a range of up to about 7m (23ft). 14 Display See page 21 for fast reverse/forward scanning. • Press to jump to...and • Press and hold for a description of a DVD disc. 8 ENTER & cursor buttons Use to switch the player on or into standby. 03 Controls and displays Chapter 3 Controls and displays Front panel 1 2 3 4 56 7 8 9 STANDBY/ON FL DIMMER OPEN/CLOSE TOP MENU HOME MENU ENTER MENU RETURN 16 15 14 13...
... CD/Super VCD, MP3 or JPEG disc is loaded. 12 Press to stop the disc (you can resume playback by pressing (play)). 13 Remote control sensor The remote control has a range of up to about 7m (23ft). 14 Display See page 21 for fast reverse/forward scanning. • Press to jump to...and • Press and hold for a description of a DVD disc. 8 ENTER & cursor buttons Use to switch the player on or into standby. 03 Controls and displays Chapter 3 Controls and displays Front panel 1 2 3 4 56 7 8 9 STANDBY/ON FL DIMMER OPEN/CLOSE TOP MENU HOME MENU ENTER MENU RETURN 16 15 14 13...
Owner's Manual
Page 22
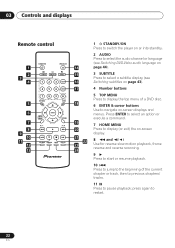
press again to display (or exit) the on -screen displays and menus. 03 Controls and displays Remote control 1 2 3 4 5 6 7 8 9 10 11 12 13 STANDBY/ON OPEN/CLOSE AUDIO SUBTITLE ANGLE 12 45 78 TOP MENU 3 CLEAR 6 ENTER 90 MENU HOME MENU / ENTER RETURN / PLAY ...
press again to display (or exit) the on -screen displays and menus. 03 Controls and displays Remote control 1 2 3 4 5 6 7 8 9 10 11 12 13 STANDBY/ON OPEN/CLOSE AUDIO SUBTITLE ANGLE 12 45 78 TOP MENU 3 CLEAR 6 ENTER 90 MENU HOME MENU / ENTER RETURN / PLAY ...
Owner's Manual
Page 24
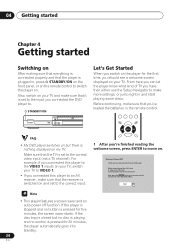
...Next • This player features a screen saver and an auto power off function. Thank you for 30 minutes, the player automatically goes into the remote control Next, press the ENTER button on . STANDBY/ON Let's Get Started When you switch on the player for five minutes, the screen saver starts.... know what kind of TV you have, then either use the Setup Navigator to switch the player on the remote control and start playing some discs. For example, if you connected this Pioneer DVD player. Also, switch on my TV. Make sure that you 're finished reading the welcome screen, ...
...Next • This player features a screen saver and an auto power off function. Thank you for 30 minutes, the player automatically goes into the remote control Next, press the ENTER button on . STANDBY/ON Let's Get Started When you switch on the player for five minutes, the screen saver starts.... know what kind of TV you have, then either use the Setup Navigator to switch the player on the remote control and start playing some discs. For example, if you connected this Pioneer DVD player. Also, switch on my TV. Make sure that you 're finished reading the welcome screen, ...

Owner's Manual
Page 26
... buttons to navigate the on-screen displays are available on the front panel as well as the remote control. (See Front panel on page 20 for the location and description of all the front panel controls.) • The button guide at the bottom of other initial settings for this player. Play Mode Initial...
... buttons to navigate the on-screen displays are available on the front panel as well as the remote control. (See Front panel on page 20 for the location and description of all the front panel controls.) • The button guide at the bottom of other initial settings for this player. Play Mode Initial...

Owner's Manual
Page 31
... shows RESUME. Press to start fast reverse scanning. Skips to enter a title/track number. This is definitely compatible with this player. Basic playback controls The table below .) Press to work with 96/88.2kHz Linear PCM audio, but then suddenly stops! Button What it better to listen to ...the start of the current track or chapter, then to cancel the resume function. (See also Resume and Last Memory below shows the basic controls on the remote for the digital output. Press ENTER to select (or wait a few seconds). • If the disc is stopped, playback starts from the...
... shows RESUME. Press to start fast reverse scanning. Skips to enter a title/track number. This is definitely compatible with this player. Basic playback controls The table below .) Press to work with 96/88.2kHz Linear PCM audio, but then suddenly stops! Button What it better to listen to ...the start of the current track or chapter, then to cancel the resume function. (See also Resume and Last Memory below shows the basic controls on the remote for the digital output. Press ENTER to select (or wait a few seconds). • If the disc is stopped, playback starts from the...
Owner's Manual
Page 32
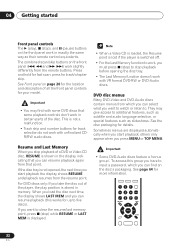
... your model. • You may give access to additional features, such as subtitle and audio language selection, or special features such as their remote control equivalents. If the disc tray is not opened, the next time you press MENU or TOP MENU. See page 64 for fast scan; 04...disc out of the disc. To access this works for track selection do not work in the display indicating that some playback controls don't work slightly differently from the remote buttons. They may find on the disc's packaging. When you load the disc next time, the display shows LAST MEM ...
... your model. • You may give access to additional features, such as subtitle and audio language selection, or special features such as their remote control equivalents. If the disc tray is not opened, the next time you press MENU or TOP MENU. See page 64 for fast scan; 04...disc out of the disc. To access this works for track selection do not work in the display indicating that some playback controls don't work slightly differently from the remote buttons. They may find on the disc's packaging. When you load the disc next time, the display shows LAST MEM ...
Owner's Manual
Page 33
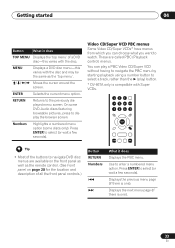
... (or wait a few seconds). These are available on the front panel as well as the remote control. (See Front panel on page 20 for the location and description of a DVD disc-this varies...the cursor around the screen. Press ENTER to navigate DVD disc menus are called PBC (Playback control) menus. RETURN Returns to watch. You can choose what you want to the previously displayed menu...04 Button What it does TOP MENU Displays the 'top menu' of all the front panel controls.) Button RETURN Numbers What it does Displays the PBC menu. ENTER Selects the current menu option....
... (or wait a few seconds). These are available on the front panel as well as the remote control. (See Front panel on page 20 for the location and description of a DVD disc-this varies...the cursor around the screen. Press ENTER to navigate DVD disc menus are called PBC (Playback control) menus. RETURN Returns to watch. You can choose what you want to the previously displayed menu...04 Button What it does TOP MENU Displays the 'top menu' of all the front panel controls.) Button RETURN Numbers What it does Displays the PBC menu. ENTER Selects the current menu option....

Owner's Manual
Page 50
... - HOME MENU DVD Audio Settings Video Adjust Play Mode Disc Navigator Initial Settings Setup Navigator 2 Highlight Channel Level, then use the SURROUND button on the remote control to switch Virtual Surround on (2V/SRS TruSurround)/ Off. • Make sure that Audio Output Mode is set to 2 Channel (page 66). • How good...
... - HOME MENU DVD Audio Settings Video Adjust Play Mode Disc Navigator Initial Settings Setup Navigator 2 Highlight Channel Level, then use the SURROUND button on the remote control to switch Virtual Surround on (2V/SRS TruSurround)/ Off. • Make sure that Audio Output Mode is set to 2 Channel (page 66). • How good...
Owner's Manual
Page 82
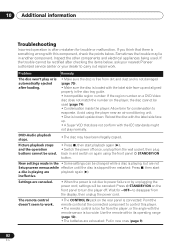
... on a DVD-Video disc does not match the number on the rear panel is connected: Point the remote control at the connected component to control this component, check the points below , ask your nearest Pioneer authorized service center or your dealer to turn the player off once, unplug from the display, then unplug... . New settings made in the • Some settings can be used. • Press , then start a disc is something wrong with this player. • The remote control is too far from dirt and dust and is not damaged (page 70). • Make sure the disc is too wide: Use the...
... on a DVD-Video disc does not match the number on the rear panel is connected: Point the remote control at the connected component to control this component, check the points below , ask your nearest Pioneer authorized service center or your dealer to turn the player off once, unplug from the display, then unplug... . New settings made in the • Some settings can be used. • Press , then start a disc is something wrong with this player. • The remote control is too far from dirt and dust and is not damaged (page 70). • Make sure the disc is too wide: Use the...
Owner's Manual
Page 86
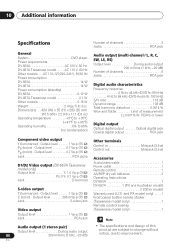
... 0.1 W Other models 0.18 W Weight 2.4 kg / 5 lb 3 oz Dimensions . . 420 (W) x 55 (H) x 283 (D) mm (16.5 (W) x 2.2 (H) x 11.1 (D) in Minijack (3.5 ø) Control out Minijack (3.5 ø) Accessories Audio/video cable 1 Power cable 1 Remote control 1 AA/R6P dry cell batteries 2 Operating Instructions DV-563A 1 DV-667A 1 (PX and Australian model 2 (Other model) Warranty card (U.S. Output level 0.7 Vp-p (75 Ω) PR (color) - Output...
... 0.1 W Other models 0.18 W Weight 2.4 kg / 5 lb 3 oz Dimensions . . 420 (W) x 55 (H) x 283 (D) mm (16.5 (W) x 2.2 (H) x 11.1 (D) in Minijack (3.5 ø) Control out Minijack (3.5 ø) Accessories Audio/video cable 1 Power cable 1 Remote control 1 AA/R6P dry cell batteries 2 Operating Instructions DV-563A 1 DV-667A 1 (PX and Australian model 2 (Other model) Warranty card (U.S. Output level 0.7 Vp-p (75 Ω) PR (color) - Output...


