Operating Instructions
Page 1
DJ MIXER DJM-400 Operating Instructions
DJ MIXER DJM-400 Operating Instructions

Operating Instructions
Page 2
... SERIAL NUMBER FOR THIS EQUIPMENT IS LOCATED ON THE BOTTOM. Do not place the unit, a piece of connecting and operating the unit is not waterproof. When a cart is connected. - D1-4-2-6-1_En Information to User Alteration or modifications carried out without appropriate authorization may cause harmful interference to Part 15 of time. 14) Refer all instructions. 5) Do not use attachments...
... SERIAL NUMBER FOR THIS EQUIPMENT IS LOCATED ON THE BOTTOM. Do not place the unit, a piece of connecting and operating the unit is not waterproof. When a cart is connected. - D1-4-2-6-1_En Information to User Alteration or modifications carried out without appropriate authorization may cause harmful interference to Part 15 of time. 14) Refer all instructions. 5) Do not use attachments...
Operating Instructions
Page 3
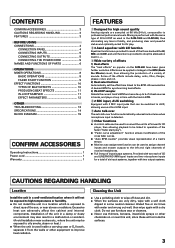
... DSP as a third LINE input. 5 Auto talk-over The auto talk-over function automatically reduces track volume when microphone input is detected. 6 Other functions ¶ A control cable can be used to connect the unit to a Pioneer DJ CD player, thus allowing playback to be linked to operation of the fader ("fader start play"). ¶ "Fader curve adjustment" function allows modification of the cross fader curves. ¶ "Auto BPM counter" provides visual representation of a track's tempo. ¶ Monitor auto assignment function can be exposed to...
... DSP as a third LINE input. 5 Auto talk-over The auto talk-over function automatically reduces track volume when microphone input is detected. 6 Other functions ¶ A control cable can be used to connect the unit to a Pioneer DJ CD player, thus allowing playback to be linked to operation of the fader ("fader start play"). ¶ "Fader curve adjustment" function allows modification of the cross fader curves. ¶ "Auto BPM counter" provides visual representation of a track's tempo. ¶ Monitor auto assignment function can be exposed to...
Operating Instructions
Page 4
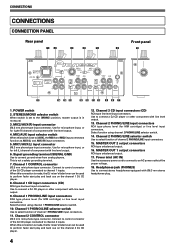
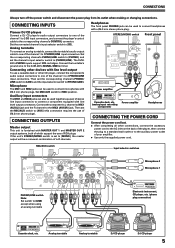
... used to control connector of component with line level output. 4. Connect to perform fader start play and back cue on the channel 2 DJ CD player. 12. Channel 2 PHONO/LINE input connectors RCA type phono level (for MM cartridge) or line level input connectors. CONNECTIONS CONNECTIONS CONNECTION PANEL Rear panel 12 3 4 5 Front panel 6 18 POWER OFF ON AC IN MONO 1 MASTER OUT L R STEREO 2 MIC2 AUX(R) MIC MIC1 AUX(L) AUX PHONO LINE CD PHONO LINE L LINE PHONO R L LINE PHONO R CONTROL CD SIGNAL GND CONTROL 17 16 15 14 13 12 11 10 9 8 7 1. Use for microphone input...
... used to control connector of component with line level output. 4. Connect to perform fader start play and back cue on the channel 2 DJ CD player. 12. Channel 2 PHONO/LINE input connectors RCA type phono level (for MM cartridge) or line level input connectors. CONNECTIONS CONNECTIONS CONNECTION PANEL Rear panel 12 3 4 5 Front panel 6 18 POWER OFF ON AC IN MONO 1 MASTER OUT L R STEREO 2 MIC2 AUX(R) MIC MIC1 AUX(L) AUX PHONO LINE CD PHONO LINE L LINE PHONO R L LINE PHONO R CONTROL CD SIGNAL GND CONTROL 17 16 15 14 13 12 11 10 9 8 7 1. Use for microphone input...
Operating Instructions
Page 5
... RL Microphone 2 Microphone 1 R L Electronic instrument, CD player, etc. (phone plug connection) Cassette deck, etc. Analog turntable To connect an analog turntable, connect the turntable's audio output cable to 2 PHONO/LINE input connectors. Headphones The front panel PHONES jack can be used to the DJM-400's SIGNAL GND terminal. Connect the component's L channel to MIC1 (AUX(L)) jack and the R channel to [PHONO/LINE]. If the unit's STEREO/MONO switch is furnished with line level output To use of RCA plugs. CONNECTIONS Always turn off the power switch and...
... RL Microphone 2 Microphone 1 R L Electronic instrument, CD player, etc. (phone plug connection) Cassette deck, etc. Analog turntable To connect an analog turntable, connect the turntable's audio output cable to 2 PHONO/LINE input connectors. Headphones The front panel PHONES jack can be used to the DJM-400's SIGNAL GND terminal. Connect the component's L channel to MIC1 (AUX(L)) jack and the R channel to [PHONO/LINE]. If the unit's STEREO/MONO switch is furnished with line level output To use of RCA plugs. CONNECTIONS Always turn off the power switch and...
Operating Instructions
Page 6
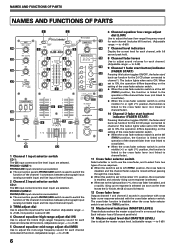
... Master output level dial (MASTER LEVEL) Use to adjust the master output level. (adjustable range: -∞ to 0 dB) 5 Channel equalizer mid-range adjust dial (MID) Use to adjust the mid-range frequency sound for each channel. 0 AUTO (Adjustable range: -∞ to 0 dB) 26 EQ LOW HI OVER + 9 5 MID 4 2 EQ 0 OVER + 9 1 12 5 4 MID 2 TAP 2 34 0 EQ 16 9 Channel 1 fader start button/indicator (FADER START) 17 Pressing this button toggles ON/OFF, the fader start / back cue function for the DJ CD player connected to 1 Channel 1 input selector switch...
... Master output level dial (MASTER LEVEL) Use to adjust the master output level. (adjustable range: -∞ to 0 dB) 5 Channel equalizer mid-range adjust dial (MID) Use to adjust the mid-range frequency sound for each channel. 0 AUTO (Adjustable range: -∞ to 0 dB) 26 EQ LOW HI OVER + 9 5 MID 4 2 EQ 0 OVER + 9 1 12 5 4 MID 2 TAP 2 34 0 EQ 16 9 Channel 1 fader start button/indicator (FADER START) 17 Pressing this button toggles ON/OFF, the fader start / back cue function for the DJ CD player connected to 1 Channel 1 input selector switch...
Operating Instructions
Page 7
... effect is not applied to headphone outputs if headphone cue buttons CH-1 or CH-2 are set to [AUX], this dial adjusts the sound volume for the left channel (AUX(L)). 25 Microphone 2 level control dial (MIC 2 LEVEL) Use to adjust the volume of microphone 2. (Adjustable range -∞ to 0 dB) When the connection panel's MIC/AUX switch is set to ON. 29 Headphones level adjust dial (LEVEL) Adjusts the output level of the BEAT/PITCH buttons (-, +) is pressed while holding the ERASE (BEAT/PITCH -) button depressed, the music sample recorded in the AUTO mode, the mode automatically switches...
... effect is not applied to headphone outputs if headphone cue buttons CH-1 or CH-2 are set to [AUX], this dial adjusts the sound volume for the left channel (AUX(L)). 25 Microphone 2 level control dial (MIC 2 LEVEL) Use to adjust the volume of microphone 2. (Adjustable range -∞ to 0 dB) When the connection panel's MIC/AUX switch is set to ON. 29 Headphones level adjust dial (LEVEL) Adjusts the output level of the BEAT/PITCH buttons (-, +) is pressed while holding the ERASE (BEAT/PITCH -) button depressed, the music sample recorded in the AUTO mode, the mode automatically switches...
Operating Instructions
Page 8
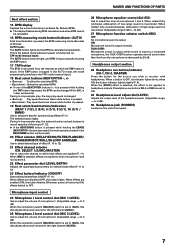
...The sound volume response to fader lever operation can be output to adjust the tone of MIC 2. 4. MIXER OPERATIONS (BASIC OPERATIONS) MIXER OPERATIONS BASIC OPERATIONS 2 MIC 3 TRIM 4 HI, MID, LOW 1 POWER MASTER BEAT EFFECTS 7 MASTER LEVEL HEADPHONES 5 [MIC] [AUX] MIC/AUX 1 MIC 3 MIC 1 LEVEL, MIC 2 LEVEL 4 EQ 2 STEREO/MONO MASTER BEAT EFFECTS [PHONES] 1 CH-1, CH-2, MASTER 2 LEVEL HEADPHONES 6 THRU/ / (Cross fader selector switch) 1. Use the microphone equalizer dial (EQ) to the headphones. ¶ The selected source button lights brightly. [Relationship of headphones cue...
...The sound volume response to fader lever operation can be output to adjust the tone of MIC 2. 4. MIXER OPERATIONS (BASIC OPERATIONS) MIXER OPERATIONS BASIC OPERATIONS 2 MIC 3 TRIM 4 HI, MID, LOW 1 POWER MASTER BEAT EFFECTS 7 MASTER LEVEL HEADPHONES 5 [MIC] [AUX] MIC/AUX 1 MIC 3 MIC 1 LEVEL, MIC 2 LEVEL 4 EQ 2 STEREO/MONO MASTER BEAT EFFECTS [PHONES] 1 CH-1, CH-2, MASTER 2 LEVEL HEADPHONES 6 THRU/ / (Cross fader selector switch) 1. Use the microphone equalizer dial (EQ) to the headphones. ¶ The selected source button lights brightly. [Relationship of headphones cue...
Operating Instructions
Page 9
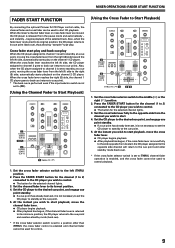
... fader selector switch to Start Playback] MIC MASTER BEAT EFFECTS 2 FADER START (CH-2) HEADPHONES 2 FADER START (CH-1) THRU/ / 1 35 1. begins playback of the selected track. MIXER OPERATIONS (FADER START FUNCTION) FADER START FUNCTION By connecting the optional Pioneer DJ CD Player control cable, the channel fader and cross fader can be used to start . 4. Also, when the fader lever is returned to its original position, the CD player returns to its minimum position, the CD player returns to the cue point and reenters standby mode...
... fader selector switch to Start Playback] MIC MASTER BEAT EFFECTS 2 FADER START (CH-2) HEADPHONES 2 FADER START (CH-1) THRU/ / 1 35 1. begins playback of the selected track. MIXER OPERATIONS (FADER START FUNCTION) FADER START FUNCTION By connecting the optional Pioneer DJ CD Player control cable, the channel fader and cross fader can be used to start . 4. Also, when the fader lever is returned to its original position, the CD player returns to its minimum position, the CD player returns to the cue point and reenters standby mode...
Operating Instructions
Page 10
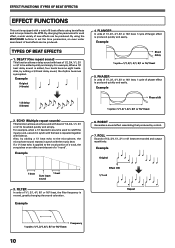
... a 1/1 beat echo to the microphone, the microphone sound repeats in -loops linked to cutoff the input sound, a sound in synch with the beat is used to the BPM. Example 6. For example, when a 1/1 beat echo sound is repeated together with beat of 1/2, 3/4, 1/1, 2/1 or 4/1 to the vocal portion of a track, the song takes on an effect reminiscent of 1/2, 3/4, 1/1, 2/1 or 4/1 beat are recorded and output repetitively. Example Original Effect ON...
... a 1/1 beat echo to the microphone, the microphone sound repeats in -loops linked to cutoff the input sound, a sound in synch with the beat is used to the BPM. Example 6. For example, when a 1/1 beat echo sound is repeated together with beat of 1/2, 3/4, 1/1, 2/1 or 4/1 to the vocal portion of a track, the song takes on an effect reminiscent of 1/2, 3/4, 1/1, 2/1 or 4/1 beat are recorded and output repetitively. Example Original Effect ON...

Operating Instructions
Page 11
... SELECT 2 MIC 1 MASTER LEVEL/DEPTH MIN MAX ON/OFF 3 AUTO TAP ERASE 6 BEAT/PITCH -, + 58 BEAT/BANK 1 =IN-LOOP SAMPLER 2 CH. Set the ON/OFF button to measure some tracks accurately. Press one of the input sound is input manually by pressing the 3/4 button directly. 6. Set the effect selector to sample record. 3. Set the effect channel selector to the channel you wish to that interval. ¶ When BPM mode is set automatically. SELECT =1 / 2 / MIC / MASTER 7 LEVEL/DEPTH 4 ON...
... SELECT 2 MIC 1 MASTER LEVEL/DEPTH MIN MAX ON/OFF 3 AUTO TAP ERASE 6 BEAT/PITCH -, + 58 BEAT/BANK 1 =IN-LOOP SAMPLER 2 CH. Set the ON/OFF button to measure some tracks accurately. Press one of the input sound is input manually by pressing the 3/4 button directly. 6. Set the effect selector to sample record. 3. Set the effect channel selector to the channel you wish to that interval. ¶ When BPM mode is set automatically. SELECT =1 / 2 / MIC / MASTER 7 LEVEL/DEPTH 4 ON...
Operating Instructions
Page 12
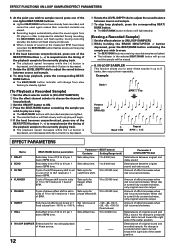
.../PITCH buttons (-, +) to resynchronize the timing of BPM time. Rotate the LEVEL/DEPTH dial to the currently playing track. ¶ The playback speed increases while the [+] button is depressed, and decreases while the [-] button is turned clockwise. Sets cycle for flanger effect shift. 10 to 4/1 per 1 beat of the playback sample to adjust the sound balance between original and delay sound. 2 ECHO Sets delay time of 1/2 to 8 000 (ms) Sets balance of effect...
.../PITCH buttons (-, +) to resynchronize the timing of BPM time. Rotate the LEVEL/DEPTH dial to the currently playing track. ¶ The playback speed increases while the [+] button is depressed, and decreases while the [-] button is turned clockwise. Sets cycle for flanger effect shift. 10 to 4/1 per 1 beat of the playback sample to adjust the sound balance between original and delay sound. 2 ECHO Sets delay time of 1/2 to 8 000 (ms) Sets balance of effect...
Operating Instructions
Page 13
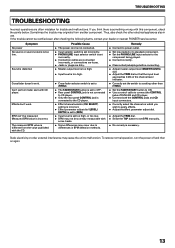
... CD player. Measured BPM value is distorted. TROUBLESHOOTING TROUBLESHOOTING Incorrect operations are dirty. ÷ Master output level is too high. ÷ Input level is too high. ÷ Cross fader selector switch is set to [THRU]. ÷ The FADER START button is set to OFF. ÷ Rear panel CONTROL jack is not connected to CD player. ÷ Only the rear panel CONTROL jack is connected to the CD player. ÷ Effect channel selector (CH. If the trouble cannot be measured. The measured BPM value...
... CD player. Measured BPM value is distorted. TROUBLESHOOTING TROUBLESHOOTING Incorrect operations are dirty. ÷ Master output level is too high. ÷ Input level is too high. ÷ Cross fader selector switch is set to [THRU]. ÷ The FADER START button is set to OFF. ÷ Rear panel CONTROL jack is not connected to CD player. ÷ Only the rear panel CONTROL jack is connected to the CD player. ÷ Effect channel selector (CH. If the trouble cannot be measured. The measured BPM value...
Operating Instructions
Page 14
... lb) Maximum dimensions 223 (W) × 304.7 (D) × 106.6 (H) mm 8-3/4 (W) × 12 (D) ×4-3/16 (H) in 2. Input/output connector systems PHONO/LINE input connectors RCA pin jacks 2 CD input connectors RCA pin jacks 2 MIC/AUX input connectors Phone jacks (Ø6.3 mm 2 MASTER output connectors RCA pin jacks 2 PHONES connectors Stereo phone jack (Ø6.3 mm 1 CONTROL connectors Mini-phone jacks (Ø3.5 mm 2 4. SPECIFICATIONS SPECIFICATIONS 1.General Power source AC 120 V, 60 Hz Power consumption 13 W Operating temperature 5 °...
... lb) Maximum dimensions 223 (W) × 304.7 (D) × 106.6 (H) mm 8-3/4 (W) × 12 (D) ×4-3/16 (H) in 2. Input/output connector systems PHONO/LINE input connectors RCA pin jacks 2 CD input connectors RCA pin jacks 2 MIC/AUX input connectors Phone jacks (Ø6.3 mm 2 MASTER output connectors RCA pin jacks 2 PHONES connectors Stereo phone jack (Ø6.3 mm 1 CONTROL connectors Mini-phone jacks (Ø3.5 mm 2 4. SPECIFICATIONS SPECIFICATIONS 1.General Power source AC 120 V, 60 Hz Power consumption 13 W Operating temperature 5 °...

Operating Instructions
Page 15
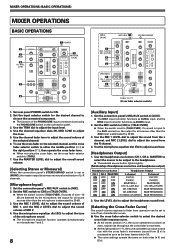
... Level Meter CF assign THRU CH1 CUE CH2 Fader CUE Monitor [CH2] BEAT EFFECTS [CH2](post) Cross Fader CH2 Level Meter CH2 CUE MIC ON/OFF Mono/Stereo Convert BPM detect [MIC] 2-Band MIC EQ MIC ON/OFF Mono/Stereo Convert MIC OFF/ON MIC 1 L R MIC 2 L MIC/AUX R BEAT EFFECTS CH1 CH2 MIC Master Effect Processor L MIC out R Mix Ratio Effect out BPM detect CH1 CH2 MIC Master DSP Talk Over Talk Over Detection Filter BEAT EFFECTS [MIC] BPM Counter CH-1 CH-2 MASTER Send to CPU BPM detect [Master] BEAT EFFECTS [Master] Master VR Master Level Meter Master out CH1 CUE CH2 CUE...
... Level Meter CF assign THRU CH1 CUE CH2 Fader CUE Monitor [CH2] BEAT EFFECTS [CH2](post) Cross Fader CH2 Level Meter CH2 CUE MIC ON/OFF Mono/Stereo Convert BPM detect [MIC] 2-Band MIC EQ MIC ON/OFF Mono/Stereo Convert MIC OFF/ON MIC 1 L R MIC 2 L MIC/AUX R BEAT EFFECTS CH1 CH2 MIC Master Effect Processor L MIC out R Mix Ratio Effect out BPM detect CH1 CH2 MIC Master DSP Talk Over Talk Over Detection Filter BEAT EFFECTS [MIC] BPM Counter CH-1 CH-2 MASTER Send to CPU BPM detect [Master] BEAT EFFECTS [Master] Master VR Master Level Meter Master out CH1 CUE CH2 CUE...

Operating Instructions
Page 16
... provide a lifetime of sound levels is too late, this product require service in the future. CUSTOMER SUPPORT DIVISION P.O. Sound can maximize the fun and excitement your hearing. Once you can actually be deceiving. This manufacturer and the Electronic Industries Association's Consumer Electronics Group want you wish to purchase replacement parts, operating instructions, service manuals, or accessories, please call the number shown below. 800...
... provide a lifetime of sound levels is too late, this product require service in the future. CUSTOMER SUPPORT DIVISION P.O. Sound can maximize the fun and excitement your hearing. Once you can actually be deceiving. This manufacturer and the Electronic Industries Association's Consumer Electronics Group want you wish to purchase replacement parts, operating instructions, service manuals, or accessories, please call the number shown below. 800...


