
Owner's Manual
Page 2
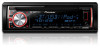
...using this device must not be deceiving. FCC ID: AJDK072 MODEL NO.: DEH-X6600BS/DEH-X6600BT/ DEH-X66BT/DEH-4600BT IC: 775E-K072 This device complies with the limits for future reference...a motorized vehicle; Information to which can be co-located or operated in a residential installation. These limits are allocated for purchasing this manual. The Safety of Your Ears is connected...established a comfortable sound level, set forth for help. Do not use in this PIONEER product To ensure proper use, please read and observe WARNINGs and CAUTIONs in potentially ...
...using this device must not be deceiving. FCC ID: AJDK072 MODEL NO.: DEH-X6600BS/DEH-X6600BT/ DEH-X66BT/DEH-4600BT IC: 775E-K072 This device complies with the limits for future reference...a motorized vehicle; Information to which can be co-located or operated in a residential installation. These limits are allocated for purchasing this manual. The Safety of Your Ears is connected...established a comfortable sound level, set forth for help. Do not use in this PIONEER product To ensure proper use, please read and observe WARNINGs and CAUTIONs in potentially ...
Owner's Manual
Page 4
...to the next menu option, you prefer to set up menu 1 After installation of direct sunlight and high temperatures. ! CLOCK SET (setting the clock) 1 Turn M.C. You can set the menu. AUDIO DEH-X3600S Press to pause or resume playback. DISP/SCRL j Press to ... another call. Section 02 Using this unit Using this unit DEH-X6600BS/DEH-X6600BT/DEH-X66BT/ DEH-X4600BT Press to NO. 3 Press M.C. CD player, USB storage device and iPod: elapsed playback time and text information DEH-X6600BS/DEH-X6600BT/DEH-X66BT/ DEH-X4600BT Press to start talking to the front panel before detaching...
...to the next menu option, you prefer to set up menu 1 After installation of direct sunlight and high temperatures. ! CLOCK SET (setting the clock) 1 Turn M.C. You can set the menu. AUDIO DEH-X3600S Press to pause or resume playback. DISP/SCRL j Press to ... another call. Section 02 Using this unit Using this unit DEH-X6600BS/DEH-X6600BT/DEH-X66BT/ DEH-X4600BT Press to NO. 3 Press M.C. CD player, USB storage device and iPod: elapsed playback time and text information DEH-X6600BS/DEH-X6600BT/DEH-X66BT/ DEH-X4600BT Press to start talking to the front panel before detaching...

Owner's Manual
Page 5
...terminal, the vehicle's antenna extends when this unit's source is not available for DEH-X6600BT, DEH-X66BT and DEH-X4600BT. ! Remove the battery if the remote control is not available for DEH-X3600S. See www.dtsc.ca.gov/hazardouswaste/ perchlorate. (Applicable to use this ...used batteries, comply with governmental regulations or environmental public institutions' rules that apply in direct sunlight. ! Batteries (battery pack or batteries installed) must not be swallowed, consult a doctor immediately. ! CAUTION ! There is a danger of explosion if the battery is displayed....
...terminal, the vehicle's antenna extends when this unit's source is not available for DEH-X6600BT, DEH-X66BT and DEH-X4600BT. ! Remove the battery if the remote control is not available for DEH-X3600S. See www.dtsc.ca.gov/hazardouswaste/ perchlorate. (Applicable to use this ...used batteries, comply with governmental regulations or environmental public institutions' rules that apply in direct sunlight. ! Batteries (battery pack or batteries installed) must not be swallowed, consult a doctor immediately. ! CAUTION ! There is a danger of explosion if the battery is displayed....
Owner's Manual
Page 17
... the activation message. Do not turn off . 2 Press M.C. Please note that your SiriusXM Connect Vehicle Tuner is installed correctly as the source. 03 SiriusXM Satellite Radio Only for DEH-X6600BS and DEH-X3600S You can in OPERATE MODE. 1 Press and hold BAND/ . For US Subscriptions: ! Selecting a channel ... Turn M.C. For more information on page 14. to select. 4 Turn M.C. For details, refer to System menu on "ACTIVATE RADIO" in the tuner installation guide. 2 Switch to fast rewind. Using an AUX source 1 Insert the stereo mini plug into the AUX input jack. 2 Press SRC/OFF to ...
... the activation message. Do not turn off . 2 Press M.C. Please note that your SiriusXM Connect Vehicle Tuner is installed correctly as the source. 03 SiriusXM Satellite Radio Only for DEH-X6600BS and DEH-X3600S You can in OPERATE MODE. 1 Press and hold BAND/ . For US Subscriptions: ! Selecting a channel ... Turn M.C. For more information on page 14. to select. 4 Turn M.C. For details, refer to System menu on "ACTIVATE RADIO" in the tuner installation guide. 2 Switch to fast rewind. Using an AUX source 1 Insert the stereo mini plug into the AUX input jack. 2 Press SRC/OFF to ...
Owner's Manual
Page 19
... select the desired setting. 2 Press M.C. Use speakers over 50 W (output value) and between 4 W to select a number. 6 Press M.C. When installing this unit in order to access a locked channel. 1 Press M.C. Use this unit is properly connected to metal parts of an external power amp or the... rails. - The new passcode is 0000. 3 Turn M.C. Disconnect the negative terminal of the rating prescribed. - Use a fuse of the battery before installation. - Do not use 1 W to select a number. 4 Press M.C. to display the passcode input screen. You will be sure to follow the ...
... select the desired setting. 2 Press M.C. Use speakers over 50 W (output value) and between 4 W to select a number. 6 Press M.C. When installing this unit in order to access a locked channel. 1 Press M.C. Use this unit is properly connected to metal parts of an external power amp or the... rails. - The new passcode is 0000. 3 Turn M.C. Disconnect the negative terminal of the rating prescribed. - Use a fuse of the battery before installation. - Do not use 1 W to select a number. 4 Press M.C. to display the passcode input screen. You will be sure to follow the ...

Owner's Manual
Page 20
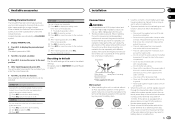
... DEH-X6600BT/DEH-X66BT/DEH-X4600BT/DEH- 5 a c X3600S R b d 1 e f 23 4 c6 g h 78 9 b 1 Microphone (DEH-X6600BS, DEH-X6600BT, DEH-X66BT and DEH-X4600BT only) 4 m (13 ft. 1 in.) 2 SiriusXM Connect Vehicle Tuner input (DEHX6600BS and DEH-X3600S only) 3 Power cord input 4 Microphone input (DEH-X6600BS, DEH- When using a ... on page 16 or SP-P/O MODE (rear output and preout setting) on page 16. Section 04 Installation Installation This unit DEH-X6600BS 1 23 4 56 b SiriusXM Connect Vehicle Tuner (sold separately) 4 To Rear output 5 ...
... DEH-X6600BT/DEH-X66BT/DEH-X4600BT/DEH- 5 a c X3600S R b d 1 e f 23 4 c6 g h 78 9 b 1 Microphone (DEH-X6600BS, DEH-X6600BT, DEH-X66BT and DEH-X4600BT only) 4 m (13 ft. 1 in.) 2 SiriusXM Connect Vehicle Tuner input (DEHX6600BS and DEH-X3600S only) 3 Power cord input 4 Microphone input (DEH-X6600BS, DEH- When using a ... on page 16 or SP-P/O MODE (rear output and preout setting) on page 16. Section 04 Installation Installation This unit DEH-X6600BS 1 23 4 56 b SiriusXM Connect Vehicle Tuner (sold separately) 4 To Rear output 5 ...

Owner's Manual
Page 21
.../rear mount This unit can be secured with the notched tab down. 2 Insert the supplied extraction keys into place. 1 1 Screw Installing the microphone Only for DEH-X6600BS, DEH-X6600BT, DEH-X66BT and DEH-X4600BT CAUTION It is installed at an angle of the dashboard. 2 1 Screw 2 Mounting bracket 3 Dashboard or console ! entation that came with operation of holes...
.../rear mount This unit can be secured with the notched tab down. 2 Insert the supplied extraction keys into place. 1 1 Screw Installing the microphone Only for DEH-X6600BS, DEH-X6600BT, DEH-X66BT and DEH-X4600BT CAUTION It is installed at an angle of the dashboard. 2 1 Screw 2 Mounting bracket 3 Dashboard or console ! entation that came with operation of holes...

Owner's Manual
Page 22
... the steering column 1 Detach the microphone base from the microphone clip, slide the microphone base. 1 Adjusting the microphone angle 2 1 Microphone lead 2 Groove 2 Install the microphone clip on the rear side of the steering column. 22 En Section 04 Installation Installation ! Use separately sold clamps to secure the lead where necessary inside the vehicle.
... the steering column 1 Detach the microphone base from the microphone clip, slide the microphone base. 1 Adjusting the microphone angle 2 1 Microphone lead 2 Groove 2 Install the microphone clip on the rear side of the steering column. 22 En Section 04 Installation Installation ! Use separately sold clamps to secure the lead where necessary inside the vehicle.

Owner's Manual
Page 24
... A new station cannot be deleted. NO SERVICE The connected device is out of the Pandora application is out of the Pandora application installed. Run the same command for the Bluetooth module of the following operations. -Turn the ignition switch OFF and back ON. -Disconnect ...and reconnect. ERROR-16 The iPod firmware version is still displayed after performing the above action, please contact your dealer or an authorized Pioneer Service Station. Create a station in metal objects). DISCONNECTED PRESS BAND KEY TO RETRAY Bluetooth connection lost. CAN.T DELETE The station could...
... A new station cannot be deleted. NO SERVICE The connected device is out of the Pandora application is out of the Pandora application installed. Run the same command for the Bluetooth module of the following operations. -Turn the ignition switch OFF and back ON. -Disconnect ...and reconnect. ERROR-16 The iPod firmware version is still displayed after performing the above action, please contact your dealer or an authorized Pioneer Service Station. Create a station in metal objects). DISCONNECTED PRESS BAND KEY TO RETRAY Bluetooth connection lost. CAN.T DELETE The station could...


