Owner's Manual
Page 5
... off . Turning the unit on 1 Press SRC/OFF to the vehicle's auto-antenna relay control terminal, the vehicle's antenna extends when this unit's blue/white lead is turned on . Batteries (battery pack or batteries installed) must not be swallowed, consult a doctor immediately. ! CAUTION ! When disposing of explosion if the battery is...
... off . Turning the unit on 1 Press SRC/OFF to the vehicle's auto-antenna relay control terminal, the vehicle's antenna extends when this unit's blue/white lead is turned on . Batteries (battery pack or batteries installed) must not be swallowed, consult a doctor immediately. ! CAUTION ! When disposing of explosion if the battery is...
Owner's Manual
Page 16
...to display the setting mode. 2 Turn M.C. to display the data transfer mode. to the RCA output. ! range speaker connected to the rear speaker leads output and there is a subwoofer connected to select the desired setting. Select when there is a subwoofer connected to the RCA output. ! Once selected,... the following initial menu functions can be adjusted. to display DEMO OFF and press to the rear speaker leads output and the RCA output. ware is a full- You can select any auxiliary amp and there is a fullrange speaker connected to select. 4...
...to display the setting mode. 2 Turn M.C. to display the data transfer mode. to the RCA output. ! range speaker connected to the rear speaker leads output and there is a subwoofer connected to select the desired setting. Select when there is a subwoofer connected to the RCA output. ! Once selected,... the following initial menu functions can be adjusted. to display DEMO OFF and press to the rear speaker leads output and the RCA output. ware is a full- You can select any auxiliary amp and there is a fullrange speaker connected to select. 4...
Owner's Manual
Page 17
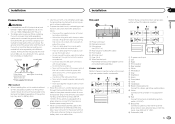
... 45 67 8 1 Power cord input 2 Microphone input 3 Microphone 4 m (13 ft. 1 in battery drain. L 1 R 2 3 4 6 8 F 7 9 5 a c R b d e f g h Perform these connections when not connecting a rear speaker lead to share the power with a glass antenna, connect it could result in a vehicle without the optional amplifier. Never wire the negative speaker cable directly to...
... 45 67 8 1 Power cord input 2 Microphone input 3 Microphone 4 m (13 ft. 1 in battery drain. L 1 R 2 3 4 6 8 F 7 9 5 a c R b d e f g h Perform these connections when not connecting a rear speaker lead to share the power with a glass antenna, connect it could result in a vehicle without the optional amplifier. Never wire the negative speaker cable directly to...

Owner's Manual
Page 18
Section 03 Installation Installation j When using a subwoofer of 70 W (2 W), be sure to connect the subwoofer to the violet and violet/black leads of this unit is monaural. k Not used. When installing, to speakers. ! Use either front-mount or rear-mount installation. 18 En...mounting sleeve that came with RCA cables (sold separately) Perform these connections when using a screwdriver to the green and green/ black leads. Refer to the speaker leads that the unit is enough space, use the supplied mounting sleeve. Do not connect anything to SP-P/O MODE (rear output and ...
Section 03 Installation Installation j When using a subwoofer of 70 W (2 W), be sure to connect the subwoofer to the violet and violet/black leads of this unit is monaural. k Not used. When installing, to speakers. ! Use either front-mount or rear-mount installation. 18 En...mounting sleeve that came with RCA cables (sold separately) Perform these connections when using a screwdriver to the green and green/ black leads. Refer to the speaker leads that the unit is enough space, use the supplied mounting sleeve. Do not connect anything to SP-P/O MODE (rear output and ...
Owner's Manual
Page 19
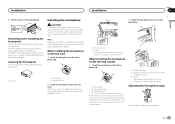
...from theft and Re-attaching the front panel on the microphone clip. 1 2 3 4 1 Microphone 2 Microphone base 3 Microphone clip 4 Fit the microphone lead into the groove. # Microphone can be adjusted. En 19 Press the detach button and push the front panel upward and pull it will enable it...system. English Installation Installation Section 03 3 Pull the unit out of the steering column. 3 Clamp Use separately sold clamps to secure the lead where necessary inside the vehicle. Note Install the microphone in such a way that will not obstruct driving. In this case, detach the microphone...
...from theft and Re-attaching the front panel on the microphone clip. 1 2 3 4 1 Microphone 2 Microphone base 3 Microphone clip 4 Fit the microphone lead into the groove. # Microphone can be adjusted. En 19 Press the detach button and push the front panel upward and pull it will enable it...system. English Installation Installation Section 03 3 Pull the unit out of the steering column. 3 Clamp Use separately sold clamps to secure the lead where necessary inside the vehicle. Note Install the microphone in such a way that will not obstruct driving. In this case, detach the microphone...
Owner's Manual
Page 22
... driving. Do not let the USB storage device fall onto the floor, where it may occur. ! Depending on the iPod when using discs that can lead to the manufacturer of the discs, which may not be played back. Operations may become jammed under the brake or accelerator pedal. The storage device...
... driving. Do not let the USB storage device fall onto the floor, where it may occur. ! Depending on the iPod when using discs that can lead to the manufacturer of the discs, which may not be played back. Operations may become jammed under the brake or accelerator pedal. The storage device...
