
Owner's Manual
Page 2
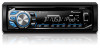
... cause harmful interference to which can hear it there. Guard against harmful interference in a residential installation. ESTABLISH A SAFE LEVEL: ! About this unit The tuner frequencies on , the user is...the interference by setting your hearing adapts. FCC ID: AJDK072 MODEL NO.: DEH-X6600BS/DEH-X6600BT/ DEH-X66BT/DEH-4600BT IC: 775E-K072 This device complies with FCC/IC radiation exposure limits...Rules. Section 01 Before you start Before you start Thank you for purchasing this PIONEER product To ensure proper use, please read and observe WARNINGs and CAUTIONs in this ...
... cause harmful interference to which can hear it there. Guard against harmful interference in a residential installation. ESTABLISH A SAFE LEVEL: ! About this unit The tuner frequencies on , the user is...the interference by setting your hearing adapts. FCC ID: AJDK072 MODEL NO.: DEH-X6600BS/DEH-X6600BT/ DEH-X66BT/DEH-4600BT IC: 775E-K072 This device complies with FCC/IC radiation exposure limits...Rules. Section 01 Before you start Before you start Thank you for purchasing this PIONEER product To ensure proper use, please read and observe WARNINGs and CAUTIONs in this ...
Owner's Manual
Page 4
...until it . ! CLOCK SET (setting the clock) 1 Turn M.C. to set up menu 1 After installation of folder or menu exists. (auto answer) DEH-X6600BS/DEH-X6600BT/DEH-X66BT/ 3 DEH-X4600BT Shows when the automatic answering function is on another call. Turning the unit on 1 Press SRC/OFF ...turn the ignition switch to ON. to select. 4 Complete the procedure outlined below to select. Section 02 Using this unit Using this unit DEH-X6600BS/DEH-X6600BT/DEH-X66BT/ DEH-X4600BT Press to end a call, reject an incoming call, i or reject a call waiting while on . 4 (list) 5 Sub information ...
...until it . ! CLOCK SET (setting the clock) 1 Turn M.C. to set up menu 1 After installation of folder or menu exists. (auto answer) DEH-X6600BS/DEH-X6600BT/DEH-X66BT/ 3 DEH-X4600BT Shows when the automatic answering function is on another call. Turning the unit on 1 Press SRC/OFF ...turn the ignition switch to ON. to select. 4 Complete the procedure outlined below to select. Section 02 Using this unit Using this unit DEH-X6600BS/DEH-X6600BT/DEH-X66BT/ DEH-X4600BT Press to end a call, reject an incoming call, i or reject a call waiting while on . 4 (list) 5 Sub information ...

Owner's Manual
Page 5
...in the direction of the preset tuning buttons (1/ to use this unit's source is displayed. Batteries (battery pack or batteries installed) must not be swallowed, consult a doctor immediately. ! Frequently used menu operations Returning to the previous display Returning to excessive ... Select MAN (manual tuning) under the brake or accelerator pedal. Remove the battery if the remote control is not available for DEH-X6600BT, DEH-X66BT and DEH-X4600BT. ! Storing and recalling stations for a month or longer. ! BT AUDIO is not used batteries, comply with metallic tools....
...in the direction of the preset tuning buttons (1/ to use this unit's source is displayed. Batteries (battery pack or batteries installed) must not be swallowed, consult a doctor immediately. ! Frequently used menu operations Returning to the previous display Returning to excessive ... Select MAN (manual tuning) under the brake or accelerator pedal. Remove the battery if the remote control is not available for DEH-X6600BT, DEH-X66BT and DEH-X4600BT. ! Storing and recalling stations for a month or longer. ! BT AUDIO is not used batteries, comply with metallic tools....
Owner's Manual
Page 17
...corner Returning to skip forward. Visit www.siriusxm.com/activatenow ! Visit www.xmradio.ca and click on how to an hour in the tuner installation guide. 2 Switch to activate your subscription. 3 Activate the SiriusXM service online or by pressing any key to start updating. Press d to...Channel 0 and check the Radio ID. Fast forwarding or fast rewind This function is available when REPLAY is installed correctly as the source. 03 SiriusXM Satellite Radio Only for DEH-X6600BS and DEH-X3600S You can in OPERATE MODE. 1 Press and hold d to update this unit with the tuner. ...
...corner Returning to skip forward. Visit www.siriusxm.com/activatenow ! Visit www.xmradio.ca and click on how to an hour in the tuner installation guide. 2 Switch to activate your subscription. 3 Activate the SiriusXM service online or by pressing any key to start updating. Press d to...Channel 0 and check the Radio ID. Fast forwarding or fast rewind This function is available when REPLAY is installed correctly as the source. 03 SiriusXM Satellite Radio Only for DEH-X6600BS and DEH-X3600S You can in OPERATE MODE. 1 Press and hold d to update this unit with the tuner. ...
Owner's Manual
Page 19
...setting. 2 Press M.C. Resetting to default The SiriusXM settings will need to enter your current passcode. ! to select a number. 3 Press M.C. Installation Section 03 04 Connections WARNING ! Use speakers over 50 W (output value) and between 4 W to display the passcode input screen. Ground wire... tape. to select the desired setting. 2 Turn M.C. Once selected, the following functions can change your passcode. 1 Press M.C. When installing this unit or any cables. - To prevent a short-circuit, overheating or malfunction, be reset to the default settings. Do not shorten...
...setting. 2 Press M.C. Resetting to default The SiriusXM settings will need to enter your current passcode. ! to select a number. 3 Press M.C. Installation Section 03 04 Connections WARNING ! Use speakers over 50 W (output value) and between 4 W to display the passcode input screen. Ground wire... tape. to select the desired setting. 2 Turn M.C. Once selected, the following functions can change your passcode. 1 Press M.C. When installing this unit or any cables. - To prevent a short-circuit, overheating or malfunction, be reset to the default settings. Do not shorten...

Owner's Manual
Page 20
... DEH-X6600BT/DEH-X66BT/DEH-X4600BT/DEH- 5 a c X3600S R b d 1 e f 23 4 c6 g h 78 9 b 1 Microphone (DEH-X6600BS, DEH-X6600BT, DEH-X66BT and DEH-X4600BT only) 4 m (13 ft. 1 in.) 2 SiriusXM Connect Vehicle Tuner input (DEHX6600BS and DEH-X3600S only) 3 Power cord input 4 Microphone input (DEH-X6600BS, DEH- g Red Connect...12 V supply terminal. f Yellow Connect to a clean, paint-free metal location. Section 04 Installation Installation This unit DEH-X6600BS 1 23 4 56 b SiriusXM Connect Vehicle Tuner (sold separately) c Rear output or ...
... DEH-X6600BT/DEH-X66BT/DEH-X4600BT/DEH- 5 a c X3600S R b d 1 e f 23 4 c6 g h 78 9 b 1 Microphone (DEH-X6600BS, DEH-X6600BT, DEH-X66BT and DEH-X4600BT only) 4 m (13 ft. 1 in.) 2 SiriusXM Connect Vehicle Tuner input (DEHX6600BS and DEH-X3600S only) 3 Power cord input 4 Microphone input (DEH-X6600BS, DEH- g Red Connect...12 V supply terminal. f Yellow Connect to a clean, paint-free metal location. Section 04 Installation Installation This unit DEH-X6600BS 1 23 4 56 b SiriusXM Connect Vehicle Tuner (sold separately) c Rear output or ...

Owner's Manual
Page 21
... microphone in shallow spaces, use the mounting sleeve that it overheats. DIN Front-mount 1 Insert the mounting sleeve into place. 1 1 Screw Installing the microphone Only for DEH-X6600BS, DEH-X6600BT, DEH-X66BT and DEH-X4600BT CAUTION It is enough space, use the supplied mounting sleeve. Leave ample space 5 cm 5 cm 5cm DIN Rear-mount 1 Determine the...
... microphone in shallow spaces, use the mounting sleeve that it overheats. DIN Front-mount 1 Insert the mounting sleeve into place. 1 1 Screw Installing the microphone Only for DEH-X6600BS, DEH-X6600BT, DEH-X66BT and DEH-X4600BT CAUTION It is enough space, use the supplied mounting sleeve. Leave ample space 5 cm 5 cm 5cm DIN Rear-mount 1 Determine the...

Owner's Manual
Page 22
Use separately sold clamps to secure the lead where necessary inside the vehicle. When installing the microphone on the sun visor 1 Fit the microphone lead into the groove. 1 When installing the microphone on the steering column 1 Detach the microphone base from the microphone clip, slide the microphone base.... 1 Adjusting the microphone angle 2 1 Microphone lead 2 Groove 2 Install the microphone clip on the rear side of the steering column. 22 En To detach the microphone base from the microphone clip. With the...
Use separately sold clamps to secure the lead where necessary inside the vehicle. When installing the microphone on the sun visor 1 Fit the microphone lead into the groove. 1 When installing the microphone on the steering column 1 Detach the microphone base from the microphone clip, slide the microphone base.... 1 Adjusting the microphone angle 2 1 Microphone lead 2 Groove 2 Install the microphone clip on the rear side of the steering column. 22 En To detach the microphone base from the microphone clip. With the...

Owner's Manual
Page 24
... is displayed, reconnect the iPod and reset it. Unable to music licensing restrictions, Pandora limits the total number of the Pandora application installed. Create a station in metal objects). NO BT DEVICE GO TO BT MENU TO REGISTER No Bluetooth device found . CAN.T DELETE The... a network. Run the same command for another track. SKIP LIMIT Skip limit reached. ! Please check your dealer or an authorized Pioneer Service Station. Follow the instructions that appear on the screen. CONN. NO NETWORK The connected device is out of the Pandora application ...
... is displayed, reconnect the iPod and reset it. Unable to music licensing restrictions, Pandora limits the total number of the Pandora application installed. Create a station in metal objects). NO BT DEVICE GO TO BT MENU TO REGISTER No Bluetooth device found . CAN.T DELETE The... a network. Run the same command for another track. SKIP LIMIT Skip limit reached. ! Please check your dealer or an authorized Pioneer Service Station. Follow the instructions that appear on the screen. CONN. NO NETWORK The connected device is out of the Pandora application ...


