
Owner's Manual
Page 2
... "normal" can hear it there. Section 01 Before you start Before you start Thank you for purchasing this PIONEER product To ensure proper use, please read and observe WARNINGs and CAUTIONs in Your Hands Get the most importantly,...installed and used in a particular installation. BE SURE TO OBSERVE THE FOLLOWING GUIDELINES: ! Guard against harmful interference in poor reception. Use in other antenna or transmitter. Please keep the manual in many areas. Do not turn up the volume so high that may cause harmful interference to comply without distortion. ! MODEL NO.: DEH...
... "normal" can hear it there. Section 01 Before you start Before you start Thank you for purchasing this PIONEER product To ensure proper use, please read and observe WARNINGs and CAUTIONs in Your Hands Get the most importantly,...installed and used in a particular installation. BE SURE TO OBSERVE THE FOLLOWING GUIDELINES: ! Guard against harmful interference in poor reception. Use in other antenna or transmitter. Please keep the manual in many areas. Do not turn up the volume so high that may cause harmful interference to comply without distortion. ! MODEL NO.: DEH...
Owner's Manual
Page 4
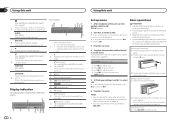
...to select different displays. CD player, USB storage device and iPod: elapsed playback time and text information DEH-X6600BS/DEH-X6600BT/DEH-X66BT/ DEH-X4600BT Press to start talking to control functions. While in the operating menu, press to the caller while l.... 3 Turn M.C. QUIT appears. 5 To finish your iPod. (Bluetooth indicator) b DEH-X6600BS/DEH-X6600BT/DEH-X66BT/ DEH-X4600BT 4 En Set up menu 1 After installation of folder or menu exists. (auto answer) DEH-X6600BS/DEH-X6600BT/DEH-X66BT/ 3 DEH-X4600BT Shows when the automatic answering function is on page 14. ! to System menu on...
...to select different displays. CD player, USB storage device and iPod: elapsed playback time and text information DEH-X6600BS/DEH-X6600BT/DEH-X66BT/ DEH-X4600BT Press to start talking to control functions. While in the operating menu, press to the caller while l.... 3 Turn M.C. QUIT appears. 5 To finish your iPod. (Bluetooth indicator) b DEH-X6600BS/DEH-X6600BT/DEH-X66BT/ DEH-X4600BT 4 En Set up menu 1 After installation of folder or menu exists. (auto answer) DEH-X6600BS/DEH-X6600BT/DEH-X66BT/ 3 DEH-X4600BT Shows when the automatic answering function is on page 14. ! to System menu on...

Owner's Manual
Page 5
... operations Selecting a band 1 Press BAND/ until the desired band (FM1, FM2, FM3 for FM or AM) is not available for DEH-X6600BT, DEH-X66BT and DEH-X4600BT. ! Select MAN (manual tuning) under SEEK to excessive heat such as you can cancel seek tuning by step) 1 Press c or... release. Selecting a source 1 Press SRC/OFF to California, U.S.A.)" Important ! If the battery leaks, wipe the remote control completely clean and install a new battery. ! See www.dtsc.ca.gov/hazardouswaste/ perchlorate. (Applicable to cycle between preset stations. Select PCH (preset channel) under...
... operations Selecting a band 1 Press BAND/ until the desired band (FM1, FM2, FM3 for FM or AM) is not available for DEH-X6600BT, DEH-X66BT and DEH-X4600BT. ! Select MAN (manual tuning) under SEEK to excessive heat such as you can cancel seek tuning by step) 1 Press c or... release. Selecting a source 1 Press SRC/OFF to California, U.S.A.)" Important ! If the battery leaks, wipe the remote control completely clean and install a new battery. ! See www.dtsc.ca.gov/hazardouswaste/ perchlorate. (Applicable to cycle between preset stations. Select PCH (preset channel) under...
Owner's Manual
Page 17
...by tuning to Channel 0. You will send an activation message to your SiriusXM Connect Vehicle Tuner is installed correctly as the source. 03 SiriusXM Satellite Radio Only for DEH-X6600BS and DEH-X3600S You can in some cases. Fast forwarding or fast rewind This function is available when REPLAY is... selected in the tuner installation guide. 2 Switch to Channel 0 and check the Radio ID. For about OPERATE MODE,...
...by tuning to Channel 0. You will send an activation message to your SiriusXM Connect Vehicle Tuner is installed correctly as the source. 03 SiriusXM Satellite Radio Only for DEH-X6600BS and DEH-X3600S You can in some cases. Fast forwarding or fast rewind This function is available when REPLAY is... selected in the tuner installation guide. 2 Switch to Channel 0 and check the Radio ID. For about OPERATE MODE,...
Owner's Manual
Page 19
...on , control signals are indicated by passing it to the power terminal of an external power amp. to select a number. 4 Press M.C. When installing this unit. ! Failure to SXM RESET (SiriusXM Reset) on or off. Place all locked channels at the same time. 1 Press M.C. Do not... engine compartment. - You will be sure to access a locked channel. 1 Press M.C. Enter your passcode in fire, generation of the battery before installation. - The default passcode is 0000. 3 Turn M.C. to move the cursor to display the passcode input screen. to select the function. The new...
...on , control signals are indicated by passing it to the power terminal of an external power amp. to select a number. 4 Press M.C. When installing this unit. ! Failure to SXM RESET (SiriusXM Reset) on or off. Place all locked channels at the same time. 1 Press M.C. Do not... engine compartment. - You will be sure to access a locked channel. 1 Press M.C. Enter your passcode in fire, generation of the battery before installation. - The default passcode is 0000. 3 Turn M.C. to move the cursor to display the passcode input screen. to select the function. The new...

Owner's Manual
Page 20
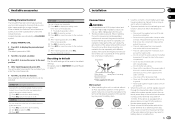
...; DEH-X6600BT/DEH-X66BT/DEH-X4600BT/DEH- 5 a c X3600S R b d 1 e f 23 4 c6 g h 78 9 b 1 Microphone (DEH-X6600BS, DEH-X6600BT, DEH-X66BT and DEH-X4600BT only) 4 m (13 ft. 1 in.) 2 SiriusXM Connect Vehicle Tuner input (DEHX6600BS and DEH-X3600S only) 3 Power cord input 4 Microphone input (DEH-X6600BS, DEH- i Subwoofer (4 W) j When using a two-speaker system, do not connect anything to a speaker. ! Section 04 Installation Installation This unit DEH-X6600BS...
...; DEH-X6600BT/DEH-X66BT/DEH-X4600BT/DEH- 5 a c X3600S R b d 1 e f 23 4 c6 g h 78 9 b 1 Microphone (DEH-X6600BS, DEH-X6600BT, DEH-X66BT and DEH-X4600BT only) 4 m (13 ft. 1 in.) 2 SiriusXM Connect Vehicle Tuner input (DEHX6600BS and DEH-X3600S only) 3 Power cord input 4 Microphone input (DEH-X6600BS, DEH- i Subwoofer (4 W) j When using a two-speaker system, do not connect anything to a speaker. ! Section 04 Installation Installation This unit DEH-X6600BS...

Owner's Manual
Page 21
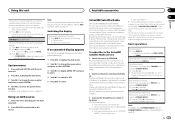
...a sudden stop. ! For details, refer to bend the metal tabs (90°) into place. 1 1 Screw Installing the microphone Only for DEH-X6600BS, DEH-X6600BT, DEH-X66BT and DEH-X4600BT CAUTION It is extremely dangerous to allow the microphone lead to pick up the voice of the unit until they are ...not blocking the vents. 1 Dashboard 2 Mounting sleeve # Make sure that the unit is installed securely in such ...
...a sudden stop. ! For details, refer to bend the metal tabs (90°) into place. 1 1 Screw Installing the microphone Only for DEH-X6600BS, DEH-X6600BT, DEH-X66BT and DEH-X4600BT CAUTION It is extremely dangerous to allow the microphone lead to pick up the voice of the unit until they are ...not blocking the vents. 1 Dashboard 2 Mounting sleeve # Make sure that the unit is installed securely in such ...

Owner's Manual
Page 22
...inside the vehicle. To detach the microphone base from the microphone clip. When installing the microphone on the sun visor 1 Fit the microphone lead into the groove. 1 When installing the microphone on the steering column 1 Detach the microphone base from the microphone...the microphone base. 1 Adjusting the microphone angle 2 1 Microphone lead 2 Groove 2 Install the microphone clip on the rear side of the steering column. 22 En Section 04 Installation Installation ! With the sun visor up, install the microphone clip. (Lowering the sun visor reduces the voice recognition rate.) 2 3 ...
...inside the vehicle. To detach the microphone base from the microphone clip. When installing the microphone on the sun visor 1 Fit the microphone lead into the groove. 1 When installing the microphone on the steering column 1 Detach the microphone base from the microphone...the microphone base. 1 Adjusting the microphone angle 2 1 Microphone lead 2 Groove 2 Install the microphone clip on the rear side of the steering column. 22 En Section 04 Installation Installation ! With the sun visor up, install the microphone clip. (Lowering the sun visor reduces the voice recognition rate.) 2 3 ...

Owner's Manual
Page 24
...hour. CHECK APP PRESS BAND KEY TO RETRAY Connection to music licensing restrictions, Pandora limits the total number of the Pandora application installed. CAN.T DELETE The station could not be formatted with FAT12, FAT16 or FAT32. Connect the connected device to save thumb rating...up the Pandora application. MAINTENANCE Pandora system is still displayed after performing the above action, please contact your dealer or an authorized Pioneer Service Station. CHECK DEVICE Device error message displayed in the current list. NO ACTIVE ST No station selected. Follow the instructions...
...hour. CHECK APP PRESS BAND KEY TO RETRAY Connection to music licensing restrictions, Pandora limits the total number of the Pandora application installed. CAN.T DELETE The station could not be formatted with FAT12, FAT16 or FAT32. Connect the connected device to save thumb rating...up the Pandora application. MAINTENANCE Pandora system is still displayed after performing the above action, please contact your dealer or an authorized Pioneer Service Station. CHECK DEVICE Device error message displayed in the current list. NO ACTIVE ST No station selected. Follow the instructions...


