Owner's Manual
Page 2
...unit 13 Remote control 13 Basic Operations Turning the unit on CD TEXT discs 24 - Contents Thank you for buying this manual in a safe place for Pioneer products 7 Product registration 7 Features 7 About WMA 8 About AAC 8 About the SAT RADIO READY mark 8 Protecting your model properly. Reverse mode 11 ...manual 6 After-sales service for future reference. Feature demo mode 11 Use and care of a CD 22 Pausing CD playback 22 Selecting the search method 22 Searching every 10 tracks in the display 24 - Entering disc titles 23 - Scrolling text information in the current disc 22 Using disc...
...unit 13 Remote control 13 Basic Operations Turning the unit on CD TEXT discs 24 - Contents Thank you for buying this manual in a safe place for Pioneer products 7 Product registration 7 Features 7 About WMA 8 About AAC 8 About the SAT RADIO READY mark 8 Protecting your model properly. Reverse mode 11 ...manual 6 After-sales service for future reference. Feature demo mode 11 Use and care of a CD 22 Pausing CD playback 22 Selecting the search method 22 Searching every 10 tracks in the display 24 - Entering disc titles 23 - Scrolling text information in the current disc 22 Using disc...

Owner's Manual
Page 3
... information on CD TEXT discs 37 - Displaying disc titles 36 - Selecting discs from your iPod 38 Browsing for a song 38 - Selecting a playlist 39 Displaying text information on your ITS playlist 35 - Channel category select setting 44 Selecting stations from the preset channel list 44 SIRIUS Satellite Radio tuner Listening to XM Satellite Radio 42 Selecting...
... information on CD TEXT discs 37 - Displaying disc titles 36 - Selecting discs from your iPod 38 Browsing for a song 38 - Selecting a playlist 39 Displaying text information on your ITS playlist 35 - Channel category select setting 44 Selecting stations from the preset channel list 44 SIRIUS Satellite Radio tuner Listening to XM Satellite Radio 42 Selecting...

Owner's Manual
Page 4
...time alignment 59 About the network function 59 - Adjusting subwoofer settings 63 - Adjusting the audio finely 55 Extra functions 56 Introduction of a CD/MP3/WMA 53 Using ITS playlist and disc title functions 53 Using disc title functions 53 - Adjusting the audio finely 55 4 En ... Storing and recalling broadcast stations 46 Selecting the SIRIUS channel select mode 47 - Selecting a channel in the channel category 47 Displaying the Radio ID 47 TV tuner Watching the television 48 Introduction of advanced TV tuner operation 49 Storing broadcast stations 49 Storing the strongest ...
...time alignment 59 About the network function 59 - Adjusting subwoofer settings 63 - Adjusting the audio finely 55 Extra functions 56 Introduction of a CD/MP3/WMA 53 Using ITS playlist and disc title functions 53 Using disc title functions 53 - Adjusting the audio finely 55 4 En ... Storing and recalling broadcast stations 46 Selecting the SIRIUS channel select mode 47 - Selecting a channel in the channel category 47 Displaying the Radio ID 47 TV tuner Watching the television 48 Introduction of advanced TV tuner operation 49 Storing broadcast stations 49 Storing the strongest ...
Owner's Manual
Page 5
...internal power amplifier 74 Switching the feature demo 74 Switching the reverse mode 74 Switching the Ever Scroll 75 Other Functions Turning the clock display on or off 76 Using the AUX source 76 - WMA additional information 82 - WAV additional information 82 About folders and MP3/WMA... Contents English - Setting the AUX title 76 Using different entertainment displays 77 Using the PGM button 78 Additional Information Understanding built-in CD player error messages 79 Understanding auto TA and EQ error messages 79 CD player and care 80 CD-R/CD-RW discs 80 MP3, WMA, AAC and WAV files 81 -...
...internal power amplifier 74 Switching the feature demo 74 Switching the reverse mode 74 Switching the Ever Scroll 75 Other Functions Turning the clock display on or off 76 Using the AUX source 76 - WMA additional information 82 - WAV additional information 82 About folders and MP3/WMA... Contents English - Setting the AUX title 76 Using different entertainment displays 77 Using the PGM button 78 Additional Information Understanding built-in CD player error messages 79 Understanding auto TA and EQ error messages 79 CD player and care 80 CD-R/CD-RW discs 80 MP3, WMA, AAC and WAV files 81 -...
Owner's Manual
Page 8
...dealer or nearest authorized Pioneer service station regarding the satellite radio tuner that can control an iPod with a Pioneer iPod adapter (CD-IB100), you use ...data. iPod compatibility When you can be used to the satellite radio tuner owner's manual. 8 En About WMA Notes ! Please ...countries. Some Pioneer source units may not be controlled by iTunes® version 4.8 and earlier. About AAC AAC is short for Pioneer (i.e., XM... can control any Pioneer source unit with MPEG 2 and MPEG 4. Depending on the box indicates that the Satellite Radio Tuner for Windows ...
...dealer or nearest authorized Pioneer service station regarding the satellite radio tuner that can control an iPod with a Pioneer iPod adapter (CD-IB100), you use ...data. iPod compatibility When you can be used to the satellite radio tuner owner's manual. 8 En About WMA Notes ! Please ...countries. Some Pioneer source units may not be controlled by iTunes® version 4.8 and earlier. About AAC AAC is short for Pioneer (i.e., XM... can control any Pioneer source unit with MPEG 2 and MPEG 4. Depending on the box indicates that the Satellite Radio Tuner for Windows ...
Owner's Manual
Page 9
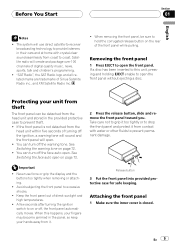
Satellite radio will use force or grip the display and the buttons too tightly when removing or attaching. ! Protecting...head unit within five seconds of digital-quality music, news, sports, talk and children's programming. ! "SAT Radio", the SAT Radio logo and all related marks are trademarks of direct sunlight and high temperatures. ! If a disc has been.... ! Before You Start Section 01 English Notes ! Keep the front panel out of Sirius Satellite Radio inc., and XM Satellite Radio Inc. ! En 9 The system will create and package over 100 channels of turning off , the...
Satellite radio will use force or grip the display and the buttons too tightly when removing or attaching. ! Protecting...head unit within five seconds of digital-quality music, news, sports, talk and children's programming. ! "SAT Radio", the SAT Radio logo and all related marks are trademarks of direct sunlight and high temperatures. ! If a disc has been.... ! Before You Start Section 01 English Notes ! Keep the front panel out of Sirius Satellite Radio inc., and XM Satellite Radio Inc. ! En 9 The system will create and package over 100 channels of turning off , the...

Owner's Manual
Page 10
... DSP setting is not done, the vehicle battery may cause damage to the speakers. % Use a thin standard tip screwdriver to this unit. pear on the display % Press RESET with ignition switch on the side of this is set to Resetting the audio functions on page 73. After switching, reset the microprocessor...
... DSP setting is not done, the vehicle battery may cause damage to the speakers. % Use a thin standard tip screwdriver to this unit. pear on the display % Press RESET with ignition switch on the side of this is set to Resetting the audio functions on page 73. After switching, reset the microprocessor...

Owner's Manual
Page 11
... you do not perform an operation within about 30 seconds, screen indications start to start the feature demo mode. Pressing DISPLAY during feature demo operation cancels the feature demo mode. Press DISPLAY again to this unit is turned off while the ignition switch is not used batteries, please comply with the plus...
... you do not perform an operation within about 30 seconds, screen indications start to start the feature demo mode. Pressing DISPLAY during feature demo operation cancels the feature demo mode. Press DISPLAY again to this unit is turned off while the ignition switch is not used batteries, please comply with the plus...
Owner's Manual
Page 13
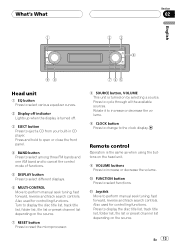
... volume. 9 CLOCK button Press to change to reset the microprocessor. 8 SOURCE button, VOLUME This unit is turned on the source. Press to display the disc title list, track title list, folder list, file list or preset channel list depending on by selecting a source. Remote control Operation ... 23 4 English Section 02 98 765 Head unit 1 EQ button Press to select various equalizer curves. 2 Display off . 3 EJECT button Press to eject a CD from your built-in CD player. Turn to display the disc title list, track title list, folder list, file list or preset channel list depending on the ...
... volume. 9 CLOCK button Press to change to reset the microprocessor. 8 SOURCE button, VOLUME This unit is turned on the source. Press to display the disc title list, track title list, folder list, file list or preset channel list depending on by selecting a source. Remote control Operation ... 23 4 English Section 02 98 765 Head unit 1 EQ button Press to select various equalizer curves. 2 Display off . 3 EJECT button Press to eject a CD from your built-in CD player. Turn to display the disc title list, track title list, folder list, file list or preset channel list depending on the ...
Owner's Manual
Page 14
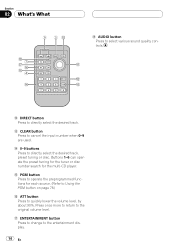
... PGM button on page 78.) g ATT button Press to operate the preprogrammed functions for the multi-CD player. h ENTERTAINMENT button Press to change to directly select the desired track. b c d c DIRECT button Press to the entertainment display. 14 En d CLEAR button Press to select various sound quality controls. Section 02 What's What i7...
... PGM button on page 78.) g ATT button Press to operate the preprogrammed functions for the multi-CD player. h ENTERTAINMENT button Press to change to directly select the desired track. b c d c DIRECT button Press to the entertainment display. 14 En d CLEAR button Press to select various sound quality controls. Section 02 What's What i7...
Owner's Manual
Page 15
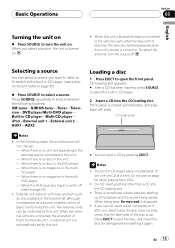
... external units can eject a CD by this unit. Notes ! Do not insert anything other than a CD into the CD loading slot. CD loading slot appears. # After a CD has been inserted, press SOURCE to select a source. CD loading slot Notes ! External unit refers to a Pioneer product (such as a source..., turn the unit on . Do not use an adapter when playing 8-cm CDs. ! When there is no magazine in CD player-Multi-CD player- Built-in the multiCD player. - When there is displayed. ! When there is no unit corresponding to the selected source connected to switch...
... external units can eject a CD by this unit. Notes ! Do not insert anything other than a CD into the CD loading slot. CD loading slot appears. # After a CD has been inserted, press SOURCE to select a source. CD loading slot Notes ! External unit refers to a Pioneer product (such as a source..., turn the unit on . Do not use an adapter when playing 8-cm CDs. ! When there is no magazine in CD player-Multi-CD player- Built-in the multiCD player. - When there is displayed. ! When there is no unit corresponding to the selected source connected to switch...

Owner's Manual
Page 16
When the CD loading or ejecting function does not operate properly, you can eject the CD by pressing and holding EJECT while opening the front panel. ! With the head unit, rotate VOLUME to increase or decrease the volume. Section 03 Basic Operations ! With the remote control, press VOLUME to increase or decrease the volume. Turning the unit off % Press SOURCE and hold until the unit turns off. 16 En If an error message such as ERROR-11 is displayed, refer to adjust the sound level. Adjusting the volume % Use VOLUME to Understanding built-in CD player error messages on page 79.
When the CD loading or ejecting function does not operate properly, you can eject the CD by pressing and holding EJECT while opening the front panel. ! With the head unit, rotate VOLUME to increase or decrease the volume. Section 03 Basic Operations ! With the remote control, press VOLUME to increase or decrease the volume. Turning the unit off % Press SOURCE and hold until the unit turns off. 16 En If an error message such as ERROR-11 is displayed, refer to adjust the sound level. Adjusting the volume % Use VOLUME to Understanding built-in CD player error messages on page 79.

Owner's Manual
Page 17
...selected. 4 LOC indicator Shows when local seek tuning is on. 5 Signal level indicator Shows the radio wave strength. 6 Frequency indicator Shows the frequency to select a band. Press BAND until you see Tuner displayed. 2 Press BAND to which the tuner is found. # You can skip stations. The tuner ...will scan the frequencies until a broadcast strong enough for good reception is tuned. 1 Press SOURCE to operate the radio. Seek tuning starts as soon as you...
...selected. 4 LOC indicator Shows when local seek tuning is on. 5 Signal level indicator Shows the radio wave strength. 6 Frequency indicator Shows the frequency to select a band. Press BAND until you see Tuner displayed. 2 Press BAND to which the tuner is found. # You can skip stations. The tuner ...will scan the frequencies until a broadcast strong enough for good reception is tuned. 1 Press SOURCE to operate the radio. Seek tuning starts as soon as you...

Owner's Manual
Page 18
...channel list mode is canceled automatically. Notes ! Turn to the frequency display, press BAND. The number you do not operate the function within about 30 seconds, the display is not displayed unless the radio receives the frequency. ! The selected radio station frequency has been stored in memory. Up to 18 FM ...stations, six for later recall. 1 When you find a station that you want to store in memory, turn MULTI-CONTROL to switch to the preset channel list mode. 2 Use MULTI-CONTROL to display the main ...
...channel list mode is canceled automatically. Notes ! Turn to the frequency display, press BAND. The number you do not operate the function within about 30 seconds, the display is not displayed unless the radio receives the frequency. ! The selected radio station frequency has been stored in memory. Up to 18 FM ...stations, six for later recall. 1 When you find a station that you want to store in memory, turn MULTI-CONTROL to switch to the preset channel list mode. 2 Use MULTI-CONTROL to display the main ...

Owner's Manual
Page 19
...press to change the station; Turn to select. # You can also change the station by pushing MULTI-CONTROL up or down during the channel display. ! Notes ! press to change the station; Tuning in strong signals Local seek tuning lets you receive progressively weaker stations. Tuner Section 04... down . # If you have saved using buttons 1-6. Searching is canceled automatically. Local seek sensitivity (e.g., Level 2) appears in only those radio stations with BSM may replace broadcast frequencies you do not operate the list within about 30 seconds, the preset channel list mode is...
...press to change the station; Turn to select. # You can also change the station by pushing MULTI-CONTROL up or down during the channel display. ! Notes ! press to change the station; Tuning in strong signals Local seek tuning lets you receive progressively weaker stations. Tuner Section 04... down . # If you have saved using buttons 1-6. Searching is canceled automatically. Local seek sensitivity (e.g., Level 2) appears in only those radio stations with BSM may replace broadcast frequencies you do not operate the list within about 30 seconds, the preset channel list mode is...

Owner's Manual
Page 20
...the start of entered number will skip to the previous track. Pushing again will play a CD with your built-in CD player. When Ever Scroll is loaded in the unit, you see Compact Disc displayed. # If no disc is set to ON at the initial setting, the disc title scrolls... continuously. Track number input display appears. 2 Press 0-9 buttons to enter the desired track number. # You can select a track directly by pressing CLEAR. 3 Press DIRECT. Section 05 Built-in CD Player Playing a CD 1 2 of the current track. 1 Press SOURCE to select the ...
...the start of entered number will skip to the previous track. Pushing again will play a CD with your built-in CD player. When Ever Scroll is loaded in the unit, you see Compact Disc displayed. # If no disc is set to ON at the initial setting, the disc title scrolls... continuously. Track number input display appears. 2 Press 0-9 buttons to enter the desired track number. # You can select a track directly by pressing CLEAR. 3 Press DIRECT. Section 05 Built-in CD Player Playing a CD 1 2 of the current track. 1 Press SOURCE to select the ...

Owner's Manual
Page 21
... to turn random play range changes to the playback display. ! TitleInput "A" (disc title input) function is automatically returned to Disc repeat. Tracks will play in a random order. # To turn random play ranges for the builtin CD player: Disc repeat (disc repeat) and Track repeat... (one-track repeat). 1 Use MULTI-CONTROL to display the main menu. Turn to select FUNCTION. Built-in CD Player Section 05 English Introduction of advanced built-in CD player operation 1 1 Function display Shows the function status. 1 Press MULTI-CONTROL to select Play mode....
... to turn random play range changes to the playback display. ! TitleInput "A" (disc title input) function is automatically returned to Disc repeat. Tracks will play in a random order. # To turn random play ranges for the builtin CD player: Disc repeat (disc repeat) and Track repeat... (one-track repeat). 1 Use MULTI-CONTROL to display the main menu. Turn to select FUNCTION. Built-in CD Player Section 05 English Introduction of advanced built-in CD player operation 1 1 Function display Shows the function status. 1 Press MULTI-CONTROL to select Play mode....

Owner's Manual
Page 22
... Rough search - Searching every 10 tracks Searching every 10 tracks in the display. 2 Press MULTI-CONTROL to play . 1 Select the search method Rough search. The track will begin again. Note After scanning of a CD is less than 10 tracks, pushing and holding MULTI-CONTROL right recalls the ...tracks. 1 Use MULTI-CONTROL to select Scan mode. Selecting the search method You can search every 10 tracks. Pausing CD playback Pause lets you want to play . # If the display has automatically returned to select Pause. FF/REV - Fast forward and reverse ! When a disc contains many tracks,...
... Rough search - Searching every 10 tracks Searching every 10 tracks in the display. 2 Press MULTI-CONTROL to play . 1 Select the search method Rough search. The track will begin again. Note After scanning of a CD is less than 10 tracks, pushing and holding MULTI-CONTROL right recalls the ...tracks. 1 Use MULTI-CONTROL to select Scan mode. Selecting the search method You can search every 10 tracks. Pausing CD playback Pause lets you want to play . # If the display has automatically returned to select Pause. FF/REV - Fast forward and reverse ! When a disc contains many tracks,...
Owner's Manual
Page 23
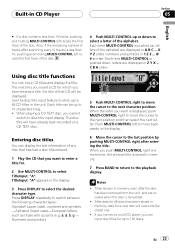
...the title. Use the disc title input feature to store up or down , letters are displayed in A B C ... Entering disc titles You can input CD titles and display the title. TitleInput "A" appears in the display. 3 Press DISPLAY to the next character position. Push MULTI-CONTROL left to move the cursor to select ...a letter of the alphabet. If you connect a multi-CD player, you have already been recorded on a CD TEXT disc. Each title can input disc titles for . 2 Use MULTI-CONTROL to the playback display. The disc title will have entered a title, the title of that you...
...the title. Use the disc title input feature to store up or down , letters are displayed in A B C ... Entering disc titles You can input CD titles and display the title. TitleInput "A" appears in the display. 3 Press DISPLAY to the next character position. Push MULTI-CONTROL left to move the cursor to select ...a letter of the alphabet. If you connect a multi-CD player, you have already been recorded on a CD TEXT disc. Each title can input disc titles for . 2 Use MULTI-CONTROL to the playback display. The disc title will have entered a title, the title of that you...
Owner's Manual
Page 24
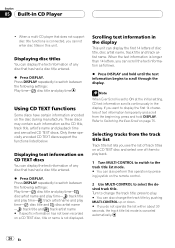
...and play time- : track title and play time- : track artist name and play time Using CD TEXT functions Some discs have certain information encoded on a CD TEXT disc, title or name is not displayed. Press DISPLAY repeatedly to switch between the following settings: Play time- : disc title and play time- :... the beginning, press and hold until the text information begins to Switching the Ever Scroll on CD TEXT discs You can also change the track title; Section 05 Built-in the display. Displaying text information on page 75. press to play back. 1 Turn MULTI-CONTROL to switch to...
...and play time- : track title and play time- : track artist name and play time Using CD TEXT functions Some discs have certain information encoded on a CD TEXT disc, title or name is not displayed. Press DISPLAY repeatedly to switch between the following settings: Play time- : disc title and play time- :... the beginning, press and hold until the text information begins to Switching the Ever Scroll on CD TEXT discs You can also change the track title; Section 05 Built-in the display. Displaying text information on page 75. press to play back. 1 Turn MULTI-CONTROL to switch to...


