
Other Manual
Page 1
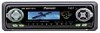
..., check the battery voltage. • To avoid shorts in a vehicle that get hot, such as near the heater outlet. INSTALLATION MANUAL OF OF DEH-P7300 DEH-P6300 This product conforms to an external power amp's system remote control or the car's Auto-antenna relay control terminal (max....here may be highpower types with a 12-volt battery and negative grounding. Printed in Thailand Imprimé en Thaïlande UC N STAR N STAR MANUEL D'INSTALLATION Connecting the Units Note: • This unit is for several hours. (Fig. 1) F ACC O F O T T ACC position No ACC position Fig....
..., check the battery voltage. • To avoid shorts in a vehicle that get hot, such as near the heater outlet. INSTALLATION MANUAL OF OF DEH-P7300 DEH-P6300 This product conforms to an external power amp's system remote control or the car's Auto-antenna relay control terminal (max....here may be highpower types with a 12-volt battery and negative grounding. Printed in Thailand Imprimé en Thaïlande UC N STAR N STAR MANUEL D'INSTALLATION Connecting the Units Note: • This unit is for several hours. (Fig. 1) F ACC O F O T T ACC position No ACC position Fig....
Other Manual
Page 3
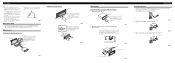
... 6 Insert the supplied extraction keys into the unit, as firmly possible using the top and bottom tabs. Replace the front panel to the following illustrated installation methods. For details, refer to the unit. (Fig. 12) Fig. 11 3. Fig. 8 Factory radio mounting bracket Fig. 9 Screw Dashboard or ...unit. 1. Attach the holder to the unit using the screw holes on the side of the unit, pull the unit out. Installation Note: • Before finally installing the unit, connect the wiring temporarily, making sure it is a sudden stop, like an emergency stop. • The semiconductor ...
... 6 Insert the supplied extraction keys into the unit, as firmly possible using the top and bottom tabs. Replace the front panel to the following illustrated installation methods. For details, refer to the unit. (Fig. 12) Fig. 11 3. Fig. 8 Factory radio mounting bracket Fig. 9 Screw Dashboard or ...unit. 1. Attach the holder to the unit using the screw holes on the side of the unit, pull the unit out. Installation Note: • Before finally installing the unit, connect the wiring temporarily, making sure it is a sudden stop, like an emergency stop. • The semiconductor ...


